Hi guys,
Seems like ages since I last updated this blog, about 6 ago weeks I think. Thats not to say I haven't been busy, there has been major changes to this build. The biggest change to this model is that it is now an exterior model. I know this will disappoint some of you but I just couldn't bring myself to the interior all over again.
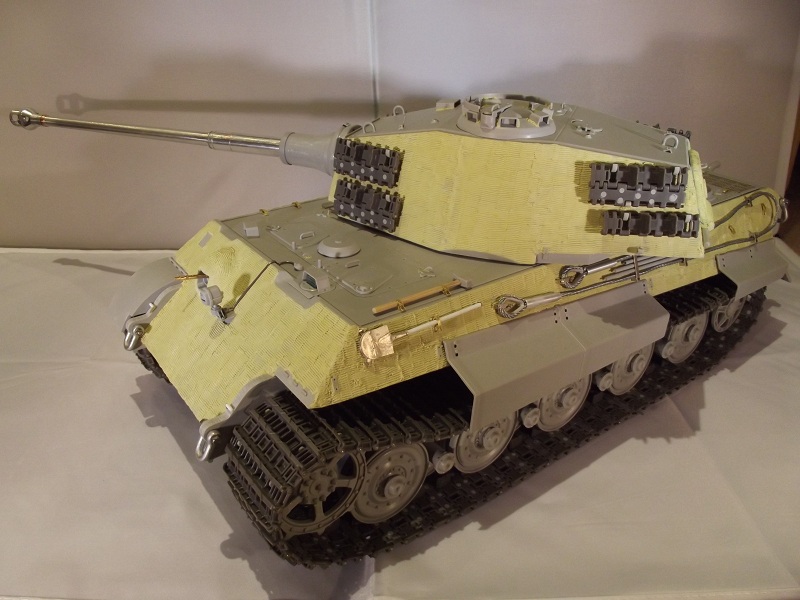
So, heres the photos of the model in its current state. I'll explain a few things between the photos
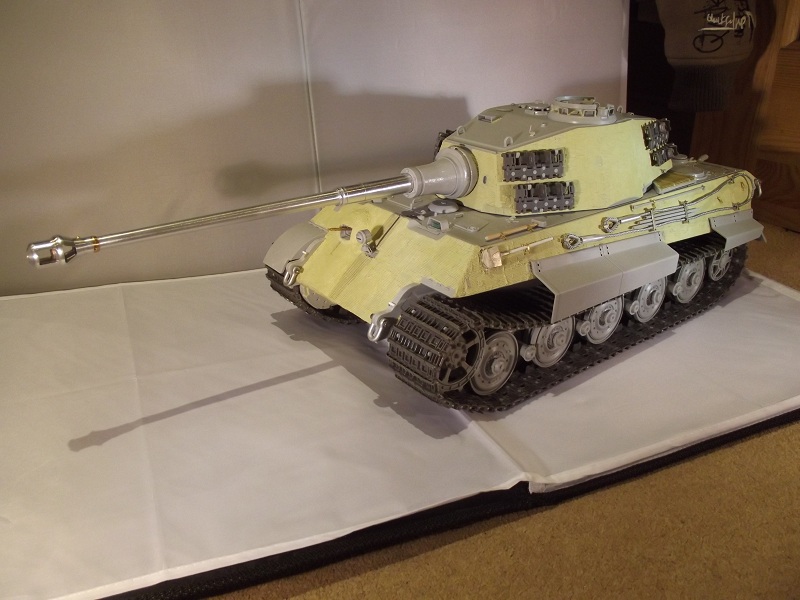
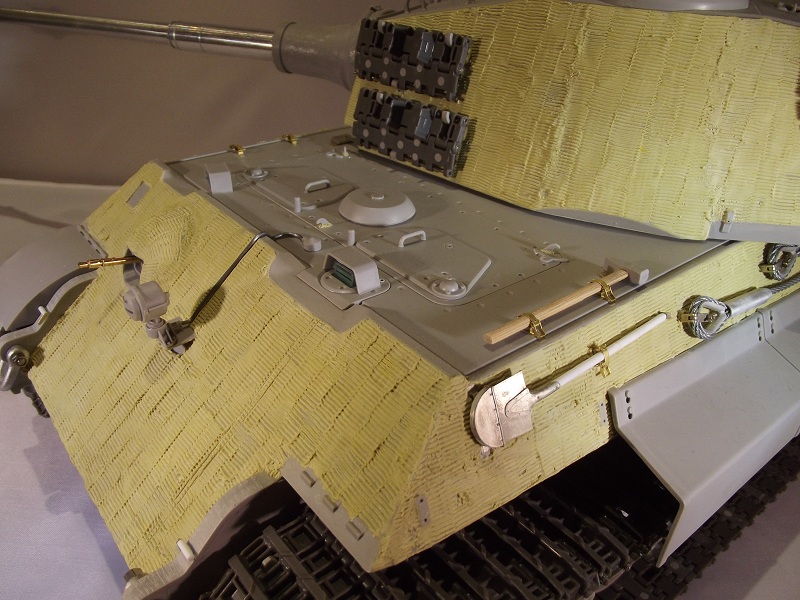
The zimmerit is hand made with milliput, about 1 and a half packs of the stuff! The kit comes with zimmerit tools which were rather handy. The main gun barrel on my build is a limited edition which was produced by Gunnar Jansson. He sold these via the AFV modeller forum dedicated to this kit. It is extremely well produced item with superb detail. I was luck to get my hands on it!
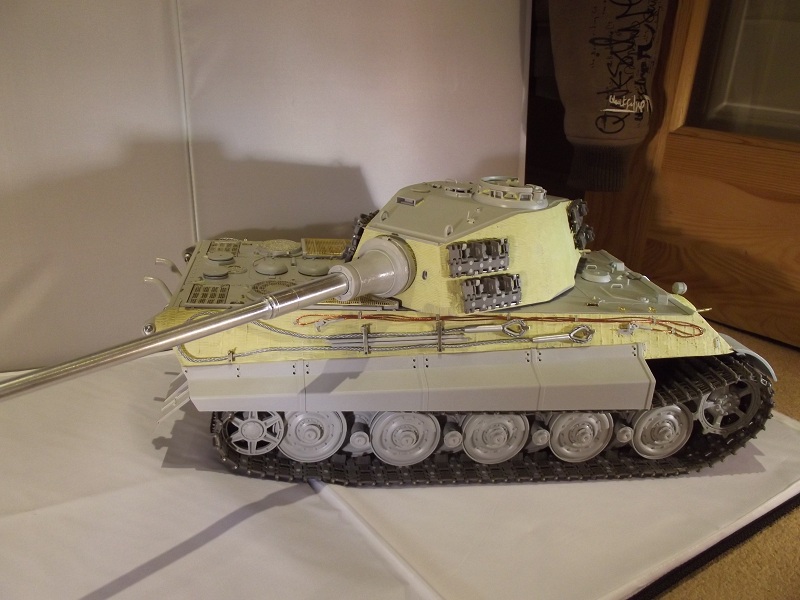
I decided to use the kit side skirts as they are decent enough and due to the cost of the build I decided it wasn't worth spending even more money.
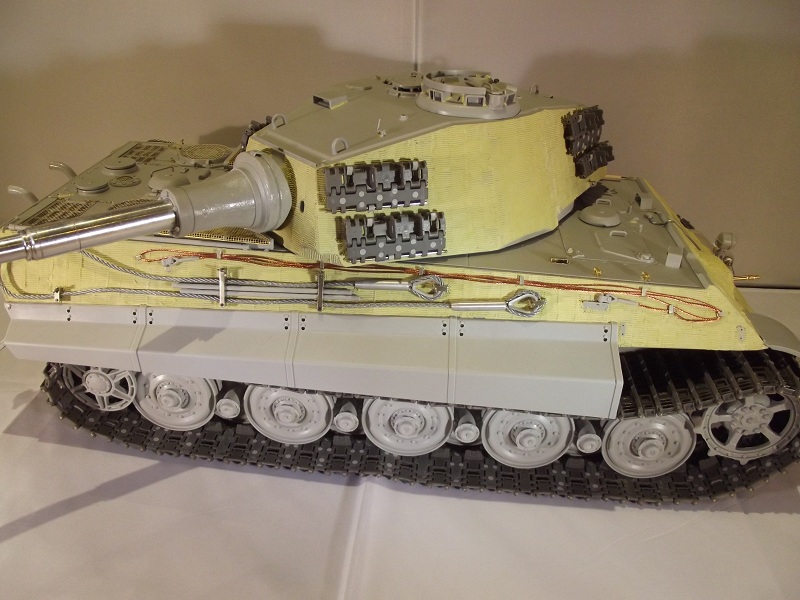
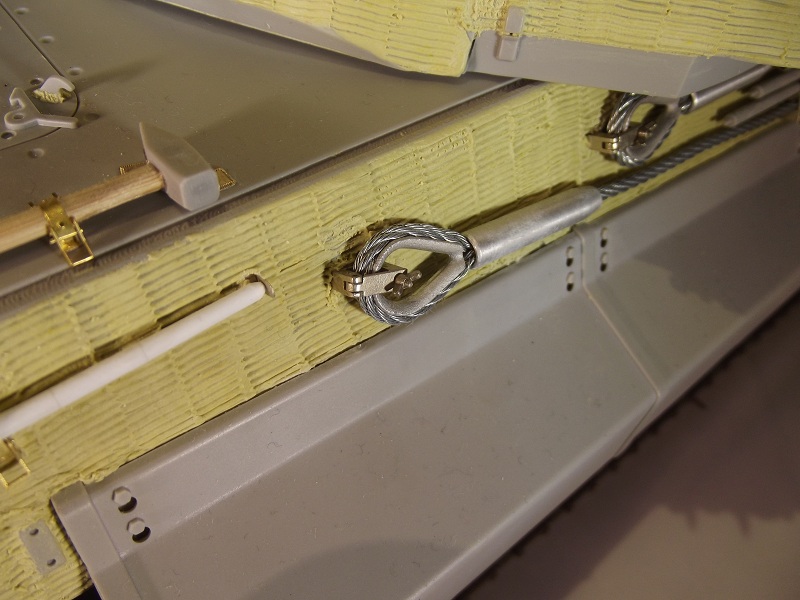
The main tow cables are by Schumo which are very nice items. The track pulling cable is from the kit.
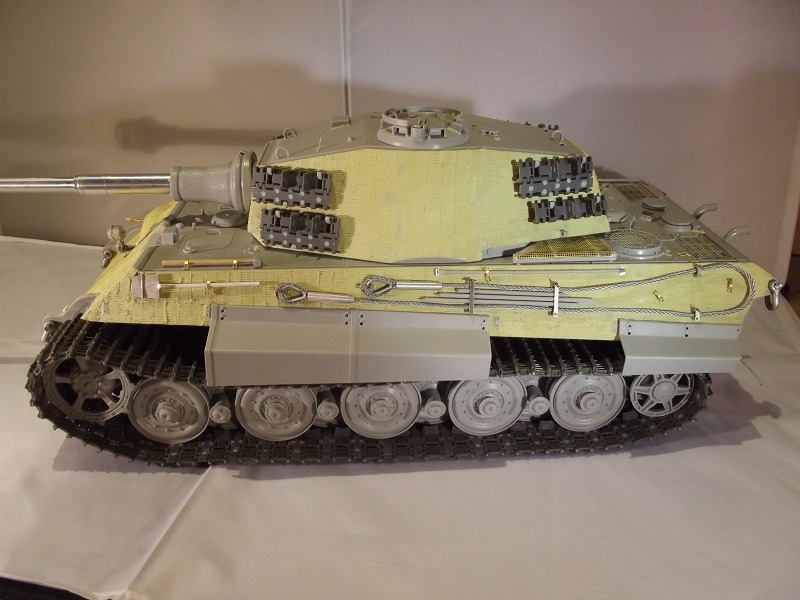
The tow cable mounts are also from Schumo and although not entirely accurate, they do look very good. I used the kit gun cleaning rods. The tool clamps are from voyager. I did try to use the aber parts but at 8 parts per clamp I just found them too over complicated.
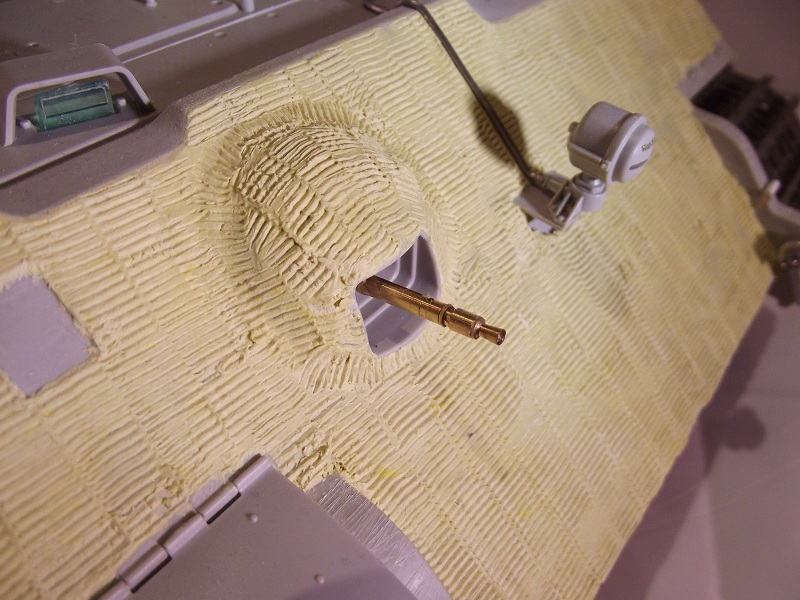
Up at the front I replaced the mg34 with an aber item which is a huge improvement over the kit item. The front periscopes are AFV modeller resin items. The wiring for the headlight is lead wire
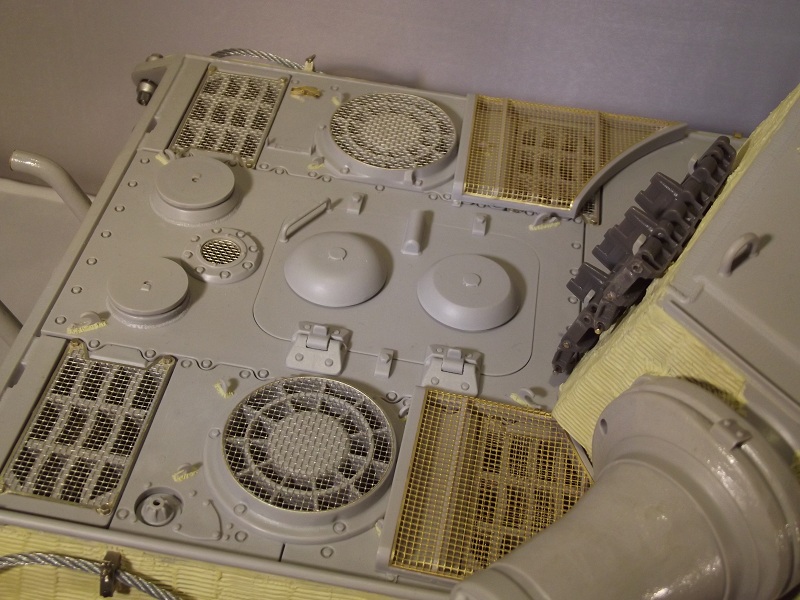
The engine mesh screens were replaced with aber items and bolts were added. I used the kit frames and mesh for the raised screens. Welds were added to all the lifting hooks.
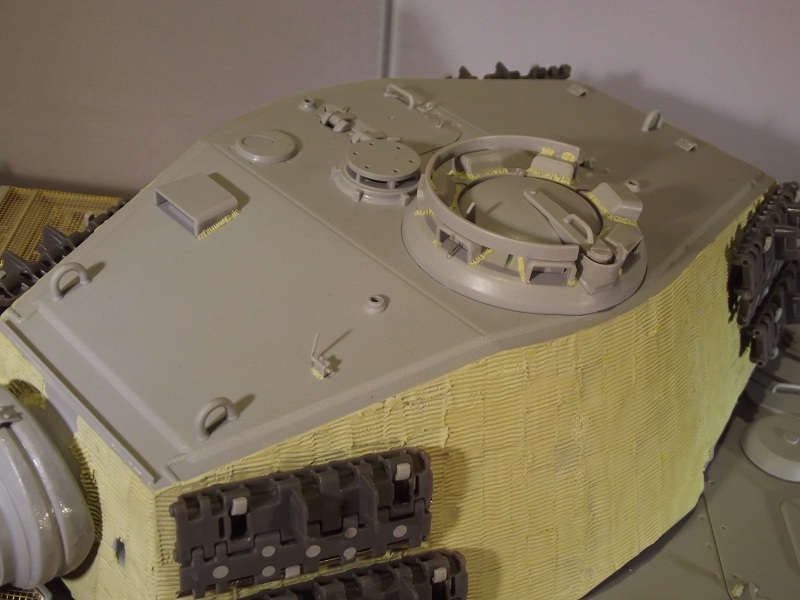
Welds were added to all the periscope covers and vane sight. The aber sight was added to the forward periscope on the commanders copula. You can see that the connecting track links have plenty of knock out marks to fill!
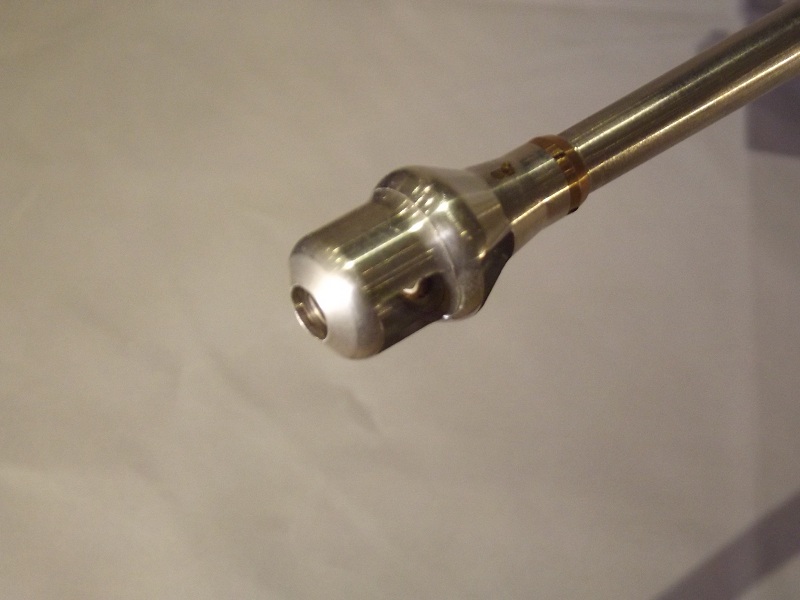
A close up of the muzzle brake. I have the larger version.
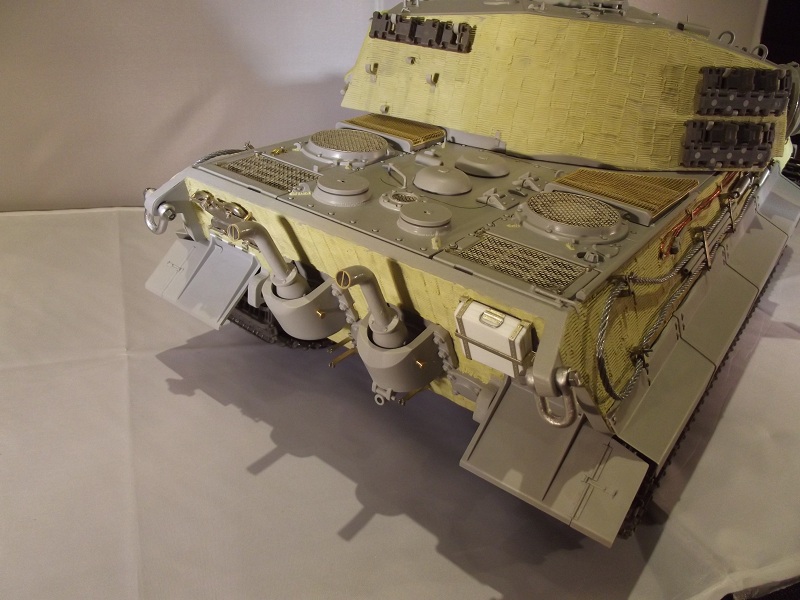
The C hooks where replaced with items from schumo with aber clamps. The jack block was scratch built. The clamp and mountings are from aber. The u hooks are from schumo
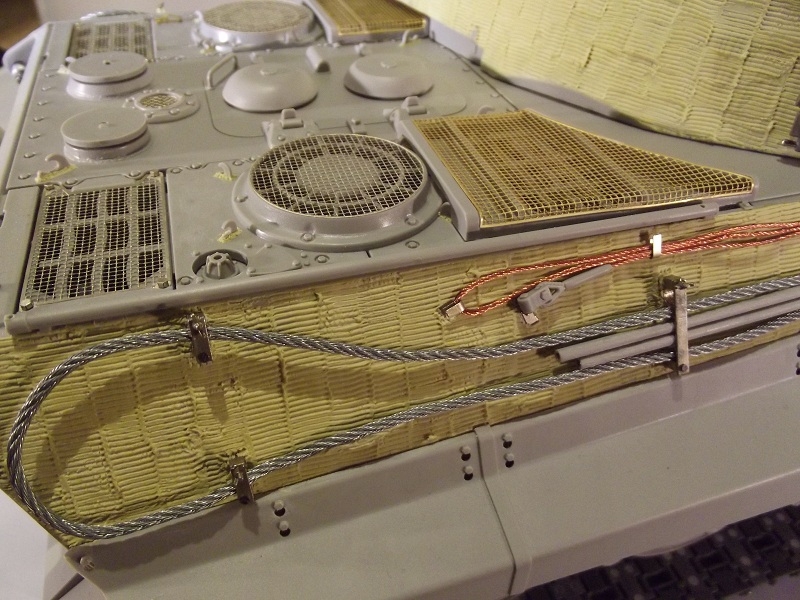
Close up shots of the schumo tow cables and their clamps
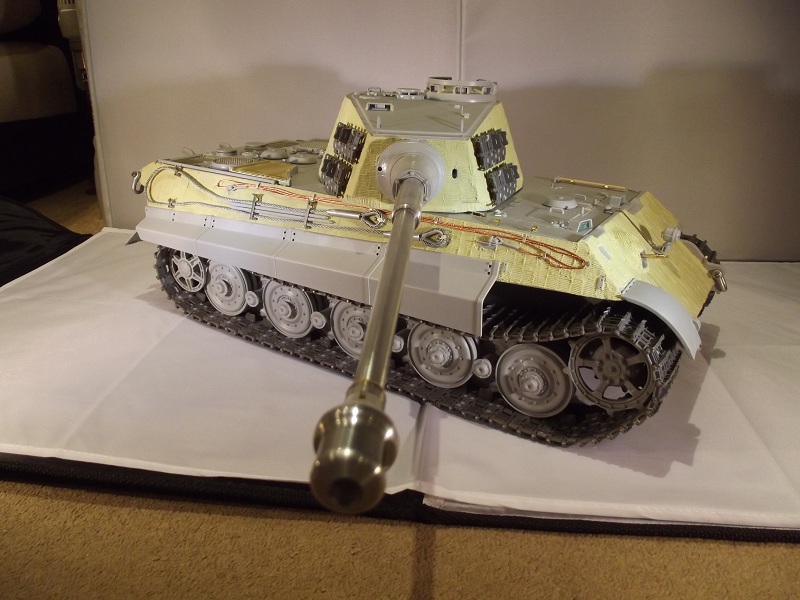
Theres still a few bits left to do such as add the fire exstinguisher and ariel. The inner guide horns on the tracks need to be sanded down slightly as the tracks do not sit properly around the drive sprocket. This is true of the tracks on the real thing but its hard to spot.
Cheers
Matt
Hosted by Darren Baker
Trumpeter 1/16 King Tiger
Matt182
United Kingdom
Joined: May 20, 2010
KitMaker: 269 posts
Armorama: 243 posts
Joined: May 20, 2010
KitMaker: 269 posts
Armorama: 243 posts
Posted: Thursday, June 14, 2012 - 09:56 AM UTC
PantherF
Indiana, United States
Joined: June 10, 2005
KitMaker: 6,188 posts
Armorama: 5,960 posts
Joined: June 10, 2005
KitMaker: 6,188 posts
Armorama: 5,960 posts
Posted: Thursday, June 14, 2012 - 10:08 AM UTC
Awesome looking there Matt!
I need to get my 1/16th KT out soon, once I un-bury myself from my "Need to Build" list!
~ Jeff
I need to get my 1/16th KT out soon, once I un-bury myself from my "Need to Build" list!
~ Jeff
BBD468
Texas, United States
Joined: March 08, 2010
KitMaker: 2,465 posts
Armorama: 2,383 posts
Joined: March 08, 2010
KitMaker: 2,465 posts
Armorama: 2,383 posts
Posted: Thursday, June 14, 2012 - 02:40 PM UTC
Matt, that is a beautifly built KT. Fine job top to bottom.
Gary
Gary
grim_marmazet
England - South East, United Kingdom
Joined: May 27, 2011
KitMaker: 45 posts
Armorama: 41 posts
Joined: May 27, 2011
KitMaker: 45 posts
Armorama: 41 posts
Posted: Thursday, June 14, 2012 - 07:18 PM UTC
That is a fantastic KT! I know how tough these 1/16 beasts can be (and how much they can cost! ). Where did you get the muzzle brea from, it's really nice. I'm using the schumo large one on my Jagdpanther, but it doesn't have the inner locking ring detail on it.
I can't wait to see what camo scheme you go with!
Matt182
United Kingdom
Joined: May 20, 2010
KitMaker: 269 posts
Armorama: 243 posts
Joined: May 20, 2010
KitMaker: 269 posts
Armorama: 243 posts
Posted: Thursday, June 14, 2012 - 08:51 PM UTC
Thanks for the positive comments guys
Rik, I forgot to mention that the muzzle brake was included with the barrel so is also a limited edition item. It is actually quite an important detail in this build as only a couple a series production turrets had the large muzzle brake installed.
With lots of help from Grant (Vanhall) I initially decided on '111' of SSpz abt 101 ('112' is the other tank with the large muzzle brake) but the way I have arranged the side skirts and fenders do not match the photos of '111' or '112'. So I've decided that I am going to take some artistic license when it comes to painting this one. As there are only a handfull of photos of these tanks I think it's quite possible that at least one of the other tanks carried a large muzzle brake. The camo on the photographed tanks is a random blotchy 3 tone job so I will be going with that for the camo.
Cheers
Matt
asmodeuss
Quebec, Canada
Joined: November 19, 2011
KitMaker: 1,389 posts
Armorama: 1,388 posts
Joined: November 19, 2011
KitMaker: 1,389 posts
Armorama: 1,388 posts
Posted: Friday, June 15, 2012 - 01:01 AM UTC
Matt, this is a first grade build! I'm looking forward to the next update.
Phil.
Phil.
vanhall
Groningen, Netherlands
Joined: January 23, 2007
KitMaker: 406 posts
Armorama: 391 posts
Joined: January 23, 2007
KitMaker: 406 posts
Armorama: 391 posts
Posted: Friday, June 15, 2012 - 10:28 PM UTC
Hi Matt,
Fantastic looking build. I especially like your zimmerit job, it looks very very authentic.
This definitely makes me want to break open my kit and get started. (and leave the interior in the box )
I noticed you've correctly left off the armoured guards from the rear hatch bars and the cover off the engine vent.
But there are a couple more little things you could change if you want it to be a little more accurate for June/July'44 production Kingtiger?
Let me know if you'd like to know
Grant.
Matt182
United Kingdom
Joined: May 20, 2010
KitMaker: 269 posts
Armorama: 243 posts
Joined: May 20, 2010
KitMaker: 269 posts
Armorama: 243 posts
Posted: Saturday, June 16, 2012 - 01:53 AM UTC
Thanks Phil,
I'm hoping to get the build finished in the next week so I can start on the paint.
Grant,
Thanks for the positive comments. Any extra info that increases the accuracy of my build would be much appreciated
Cheers
Matt
I'm hoping to get the build finished in the next week so I can start on the paint.
Grant,
Thanks for the positive comments. Any extra info that increases the accuracy of my build would be much appreciated
Cheers
Matt
vanhall
Groningen, Netherlands
Joined: January 23, 2007
KitMaker: 406 posts
Armorama: 391 posts
Joined: January 23, 2007
KitMaker: 406 posts
Armorama: 391 posts
Posted: Saturday, June 16, 2012 - 02:16 AM UTC
Quoted Text
......Any extra info that increases the accuracy of my build would be much appreciated
Cheers
Matt
Hi Matt,
As I said, just a couple things.
These June/July'44 KT's were built a little too early to have the 'Poison gas detector panel mounts' on the the top of the mantlet and the rear turret roof.
You can see they're not fitted in many of the SS101 pics. For example:
Also, the bolted down Commanders cupola wasn't introduced until later (Aug/Sept I think).
So yours should really have a welded down cupola, such as these two examples from the SS101:
Unfortunately, the cupola weld looks the most work.
But seeing you've done such good job with the other welds, I don't think you'll have any problems.
Again, great build, and looking forward to seeing the camo.
Regards, Grant.
Matt182
United Kingdom
Joined: May 20, 2010
KitMaker: 269 posts
Armorama: 243 posts
Joined: May 20, 2010
KitMaker: 269 posts
Armorama: 243 posts
Posted: Saturday, June 16, 2012 - 02:39 AM UTC
Thanks Grant,
Glad to see its only a couple of minor alterations The kit parts have caught me out on the coupla as the internal mounting are for the the bolted type. Guess some of the details on the kit are better for a later production. Also looks like I need to add a few more welds on the mg ring. It looks like there was a couple of small welds on each periscope cover.
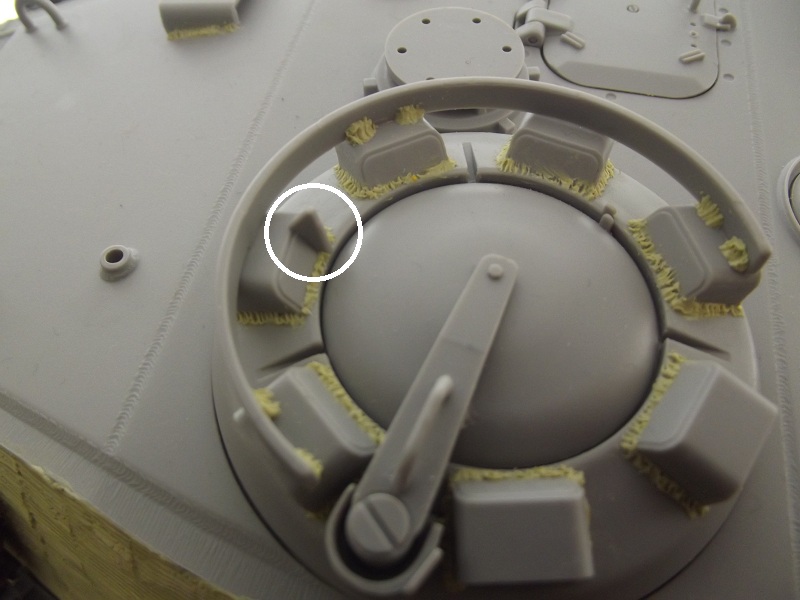
Just one other question. Should I remove the part circled in the photo below? I can't see it on those reference photos of '113'.
I'm not even sure what this thing was for
Cheers
Matt
vanhall
Groningen, Netherlands
Joined: January 23, 2007
KitMaker: 406 posts
Armorama: 391 posts
Joined: January 23, 2007
KitMaker: 406 posts
Armorama: 391 posts
Posted: Saturday, June 16, 2012 - 02:55 AM UTC
Hi Matt,
Yes, that thing should be there. It can be seen clearly on the museum pics of '121'. It also can be spotted on many Tiger I pics.
I don't know it's offical name?
But it's a sort of 'centering guide' for when the cupola lid is lowered/wound-down from inside the turret.
The forward edge of the lid would slide down the diagonal side of piece, centering it for a good fit.. If you know what I mean..
Grant.
Matt182
United Kingdom
Joined: May 20, 2010
KitMaker: 269 posts
Armorama: 243 posts
Joined: May 20, 2010
KitMaker: 269 posts
Armorama: 243 posts
Posted: Saturday, June 16, 2012 - 08:01 AM UTC
Ah yes, I see what you mean, makes sense. I won't be removing that then!
Thanks again Grant
Cheers
Matt
Thanks again Grant
Cheers
Matt
grim_marmazet
England - South East, United Kingdom
Joined: May 27, 2011
KitMaker: 45 posts
Armorama: 41 posts
Joined: May 27, 2011
KitMaker: 45 posts
Armorama: 41 posts
Posted: Saturday, June 16, 2012 - 07:42 PM UTC
Quoted Text
Rik, I forgot to mention that the muzzle brake was included with the barrel so is also a limited edition item. It is actually quite an important detail in this build as only a couple a series production turrets had the large muzzle brake installed.
Shame it was limited, its a lovely piece. The schumo one is pretty good, it needs a bit of filling, and im going to have to add the locking ring. Im also using the large muzzle break on my Jagdpanther, mostly because I think it looks better!
SDavies
England - South East, United Kingdom
Joined: January 09, 2010
KitMaker: 979 posts
Armorama: 959 posts
Joined: January 09, 2010
KitMaker: 979 posts
Armorama: 959 posts
Posted: Saturday, June 16, 2012 - 09:11 PM UTC
Its a shame that you are not building an interior but your King tiger looks really good
S
S
blake_500ci
Victoria, Australia
Joined: January 09, 2012
KitMaker: 37 posts
Armorama: 30 posts
Joined: January 09, 2012
KitMaker: 37 posts
Armorama: 30 posts
Posted: Saturday, June 30, 2012 - 11:50 PM UTC
Hi mate nice work so far but bummed out to see ur not doing the interior now, i can understand its daunting as im currently getting all the bits and peices together from all over the world to build my kit also, i was wondering if u would be interested in selling ur already scratch built peices as they are very nice examples and probly better than i could do ;P. if so pm me. and i also cant wait for u to get some colour on this beast its going to look great.
Cheers Blake.
Cheers Blake.
Matt182
United Kingdom
Joined: May 20, 2010
KitMaker: 269 posts
Armorama: 243 posts
Joined: May 20, 2010
KitMaker: 269 posts
Armorama: 243 posts
Posted: Thursday, July 05, 2012 - 01:04 AM UTC
Rik,
The shumo muzzle brakes do look good but as you said, they are missing a little detail. I look forward to your next update on your Jagdpanther.
I think I kind of hit a wall with the interior. Having done it before I just kept remembering how much work was in involed just to build it OOB. The idea of superdetailing it as well put an end to it.
Blake, the scratch built parts are still attached to parts that have been glued into the interior so I cant even get to them anymore, let alone remove them in one piece. Thanks for the offer though.
As for my current progress, i'm at a stand still. I had started getting the base coats down but half way through I somehow forgot how to thin paint! So I now have some interesting tones of dark yellow all over the place and the turret is a completely different tone to the hull. I'm just waiting for my LHS to get thier next shippment of paint in so I can repaint it. So hopefully in the next few weeks I will have an update worth mentioning!
Cheers
Matt
Guy13b
United States
Joined: April 14, 2015
KitMaker: 1 posts
Armorama: 1 posts
Joined: April 14, 2015
KitMaker: 1 posts
Armorama: 1 posts
Posted: Tuesday, April 14, 2015 - 06:36 AM UTC
I have a rookie question. I am a long time builder but not a technical builder. What should I use use to fill in processing wholes, the ones that come from the manufactures?