_GOTOBOTTOM
Dioramas
Do you love dioramas & vignettes? We sure do.
7TP - Get stuck
Peelou75
Visit this Community
Budapest, Hungary
Joined: April 09, 2009
KitMaker: 140 posts
Armorama: 138 posts
Posted: Tuesday, May 01, 2012 - 02:44 AM UTC
Hi all,

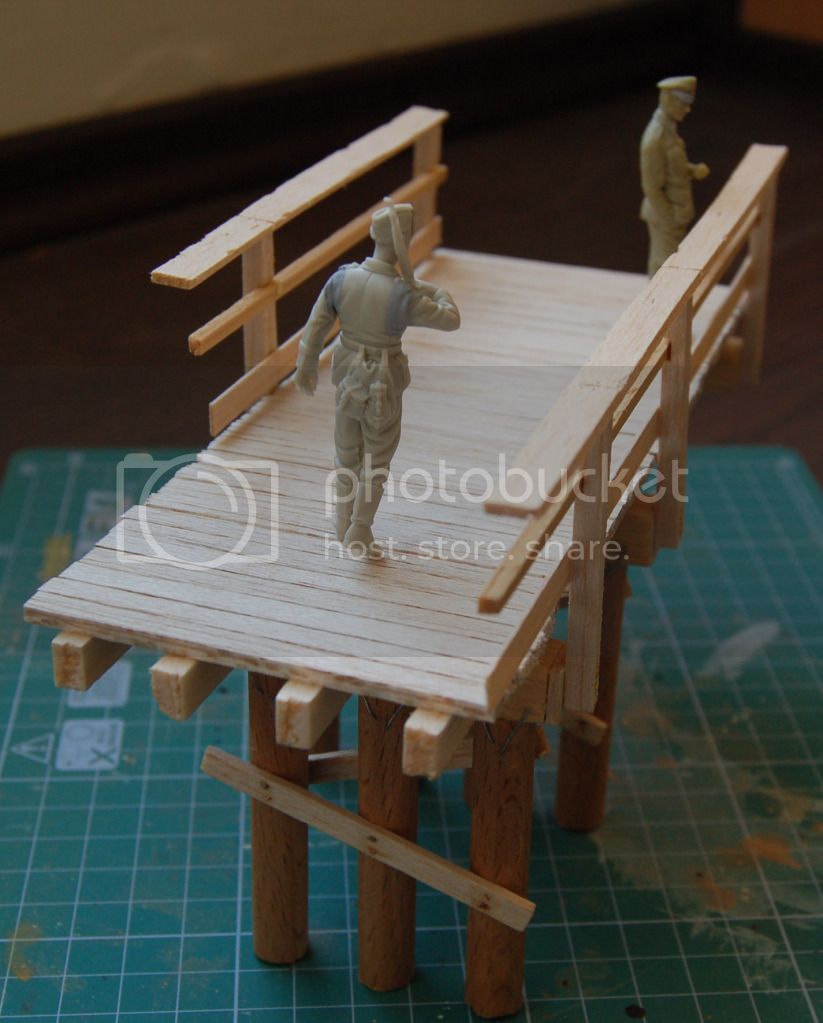
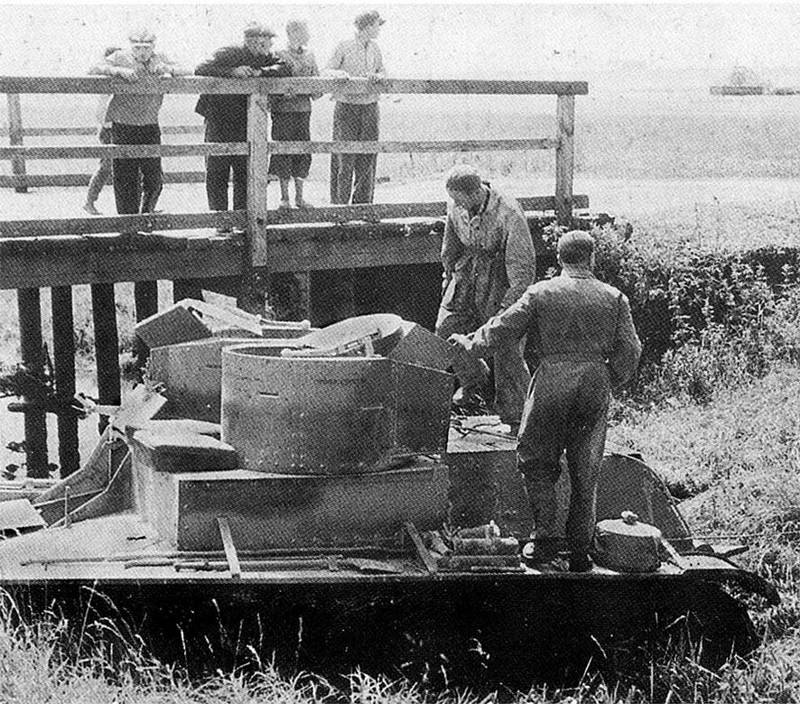
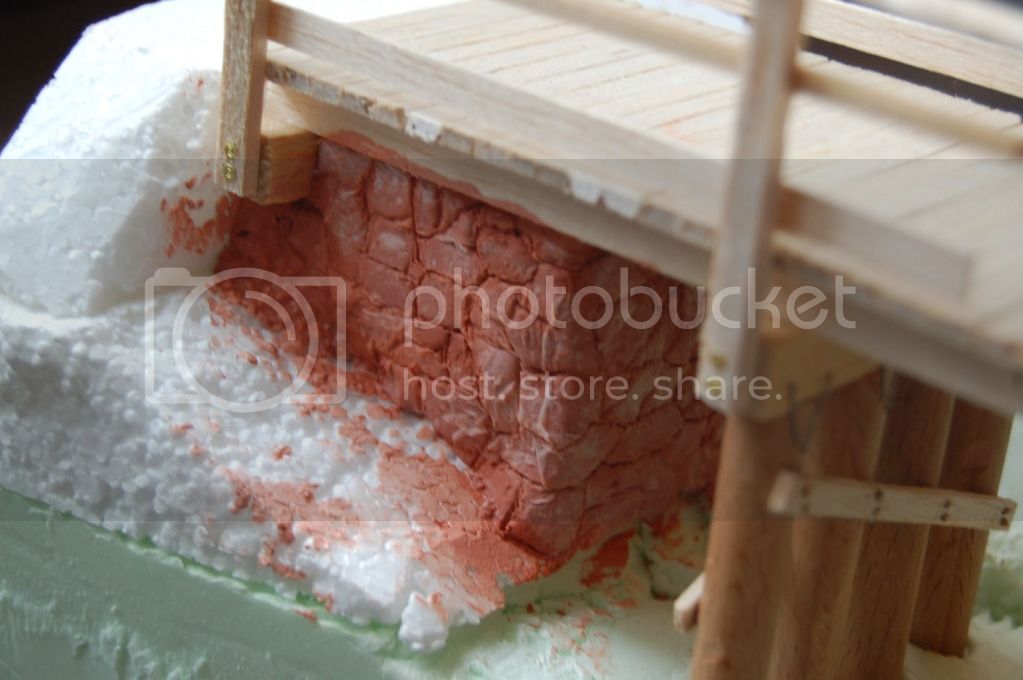
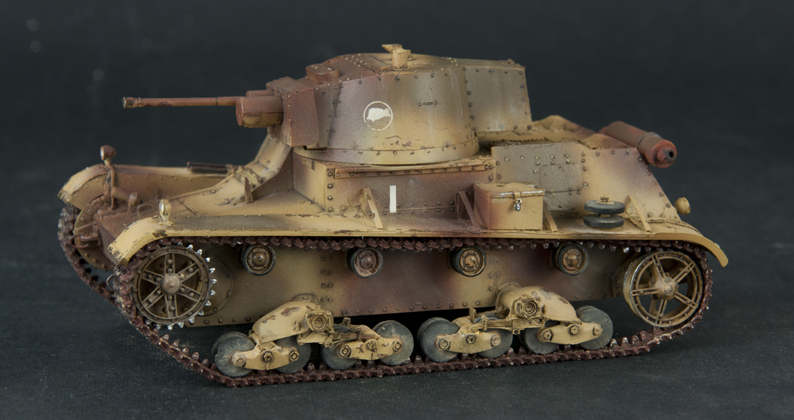
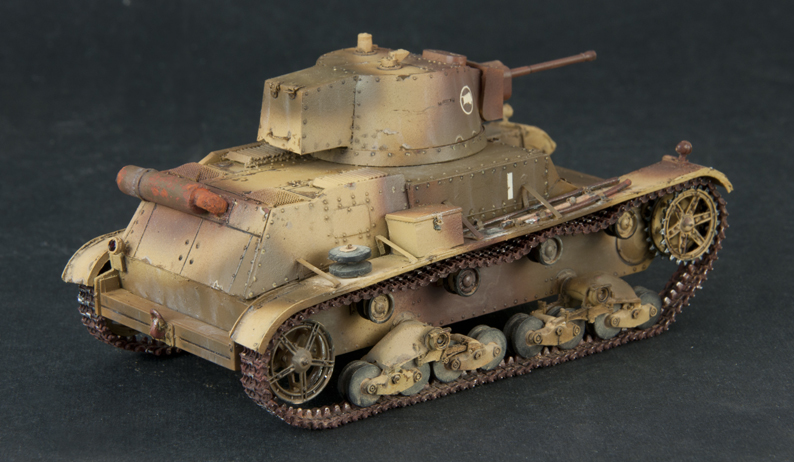
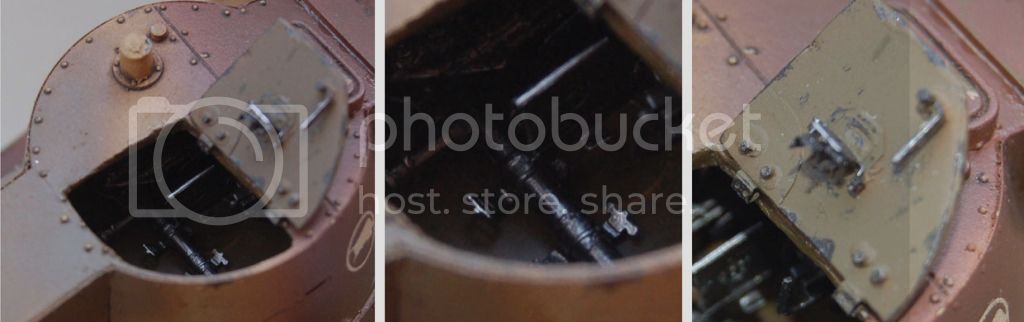
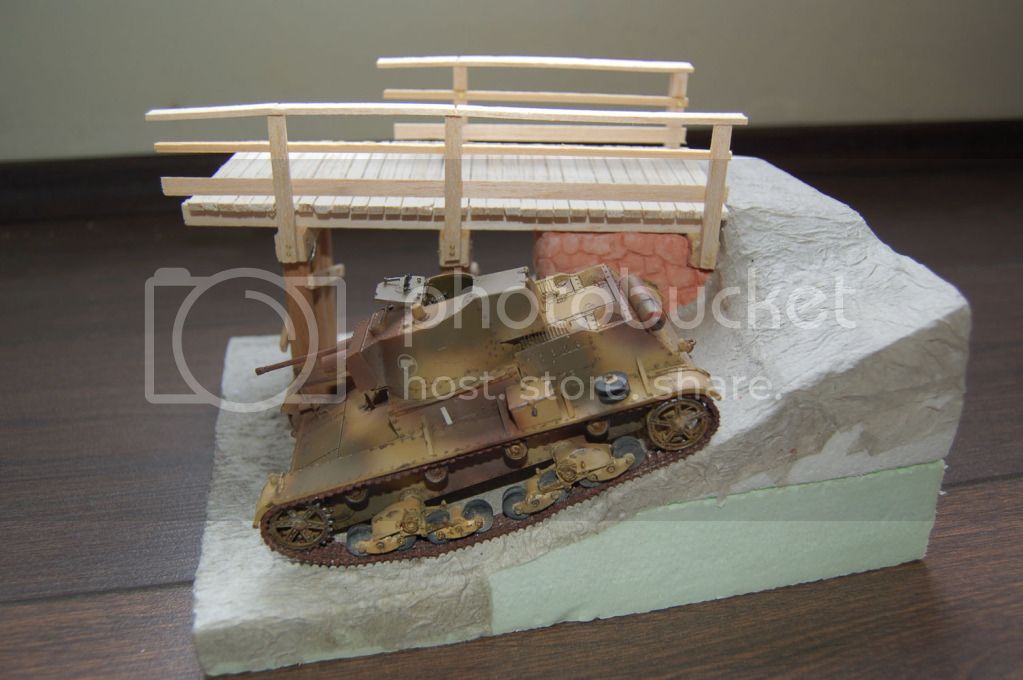
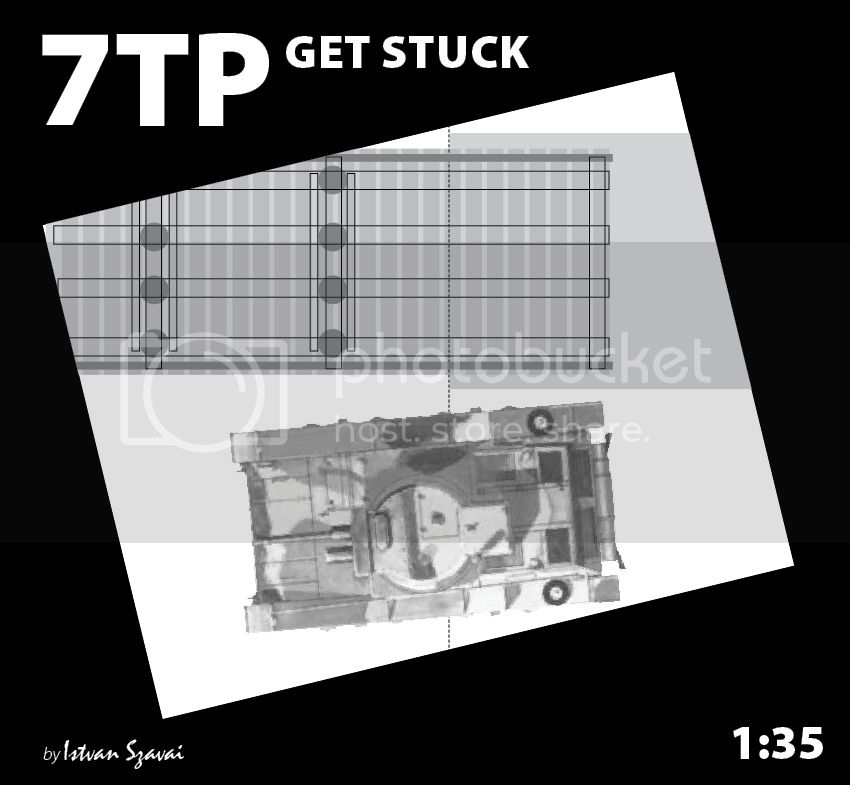
I'm planning a new dio. The scene takes place in Poland, on the fall of '39. A Polish 7TP light tank get stuck while crossing a small river, close to a wooden bridge. The advancing german troops passing by the abandoned vehicle on the bridge.

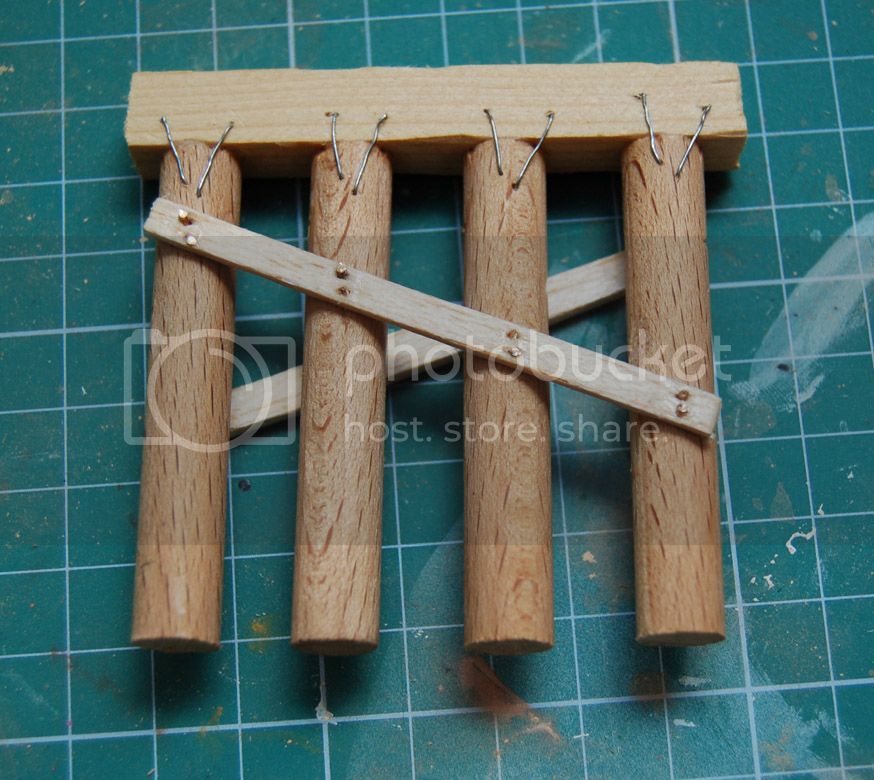
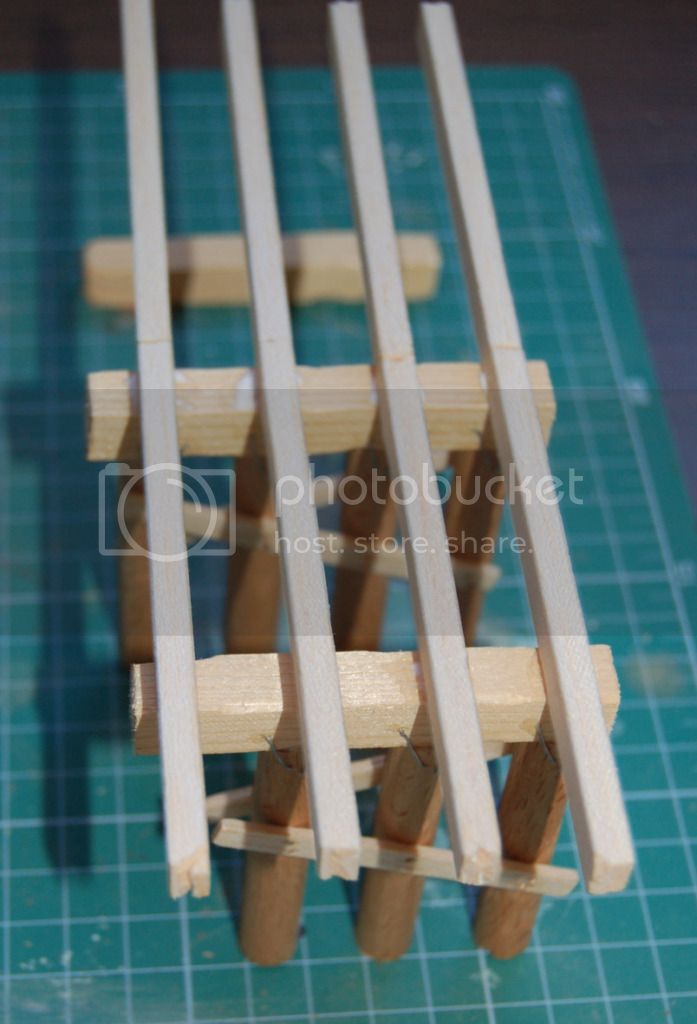
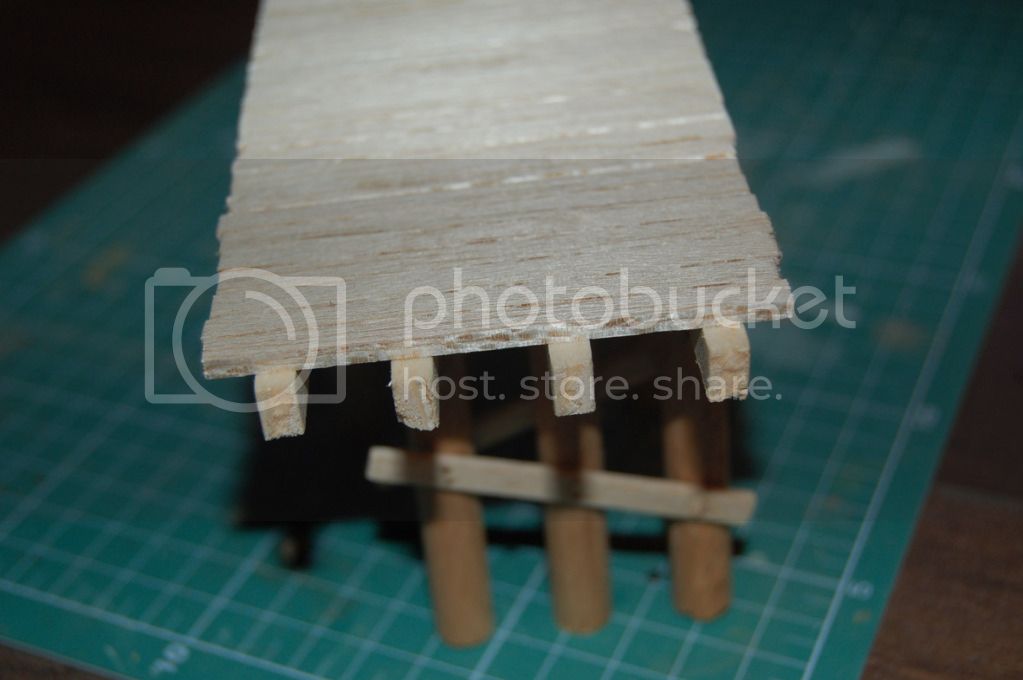
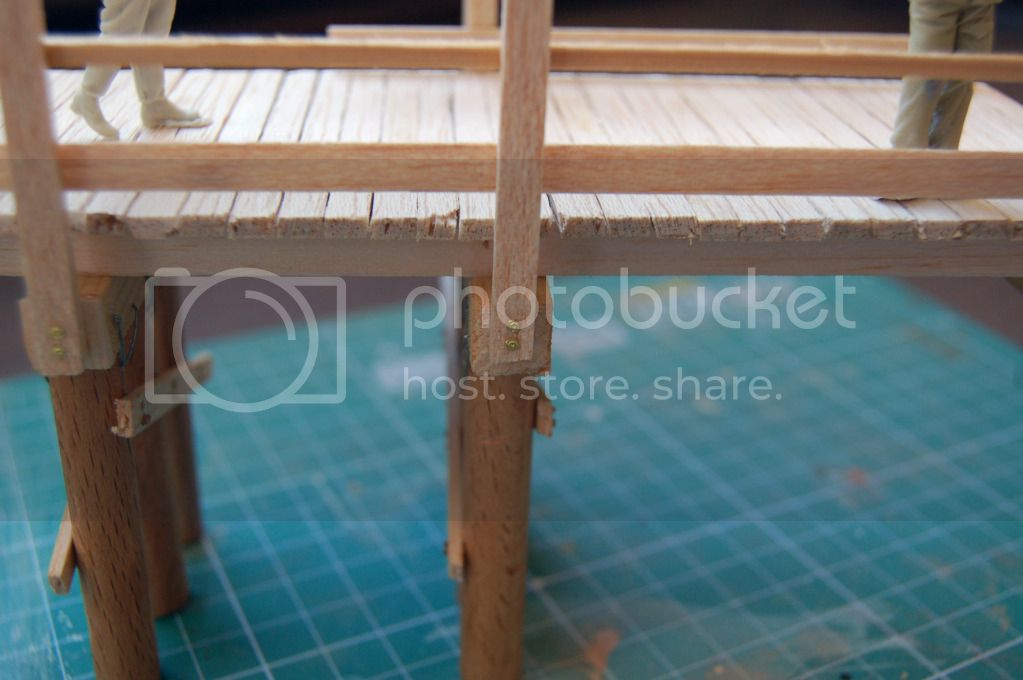
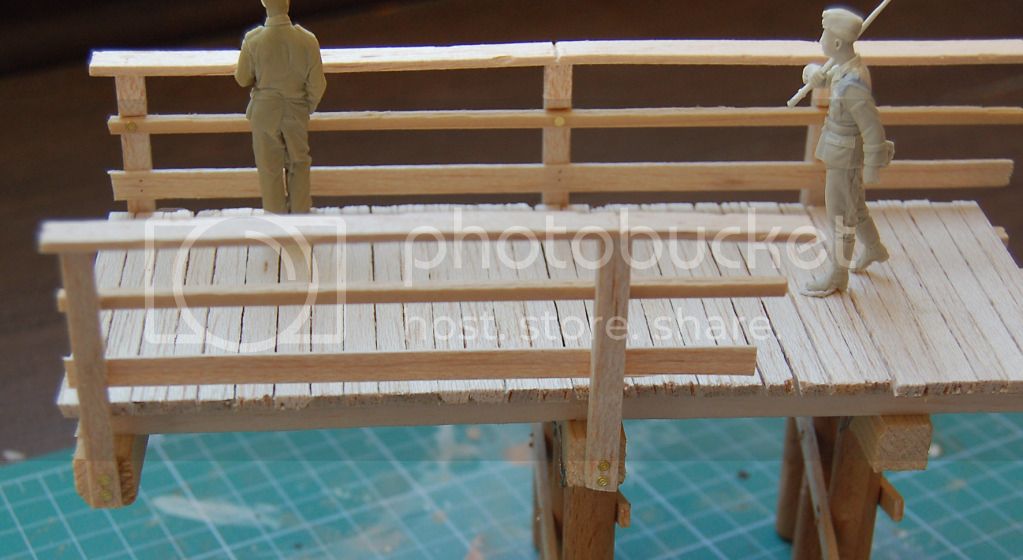
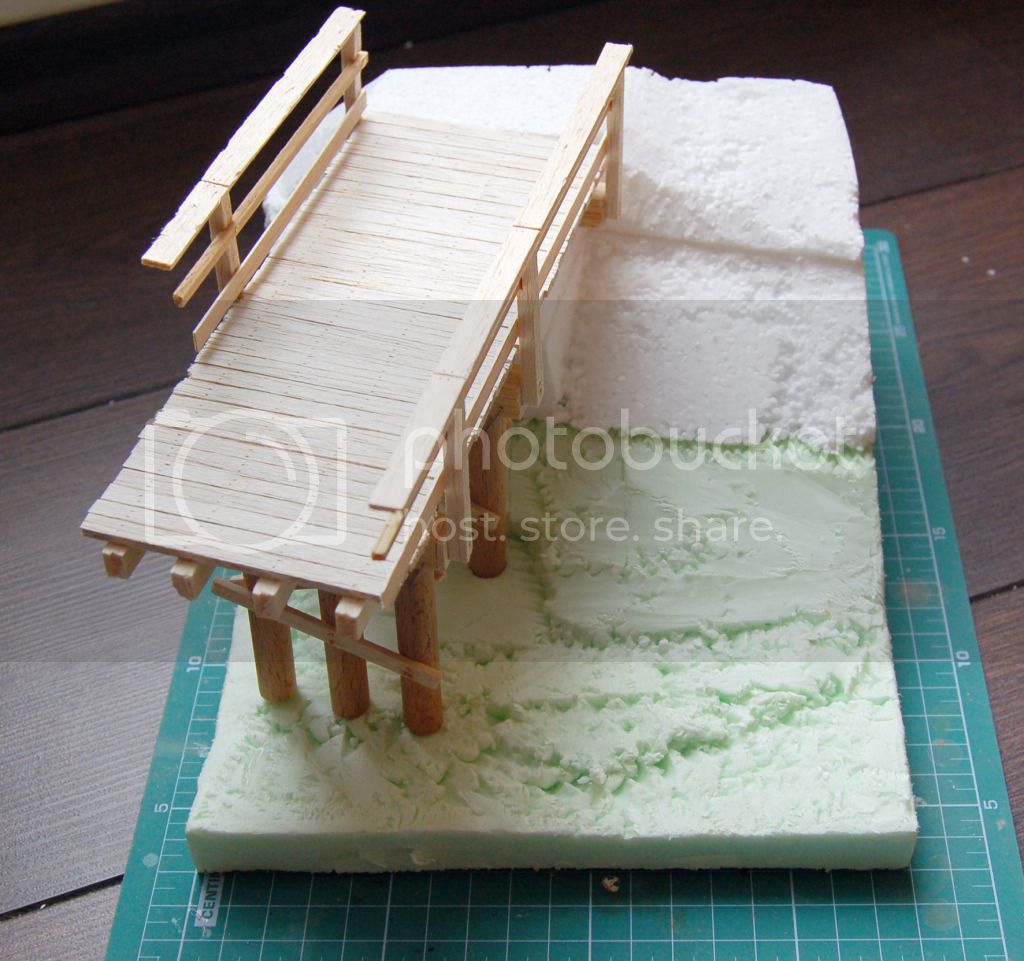
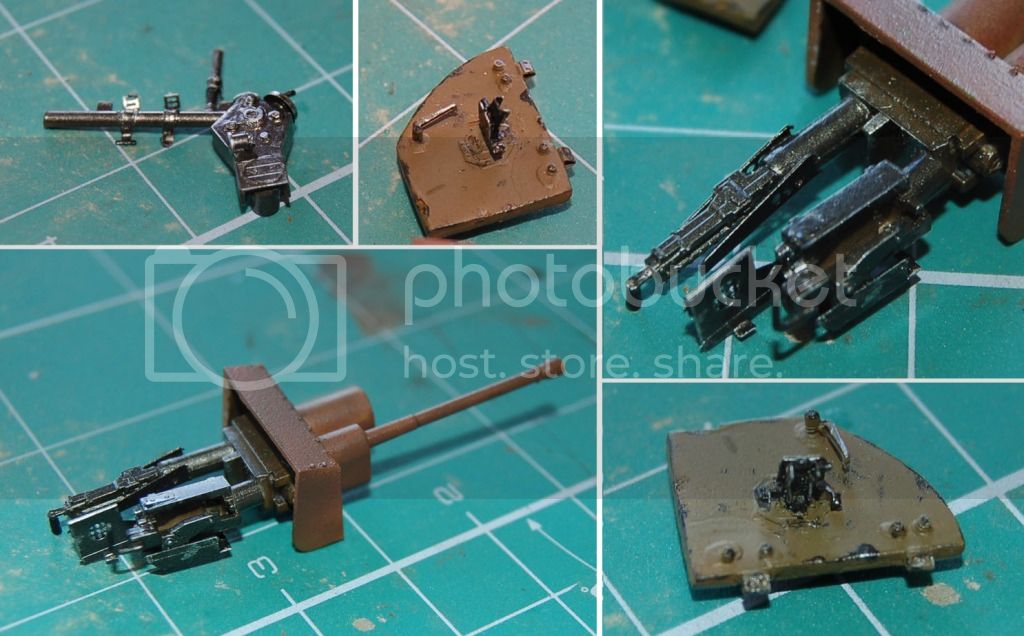
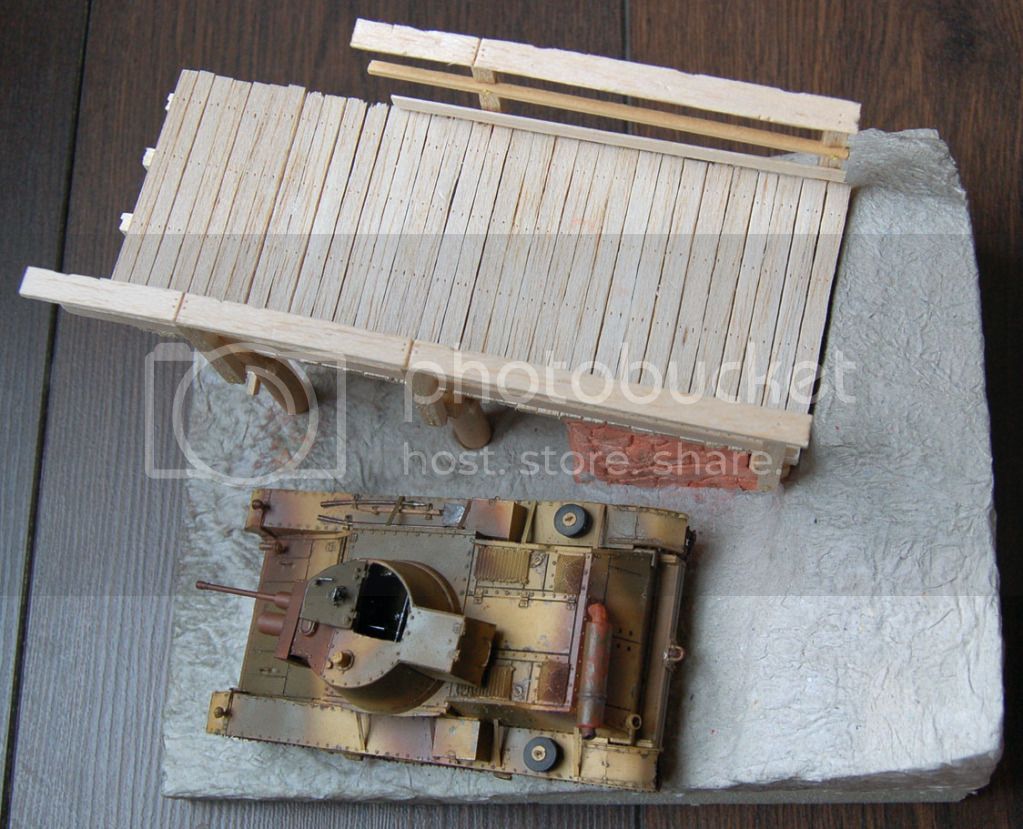
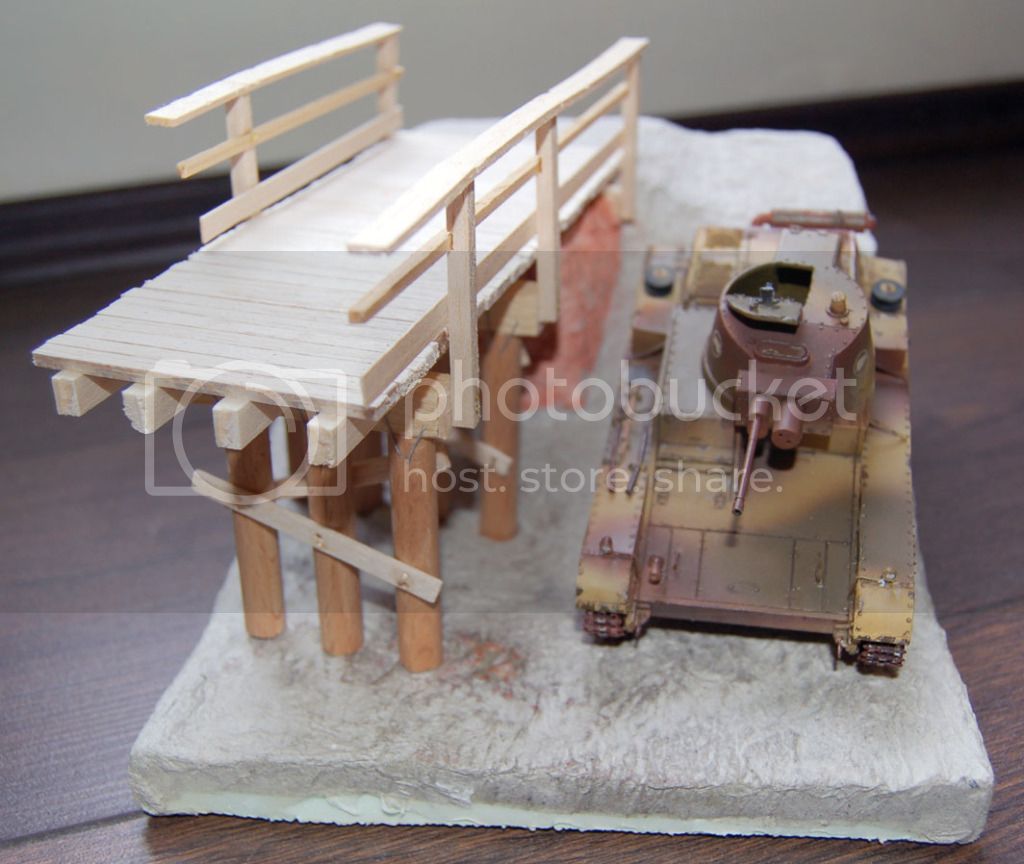
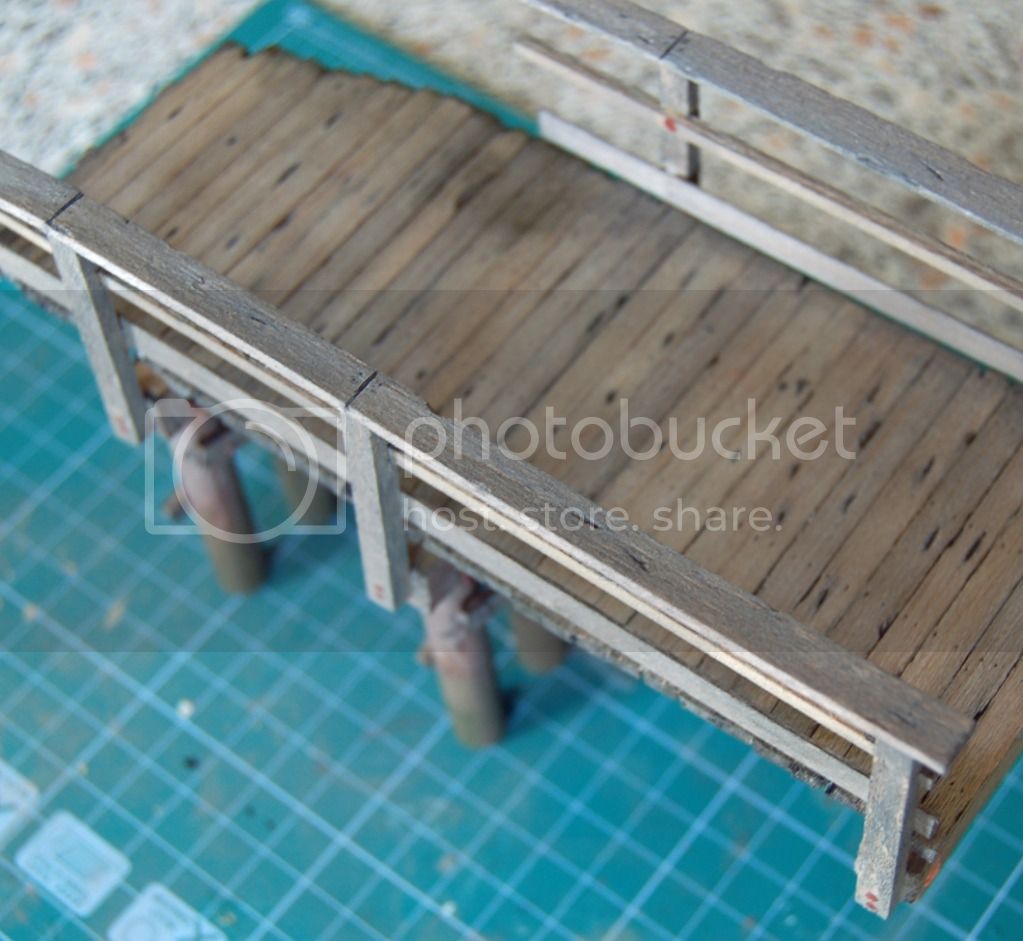
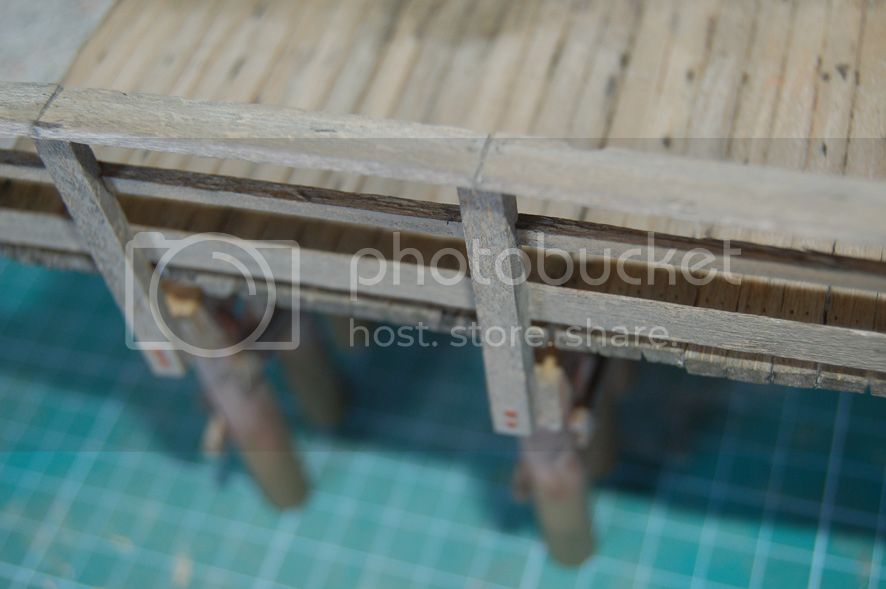
I have created the plans, the vehicle is ready (pictures coming soon), and I will start working on the bridge first - I will use mostly balsa wood for it -, then next come the groundwork.
First of all, here are the plans:


As I'm just a beginner in dio building, every comment, critics, tips and tricks are more than welcomed

Istvan
Peelou75
Visit this Community
Budapest, Hungary
Joined: April 09, 2009
KitMaker: 140 posts
Armorama: 138 posts
Posted: Monday, May 07, 2012 - 06:39 AM UTC
I have managed to do some progress, so here comes some photo of the bridge.

I have used a rounded hard wood for the pillars, the traverse on it is a semi-hard (pine) wood, while the other elemnts made from very soft balsa wood. It was cemented with white glue. I have added some damage to the pillars and the traverses with an Exacto knife. I will soon continue with the bars.


Cheers,
Istvan
retiredyank
Visit this Community
Arkansas, United States
Joined: June 29, 2009
KitMaker: 11,610 posts
Armorama: 7,843 posts
Posted: Monday, May 07, 2012 - 08:44 AM UTC
The bridge looks very nice. I think you have some untapped talent in the diorama category. A unique concept. I have only recently become aware that the Polish had armor ar the beginning of WWII. I'll be following along.
Nahuel19431
Visit this Community
Chubut, Argentina
Joined: August 15, 2010
KitMaker: 593 posts
Armorama: 548 posts
Posted: Monday, May 07, 2012 - 12:04 PM UTC
I think the same. Very nice job, The bridge looks excellent.

Omar
Peelou75
Visit this Community
Budapest, Hungary
Joined: April 09, 2009
KitMaker: 140 posts
Armorama: 138 posts
Posted: Thursday, May 10, 2012 - 09:21 AM UTC
Hi Folks,

Thanks for the kind words!

Some more progress on the bridge, I have added the bars, and some photoetched bolts from the spare box. I think it is ready for painting, but first I have to create the groundworks...

I'm planning to use two more figures from Tank company for the marching troops.

As I have never used resin type artifical water, for creating water effects, does anybody has a suggestion which product should I use? The goal would be a small creek under the bridge, with some vegetation on the banks.

And the pictures:


Regards,
Istvan
recceboy
Visit this Community
Alberta, Canada
Joined: July 20, 2006
KitMaker: 706 posts
Armorama: 665 posts
Posted: Thursday, May 10, 2012 - 01:48 PM UTC
Nice looking so far, well done with the bridge. Keep us posted.

Anthony
deathdork
Joined: March 26, 2007
KitMaker: 314 posts
Armorama: 296 posts
Posted: Thursday, May 10, 2012 - 05:03 PM UTC
Really neat. Would suggest indentations for nail holes would make it perfect!

Cheers
Peelou75
Visit this Community
Budapest, Hungary
Joined: April 09, 2009
KitMaker: 140 posts
Armorama: 138 posts
Posted: Thursday, May 10, 2012 - 08:28 PM UTC
Good point deathdork, thanks! I have already did it on the bars, but sure it would look great to do it on the deck as well.
Jendrass
Visit this Community
Województwo Poznanskie, Poland
Joined: February 10, 2006
KitMaker: 15 posts
Armorama: 13 posts
Posted: Friday, May 11, 2012 - 12:20 AM UTC
If You need any information about 7TP tank, please contact me.
Dio seems to be quite inteesting.
slodder
Visit this Community
North Carolina, United States
Joined: February 22, 2002
KitMaker: 11,718 posts
Armorama: 7,138 posts
Posted: Friday, May 11, 2012 - 12:36 AM UTC
Technically you're doing really well. The bridge looks good. My biggest question is "why". Why did the light tank decide to avoid a bridge that looks pretty strong and wide enough and try and ford a pretty deep river?

Couple of ideas - maybe 'break' the rail on the tank side of the bridge and have the 7TP on its side as if it fell off. Maybe break some of the deck material to give the bridge a worn out look to support the idea that it could not support the weight.

As far as water goes, I don't know what available to you. I would highly recommend testing the resin with the plastic sprues from the 7TP kit. Resin products will produce heat and could soften and melt some plastics. I would plan on pouring multiple layers to control to pour better.
Peelou75
Visit this Community
Budapest, Hungary
Joined: April 09, 2009
KitMaker: 140 posts
Armorama: 138 posts
Posted: Friday, May 11, 2012 - 01:05 AM UTC

Hi Jedrzej,

Thanks for it, fortunately I have tons of references for the 7TP.

Scott,

Your question is good, I might ask these guys:


Thanks for the tip about the water, I really had to make some try before it goes live on the dio.

Cheers,
Istvan
slodder
Visit this Community
North Carolina, United States
Joined: February 22, 2002
KitMaker: 11,718 posts
Armorama: 7,138 posts
Posted: Friday, May 11, 2012 - 01:18 AM UTC
Well, there's the story. The proof is in the photo.....
Thanks
Peelou75
Visit this Community
Budapest, Hungary
Joined: April 09, 2009
KitMaker: 140 posts
Armorama: 138 posts
Posted: Sunday, May 13, 2012 - 01:08 AM UTC
The basics of the groundwork has done, from styrofoam.


The easy part is over, the next stage will be the stone base for the bridgehead. I'm planning to use airhardening plasticine, with the method of Laszlo Adoba, described in his fantastic Let's Build Diorama book.

Cheers,
Istvan
Peelou75
Visit this Community
Budapest, Hungary
Joined: April 09, 2009
KitMaker: 140 posts
Armorama: 138 posts
Posted: Sunday, May 13, 2012 - 07:04 AM UTC
I thought the easy part was over, but suprisingly I have managed to do the 'stonework' today as well, and it was quite fun.

For those who not familiar with the technique, here is some basics.

First I have put a relatively thick layer of plasticine onto the styrofoam. For this I have used white glue.


Then with a small screwdriver I have scratched the shape of the stones into the plasticine. In the next step, I have brushed it with very thinned white glue, and then attached a lot of small toilet paper pieces, on the still wet plasticine.


Then I have redraw the lines of the stones with the screwdriver.


I have to work a bit more in the fitting of the bridge, and then it is ready for paint.


GregCloseCombat
Visit this Community
California, United States
Joined: June 30, 2008
KitMaker: 2,408 posts
Armorama: 2,394 posts
Posted: Sunday, May 13, 2012 - 08:24 AM UTC
Thanks for sharing your basework techniques - great stuff!
retiredyank
Visit this Community
Arkansas, United States
Joined: June 29, 2009
KitMaker: 11,610 posts
Armorama: 7,843 posts
Posted: Sunday, May 13, 2012 - 09:17 AM UTC
The stonework is very well done! I'll have to look into that method for my next diorama.
UncaBret
Visit this Community
Illinois, United States
Joined: May 11, 2008
KitMaker: 767 posts
Armorama: 672 posts
Posted: Sunday, May 13, 2012 - 11:22 AM UTC
I use this for water;
http://woodlandscenics.woodlandscenics.com/show/Item/C1211/page/1
Peelou75
Visit this Community
Budapest, Hungary
Joined: April 09, 2009
KitMaker: 140 posts
Armorama: 138 posts
Posted: Sunday, May 13, 2012 - 07:10 PM UTC
UncaBret, thanks for the tip, I think I will give it a try.
Peelou75
Visit this Community
Budapest, Hungary
Joined: April 09, 2009
KitMaker: 140 posts
Armorama: 138 posts
Posted: Sunday, May 27, 2012 - 03:14 AM UTC
Finally, it is time to presentate the vehicle, the 7TP Polish light tank, armed with a 37mm Bofors gun.


It was a rebuild, dedicated to the Light Tank campaign, but in the meantime I decided to build a diorama for it. As it would be an abandoned vehicle, I had to open at least one hatch, which is not an easy task, due to this tank don't have any interior AM set. First of all, I have carefully cut the top hatch with my exacto knife. Than I had to scratcbuild something inside the turret. Luckily, I have good interior plans and pictures, so based on these ones, and using the sparebox I have managed to build a "look-alike" gun, and some additional elements as the periscope of the commander mounted on the hatch, and the side periscopes as well.


It was painted,


and then built into the turret.


So the tiny tank is ready to put into the river, but for this, I need to finish the base. Stay tuned.

Istvan

Peelou75
Visit this Community
Budapest, Hungary
Joined: April 09, 2009
KitMaker: 140 posts
Armorama: 138 posts
Posted: Sunday, May 27, 2012 - 07:39 PM UTC
Nowadays I'm short of time, but beside the tank interior update, yesterday I have managed to work a bit on the base as well. I have put several layer of cheap toilet paper onto the styrofoam. The first layer was fixed by white glue highly diluted by warm water, and the rest by wallpaper glue, which is lot more cheap. The surface is getting smooth, but I have to add more layers to some parts, to hide the edges of the styrofoam.


The missing two figure has arrived last week. Manufactured by the Russian "TANK", the quality is superb. So I had to make some more time, to put them together, and get a lot of Vallejo colour to paint the figures.

I.
Jendrass
Visit this Community
Województwo Poznanskie, Poland
Joined: February 10, 2006
KitMaker: 15 posts
Armorama: 13 posts
Posted: Sunday, May 27, 2012 - 11:31 PM UTC
Hi there !

I`m really surprised to se 7TP turret with interior. Very good idea Istvan !
Despite some simplifications You`ve made, the main elements of turret look decently. Why You didn`t make commander`s and shooter`s seats ?
Peelou75
Visit this Community
Budapest, Hungary
Joined: April 09, 2009
KitMaker: 140 posts
Armorama: 138 posts
Posted: Monday, May 28, 2012 - 12:12 AM UTC
Hi Jedrzej,

Unfortunately the kit was already built when I get the idea to make the interior, and even opening the hatch was a great challenge. Maybe one day I will try to cut the bottom of the turret and the top of the chassis, and put the seats and other elements, but I'm afraid it would damage the paint a lot. Next time I will be smarter, and will think forward...
Jendrass
Visit this Community
Województwo Poznanskie, Poland
Joined: February 10, 2006
KitMaker: 15 posts
Armorama: 13 posts
Posted: Monday, May 28, 2012 - 12:22 AM UTC
Keep goin Istvan !
Peelou75
Visit this Community
Budapest, Hungary
Joined: April 09, 2009
KitMaker: 140 posts
Armorama: 138 posts
Posted: Sunday, June 03, 2012 - 12:54 AM UTC
Some more advance, the bridge has been painted.

The method was the following: the first layer was an extremely thinned black one, then i have drybrushed it with several shades of beige and grey. The pillars got an additional brownish wash, ant the bottom part was painted with green to simulate it has been coloured by some algae.


Checking the photos, I have considered, the rivets need to treated more with different shades of brown, as it stands out too much now.
SGTJKJ
#041
Visit this Community
Kobenhavn, Denmark
Joined: July 20, 2006
KitMaker: 10,069 posts
Armorama: 4,677 posts
Posted: Sunday, June 03, 2012 - 01:15 AM UTC
Looks great, Istvan. nice layout and very realistic looking brigde.

Looking forward to see more
 _GOTOTOP