_GOTOBOTTOM
Armor/AFV: AA/AT/Artillery
For discussions about artillery and anti-aircraft or anti-tank guns.
Hosted by Darren Baker
1/35 Hobby Boss M4 18T HST WIP
redleg12
Visit this Community
New Jersey, United States
Joined: March 11, 2007
KitMaker: 872 posts
Armorama: 831 posts
Posted: Sunday, May 20, 2012 - 11:37 AM UTC
M4 18 ton High Speed Tractor

Fire Mission

Introduction

The M4 was based on the chassis and drive train of the obsolescent M2 Light Tank. This common practice of re-using old vehicles simplified design, allowed for easy production, and made maintenance in the field easier.

One variant was designed to tow anti-aircraft guns and another for howitzers. The rear compartment carried the gun crew and other equipment. The howitzer variants included a crane to assist with heavier projectiles

The M4 was manufactured by Allis-Chalmers of Milwaukee, starting in 1942 and was in U.S. military service until approximately 1960.

The M4 version I will be building will be the howitzer version with the ammunition box designed to carry 8 inch howitzer ammunition.

My building reference is the book High Speed Tractors by David Doyle


The Kit

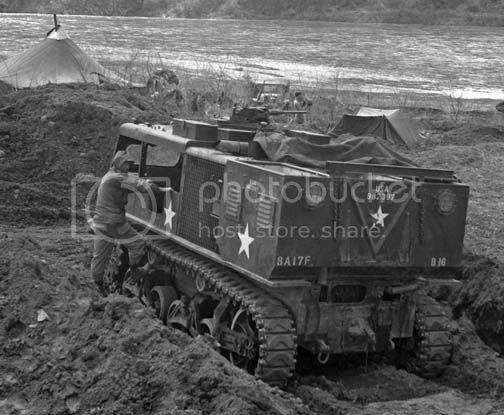
The kit I will be using is the Hobby Boss M4 Tractor 155mm/240mm (which is incorrect as the 8 inch projectile is 203mm), kit #82408
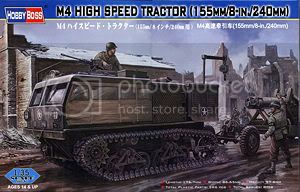


I will also be adding the Eduard PE sets 36072 which is the outside details and 36073 which is the cab doors. I will also replace the M2 MG with a Tasca MG.

By the start of building this kit I quickly realized it will also require, liquid putty, Mr. Surfacer, .010, .020 & .040 styrene sheet and lots of sandpaper as you will see below.

The Build

Because of the nature of this kit and how it is assembled, the instructions are for guidance but it has to be assembled and painted in small sub assemblies otherwise it will be almost impossible to paint all the details.

First I began with lower hull assembly. This included the hull front plate, rear plate and interior floor plate. The side panels which cover the tracks were completely covered with large deep pin marks, about 6 on each side. After trying to fill and sand, I went the route of using .010 styrene sheet and just covering the marks.

I then primed the top half with Vallejo OD primer and painted with Poly Scale Olive Drab 505 370. The engine compartment was weathered to prepare for the engine and winch installation with AK track wash.
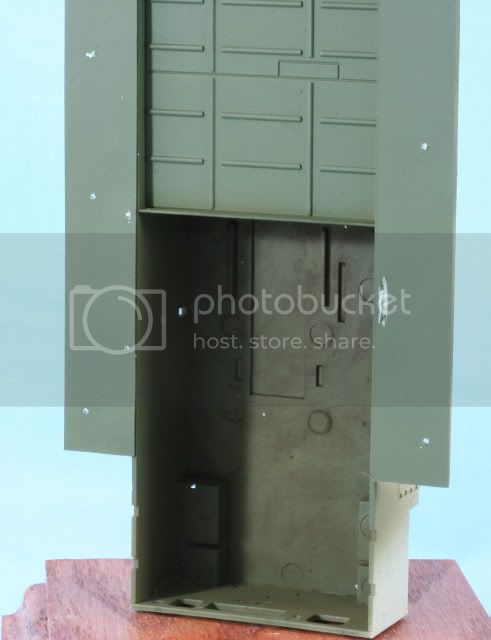


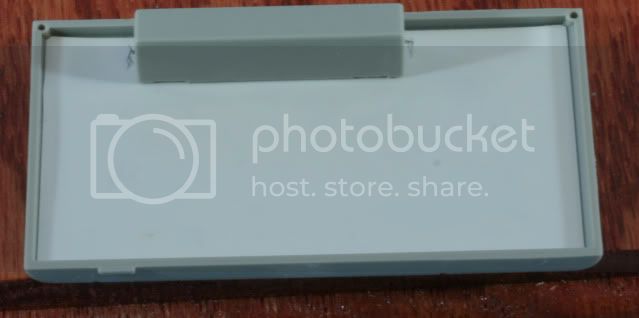
The same problem exists with the inside of the engine roof, covered with part position holes and big pin marks. I covered it again with .010 styrene sheet. Here it is with a roof part added.


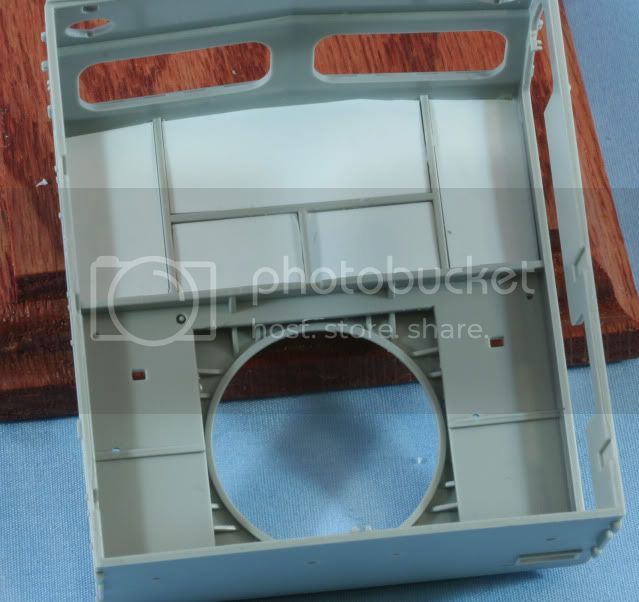
While I have the styrene out, the inside roof of the cab is a mess of pin marks and part holes. It is a bit more complicated and requires panels. Here is the roof in process.


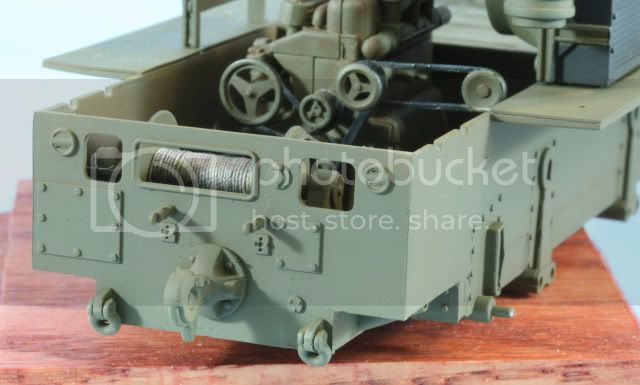
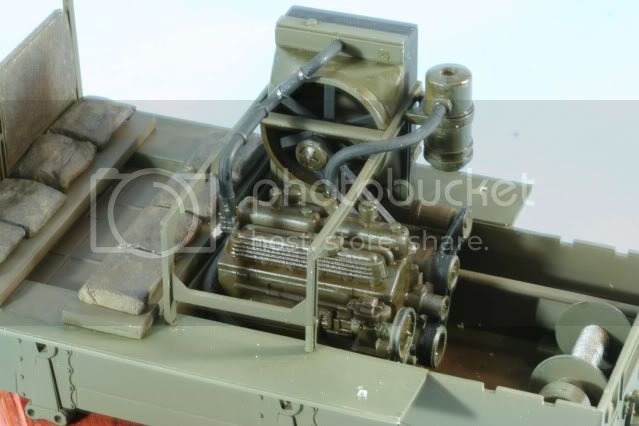
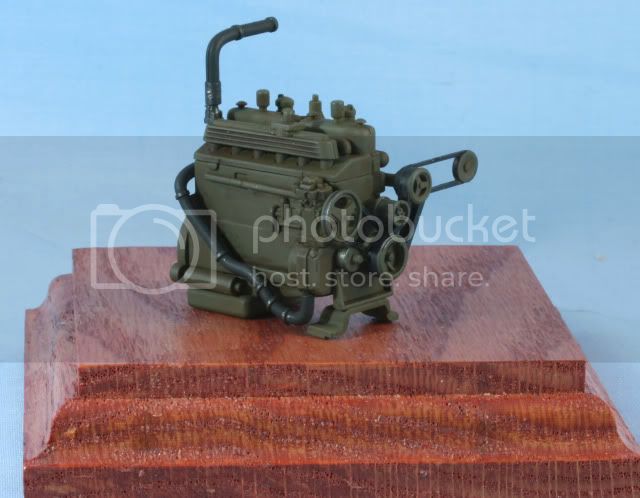
As a break from the styrene sheet puzzle, I assembled the engine. The engine on the M4 was painted OD with black hoses and steel hose clamps. After assembly and priming the main engine was painted with Poly Scale OD. The hoses and belts are painted with a rubber mix of Flat & NATO Black. The clamps and belt pulleys are painted with Alclad Steel. The engine was then weathered with AK Track wash.


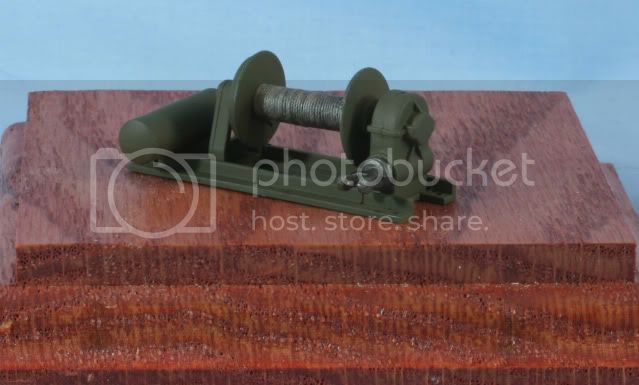
Also in the engine compartment is the winch assembly. Again after assembly and priming I painted with Poly Scale OD. I then wound some wax coated ship builders string onto the winch spool to create the winch cable. Then I painted the cable with Alclad Steel. Also the PTO connection on the winch was also painted with Alclad Steel.


That’s it for now. Working in 9 different directions at one time on this model. See what I get done for the next update.

As always all comments are welcome.

Rounds Complete!!
HeavyArty
Visit this Community
Florida, United States
Joined: May 16, 2002
KitMaker: 17,694 posts
Armorama: 13,742 posts
Posted: Sunday, May 20, 2012 - 11:53 AM UTC
Looking great Mike. It will look awesome pulling your M115. Keep us posted.
redleg12
Visit this Community
New Jersey, United States
Joined: March 11, 2007
KitMaker: 872 posts
Armorama: 831 posts
Posted: Sunday, May 20, 2012 - 01:59 PM UTC
Thanks Gino....still working out the layout!!

Rounds Complete!!
Cobrahistorian
Visit this Community
Oklahoma, United States
Joined: November 11, 2006
KitMaker: 710 posts
Armorama: 553 posts
Posted: Monday, May 21, 2012 - 02:57 AM UTC
Mike,

Looking forward to following this one with great interest. I've got the 90mm version sitting on my 'to build' pile. We've got a real one in the collection and I've shot a ton of pics of it, so let me know if you need any detail shots.

I'm hoping to scratchbuild a 90mm AA gun to go along with it, but we'll see how that goes...

Keep it up!

Jon
redleg12
Visit this Community
New Jersey, United States
Joined: March 11, 2007
KitMaker: 872 posts
Armorama: 831 posts
Posted: Monday, May 21, 2012 - 11:33 AM UTC
Jon

Thanks for stopping by and for the offer. Glad to have you along for the ride.

I just remember a picture of the 90mm M4 towing a captured German 88...Now there is a thought of a marriage!!

I wish someone would come out with a 90mm...

Thanks again

Rounds Complete!!
Cobrahistorian
Visit this Community
Oklahoma, United States
Joined: November 11, 2006
KitMaker: 710 posts
Armorama: 553 posts
Posted: Tuesday, May 22, 2012 - 02:10 AM UTC
I've got two 90mms in the collection and I'm hoping to at least do a rough kit in 35th. I've been using the old Adams 120mm as a basis for some parts and while the scales are different, the difference in size actually makes them match up fairly nicely. I've got a Pershing barrel for it (still haven't figured out what to do with the threaded muzzle, but I'll get there...) and the rest will be Evergreen styrene and cast resin. We'll see...

Anyhow, here's a dozen pics of our M4 to further inspire you. Let me know if you need more!

Jon


Cobrahistorian
Visit this Community
Oklahoma, United States
Joined: November 11, 2006
KitMaker: 710 posts
Armorama: 553 posts
Posted: Tuesday, May 22, 2012 - 02:11 AM UTC

Tankrider
Visit this Community
Oklahoma, United States
Joined: October 07, 2002
KitMaker: 1,280 posts
Armorama: 1,208 posts
Posted: Tuesday, May 22, 2012 - 02:23 AM UTC
Mike,
Missed you last month but I did spot your "deployed" models on the Catagory V table. Nice work.

The .010 jisaw puzzle is a great idea that I might just have to incorporate on an upcoming Tuna Boat build... Hobby Boss and their knock out marks, what cna you say.

Take care and I will be watching this build to see what additional tricks I might pick up from the FA cousins. Maybe I might just have to finish my M115 and add a M4 for company.

John
redleg12
Visit this Community
New Jersey, United States
Joined: March 11, 2007
KitMaker: 872 posts
Armorama: 831 posts
Posted: Tuesday, May 22, 2012 - 12:20 PM UTC
Jon - Excellent pictures....the interior shots are great. Thanks for putting them up. I will be peeking at them.

If I have any questions I may hit you up by PM, thanks

John - Yep missed last month...was on TDY for my daughter!!

As for Hobby Boss....I feel like I am working an old kit from the 60s with a lot more detail.

Every seam needs work...plus all the nice flash and pin marks. Next is to scratch make new seat as the kit supplied are yuch.

I will keep posting my fixes and upgrades

You are always welcome you into my position

Rounds Complete!!
redleg12
Visit this Community
New Jersey, United States
Joined: March 11, 2007
KitMaker: 872 posts
Armorama: 831 posts
Posted: Sunday, May 27, 2012 - 09:42 AM UTC
Happy Memorial Day Weekend to everyone. First while you are enjoying that hot dog, remember the 7% of the population who have worn the uniform, and especially those who made the supreme sacrifice. Say thank you to a vet!

OK….now for this weeks update

Going in one direction was completing the lower hull by installing the engine and the radiator and fan assembly


Then I installed the winch assembly and power takeoff


The rear of the hull has some details to add such as the towing hook, Chicago fittings for the air lines and towing clevises. Once these were complete I gave the lower half and bottom a prime coat with Vallejo OD primer and a base coat with Poly Scale OD


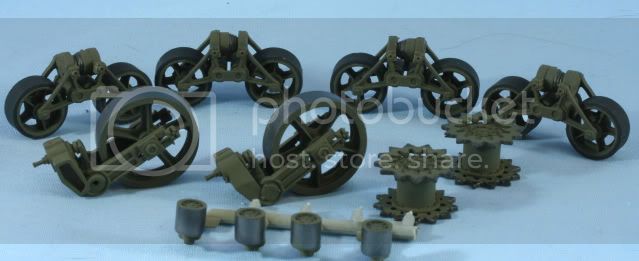
In another direction are the road wheels and assemblies. The drive is a two-part assembly, the rear idler wheel is 3 parts for the wheel and then another 3 parts for the assembly. The boogies are a three-part assembly plus the two wheels. The upper idler rollers are mounted on there axels.

After cleaning up and priming all the parts the road wheels were painted with a tire black mix of 50/50% Flat & NATO black. The idler and upper idlers were painted with Alclad Steel. After drying the rims and mounting parts were painted with Poly Scale OD. Once dry, I completed final assembly of the road wheel assemblies.


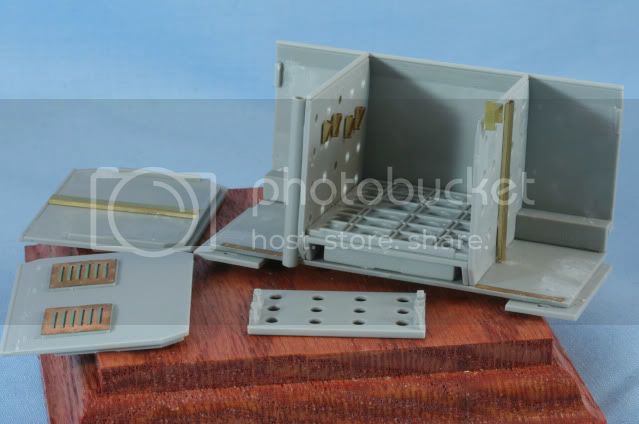
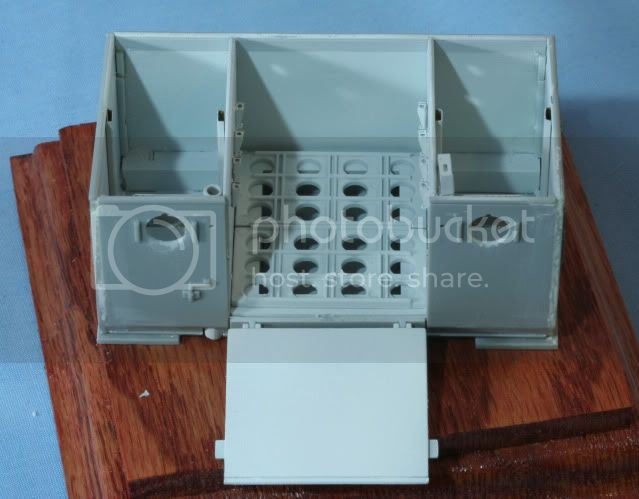
Now…in a third direction, I began assembly of the ammo box. This included the center floor plate with recess holes for 8 inch projectiles. The kit gives you a choice of two different sizes for 155mm or 8 inch (203 mm). Even with the large size the projectiles are a bit tight. On the internal walls, are the brackets for the projectile holders from the Eduard PE set. On the opposite side of each center wall panel is a divider bracket also from the Eduard PE set

I mounted the internal divider walls and on the right wall is also mounted the crane locking bracket from the Eduard PE set. I then worked on the outside sidewalls removing the styrene blobs for the tie downs and the vent grill. I applied the Eduard vent grills to the outside walls. The Eduard set gives you parts so you can cut the holes through the end walls for the vents. Even though I will have the ammo box partially open when finished, I will have powder cans in those compartments so I took the easy way out and just mounted the grilles since the holes would not be visible. Also, on the inside wall of the end panels is a PE panel divider.


Also working on the ammo box front wall removing blobs for the tie downs and filling some big ejector pin marks on the inside of the door and front panels

That’s it for now, once I finish with the ammo box parts that will head for internal painting, meanwhile I need to mud up the track area before I mount the road wheels. And lets not forget the cab!! See how many directions I head in by next week

As always all comments are welcome.

Rounds Complete!!
redleg12
Visit this Community
New Jersey, United States
Joined: March 11, 2007
KitMaker: 872 posts
Armorama: 831 posts
Posted: Monday, June 11, 2012 - 01:36 PM UTC
Well, the past couple of weeks have been a zoo at work and busy at home so progress slowed. Just a small update this time to keep your interest.

First I painted the interior components of the ammunition box section with Tamiya Flat White. After the paint dried I assembled the box. The fit of the side panel to the rear panel left a lot to be desired and all the seams needed a fair amount of putty and sanding.

Here is the current status of the ammunition box. I have removed the molded blobs for tie downs and I still have to replace them with PE tie downs.


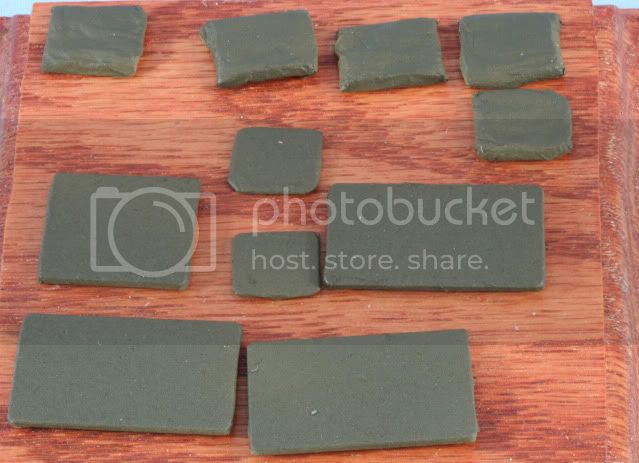
The interior cushions looked like blobs of plastic. The seat cushions are totally wrong. So, to give the side and back cushions the look of cloth, I covered them in aircraft tissue. The seat cushions are long molded double seats with no character. The interior photos in High Speed Tractors by Doyle shows single seat cushions, which look like old used pillows.

To create these I used two-part epoxy putty rolled out to about the right thickness then cut to size. After they set up I also covered them with aircraft tissue. With all the cushions covered, the cushions were primed and then painted with Tamiya Drab Green.


I am in the process of scratching the benches that the seat cushions sit on. That’s it for now

As always all comments are welcome.

Rounds Complete!!


tanknick22
Visit this Community
United States
Joined: February 19, 2009
KitMaker: 1,139 posts
Armorama: 1,100 posts
Posted: Monday, June 11, 2012 - 02:59 PM UTC

Quoted Text

M4 18 ton High Speed Tractor

Fire Mission

Introduction

The M4 was based on the chassis and drive train of the obsolescent M2 Light Tank. This common practice of re-using old vehicles simplified design, allowed for easy production, and made maintenance in the field easier.

One variant was designed to tow anti-aircraft guns and another for howitzers. The rear compartment carried the gun crew and other equipment. The howitzer variants included a crane to assist with heavier projectiles

The M4 was manufactured by Allis-Chalmers of Milwaukee, starting in 1942 and was in U.S. military service until approximately 1960.

The M4 version I will be building will be the howitzer version with the ammunition box designed to carry 8 inch howitzer ammunition.

My building reference is the book High Speed Tractors by David Doyle


The Kit

The kit I will be using is the Hobby Boss M4 Tractor 155mm/240mm (which is incorrect as the 8 inch projectile is 203mm), kit #82408


I will also be adding the Eduard PE sets 36072 which is the outside details and 36073 which is the cab doors. I will also replace the M2 MG with a Tasca MG.

By the start of building this kit I quickly realized it will also require, liquid putty, Mr. Surfacer, .010, .020 & .040 styrene sheet and lots of sandpaper as you will see below.

The Build

Because of the nature of this kit and how it is assembled, the instructions are for guidance but it has to be assembled and painted in small sub assemblies otherwise it will be almost impossible to paint all the details.

First I began with lower hull assembly. This included the hull front plate, rear plate and interior floor plate. The side panels which cover the tracks were completely covered with large deep pin marks, about 6 on each side. After trying to fill and sand, I went the route of using .010 styrene sheet and just covering the marks.

I then primed the top half with Vallejo OD primer and painted with Poly Scale Olive Drab 505 370. The engine compartment was weathered to prepare for the engine and winch installation with AK track wash.


The same problem exists with the inside of the engine roof, covered with part position holes and big pin marks. I covered it again with .010 styrene sheet. Here it is with a roof part added.


While I have the styrene out, the inside roof of the cab is a mess of pin marks and part holes. It is a bit more complicated and requires panels. Here is the roof in process.


As a break from the styrene sheet puzzle, I assembled the engine. The engine on the M4 was painted OD with black hoses and steel hose clamps. After assembly and priming the main engine was painted with Poly Scale OD. The hoses and belts are painted with a rubber mix of Flat & NATO Black. The clamps and belt pulleys are painted with Alclad Steel. The engine was then weathered with AK Track wash.


Also in the engine compartment is the winch assembly. Again after assembly and priming I painted with Poly Scale OD. I then wound some wax coated ship builders string onto the winch spool to create the winch cable. Then I painted the cable with Alclad Steel. Also the PTO connection on the winch was also painted with Alclad Steel.


That’s it for now. Working in 9 different directions at one time on this model. See what I get done for the next update.

As always all comments are welcome.

Rounds Complete!!


Hate to tell you this the m4 tractors were not based on the old m2 light tank, the tracks, road wheels and drive sprokets were from the m4 sherman
Removed by original poster on 06/12/12 - 04:59:24 (GMT).
redleg12
Visit this Community
New Jersey, United States
Joined: March 11, 2007
KitMaker: 872 posts
Armorama: 831 posts
Posted: Sunday, July 01, 2012 - 01:31 PM UTC
This summer has been busy and it has been hard to get bench time. I have some progress to report from our last update.

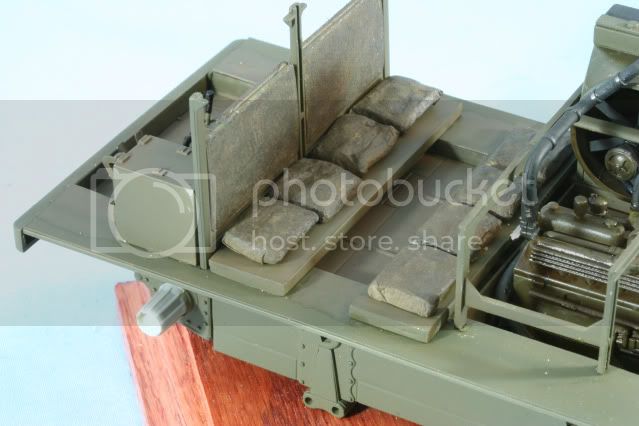
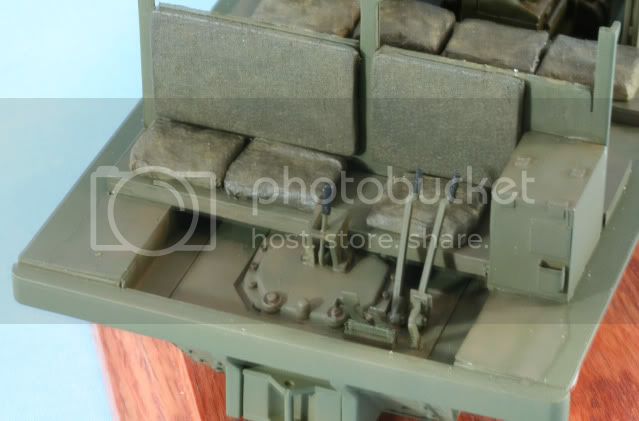
The benches were scratched from two sheets of .040 styrene, laminated together. After cutting and sanding the benches were primed and painted with Poly Scale OD. While working on the benches I weathered the floor of the cabin with AK Mud Effects. While I was in the weathering mode, all of the cushions were weathered with MIG Ochre Wash, then a pin wash using MIG dark wash for deep spots on the cushions. After installing the benches, I installed the back cushions on the divider panel and installed the divider panel. Then I installed the rear cushions.


In the front section I used the PE set for the pedals, and installed the driving arms and clutch. The handles were painted black while the frames were Poly scale OD and some Alclad Steel dry brushed for wear on the track levers and pedals. Here is the view with the front seats installed.


With all the weathering products open, the engine was coated and pin washed with AK Engine Grime


That’s it for now. Need to work on the fire extingushers and the dash board to finish up the cabin interior.

Hope everyone has a great July 4, stay cool and enjoy some tube steaks.

As always, all comments are welcome.

Rounds Complete!!
redleg12
Visit this Community
New Jersey, United States
Joined: March 11, 2007
KitMaker: 872 posts
Armorama: 831 posts
Posted: Sunday, July 15, 2012 - 11:00 AM UTC
Here is my latest update, as usual summer is taking a big bite out of the bench time.

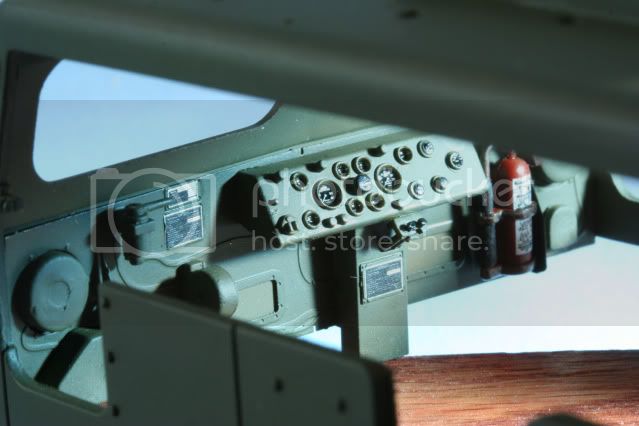
I worked on the dashboard using the Eduard PE dash as a substitute for the kit dash. This requires mounting some of the kit parts on the dash. The instrument cluster is from the kit. The instruments are from the Archer Transfers set for the M4 tractor. After the gauges were set in place, I filled the instrument bezel with Future and let it dry and then repeated it to create the illusion of glass on the bezel. Also the Archer sheet comes with some data plates, which also go on the dashboard. The fire extinguisher is done with Tamiya Flat Red, NATO Black and Alclad Steel. Again the markings on the fire extinguisher are included in the Archer set. Overall the dash is painted with Poly Scale OD after priming with Vallejo OD primer.


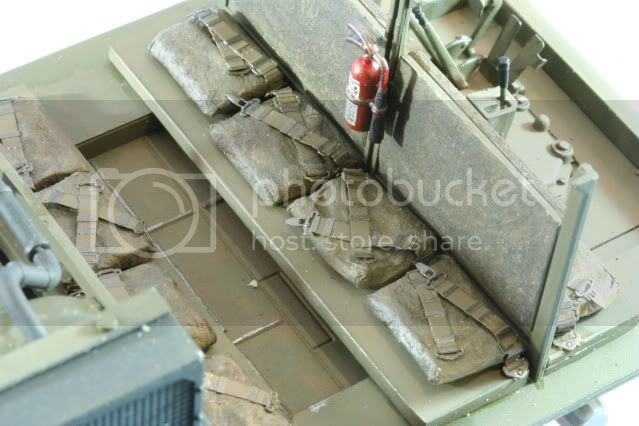
The seat cushions all had seat belts as seen in High Speed Tractors by Doyle. The Eduard set has the seat belts, which I painted with Vallejo OD primer and Vallejo Uniform Green. The metal clasps were painted with Alclad Steel. Putting them in and trying to bend each set into a different position was a time consuming and laborious task. The floor and other high spots were also given edge wear with a 2H pencil. This fire extinguisher was painted and finished same as the one above. Here is the view of the back set of crew seats.


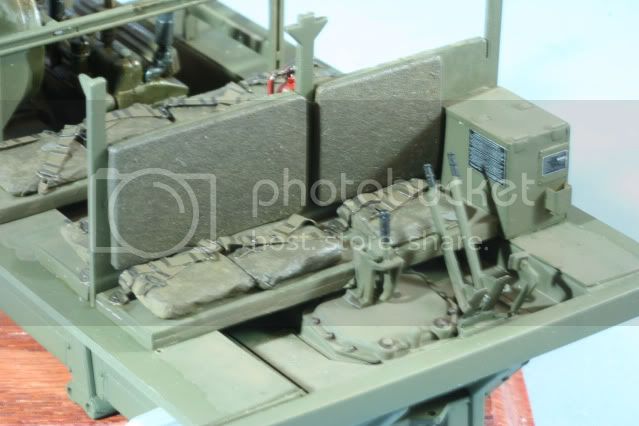
Here is the view of front seats. Also note the additional data plates also from the Archer Transfer set.


That pretty much gets the interior done. I will be doing some shading on the front cab and stenciling on the white star. At that point I can assemble the cab and the engine compartment roof on the hull.

As always all comments are welcome.

Rounds Complete!!
KurtLaughlin
Visit this Community
Pennsylvania, United States
Joined: January 18, 2003
KitMaker: 2,402 posts
Armorama: 2,377 posts
Posted: Sunday, July 15, 2012 - 01:04 PM UTC

Quoted Text

The kit I will be using is the Hobby Boss M4 Tractor 155mm/240mm (which is incorrect as the 8 inch projectile is 203mm), kit #82408


The kit is listed as 155mm/8 in/240mmm because the "Class B" ammo box on this version was meant to haul ammunition for the M1918 240mm howitzer in addition to rounds for the 155mm gun and 8-in howitzer. I don't think the M1918 was ever used in WW II though.

The M2 light tanks used the same suspension as the M3 and M5 light tanks - which looks completely different than that on the M4 HST - so I don't know where that old saw about the suspension origin came from. (I think it was a proprietary Allis-Chalmers design.) Besides, light tanks had 6 inch wide wheels and sprockets while the M4 HST used 9 inch wide components like those on medium tanks . . . Light tank components wouldn't even fit!

I was recently crawling around a bunch of M4 wrecks and was surprised as to how small the cab was. It was like it was a 2/3-size model of what I expected.

This will be nice to see built.

KL
HeavyArty
Visit this Community
Florida, United States
Joined: May 16, 2002
KitMaker: 17,694 posts
Armorama: 13,742 posts
Posted: Sunday, July 15, 2012 - 02:02 PM UTC
Looking great Mike. The seat belts really bring it alive.
redleg12
Visit this Community
New Jersey, United States
Joined: March 11, 2007
KitMaker: 872 posts
Armorama: 831 posts
Posted: Sunday, July 15, 2012 - 02:03 PM UTC
Kurt - Thanks for the peek. I don't remember any 240mm weapon besides the M1 240mm being used in WWII. As for the design for 240mm rounds......maybe so but it would be very tight I think.

Thanks for the info

Rounds Complete!!
redleg12
Visit this Community
New Jersey, United States
Joined: March 11, 2007
KitMaker: 872 posts
Armorama: 831 posts
Posted: Sunday, July 15, 2012 - 10:06 PM UTC
Gino - As always thanks for stopping by.

Rounds Complete!!

hofpig
Visit this Community
England - South East, United Kingdom
Joined: March 04, 2007
KitMaker: 1,330 posts
Armorama: 1,017 posts
Posted: Sunday, July 15, 2012 - 11:41 PM UTC
Hi Mike,


Quoted Text


The interior cushions looked like blobs of plastic. The seat cushions are totally wrong. So, to give the side and back cushions the look of cloth, I covered them in aircraft tissue. The seat cushions are long molded double seats with no character. The interior photos in High Speed Tractors by Doyle shows single seat cushions, which look like old used pillows.

To create these I used two-part epoxy putty rolled out to about the right thickness then cut to size. After they set up I also covered them with aircraft tissue. With all the cushions covered, the cushions were primed and then painted with Tamiya Drab Green.


Great work so far Mike. just a quick question I am not an aircraft modeller, so what is 'aircraft tissue'?

Paul
trahe
Visit this Community
Virginia, United States
Joined: April 03, 2006
KitMaker: 1,158 posts
Armorama: 950 posts
Posted: Monday, July 16, 2012 - 01:02 AM UTC
Mike,

Looks great. You sure you didn't just take apart a real one to photograph?

Automatic Steel!
redleg12
Visit this Community
New Jersey, United States
Joined: March 11, 2007
KitMaker: 872 posts
Armorama: 831 posts
Posted: Monday, July 16, 2012 - 01:47 PM UTC
Paul - Aircraft tissue is the tissue the RC guys use to cover the balsa wood wings. Most hobby shops carry it. A sheet here in the Us runs a bit more than $1 an will last an armor modeler forever. I use it whenever I have to re-create cloth such as canvas cargo covers, tarps, seats, etc. The key is it is thin, strong and does not get fuzzy like regular tissue. It is also somewhat like paper and can be folded and hold its shape.

Hope that helps. Good excuse to hit the hobby shop.

Tom - Thanks for the comment, your kind. Though I am using the photos from High Speed Tractors, by Doyle as my reference. Great book.

Thanks guys for the kind words.

Rounds Complete!!

hofpig
Visit this Community
England - South East, United Kingdom
Joined: March 04, 2007
KitMaker: 1,330 posts
Armorama: 1,017 posts
Posted: Monday, July 16, 2012 - 07:46 PM UTC

Quoted Text

Paul - Aircraft tissue is the tissue the RC guys use to cover the balsa wood wings. Most hobby shops carry it. A sheet here in the Us runs a bit more than $1 an will last an armor modeler forever. I use it whenever I have to re-create cloth such as canvas cargo covers, tarps, seats, etc. The key is it is thin, strong and does not get fuzzy like regular tissue. It is also somewhat like paper and can be folded and hold its shape.

Hope that helps. Good excuse to hit the hobby shop.

Tom - Thanks for the comment, your kind. Though I am using the photos from High Speed Tractors, by Doyle as my reference. Great book.

Thanks guys for the kind words.

Rounds Complete!!


Mike thanks for the info I will try to get some sounds like it will come in handy!

Paul
robw_uk
Visit this Community
England - North East, United Kingdom
Joined: June 22, 2010
KitMaker: 1,224 posts
Armorama: 1,207 posts
Posted: Monday, July 16, 2012 - 09:15 PM UTC

Quoted Text

Paul - Aircraft tissue is the tissue the RC guys use to cover the balsa wood wings. Most hobby shops carry it. A sheet here in the Us runs a bit more than $1 an will last an armor modeler forever. I use it whenever I have to re-create cloth such as canvas cargo covers, tarps, seats, etc. The key is it is thin, strong and does not get fuzzy like regular tissue. It is also somewhat like paper and can be folded and hold its shape.

Hope that helps. Good excuse to hit the hobby shop.

Tom - Thanks for the comment, your kind. Though I am using the photos from High Speed Tractors, by Doyle as my reference. Great book.

Thanks guys for the kind words.

Rounds Complete!!
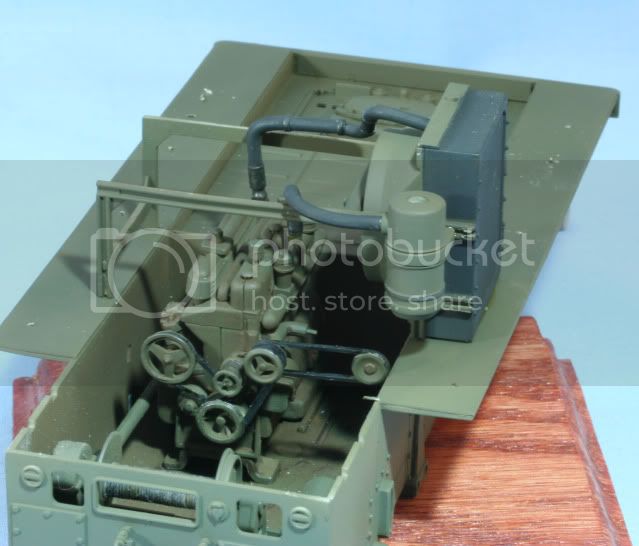


may have to look at this stuff - i have used tissue and paper before - tissue is too prone to tearing and does go "fuzzy" and paper while it can be moulded it "looks" moulded rather than draped...
redleg12
Visit this Community
New Jersey, United States
Joined: March 11, 2007
KitMaker: 872 posts
Armorama: 831 posts
Posted: Monday, July 16, 2012 - 10:41 PM UTC
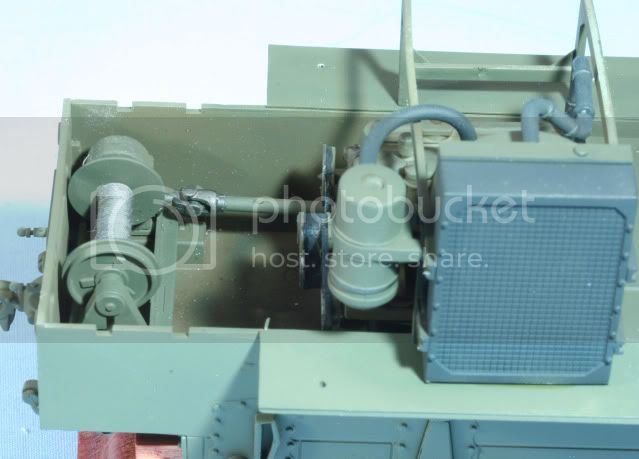
OK...here is an example of the tissue, this should give you a lead of where to look

http://www.ebay.com/itm/Guillow-15-x35-Tissue-GUI122-/160768464373?pt=Radio_Control_Parts_Accessories&hash=item256e8c15f5

Hope that helps

Rounds Complete!!
 _GOTOTOP