_GOTOBOTTOM
Armor/AFV: Allied - WWII
Armor and ground forces of the Allied forces during World War II.
Hosted by Darren Baker
Sherman V build log
barkingdigger
Staff MemberAssociate Editor
ARMORAMA
#013
Visit this Community
England - East Anglia, United Kingdom
Joined: June 20, 2008
KitMaker: 3,981 posts
Armorama: 3,403 posts
Posted: Friday, June 08, 2012 - 10:11 AM UTC
Part 1 – the idea

Back at last year’s MAFVA Nationals, held at Duxford during their Father’s Day vehicle show, I snapped some pictures of Adrian Barrell’s lovingly restored Sherman V. I knew I wanted to build a model of it, but there’s a long queue for space on my workbench…

Fast-forward to the start of this year – my Essex Branch of MAFVA has decided to team up with the Essex Military Vehicle Trust to hold our Present Arms 2012 modelling show in a marquee at Essex MVT’s Military & Flying Machines event at Damyn’s Hall Aerodrome, Upminster on August 4&5. When I was asked about build themes it turned out that Mr Barrell’s Sherman is planned to be there, and I just knew the time was right to get a model started! The plan at the moment is to offer it as a prize during the show.

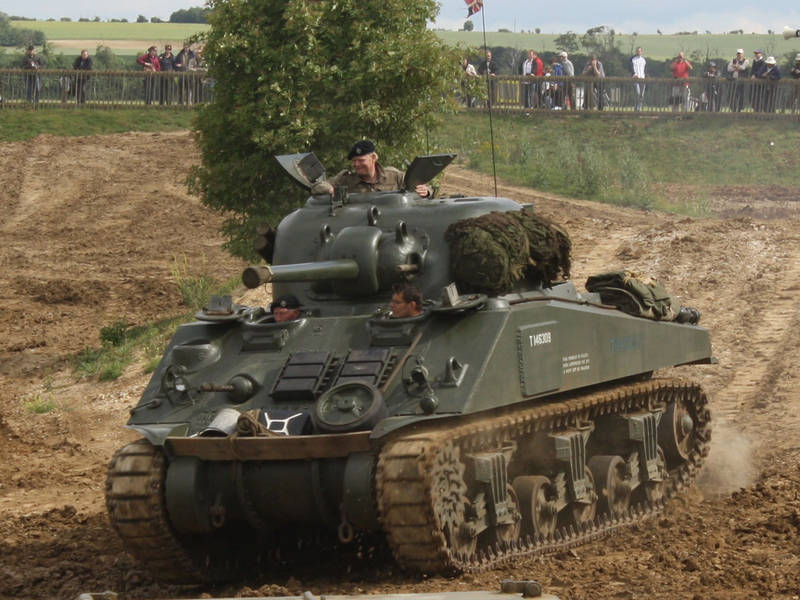
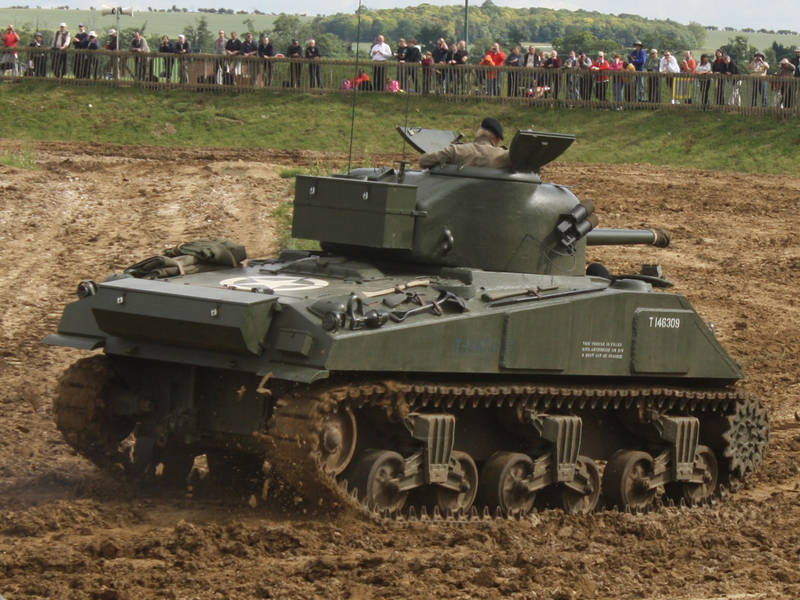
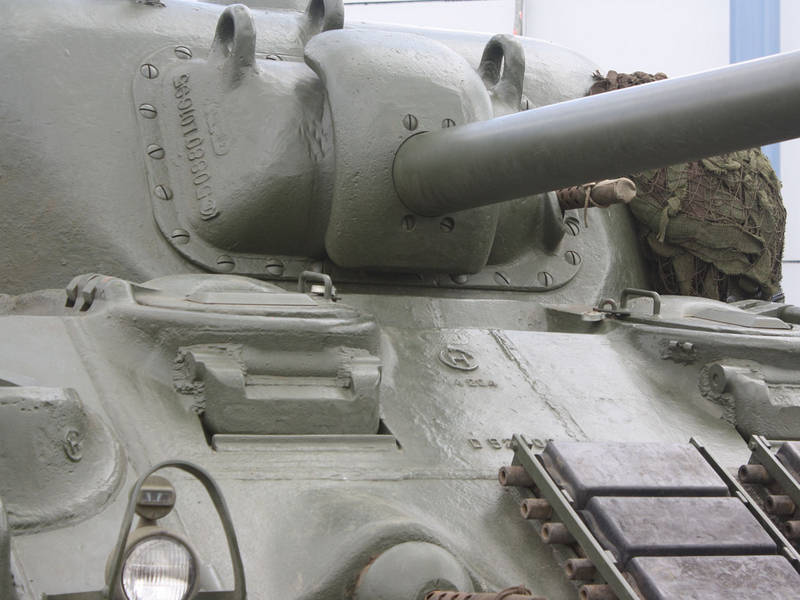
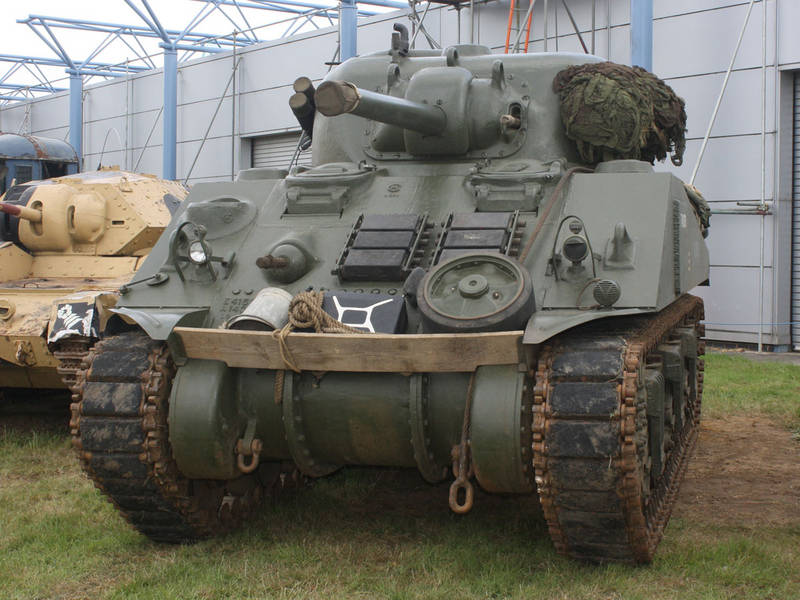
Adrian posted his restoration online here. For those who aren’t familiar with it, the tank in question looks like this:


It’s an early M4A4 with direct-vision drivers’ hoods, three-piece transmission housing, and early M34 gun mantlet without “cheeks”. Those who obsess about Shermans will quickly spot lots of tell-tale details, and those of us with spares boxes that rival full-scale junkyards can probably find all of them in 1:35 scale plastic! For this exercise I chose to use an old Cyberhobby M4A4 I had in the stash. I can hear the voices in my head crying out to me: “Buy the Tasca kit, you fool! It has everything but the hoods.” but I wanted to use up what I already had. This does mean I signed myself up to lots of detail surgery and scrounging, but then that’s half the fun!

Further build instalments to come!

Tom
barkingdigger
Staff MemberAssociate Editor
ARMORAMA
#013
Visit this Community
England - East Anglia, United Kingdom
Joined: June 20, 2008
KitMaker: 3,981 posts
Armorama: 3,403 posts
Posted: Friday, June 08, 2012 - 10:17 AM UTC
Part 2 – “On my command, release Hull”…

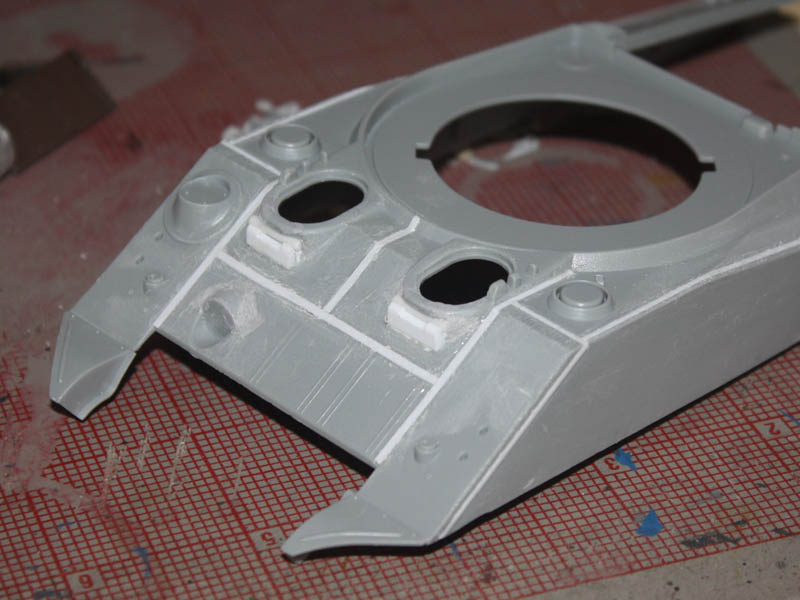
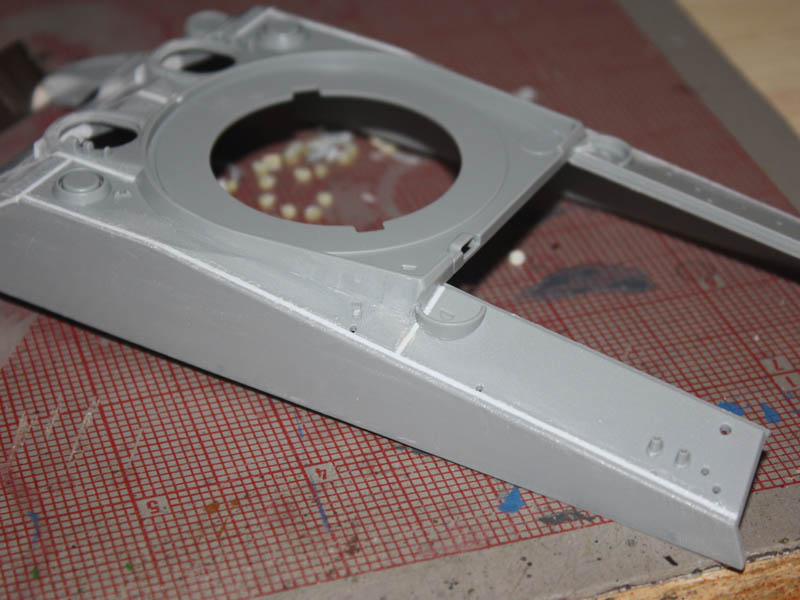
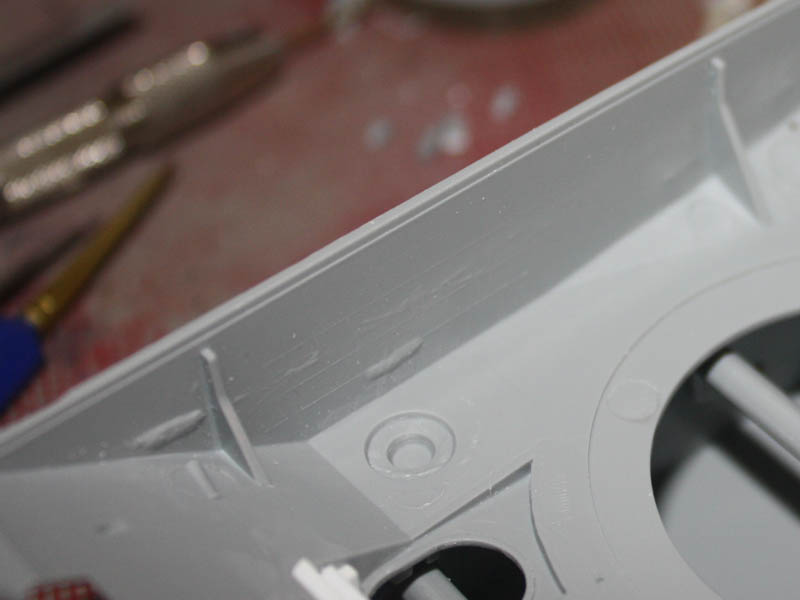
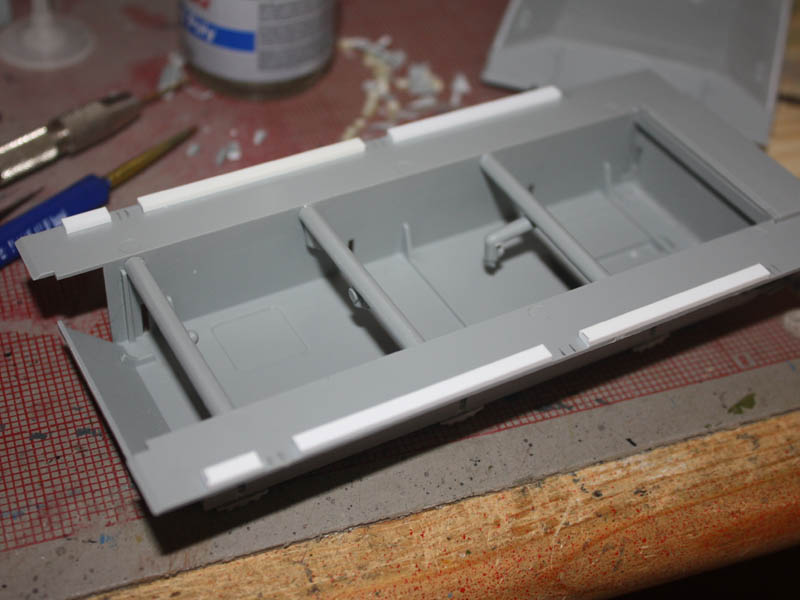
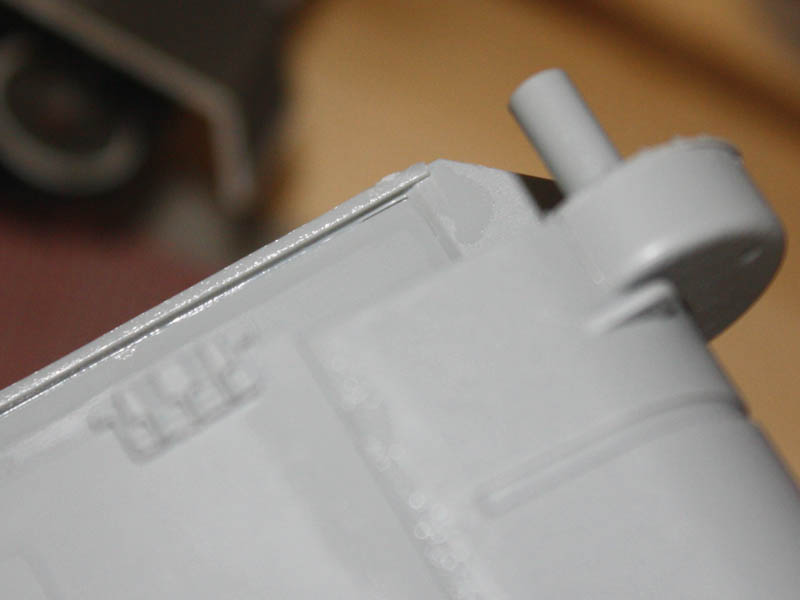
Apologies to Russell Crowe! The hull is the weakest part of the CH kit, representing 1980s design at its most misguided. The weld seams are all “trenches”, whereas real Sherman welds were all slightly raised and rather smooth in texture. That’s where Evergreen strips and glue come in – I used 0.010x0.040” for the wider seams on the front, and 0.010x0.030” for the rest, smothering the strips in Humbrol liquid poly before gently smooshing them in with the butt end of a jeweller’s file. (It was handy, but any similarly blunt object would suffice…) The key is to work in short sections because the glue evaporates off quickly, and to make sure there’s plenty of fresh air to avoid the thrills (and brain damage!) of glue-sniffing. Afterwards, a final coat of glue helps smooth out any ridges or strands, and buffing with a foam abrasive stick usually finishes the job. (Another way espoused by Steven Zaloga is to mask off either side of the “trench” and use epoxy putty to fill it.)


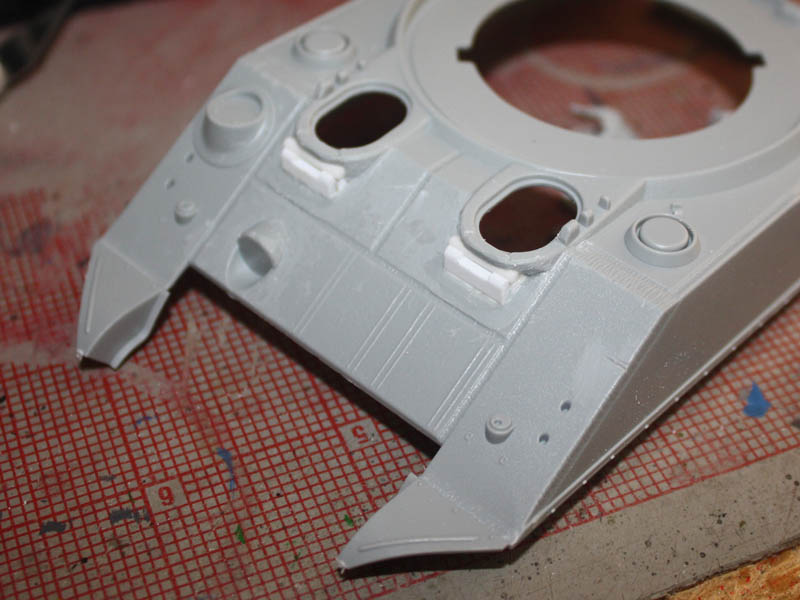
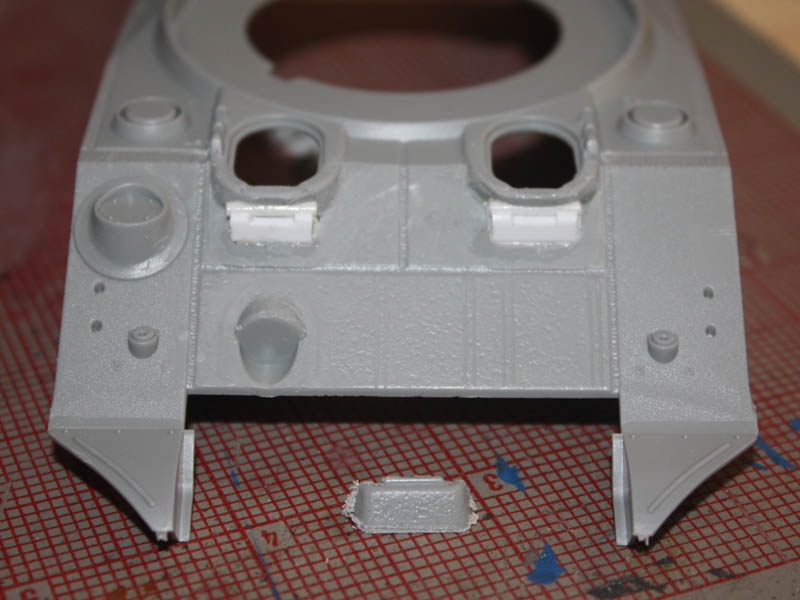
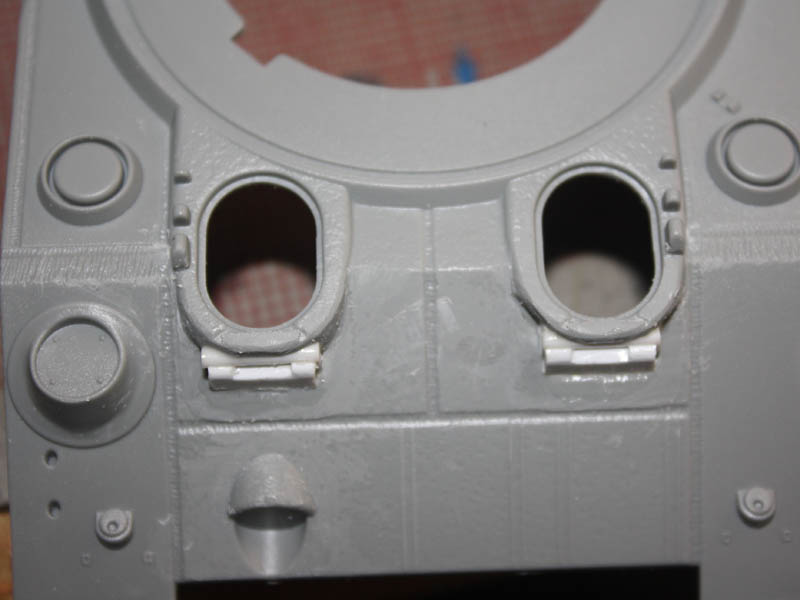
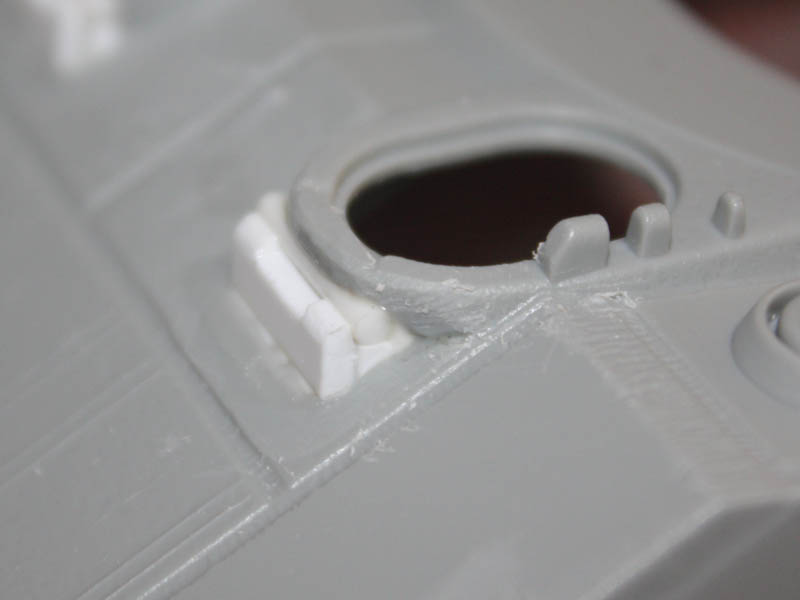
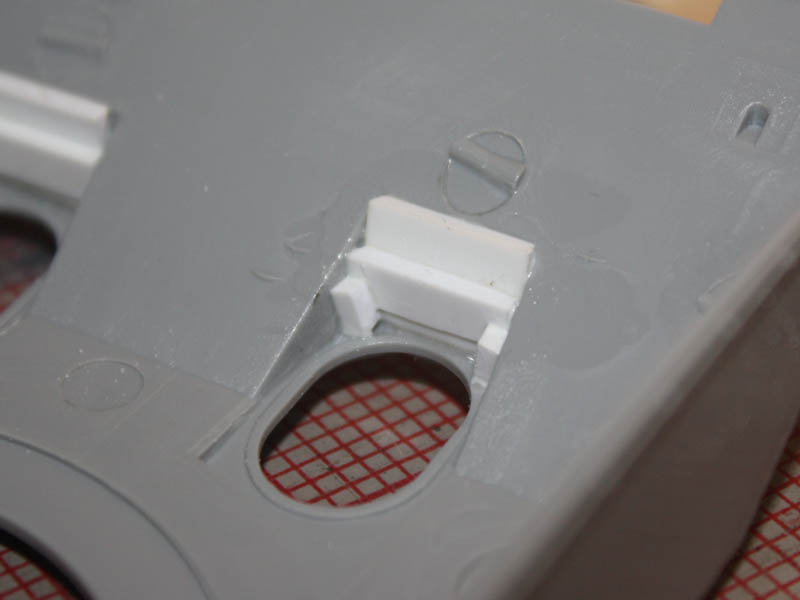
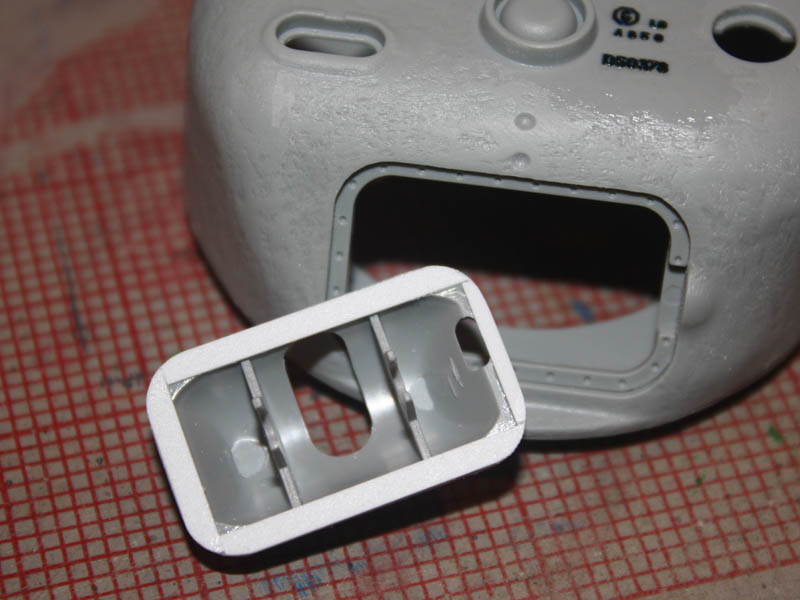
Before I did the welds, though, I tackled the surgery on the hoods. I thought this would be tough, but in the end the monstrously-thick hull casting came to my rescue. I started by sawing off the front of each hood, leaving enough “meat” around the hatch opening for the curve. I then cleaned up the base of this cut and was pleasantly surprised to see it only left a hole of about the right size in the glacis. After some trimming of the hood sides with a chisel-bladed knife to form the curve I smoothed things out with a file. Then I added a section of Evergreen rod for the hinge under the remaining hatch surround, followed by a flap carved from 0.060x0.125” strip stock. This was notched at the top, and the top edges gently rounded with a file. (The real thing was part of the ends of the hinge, but this was the easy way to get the look!) Afterwards I backed up these parts with some more strip stock from the underside, and the big holes either side of the hood magically disappeared! After a tiny amount of putty and a light sanding you can’t even tell there were any gaps. For those interested in details, I sized my hinge and flaps to the width of the gap in the hull rather than to any real measurement.


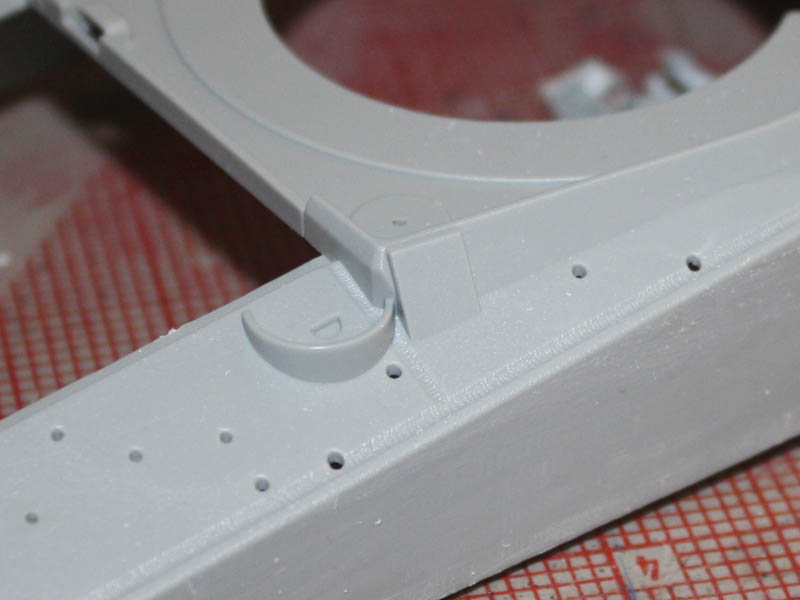
While I was in a cutting mood I scraped off the sand-skirt brackets along the base of the hull sides. These are rather poor anyway, and Adrian’s tank doesn’t have them. Be warned this takes some doing, so is best tackled before any delicate work is done – I had to man-handle the hull quite a bit.

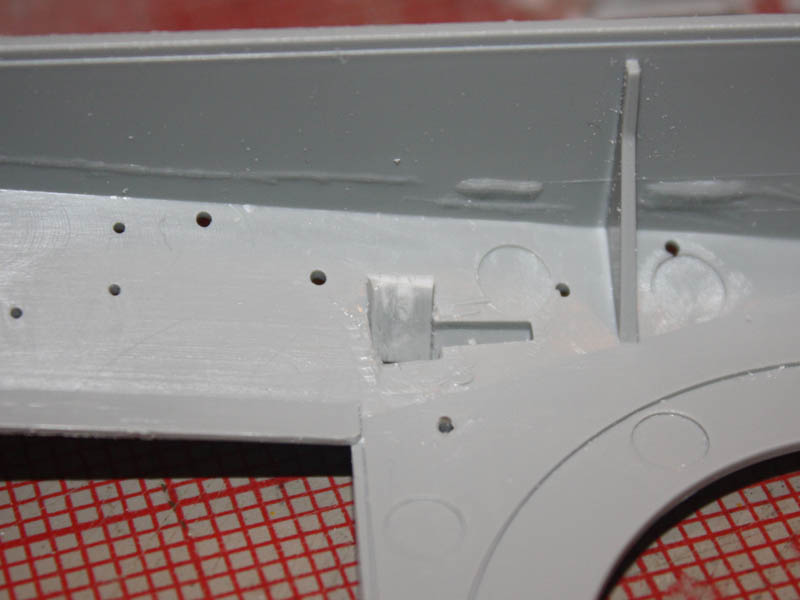
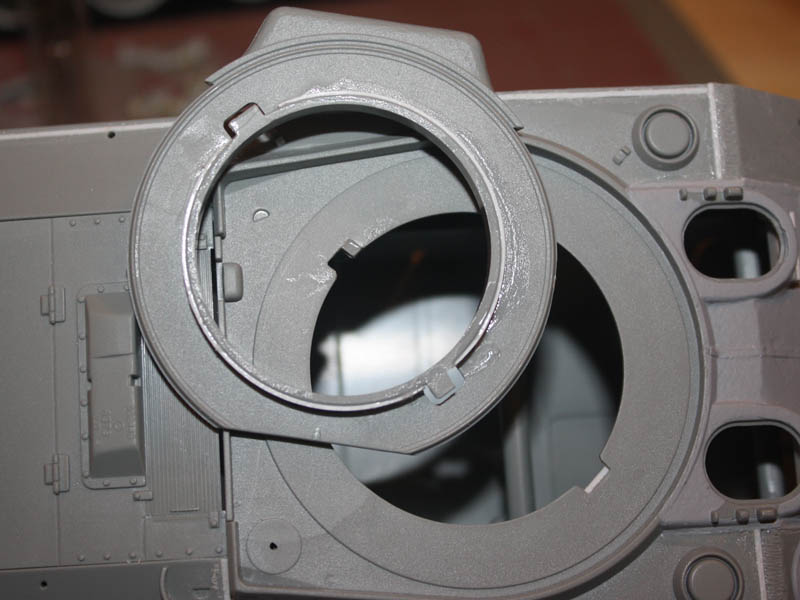
The last major items to remove were the covers for the drain holes at the rear of the turret armoured protection ring. These are moulded on as raised square sections, so I needed to chisel them off. Sadly, CH chose this one spot to provide hollow space on the underside, meaning that there isn’t much thickness left beneath them. One broke through, but I backed the hole with scrap and then puttied it up. (You, at the back! Yes, you! With the lovely Tasca kit! Stop laughing at me!...)


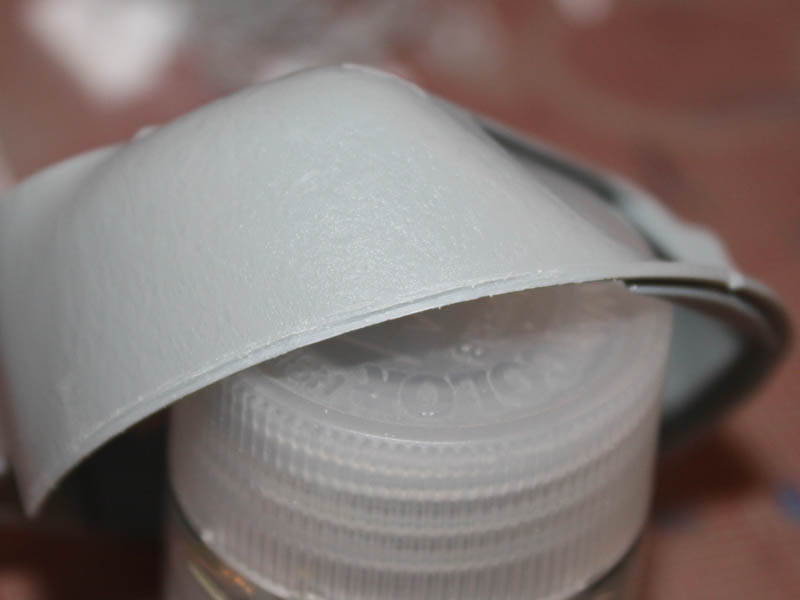
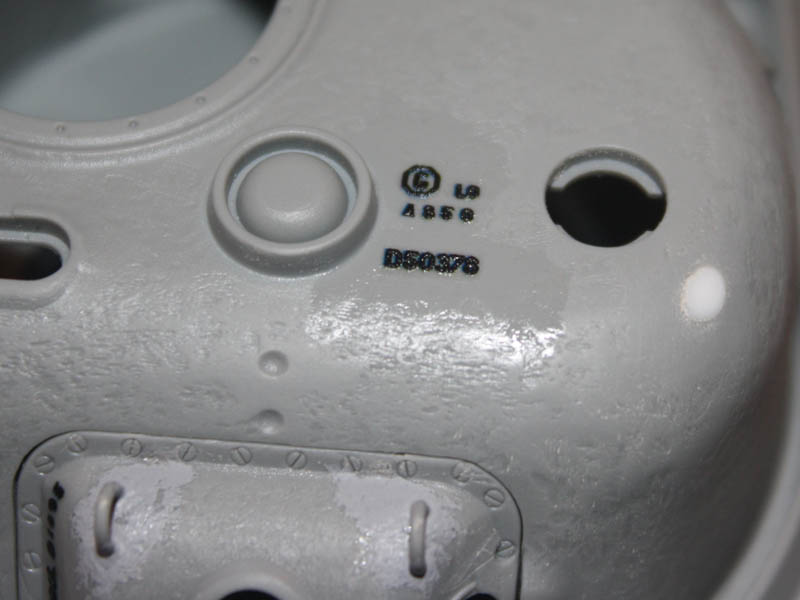
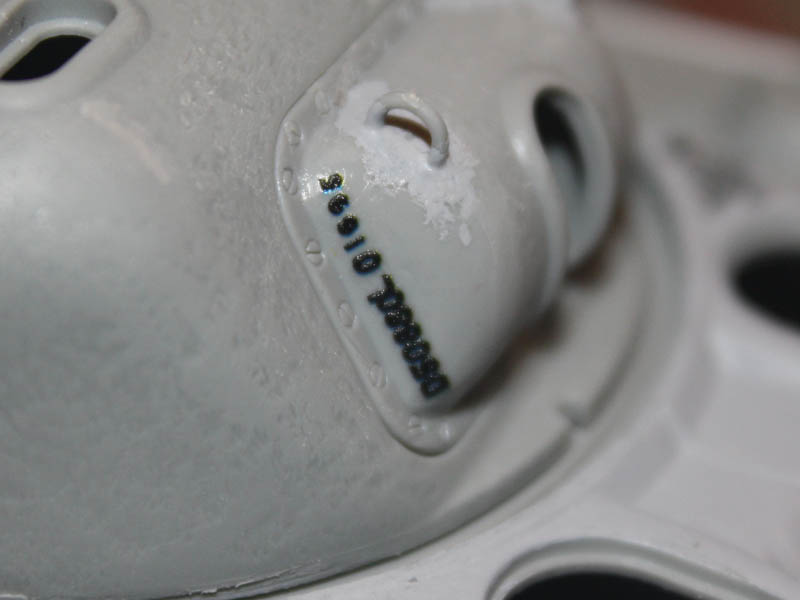
Once the putty is sanded, I’ll be adding some Mr Surfacer 500 to the cast parts, and then some casting marks from the Archer resin set. I tend to paint the area with Micro Gloss before and after adding these decals.
AlanL
Visit this Community
England - East Anglia, United Kingdom
Joined: August 12, 2005
KitMaker: 14,499 posts
Armorama: 11,675 posts
Posted: Friday, June 08, 2012 - 10:19 AM UTC
Hi Tom,

Look forward to the build. If you need the original pics let me know and I'll send them along.

Cheers

Al
patton76
Visit this Community
West-Vlaaderen, Belgium
Joined: December 01, 2002
KitMaker: 568 posts
Armorama: 528 posts
Posted: Friday, June 08, 2012 - 10:31 AM UTC
Hey Tom,

I'll definitely be following your build.

The Tasca is a great k it, build a few years ago, still have to finish it though.

Good luck!

Dave
Big-John
Visit this Community
Ohio, United States
Joined: August 12, 2010
KitMaker: 731 posts
Armorama: 711 posts
Posted: Friday, June 08, 2012 - 11:16 AM UTC
Hi Tom,

Great to see your back on a Sherman build. I'll be folloeing this one real close. The modifications and welds look great!
barkingdigger
Staff MemberAssociate Editor
ARMORAMA
#013
Visit this Community
England - East Anglia, United Kingdom
Joined: June 20, 2008
KitMaker: 3,981 posts
Armorama: 3,403 posts
Posted: Saturday, June 09, 2012 - 12:30 AM UTC
Hi guys! Glad to see I've got an audience! I'd have added more last night, but when I tried to add a reply the website went belly-up again. (Took three tries just to start the topic in the first place - I guess there was too much traffic...) Anyhow:


Part 3 – the Casting Couch

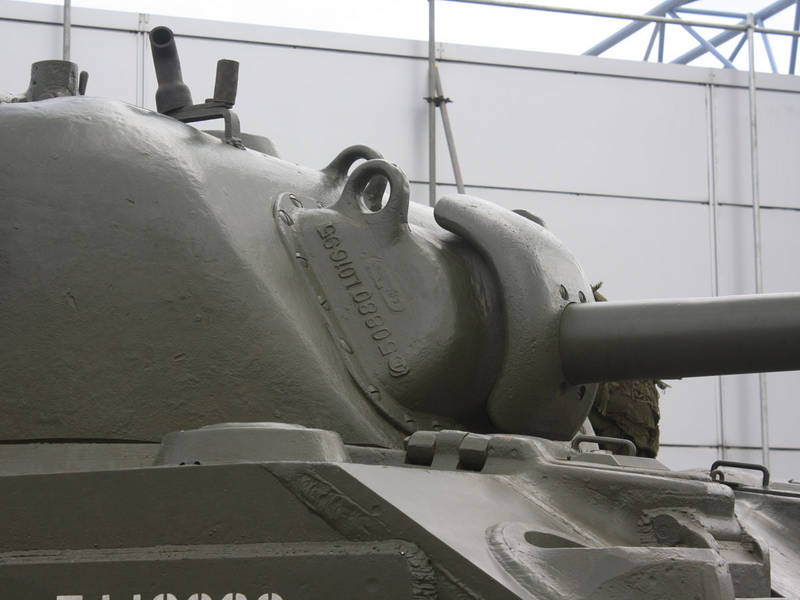
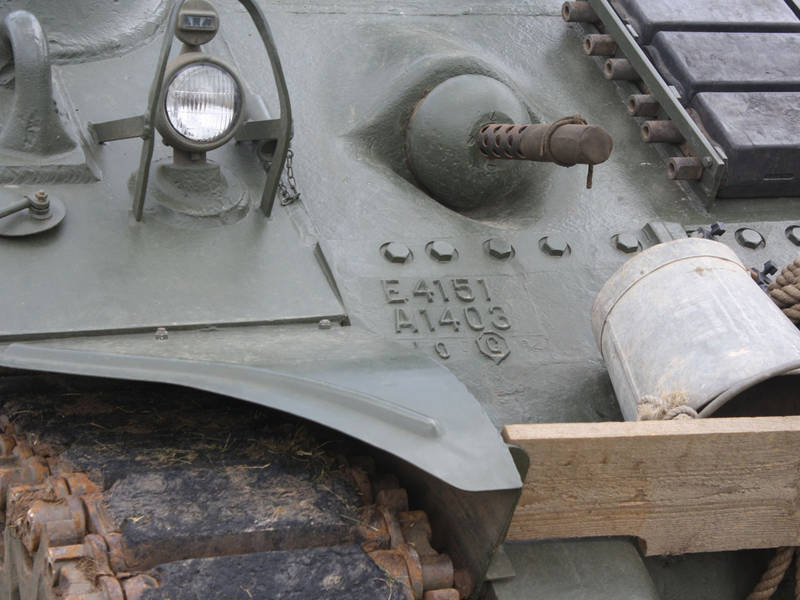
Anyone who has seen a Sherman can testify that they are covered in raised numbers. Each part made by sand-casting had to be marked with a drawing number that identified the wooden pattern used to form the sand, a casting number for each part made from the same pattern, a heat-treatment code, and the foundry identifier. This allowed any defects to be traced back to the source so any other parts from that batch could be withdrawn from stock before they found their way onto a tank. Some kits have these raised marks, others don’t, and most only include the more prominent ones. Looking at Adrian’s tank I could see prominent markings on the side of the gun shield (“D50880 LO 1695” – drawing D50880, LO for heat-treatment, 1695 for this particular casting). On the front, the co-driver’s hood plate has prominent markings (circle-H for foundry, 4224 casting number, D52403 drawing number), and there is a circle-H on the cast radio pot next to it. From correspondence with Adrian I learned the driver’s hood has LO D52402 A612 “stop-sign”-G just behind the hatch on the top surface. The three-piece tranny has the common E4151 A1403 LO “stop-sign”-G on the co-driver’s-side piece, while instead of the equally-common E1231 drawing number the driver’s side has the early (and rare) D50993 and “stop-sign”-G on the final-drive bulge and A424 on the main section above it. The central piece ought to have E1232 on it somewhere but has no visible marks – they could be underneath.


More to come!

Tom
barkingdigger
Staff MemberAssociate Editor
ARMORAMA
#013
Visit this Community
England - East Anglia, United Kingdom
Joined: June 20, 2008
KitMaker: 3,981 posts
Armorama: 3,403 posts
Posted: Saturday, June 09, 2012 - 12:46 AM UTC
Part 4 – Building up the box

With the basic surgery accomplished, I wanted to get the main hull components together before there were any details to break. I put together the three-piece transmission housing, but had to scrape off the bullet-splash lip at the top. The parts fit poorly, and it didn’t get “solid” until all the main bits were glued up. Worse still, there was a kink in the bottom of the main casting, so the side plates leave a gap. I couldn’t really straighten the thick part, so will fill it and hope nobody looks! (It’s underneath, out of sight…)

(Splash already removed from side parts)


I didn’t bother opening the holes in the towing eyes because these will be hidden by shackles. The foundry marks will be replaced, but not until the hull is assembled. Note that I added the top bolt strip, but left the two flange parts off for the moment - I’ll need to add some filler to the joint with the final-drive bulges, as these were part of the main castings, and the flanges will get in the way.

I got this kit second-hand, and a few parts had been started. The rear plate was one of them, and initially all I did was open up the towing eyes with a drill. The outboard eyes ought to be replaced, as the real ones are angled inwards, and the inner eyes will have shackles, so I shouldn’t have bothered! The plate has blocks moulded on for the leaf-spring mounted towing hook that will need to go…


Once I added the rear plate and engine deck to the upper hull I noticed the whole lot bowed out at the sides. To fix it would take my two favourite tools – brute force and ignorance! Applying the first is tricky and involves clamps, but fortunately I have an inexhaustible supply of the second…


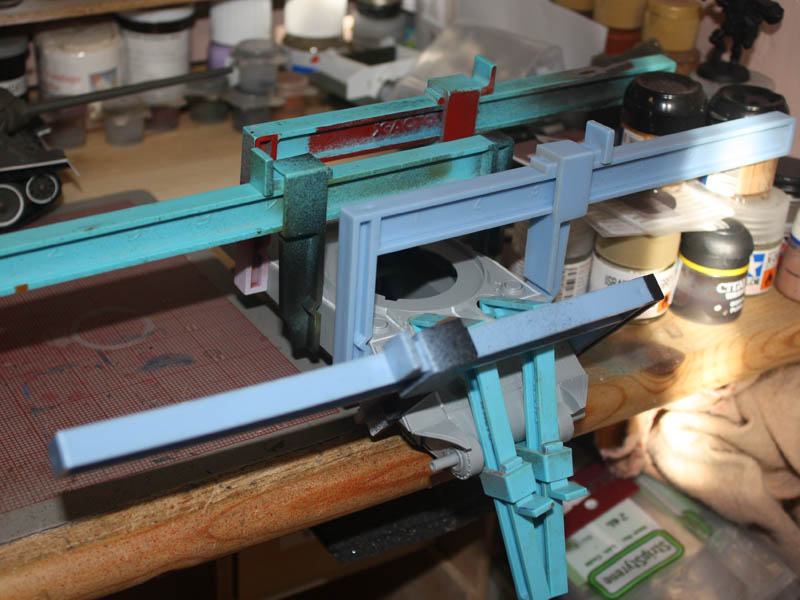
Squeezing the sides of the upper hull will compress the lower hull, so to brace it I cut some thick sprue to fit snugly across the inside, and glued three of them in. Then I added some Evergreen strip to the edges of the sponsons to make a bigger gluing surface, and then applied the glue and lots of hefty clamps! The transmission also needed a bit of force, but clamping it is tricky due to all the curves. Still, if I hadn’t, then the bolt strip wouldn’t have stood proud the way it is supposed to. I then had to reinforce the tranny side joints from the inside with more strip stock. I shied away from fixing the missing bulges on each side under the sponsons, where the transmission gets bolted on, but my nagging AMS forced me to add these later. (I’m good at fixing things later, when doing them early would have been easier!)

Only after the whole lot dried did I attempt to reshape the lower edges of the rear plate and remove about a millimetre from the lower edge of the hull sides that was left over from the sand skirts. (These edges should meet the sponson floors at a square joint.) Then I could add the missing drain covers to the underside of the sponsons below the fuel tanks.


Tom
barkingdigger
Staff MemberAssociate Editor
ARMORAMA
#013
Visit this Community
England - East Anglia, United Kingdom
Joined: June 20, 2008
KitMaker: 3,981 posts
Armorama: 3,403 posts
Posted: Saturday, June 09, 2012 - 12:49 AM UTC
By the way, the awful idler axle brackets will get what's coming to them in a future update, once I download more photos...

Tom
Totalize
Visit this Community
Ontario, Canada
Joined: February 04, 2009
KitMaker: 743 posts
Armorama: 549 posts
Posted: Saturday, June 09, 2012 - 01:03 AM UTC
Great build so far Tom. Way to show this bad boy kit who the boss is.
barkingdigger
Staff MemberAssociate Editor
ARMORAMA
#013
Visit this Community
England - East Anglia, United Kingdom
Joined: June 20, 2008
KitMaker: 3,981 posts
Armorama: 3,403 posts
Posted: Saturday, June 23, 2012 - 01:56 AM UTC
Sorry about the few-weeks gap, but RealLife got in the way! Anyhow, on with the show...

Part 5 – bringing up the rear

As I said earlier, the rear lower hull details needed revised. Normal folk would have done this before gluing it into a tight spot at the back of a tank! First off, the mountings for the leaf-spring had to go, with very careful chisel work. Then came those solenoids for the smoke launchers, moulded onto one of the engine doors – since Adrian hasn’t fitted them I needed to remove them too. While I was at it the lumpen “handle” on the doors had to go, replaced by wire.
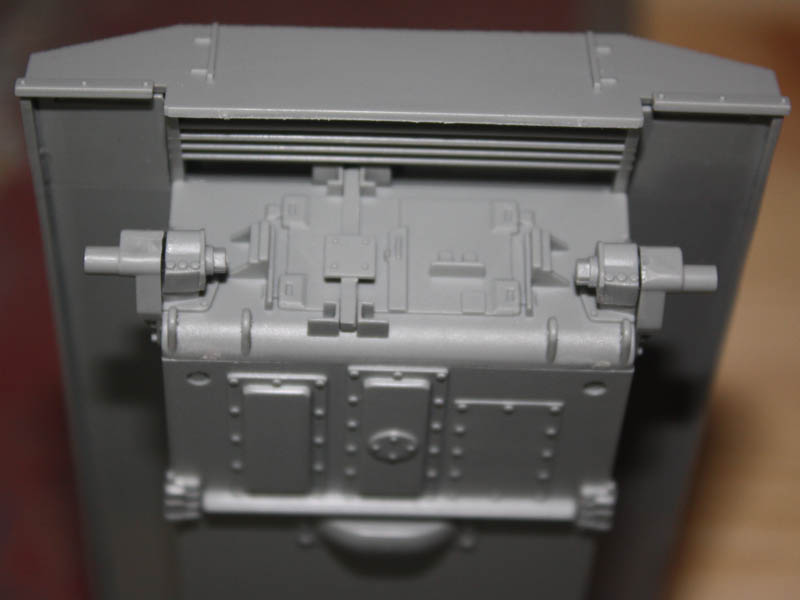


Then things got tricky – I needed a tow hook. As usual, the Tasca M4A4 has one, but the Cyberhobby kit doesn’t. So I whittled one from thick Evergreen strip, added some bolt heads from hex rod, and lowered the mounting plate to the base of the vertical post as per photos in Alan McNeilly’s walkaround here on Armorama.
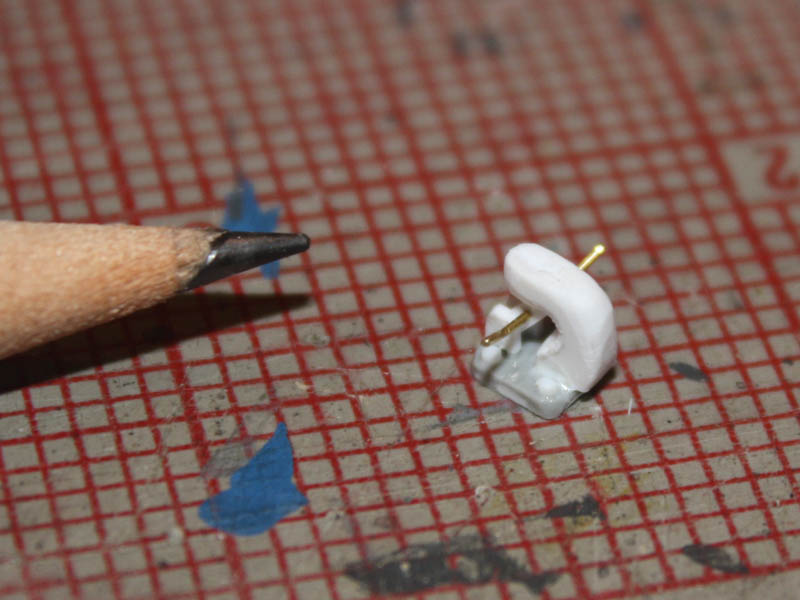


More bolt heads were added either side of the brackets holding the ends of the vertical bar, and the actual brackets got reshaped. While I was at it I also re-sculpted the idler axle mounts because the kit parts bear no resemblance to the real thing!
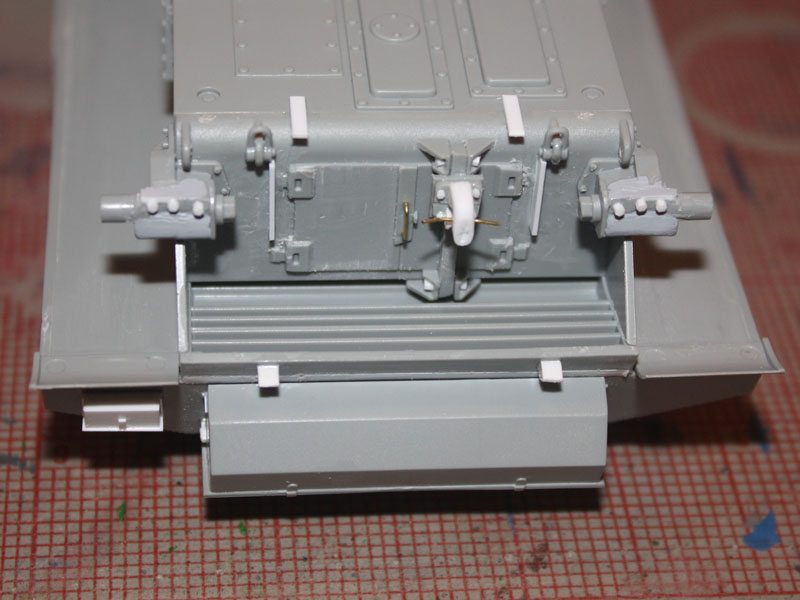


The rear of the upper hull needed a big horizontal weld across it. The earliest of these tanks originally had plates that were level across at the base of the sponsons, but were then extended in the middle by welding on an extra plate to provide some cover to the air cleaners etc below. I took some 0.005” sheet and cut off a thin strip, gluing it in place before using a file to really thin it down to a slightly raised scar.
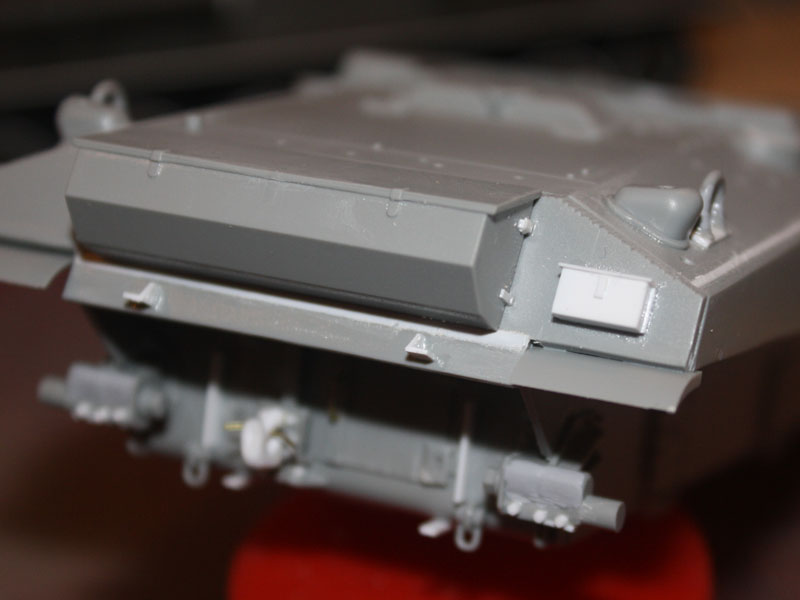


The CH toolbox had a central latch that had to go, and I needed to add some attachment details to the sides. The first-aid box I made from scratch – a slab of 0.080x0.125” strip topped with an 0.015x0.100” lid.

Happy with the rear hull, I turned to the tools and such on the rear deck. Had I paid attention I’d have noticed all the really big peg holes that don’t necessarily get covered up by the parts, and I’d have plugged them before I got this far, but where’s the fun in that? Instead, I got to stuff plastic rod into holes and carefully scrape it flush with other details in the way…

The first thing I did was glue the lift rings in place because the bases are moulded to the hull. The joints are very awkward and weak, but it was essential to leave these to harden overnight so I could then chisel the whole lot off to slip a “plate” of plastic strip under it.
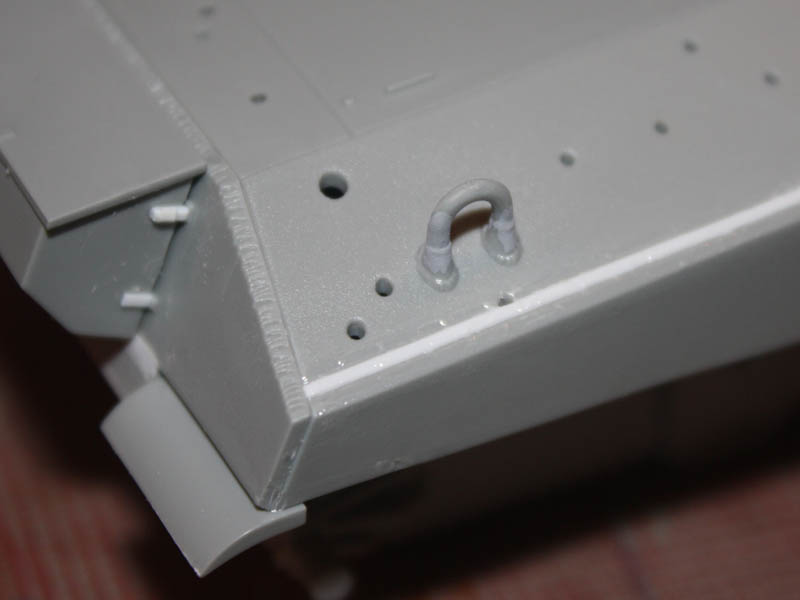
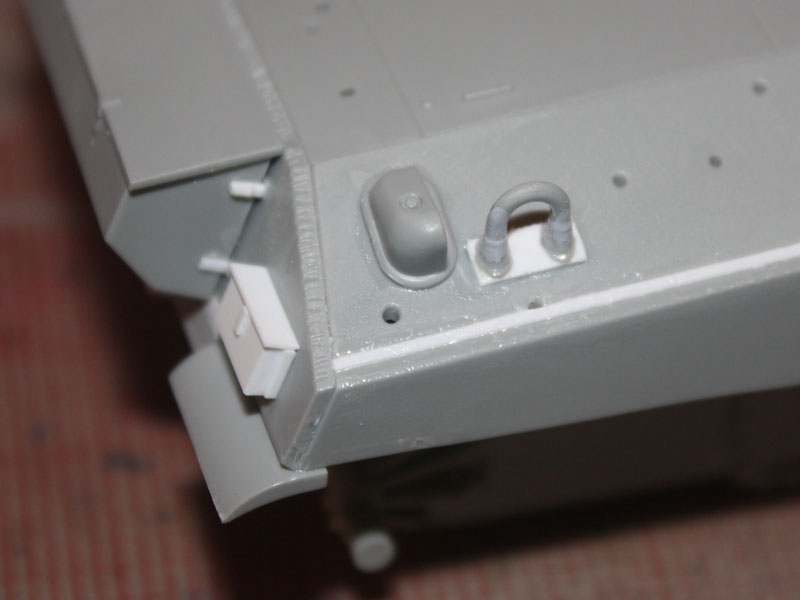


Then I added the grouser vent covers, and found the first offending peg holes to plug. I noticed in the pics that this tank does not have the mountings for a track spanner on the rear deck, so the holes and the round peg had to go.
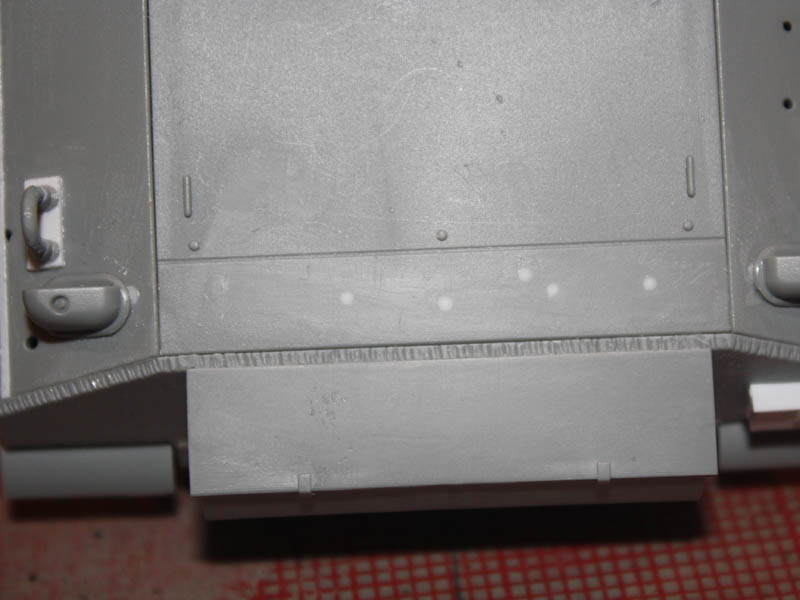


The fire extinguisher bottles either side of the lift rings needed a bracket – 0.010x0.040” strip to the rescue! As for the choice of tools, there are three of most in the kit, so I picked the ones that looked most like what I saw on the real one. Note that the two holes on the left shoulder of the hull are for cleaning rods specific to the Firefly version, and need to be plugged. Straps are lacking, as are the cleats to tie them down, so I made mine from 0.010x0.040” strip and 0.020” rod.
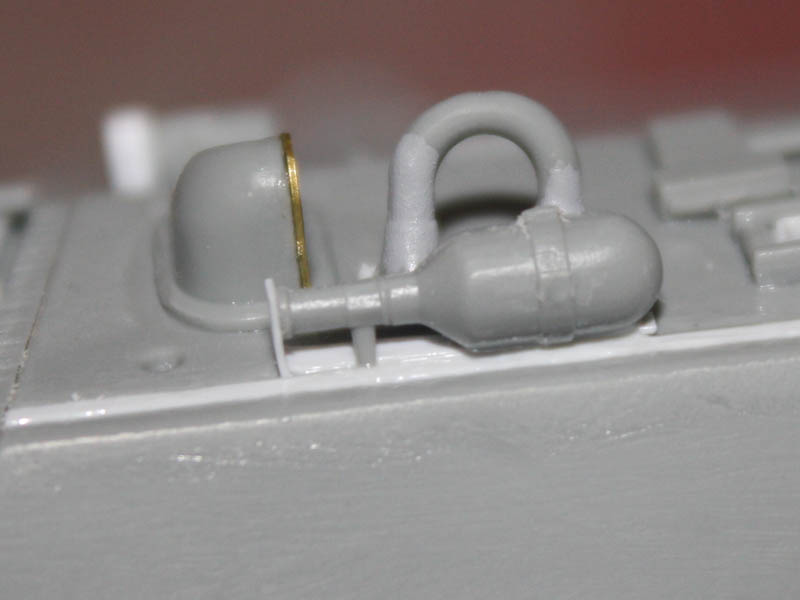
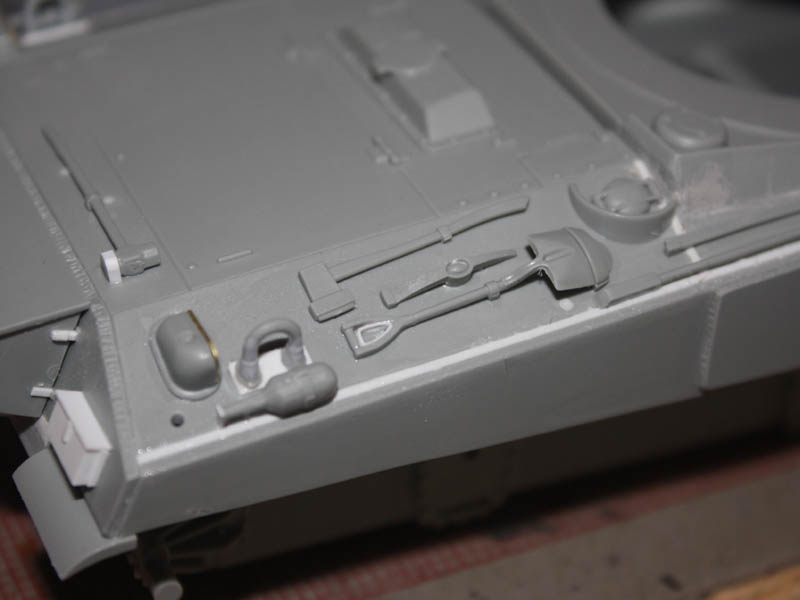
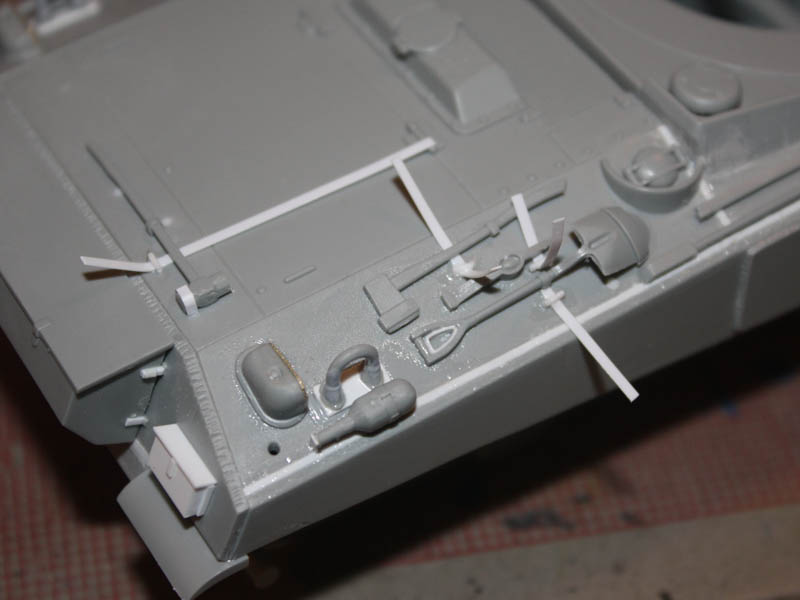
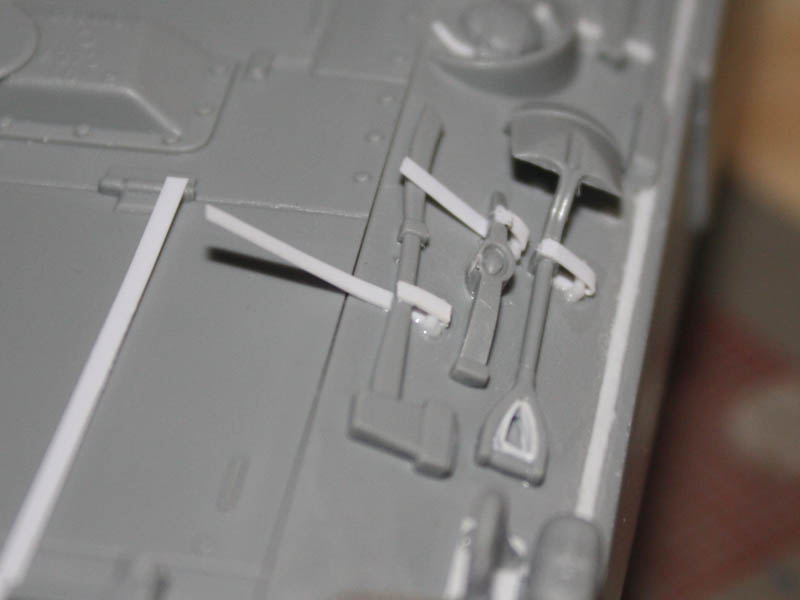
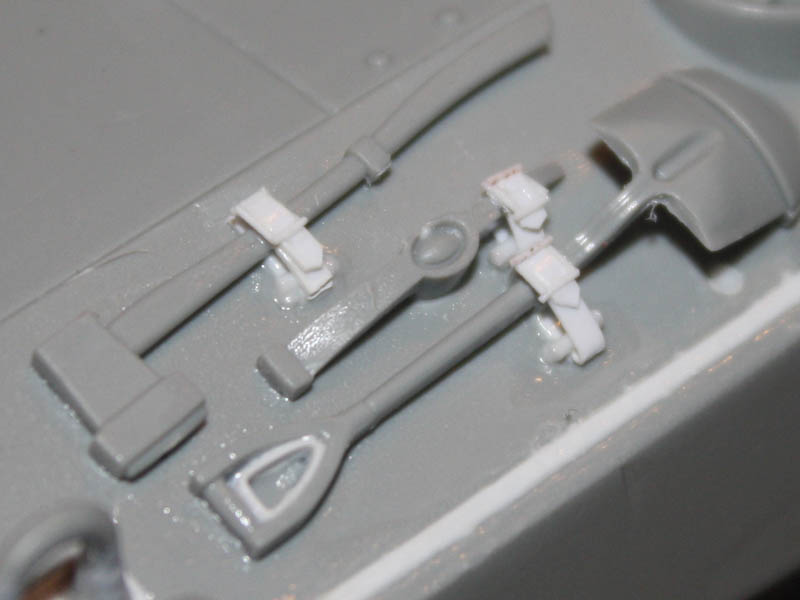


“Buckles” are a simple box of 0.010” rods glued onto the straps. They don’t stand up to microscopic scrutiny, but once painted they look good enough to my Mk.I eyeballs. Adding them is fun – I use the glue brush to pick them up, and an Optivisor to see what I’m doing…

Tom
barkingdigger
Staff MemberAssociate Editor
ARMORAMA
#013
Visit this Community
England - East Anglia, United Kingdom
Joined: June 20, 2008
KitMaker: 3,981 posts
Armorama: 3,403 posts
Posted: Monday, July 09, 2012 - 11:05 AM UTC
Part 6 – back to the front!

(Right, I've held off long enough waiting for the gallery to get sorted, but can't wait any longer - Photobucket to the rescue!)

Key items needed for the front included a rear-view mirror, so I scratched one up from a disc of 0.020” sheet cut with a leather punch (a £5 item intended for cutting holes in belts – the six different cutter sizes are very handy!) and some rod.


The spare track racks were a problem because all the links I had lacked the naked pins that stick out. So I had to scrounge some plain links from an Italeri kit, and painfully glue short lengths of rod into carefully-drilled holes before trapping them in the rack parts that came with the CH kit. After each rack was dry I trimmed and filed the rods to the same length and very carefully drilled holes in the ends. (AMS is a terrible disease…) The short rods on the headlight brush-guards are for the caps that close off the sockets if the lamps are removed.

Note that I had to hand-craft the blackout hood on the left headlight from a chunk of sprue because none of the Sherman kits on the market seem to come with these despite every wartime photo showing them!


The other item for the front is the tow cable, which I made from picture wire and attached “loose” without any clamps as per photos. The rear end was secured in a clamp made from plastic strip and a wingnut scrounged from an Academy kit. While I was back there I added tie-downs for a tarp. Since I anticipated these to be under tension as I secured a folded-tissue tarp I made them from brass wire hoops drilled through slivers of rod. Later I wove strips of paper through for the straps, but I found as I pulled them tight they tended to snap…


More to come!

Tom
barkingdigger
Staff MemberAssociate Editor
ARMORAMA
#013
Visit this Community
England - East Anglia, United Kingdom
Joined: June 20, 2008
KitMaker: 3,981 posts
Armorama: 3,403 posts
Posted: Tuesday, July 10, 2012 - 08:06 AM UTC
Part 7 – building the perfect turret…

As with the hull, Adrian’s turret has a unique combination of features that weren’t all in the box. For starters, it has a slight groove at the base where the undulating cheeks were machined into a circle for the turret ring – some work with a flat file soon added this feature.


Next up was the gun. I needed the early narrow M34 mantlet (without cheeks) and corresponding gunshield, but the kit only had the later wide M34A1 set-up. Fortunately I had an M4A2 under way (#6231) and it had the necessary bits. The shield was a bit angular and needed filing down to get smooth contours, and the lifting eyes were in the wrong place, but I fixed that soon enough. As the eyes were too thin and weedy I used some of the spare hull lifting eyes instead.


The gun shield was given casting marks, and then I noticed it sat too deep within the turret face compared to the real thing, so strips of 0.020” plastic were added to the back to get it standing proud.


The bomb-thrower on the roof needed to be deleted, so I plugged it with scrap rod and smoothed it away. Then came the casting marks on the top – again based on the real thing courtesy of a photo from Mr Barrell.

One of my favourite DML “funnies” is the way they designed the turret to fall off in both the forward and rearward positions! Naturally I couldn’t allow this, so made some adjustments to the mounting lugs so the turret can only come off in the rear-facing position.


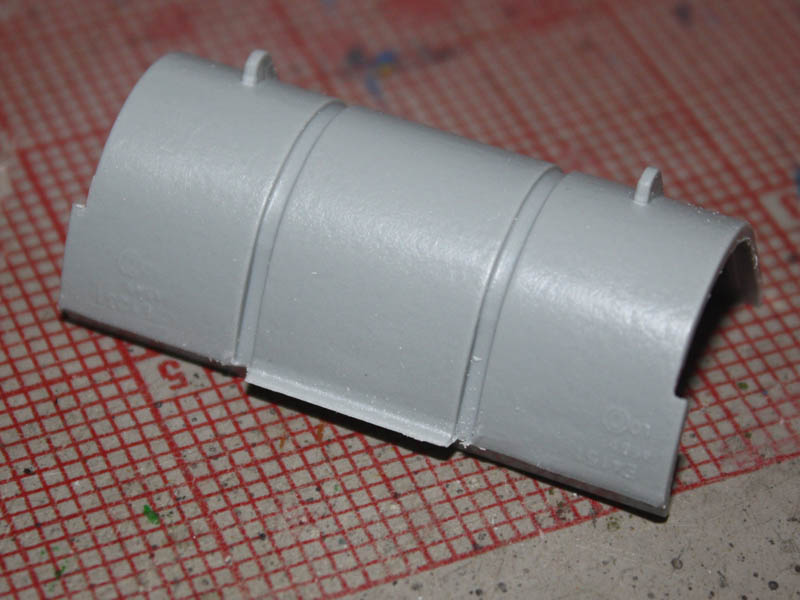
British Shermans often had stowage boxes on the rear, and this was no exception. Not having one handy, I scratched mine from 0.030” sheet (for strength – 0.020” is too thin and bends easily at the corners when glued), some 0.010x0.040” strip, and lots of bolts cut from hex rod. I used a copy of the Tasca sprue for size, having snapped one for a review ages ago, but wasn’t too worried about exact size because Mr Barrell admits in his restoration log that he just guessed from photos!


While I was at it I added the raised plate with bolts (another antenna mount???) and drilled the plate behind the hatch to accept an antenna mount. This I had to modify in order to add the British-style ring around it. I was worried about this, but with the right jig it was surprisingly easy! I sliced off a ring from some tube stock, and then drilled out the top of the mount (for a later aerial) which I slipped over a brass pin in some ¼” stock. The ring was tack-glued in place around it, and the four struts added from 0.020x0.030” strip. In retrospect I should have used thinner stock, but maybe next time…


On the right side I made some smoke launchers from 1/8” rod, 0.060” stock, and 0.010x0.030” strip. I added a thin wrap of tissue around the ends for the covers.


Then I added a base for a sun compass on the right in front of the hatch - a mark of desert service. A plug was also needed for the searchlight mount, next to the gunner's sight. Last but not least, I added wire tie-downs for a camo net from rolled crepe bandage secured with paper straps threaded through the ties. This all went well until the white glue was added, at which point the paper started to break! Another lesson…


By the way, this is the tarp on the hull side, from the previous stage:


Tom
patton76
Visit this Community
West-Vlaaderen, Belgium
Joined: December 01, 2002
KitMaker: 568 posts
Armorama: 528 posts
Posted: Tuesday, July 10, 2012 - 09:53 AM UTC
Tom,

I do love your build logs!

Terrific work!

Dave
barkingdigger
Staff MemberAssociate Editor
ARMORAMA
#013
Visit this Community
England - East Anglia, United Kingdom
Joined: June 20, 2008
KitMaker: 3,981 posts
Armorama: 3,403 posts
Posted: Tuesday, July 10, 2012 - 10:23 AM UTC
Hi Dave,

Thanks! Just a bit more to go, and then I hand it over to a friend who will paint & base it. (First time I've done the "collaborative" thing, so I'm excited and worried at the same time...)

By the way, any joy on finding those DML T54 tracks? I can let you have a set of the Italeri/Revell ones if all else fails. They aren't bad, but you do need to "pre-bend" them with heat to fit well on the sprocket & idler.

Tom
patton76
Visit this Community
West-Vlaaderen, Belgium
Joined: December 01, 2002
KitMaker: 568 posts
Armorama: 528 posts
Posted: Tuesday, July 10, 2012 - 12:38 PM UTC
Scary, sharing your work.

I actually haven't started my search yet, I'm leaving on holidays next week, so the charmer - balaclava project is something I'll start in August. I do like to assemble everything, so I can start it whenever I want.

But the Tasca kit for charmer hasn't arrived yet, I do already have the one for balaclava. I've got all the archer transfers and one set of lower wading stacks which I'll use for balaclava. I also have the canvas from TWS and Resicast for the gun mantlet.

I might add the full wading stacks on charmer, but I haven't decided yet. But that's easy to get.

Then, the only thing I need are those damn tracks.

In the meantime I'm trying to finish two fireflies I build sometime ago, a staghound and a Bren carrier. Also oldies that I'm trying to give some new life.

Dave
KurtLaughlin
Visit this Community
Pennsylvania, United States
Joined: January 18, 2003
KitMaker: 2,402 posts
Armorama: 2,377 posts
Posted: Tuesday, July 10, 2012 - 01:34 PM UTC
Hi Tom: For future reference to those following along in 2022 or whenever, the Circle-H casting logo is actually H-in-C, as it is the symbol for Continental Foundry & Machine, Hubbard Foundry. With the first generic Archer sets the C was depicted as a circle, but it is easy to repair with a sharp X-Acto. Also, the turret part number is D50878, not D50378. You can change it if so motivated, but it's not that visible. (All the sets that I worked on have correct markings.) Finally, you are correct, the markings for the center differential housing (the "carrier") were frequently at the very bottom, near the bottom bolt strip, and upside down relative to the normal tank orientation.

If it's not too late, thoroughly blend the gun shield and turret lift eyes into the main parts as they were cast in, not welded on. (This gun shield style, if not unique to M4A4s, was more or less standard for them.) When you get to the driver's hatches remove the counterbalance spring anchors on the hatch and hull and don't use the springs. Also, Adrian's tank does not have the hatch hold-open locks. I doesn't look like the kit has them and don't add them if separate parts.

HTH,
KL
barkingdigger
Staff MemberAssociate Editor
ARMORAMA
#013
Visit this Community
England - East Anglia, United Kingdom
Joined: June 20, 2008
KitMaker: 3,981 posts
Armorama: 3,403 posts
Posted: Tuesday, July 10, 2012 - 10:15 PM UTC
Hi Kurt,

Thanks for looking in! I was hoping to get some useful input from the Sherman community, because my main aim was to show the reasoning behind my choices.

I hear ya on the turret part number - it should be 50878, but given the size of the decals I decided it just wasn't worth the surgery. (Having used the incorrect number in the past, I found it wasn't actually noticable once painted/weathered...) Do you know if Archer are correcting it on reprints of the 88007 sheet? That H-in-C thing is useful to know! Again, I wonder if it is on the reprints? After all, I'll need some new sheets soon...

(By the way, do you know if Archer might want to do a new sheet with more pre-set part numbers that aren't on existing sheets? I'd love to see an "ultimate Sherman" set with all the possibilities.)

I've already spotted and left off the TC hatch hooks (the kit has them, but not the real tank!) and the hull hatch springs, which are sadly moulded onto the hatches - oh, what fun that was! As it's definitely not too late I'll do a bit more work on those lifting eyes - I can see now how they should look. More progress shots will come!

Regards,

Tom
KurtLaughlin
Visit this Community
Pennsylvania, United States
Joined: January 18, 2003
KitMaker: 2,402 posts
Armorama: 2,377 posts
Posted: Thursday, July 12, 2012 - 11:24 AM UTC

Quoted Text

Do you know if Archer are correcting it on reprints of the 88007 sheet? That H-in-C thing is useful to know! Again, I wonder if it is on the reprints? After all, I'll need some new sheets soon...

(By the way, do you know if Archer might want to do a new sheet with more pre-set part numbers that aren't on existing sheets? I'd love to see an "ultimate Sherman" set with all the possibilities.)


The sets available now are the ones that I worked with Woody to correct. They have my name printed on the decal sheet and have the correct symbols. (The picture of 88007 on the Archer site shows a draft revision and is not correct - I just checked the actual sheet and it is OK.)

I am working with Woody now on other Sherman and US tank sets. I think he is going to stick with a "two plus" format, where each sheet gives you complete markings (as groups) to do two tanks plus the ability to change the serials if desired. I pick the two tanks so there is as little duplication as possible, e.g. different turret foundries. So, you have other possibilities beyond what is shown in the instructions. This has worked well with the M4A3(76) HVSS and M4A3E2 sets. The advantage to the modeler is that somebody who only builds, say, M4A4s, or maybe just one Sherman in their life, doesn't need to get a giant ($$$) set with a ton of markings he'll never use.

BTW, do you see the black strips on the set? These can be cut to replicate the raised pads seen on some parts where data was stamped into the metal. See for example, the side of Adrian's gun shield, next to the other markings. They can also be used under other markings to simulate the raised areas someetimes seen.

KL
barkingdigger
Staff MemberAssociate Editor
ARMORAMA
#013
Visit this Community
England - East Anglia, United Kingdom
Joined: June 20, 2008
KitMaker: 3,981 posts
Armorama: 3,403 posts
Posted: Thursday, July 12, 2012 - 08:03 PM UTC
I was wondering what those black strips were for! (I needed more lateral thinking...)

I understand the idea of model-specific sheets, but I'd still prefer a single sheet that offered a few each of all the different drawing numbers for turrets, etc that would be useful on a range of builds. This is important to me because I frequently build oddbals etc. Another alternative would be a "drawing number" number-jungle sheet laid out with plenty of each letter and numbers 0-9 to allow custom markings that are a challenge with 88007. (For some reason the number 1 is rare on that sheet...)

By the way, my one huge design tip would be to leave more space around each item in the number-jungle! (I know the vehicle-specific sheets are much better at this...) Trying to cut out individual microscopic numbers is bad enough, but with them packed so close together it is a real challenge. I'd say add an extra half-millimetre between them to allow room for the knife without damaging adjacent numbers. (For each one cut out, I probably damage at least one neighbour...)

Tom
barkingdigger
Staff MemberAssociate Editor
ARMORAMA
#013
Visit this Community
England - East Anglia, United Kingdom
Joined: June 20, 2008
KitMaker: 3,981 posts
Armorama: 3,403 posts
Posted: Friday, July 13, 2012 - 07:39 AM UTC
Part 8 – bogies!

I detailed these with “asymmetric” skids typical of the early issue of the heavy bogies – these came from Tasca left-overs. On the top of the castings I drilled out the holes for the spring compressor access, and on several I added inserts from plastic rod to replicate the socketed plugs so often missing from real ones. (I could see them in one bogie on the right, and two on the left…) Then I drilled the four bolt holes in the front face of the casting, opposite the roller arm. Finally, with the skid in place I drilled the two holes in top on either side opposite the roller arm, and added more hex-rod bolt heads to the top and inside of the roller arm.


All the wheels are the solid-spoke variety, and I needed to ream out the axle holes because they were too tight. The solid idlers fit surprisingly well on their axle stumps – I thought these would wobble, but no. And I used the “fancy smooth” cast sprocket toothed rings up front. While I glued the bogie arms in the horizontal position to eliminate the “rocking horse” effect, the actual parts are only tack-fitted to the hull with a dab of CA glue for now so they can be broken off for painting. I wouldn’t have done so at this stage, except I needed to adjust the track lengths.

The tracks are T51 plain-block links from Tasca, which come in two strips per side. These are really nice, but are four links too short for an M4A4 hull. I sacrificed a second Tasca set for the missing links, gluing the extra runs on and then cutting them back to fit. This in fact uses six links because Tasca has two links of overlap at the joint. I carefully sliced the free end to half-thickness, and added a plate of 0.005” sheet under it to strengthen the joint. The sharp-eyed will notice that my spliced links are actually T48 rubber-chevron tracks with the chevrons sliced off, because that’s what I had to hand…


Note that the sprockets and idlers are loose to aid track removal and installation – I had to cut quite a chunk off the sprocket mounting pin because the old Italeri part is designed to pass through a hole in the transmission that isn’t there on the CH parts! As for the wheels, I resisted the AMS urge to add all those rivets around the wheel rims. That’s what “mud” is for…

Here is the beast as it stands, prior to painting. I haven’t bulked out the lifting eyes yet in these pics, but otherwise the build phase is complete. The plank and loose stowage come from the spares box to match what was on the tank when I saw it.


Tom
hofpig
Visit this Community
England - South East, United Kingdom
Joined: March 04, 2007
KitMaker: 1,330 posts
Armorama: 1,017 posts
Posted: Friday, July 13, 2012 - 08:07 AM UTC
Tom,

Fantastic work so far. It looks great.

Paul
Totalize
Visit this Community
Ontario, Canada
Joined: February 04, 2009
KitMaker: 743 posts
Armorama: 549 posts
Posted: Friday, July 13, 2012 - 09:37 AM UTC
Tom,

What a great build of an early Sherman V. Love your attention to detail on this one. Really looking forward to seeing some OD on her.

Regarding the front Towing eyes. The actual tank in the picture has the pads but yours does not. Are you planning to add them or not bother?

I haven't seen an early DV Sherman V modeled before so this is a real treat for me.
barkingdigger
Staff MemberAssociate Editor
ARMORAMA
#013
Visit this Community
England - East Anglia, United Kingdom
Joined: June 20, 2008
KitMaker: 3,981 posts
Armorama: 3,403 posts
Posted: Friday, July 13, 2012 - 11:48 AM UTC
Thanks guys! It's been a lot of fun checking all the pics and getting it as right as I can.

Dave, the front lift eyes have the pad moulded in, so I went with them. It's a bit narrrow for my liking now that I see it in photos, but I'll stick with them. On other builds I've done the whole business of adding plastic sheet...

Just got back from dropping it off with a friend, who will pass it to another friend to paint. He's going the whole hog with these new coloured primers etc, so I can't wait to see it myself! I'll post pics when he's done the deed. Our aim is to have it at our show on 4&5 August, as some sort of prize.

Thanks for watching!

Tom
ChrisDM
Visit this Community
England - South West, United Kingdom
Joined: January 01, 2010
KitMaker: 717 posts
Armorama: 697 posts
Posted: Friday, July 13, 2012 - 01:27 PM UTC
Tom this is some really superb modelling going on here

Love everything you're doing, but if I could ask?

Doesn't the old DML M4A4 have some serious dimensional issues with an overly long engine deck?

and also, I see you have done some lovely detailling on the bogeys (along with everything else) How about the three grease holes along the top of the part with the central pivots for the bogey arms?


And Kurt I have had a couple of sets of the Archer casting marks. some have been used as intended and others cut up and used on other things Thanks for working with Archer to produce a truly useful set handy for so many things. My kit detailing box would not be complete without a set
barkingdigger
Staff MemberAssociate Editor
ARMORAMA
#013
Visit this Community
England - East Anglia, United Kingdom
Joined: June 20, 2008
KitMaker: 3,981 posts
Armorama: 3,403 posts
Posted: Friday, July 13, 2012 - 10:30 PM UTC
Hi Chris,

Grease holes? Arrrggghhhh!!!!! (Yet another detail to add...)

As for the engine deck, it does look a bit long, but I've never measured it. I'll have to compare it to a Tasca kit at some point. The M4A4 is tricky because the deck was genuinely longer, and being plain it looks even bigger than it is, so without a ruler it can be deceptive.

By the way, despite my minor gripes I freely admit the Archer casting decals are the best thing to hit Sherman modellers in decades! I couldn't face a build nowadays without them. And Kurt's input has been invaluable - I've got his M4A3 set lined up for another build...

Tom
 _GOTOTOP