_GOTOBOTTOM
Constructive Feedback
For in-progress or completed build photos. Give and get contructive feedback!
M47 "Patton" tank of the Italian Army
Il_Colonnello
Visit this Community
Modena, Italy
Joined: March 08, 2012
KitMaker: 140 posts
Armorama: 140 posts
Posted: Friday, June 22, 2012 - 01:09 PM UTC
M47 "PATTON" tank of Italian Army

The new project that I put on my work table is the result of a promise I made to a dear girl-friend: a tank M 47 "Patton" of the 5th Tank Battalion "M.O. Chiamenti" at the barracks "Forgiarini" of Tauriano (PN) in the mid-70s.


My first idea was to present the Commander of Tank Battalion ready to march in the parade and carrying both the Commander, both the ensign-bearer with the War Flag.


But, for reasons of lack of time, I will'll be obliged to present the model on a simple base with varied terrain, but much more operative.


For this project I used the model of M47, manufactured by ITALERI, catalog # 6447, kit that has been corrected and reprinted better than the first product, to which I added a set of photo-etchings of EDUARD, catalog # 35718, the set of single tracks "all rubber " of AFV CLUB, catalog # 35037 and the turned aluminum barrel caliber 90/50 (for the M26 "Pershing" and so to modify) of JORDI RUBIO, catalog # JDR TG-34.


First, after eliminating both the few burrs of molding, both the very few signs of extractors, I assembled the bottom of the hull and the rolling train.


Particularly, I haven't mounted the track tensioner wheels because most of the Italian exemplaries don't had them.
I therefore closed the hole with a little slab made in Plasticard and fixed with bolts obtained with punch & die.


After, I fixed the reproduction of the engine, indeed a lot simplified (and that I will provide to improve as I always do, since it is the thing that I like to do more… ;o))). These details, however, I will do it later, before assembling the two parts of the hull.


To conclude the work on the hull, I fixed the rear plate, removing from it the lights and their protections. These plastic details will be replaced later with ones in photoetching.


Then I started working on the top of the hull with the first installation of the machine gun into casemate and the two sets of headlights, replacing the supports with those in photo-etching (their correct folding was revealed to be an half drama ...).


Fortunately, in reality these metallic profiles were very prone to warping from the blows that they took when the tanks were moving on varied terrain and they jostled obstacles…


After that, I clean the molding residue in plastic material from the cassettes for equipments positioned on the fenders, in which I have replaced the handrails provided by the company - which I consider to be too thick - with some plasticard rods of 0.3 mm diameter bent suitably at cold around the tips of a little forceps, it used also as a reference template.


I went on replacing also their plastic hinges printed on its with the correct ones and very realistic in photogravure, while I have not replaced the plastic handles of the locks provided by the company, because those in photoengraving are too "flat" and unrealistic.


Finally, I replaced the support for the external tools, placed on the the cassettes for equipments, with those in photogravure and I equipped it with all the tools they removing the plastic straps and the mounting brackets pre-printed on them and replacing them with ones very nice by set of EDUARD.


I have detailed both the driver's hatch, both that of the radio operator-gunner, replacing the plastic parts of the episcopes, the door handles and the locking levers with those in photoetched.


I replaced the tie rods of supports of the front fenders with plasticard rods of 0.3 mm - thinner than those provided by the company - and its blocks and turnbuckles tensioning with photoetched ones, much more realistic.


Despite the mufflers for exhaust gas are covered by their protective casing, after having assembled them, I have completed them with the building in scratch of the tubes that goes from the engine to them and replacing also the tubes of exhaust, (unfortunately, I have the syndrome "super detail"... I are very sick, I know this... but I cannot help it...)


Finally, as I have already done to the front hull, I replaced the tie rods, blocks and the turnbuckles tensioning of the rear fenders with plasticard rods and with the same details photoetched.


I then mounted the track links by the AFV CLUB company, T84E1t ype named "all rubber", comparing as their length with those provided by the company. In waiting for those in metal, maybe produced by Friulmodel, these are really good but they are rather delicate because the pins are very thin and break easily. In addition, the connectors come off quickly from the pins, making it difficult for them to use if do not have to paste them immediately on the train rolling. Sadly, I have been forced to sand the surface one by one to eliminate the signs of the extractors present on the inner face (182 links...)


Finally, here a test of the dry assembly of the two upper and lower hulls to control both the alignment of the wheels, both the space available for the tracks. The effect does not seem too bad...


For now I'll stop here. The earth continues to tremble here and finally much less and with minor shock, but the fear and discomfort are still present.
Now I need to do to reorder both my home and both my small workbench, with the hope that I and my wife we should not feel so bad more...
Greetings to all friends of Armorama and thanks again for your support.
Gianfranco
PS: In the coming days I want to devote a little of time to my other ongoing project - my Leopard - and finish at least the interior of the combat compartment. Then I'll see you soon on the other thread...
At the next time ...
Cheers
PantherF
Visit this Community
Indiana, United States
Joined: June 10, 2005
KitMaker: 6,188 posts
Armorama: 5,960 posts
Posted: Friday, June 22, 2012 - 01:40 PM UTC
THIS is nice. I have one but never seemed to get around to building it.

We need a PATTON Tank Campaign.

Will follow this now that you have my attention!


~ Jeff
mvaiano
Visit this Community
Sao Paulo, Brazil
Joined: January 24, 2012
KitMaker: 1,054 posts
Armorama: 1,050 posts
Posted: Wednesday, June 27, 2012 - 11:00 PM UTC
Hi Gianfranco !

Another great project with great skils.

I will follow for sure.

Cheers !

Marco
asmodeuss
Visit this Community
Quebec, Canada
Joined: November 19, 2011
KitMaker: 1,389 posts
Armorama: 1,388 posts
Posted: Thursday, June 28, 2012 - 01:32 AM UTC
You are a very sick man indeed
A contagious sickness.
Very impressive, thanks for sharing it with us!

Phil.
PantherF
Visit this Community
Indiana, United States
Joined: June 10, 2005
KitMaker: 6,188 posts
Armorama: 5,960 posts
Posted: Thursday, June 28, 2012 - 02:31 AM UTC
Rolled my kit out of deep storage ... must resist 'till after the Campaigns are over!

But will still keep in touch right here on your build.


~ Jeff
Nito74
Visit this Community
Lisboa, Portugal
Joined: March 04, 2008
KitMaker: 5,386 posts
Armorama: 4,727 posts
Posted: Thursday, June 28, 2012 - 03:13 AM UTC
Gianfranco I'm glad to see you on the workbench again !
Nice little project you have there !
vonHengest
Visit this Community
Texas, United States
Joined: June 29, 2010
KitMaker: 5,854 posts
Armorama: 4,817 posts
Posted: Thursday, June 28, 2012 - 03:28 AM UTC
This is why I don't buy older kits anymore, I get bogged down trying to add all the extra detail to them. Your Patton is looking good.
Il_Colonnello
Visit this Community
Modena, Italy
Joined: March 08, 2012
KitMaker: 140 posts
Armorama: 140 posts
Posted: Thursday, June 28, 2012 - 11:01 AM UTC
Hi guys,
thanks for the "psychological support" that you all are providing me for the realization of this project.
Despite the new box and the new catalog number, the kit is still the old one with some improvement but always with small errors and deficiencies unfortunately still present.
I hope that other manufacturers realized soon the other kits of this tank more complete, otherwise the modelers will always buy this kit and still continue to put his hand to punch & die and plasticard to complete one in a proper manner.

x Jeff: come on Jeff... get out your "Patton" and begins to assemble it, so we will work in pairs ... and this I think it's for us a great experience.

x Marco: I hope that you will like this project as same of my Leopard. I will put a good efforts this time to make a model at least decent, but when I will put the hands over my M47, after my other current projects, then yes I'll make a really super model.

x Phil: come on Phil... since you are also sick of my own illness, also you start to build your M47, so we are three to make models of this beautiful tank (who was the first tank with which I began my career as a tankman in 1978-79 before passing on the Leopard... and then, but so long ago ... miiii, as I am old ...).

x John: here the situation is still very critical and the tremors are still there, although they are much diminished both in number and in intensity. But the fear is still very high and is still very difficult to resume the old rhythms and habits. We hope that everything will end soon, because we cannot really more.

x Jeremy: you are quite right, but the kit of the M47 of the ITALERI is the only commercially decent, but it always needs a good set up to treat the details who are missing or are wrong. Unfortunately there isn't a kit of the last generation.
Patience ... and lots of filler and sandpaper!

But now we come to the good part ... the last works I did on my model.

How would you have guessed, I have decided to continue working on this project throughout the week, because I have to deliver it as soon as possible to my dear girl-friend who asked me... and I am already very late ....

Before closing the hull and move on to the next stage of the realization of the effect of merger on its armor, now I have to hunt for errors and lacks of the kit to correct them and make at least a discrete model (the next copy of this kit will be better and more complete) and so those who receive this M47 will be more happier.

First, I removed the bolts holding the sprocket to the drive wheel because they are too thin and undersized, for replace them with others that I have made with a hex punch & die.


Then, I added the missing bolts to the closure plates of the supports of the oscillating arms, using the same punch & die.


After eliminating the step that had formed between the back plate and the lower part of the hull, I added thecross-member cable guide folded that is located above the cassette of the phone, totally omitted from the company.


Then, I have added the three holes with Allen cap who are present on each group of final reduction of the driving wheels, which are also totally absent from the manufacturer's kit. At first glance, they appear a bit too big, but the excess plastic will then be removed at the time when I carry out the weld joints of the caps with pyrograph.


I have also added the two pairs of external bolts, that secure the groups of final reduction to the hull (omitted from the company as the other ...).


Finally, I added the two pairs of bolts that attach the crossbar to upper hull, who are missing in the model.


Now I stop working because here in the attic on the third floor is very hot - I have not yet installed the air conditioner because I had not obtained the permits provided until last week - and also because I have heard a slight shock ...
At next time ...
Cheers
Gianfranco
JPTRR
Staff MemberManaging Editor
RAILROAD MODELING
#051
Visit this Community
Tennessee, United States
Joined: December 21, 2002
KitMaker: 7,772 posts
Armorama: 2,447 posts
Posted: Thursday, June 28, 2012 - 02:47 PM UTC
Gianfranco,

Another amazing project! I look forward to your progress.

I have wondered what was the Soviet counterpart of the M-47, and how well the M-47 would have fared against it? I do not want the questions to highjack your thread, so perhaps any answers can go to a new thread?
PantherF
Visit this Community
Indiana, United States
Joined: June 10, 2005
KitMaker: 6,188 posts
Armorama: 5,960 posts
Posted: Thursday, June 28, 2012 - 09:37 PM UTC
Take it easy modeling in the heat. I did that as a youth as we didn't have Central Air but just a wimpy window unit in the kitchen ... that was way on the other side of the house from my room.

Your M47 is looking better and better each day so keep up the good work!


~ Jeff

Il_Colonnello
Visit this Community
Modena, Italy
Joined: March 08, 2012
KitMaker: 140 posts
Armorama: 140 posts
Posted: Thursday, June 28, 2012 - 09:52 PM UTC

Quoted Text

Gianfranco,

Another amazing project! I look forward to your progress.

I have wondered what was the Soviet counterpart of the M-47, and how well the M-47 would have fared against it? I do not want the questions to highjack your thread, so perhaps any answers can go to a new thread?


Hi Frederick,
thanks for the compliments.
Regarding your question, the project of the M47 was the natural evolution of last U.S. tanks born at the end of WW 2 to counteract the dominance of the new Soviet tanks JS-type 3 (tank which immediately made ​​a big impression on the U.S. DoW).
Therefore, the first target against which it would have to fight it was exactly the JS3, the Russian "new" tank of the post-war era, against which, however, was much better in almost all aspects (except in the armor).
The M47 at that time (mid-'50s, early '60s) was a beautiful tank, with some very advanced solutions to improve its powerfull and its mobility (a cannon powerful and very precise, an advanced rangefinder, excellent mobility on the terrain, thanks to a new transmission reliable and flexible, but with the problem of an engine much, indeed too thirsty for fuel. If he had a diesel engine of equal power and lower fuel consumption, would be the best of the best (certainly before the advent of last generation tanks...).
But the Russian designers weren't stopped, just for nothing, and they developed the second generation of their tanks to replace the JS3, whose ultimate expression was the "family" of T 54/T55 and their derivates.
In my opinion the M47, against of these latter tanks would played it on a par (we all know the problems of the T54/T55), always before the advent of the further new generation tanks (T62, T64 and T72).
Best regards - Gianfranco
P.S.: I apologize for my English, scholastic and very inaccurate. But I hope that it is understood, at least for the most important aspects.


retiredyank
Visit this Community
Arkansas, United States
Joined: June 29, 2009
KitMaker: 11,610 posts
Armorama: 7,843 posts
Posted: Thursday, June 28, 2012 - 09:53 PM UTC
I would recomend a paper mask, when modelling. The fumes do more than give you a body high.
Il_Colonnello
Visit this Community
Modena, Italy
Joined: March 08, 2012
KitMaker: 140 posts
Armorama: 140 posts
Posted: Thursday, June 28, 2012 - 10:23 PM UTC

Quoted Text

I would recomend a paper mask, when modelling. The fumes do more than give you a body high.


I know Matt, I know... the exhaust gases of tanks - and those of the glue - give addictive, but after so many years, now I cannot do more less of they... it's all part of the disease...
Il_Colonnello
Visit this Community
Modena, Italy
Joined: March 08, 2012
KitMaker: 140 posts
Armorama: 140 posts
Posted: Thursday, June 28, 2012 - 10:31 PM UTC

Quoted Text

Take it easy modeling in the heat. I did that as a youth as we didn't have Central Air but just a wimpy window unit in the kitchen ... that was way on the other side of the house from my room.

Your M47 is looking better and better each day so keep up the good work!

Jeff


Jeff, we have the same problems, and the same... disease.
Against to the too hot and against to the too much plastic there are a defense, but against our disease... nothing to do! Will we have to model up at the end...


Il_Colonnello
Visit this Community
Modena, Italy
Joined: March 08, 2012
KitMaker: 140 posts
Armorama: 140 posts
Posted: Tuesday, July 10, 2012 - 05:06 AM UTC
Hy guys,
this week I have been sick, so I'm a little late on my schedule but, despite this, I just finished the construction of my M47.
Here is the continuation of his WIP.

First, I have completed the hull with some details that they were not present in the kit.
After having performed the effect of melting on all surface of the tank with a mini drill, I added in particular two triangular extensions of the upper plate that were present in many tanks of ultimate production.


Then I added some triangular hooks of the rear plate scratchbuild that have not been provided by the company (probably due to the difficulty of molding) and I correct the lock of the support of anchorage of the gun, by adding a small plate on its closure and a metallic handle on the pins.


I also added some little plates welded to the hull and on the frames for ventilation, which allowed them to block the opening with a padlock.


I've also added the serial numbers in relief on the phone box, with the decals in relief produced by Archer for the Sherman - but easily adaptable to other tanks - very beautiful and very realistic.


Then I did the same on the front plate of the hull.


After the hull, I added to the side walls of turret first the gutters, profoundly etching the plate with an engraver to allow greater and more stable bonding surface and then applying a thin profiled"L" of the Evergreen.


I've also adapted the barrel of a gun 90/50 of Jordi Rubio for the M36, cutting its front tulip and on which I put in a copper tube of the correct diameter, scratchbuilding the two grommets and applying the suppressor-of- flame at "T "of the kit. I replaced on it even its front with a copper tube drilled properly, why that provided by the company was deformed and difficult to repair.


I've applied on both sides of turret all the details provided by the Eduard kit photoetched, very complete and well done. In particular, I have replaced the supports of cans of the kit with those photoetched and its relative belts, positioning on the one hand an Italian can, and no one on the other leaving the empty support.


At the front of the turret, I added two circular caps welded to the sides of the turret, missing in the kit, and I also replaced the hooks of the drape covers shield with those of Eduard photoetched. Unfortunately I could not replace the shield of the gun the kit with that produced by the "Italian Kits", complete with drape and which unfortunately it do not yet arrived me.


I also added the two transparent eyelids which protected the objectives of the telemeter using the photoetched to which I added two small sheets of clear acetate.


I replaced the rear cassette equipment hooks and its closure with those fotoinicisione, adding the rear hinges completely absent in the original kit.


On top of the turret, I added the serial numbers embossed with the decals of Archer, a great product.
Besides, I have replaced all the details of the original kit with those of Eduard photoetched, concerning in particular the M2 Browning and other details such as hooks, brackets, the frames of the episcopes of the tank commander and more.


I also modified the support of the Browning because it was missing the locking system, which I have homebuilt with a tube of Evergreen that I applied on it the lock knob and also adding the cap with chain for its closure.


Finally, here are two views of the finished model.
But now I have to another part very challenging ... its coloration and its aging and weathering...


Until next time – Gianfranco
Cheers
Nito74
Visit this Community
Lisboa, Portugal
Joined: March 04, 2008
KitMaker: 5,386 posts
Armorama: 4,727 posts
Posted: Tuesday, July 10, 2012 - 06:46 AM UTC
Amazing work Gianfranco !!!!
That is a fantastic work scratching and detailing the M47..

It is very impressive work ! Congratulations !!

I see that the Squadra Azzura latest result didn't affect your skills

They played a great tournament, but I miss Zola's Baggio & Maldini's generation..

Anyway keep up the great work !!

Ciao
vonHengest
Visit this Community
Texas, United States
Joined: June 29, 2010
KitMaker: 5,854 posts
Armorama: 4,817 posts
Posted: Wednesday, July 11, 2012 - 12:24 PM UTC
This is really turning into a nicely documented build log Gianfranco, seems more like a natural thing rather than AMS
Dangeroo
#023
Visit this Community
Zurich, Switzerland
Joined: March 13, 2009
KitMaker: 2,058 posts
Armorama: 1,656 posts
Posted: Wednesday, July 11, 2012 - 08:08 PM UTC
Great build, very inspiring! Please turn this into a feature article so we can easily find it for reference later. I have this one in the stash and always had a soft spot for it...

Cheers!
Stefan
Spiderfrommars
Visit this Community
Milano, Italy
Joined: July 13, 2010
KitMaker: 3,845 posts
Armorama: 3,543 posts
Posted: Wednesday, July 11, 2012 - 08:25 PM UTC
Great job here!

congrats indeed, you're a master!
mvaiano
Visit this Community
Sao Paulo, Brazil
Joined: January 24, 2012
KitMaker: 1,054 posts
Armorama: 1,050 posts
Posted: Wednesday, July 11, 2012 - 11:32 PM UTC
Another great work Gianfranco!

Fantastic. You really "like to do more" and you are a master!

Cheers !

Marco
Il_Colonnello
Visit this Community
Modena, Italy
Joined: March 08, 2012
KitMaker: 140 posts
Armorama: 140 posts
Posted: Monday, July 16, 2012 - 10:34 PM UTC
Hi all guys,
I apoligize for the delay in response to you, but in the last two weeks I have not been well.
Despite this, the work on my M47 was continued on my bed to respect the commitment made and the model was finished and given to my girl dear friend.
Sorry me for the last images of the tank painted and wheatered not yet present here because these are still on the camera of my friend Gianluca (a big master in photography), who came to collect and to deliver the model to my friend, but I will post them here soon.

Anyway, I am ready to build two models of M47, one for me, so I'll continue to post more pictures of them while I build them and so I can integrate this thread with other pictures more specific and detailed.
Until next time - Gianfranco
PS: At the end of this week I go on vacation for 10 days with my wife in Slovenia to fish with fly but then, on my return, I will return a lot to work on my "poor" Leopard, abandoned and alone .... ;o))) and the end of September is near ... very near ... too near ...;o(((
Il_Colonnello
Visit this Community
Modena, Italy
Joined: March 08, 2012
KitMaker: 140 posts
Armorama: 140 posts
Posted: Wednesday, October 03, 2012 - 10:15 PM UTC
Hy guys,
finally it's up to one of my model to be published on the website of the Association of Modelers to whom I am one.
So you can see the result of my work, photographed in a professional manner thanks to my dear friend Gian Luca Cocchi.
Unfortunately, due to time constraints, we were not able to photograph it after it had been painted and aged, but soon I will ask to borrow it at the friend to whom it was given and then, with Gian Luca, we will take photos of the tank finished to complete this article.
Meanwhile I hope that they will like it and, of course, any comments, advice or criticism are always welcome.
Here's the link: http://www.masterminiatures.it/gal/m47-patton.php
Ad majora - Gianfranco
Redcap1960
Visit this Community
United Kingdom
Joined: April 02, 2012
KitMaker: 23 posts
Armorama: 21 posts
Posted: Thursday, October 11, 2012 - 06:37 AM UTC
Gianfranco,

Fantastic piece of work, can't say enough about it. However, I have a question which you may be able to help me with. I have been researching a model I wish to build of an Italian M47 as used by the Carabinieri during the early 1960's. Would you know if they differed in any way from the one you have built. Further, I have had big problems trying to trace down an accurate colour scheme and markings for these tanks. Would you know of any sources I could go to to answer these questions? Once again brilliant build, concrat's

Gary
JPTRR
Staff MemberManaging Editor
RAILROAD MODELING
#051
Visit this Community
Tennessee, United States
Joined: December 21, 2002
KitMaker: 7,772 posts
Armorama: 2,447 posts
Posted: Thursday, October 11, 2012 - 03:27 PM UTC
Gianfranco,

Simply an outstanding thread of an outstanding build! Thank you for this.

I also thank you for explaining the M-47 vs IS-3 and T-54/55 family. It seems that many assessments from the 1970s and 1980s dismissed the Patton series as very inferior to Soviet tanks I have not read any new histories of the Cold War tanks so I am grateful that you took the time to give your experience.

A model question: the gutters on the turret -- to channel rain away? Why were these attached?

Gianfranco, thank you again for this article!
Il_Colonnello
Visit this Community
Modena, Italy
Joined: March 08, 2012
KitMaker: 140 posts
Armorama: 140 posts
Posted: Monday, October 15, 2012 - 05:54 AM UTC

Quoted Text

Gianfranco,

Fantastic piece of work, can't say enough about it. However, I have a question which you may be able to help me with. I have been researching a model I wish to build of an Italian M47 as used by the Carabinieri during the early 1960's. Would you know if they differed in any way from the one you have built. Further, I have had big problems trying to trace down an accurate colour scheme and markings for these tanks. Would you know of any sources I could go to to answer these questions? Once again brilliant build, concrat's

Gary


Hi Gary, thanks for the compliments but the model is not well just as I would wanted to it, because there are some inaccuracies that I will take off by my next M 47.
Regarding the question you did to me, unfortunately there are few sources available from which to take photographic information, but I can tell you that all the tanks assigned to the "Battaglioni Mobili" of the Italian Carabinieri, were tanks of series and so they have no difference with those in use at other Armed Forces.
This was also true for the color, which was the same as all other means of our Armed Forces.
As only differences, they had numbers of the various units (STANAG), like any other military vehicle, and permission to show the symbol of the company and the roman numeral of the platoon painted on the turret. Other signs and license plates are the same as those painted on all Italian armored vehicles and placed in the same positions.
In particular, only two battalions of the Carabinieri who had the tanks (the Sherman first, then the M47 and finally the Leopard), was the VII° Battaglione Mobile CC "Trentino Alto Adige", stationed in LAIVES (near BOLZANO) and XIII° Battaglione Mobile CC "Friuli Venezia Giulia", stationed in GORIZIA.
These are the only pictures that I managed to recover. I hope they are still useful to you.
Best regards


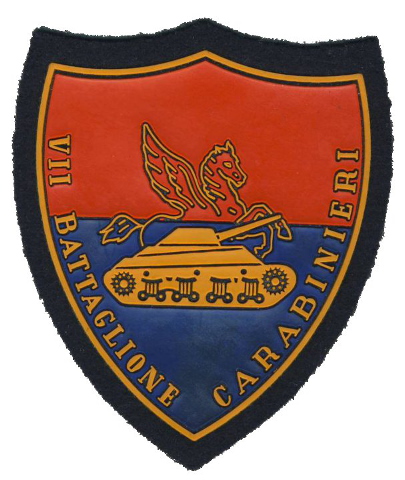
The insigna for the arm for the uniforms of the Carabinieri of VII° Battaglione Mobile CC with the colors red and blue (the same of all the units of the Armoured Corps of Army) on which is shown the silhouette of the tank topped by that of the Pegasus, symbol of the Reparti Mobili of the CC.


M 47 of the VII° Battaglione Mobile CC in training at fire on the Polygon of the river Meduna-Cellina.


The crew of the same M 47 of the VII° Battaglione Mobile CC in training at fire.


The other Battaglioni Mobili CC of the Carabinieri have the M113, which cooperated with the tanks of the VII° and XIII° Battaglioni Mobili CC. Here's one of them in training on the Polygon of the river Meduna-Cellina.


A model of the M47 of the XIII° Battaglione Mobile CC of the Carabinieri, with behind his STANAG identifier.
 _GOTOTOP