New York, United States
Joined: March 08, 2010
KitMaker: 3,662 posts
Armorama: 3,078 posts
Posted: Wednesday, December 05, 2012 - 02:15 AM UTC
Hey Keith check out this link for more pictures of 008
http://www.ss501panzer.com/index.htm So I finally started on my Tamiya KT step 1

Then I get to Step 4 and I realize that I am missing the right side rear fender piece

I checked the spare parts box and all my other Tiger kits and can only find is a Tiger 1 piece

So my appeal goes out to the great guys here does anyone have a spare 1 or can they give advice on how to make 1, I'm not much of a scratch builder

Active Campaigns on the bench:
Operation Fall Gelb - Pz.Kpfw. IV Ausf. C
Engineering the Future - M-26 Recovery Vehicle
115 Campaigns completed
Quebec, Canada
Joined: November 19, 2011
KitMaker: 1,389 posts
Armorama: 1,388 posts
Posted: Wednesday, December 05, 2012 - 02:50 AM UTC
You could use styrene sheet and wire to replicate or do a banged one
Just my 2 cents. And we would love to see some scratch hehe!
Phil.

Modeling...
I rest my case.
Ontario, Canada
Joined: March 25, 2010
KitMaker: 514 posts
Armorama: 261 posts
Posted: Wednesday, December 05, 2012 - 02:28 PM UTC
Here is the requested photo, a poor quality. Hard to get a clear one with a point and shoot. Each sprue has two small triangles, no ides what they are for. No instructions thus no ides what they are for. Put there for a reason, reason unknown. It is located between the tracks right against the sprue. As previously noted another person could not fathom a purpose for them.

CMOT
 Editor-in-Chief
England - South West, United Kingdom
Joined: May 14, 2006
KitMaker: 10,954 posts
Armorama: 8,571 posts
Posted: Wednesday, December 05, 2012 - 03:05 PM UTC
While I cannot really see could they be guide horns for the track? Only other suggestion is did the Germans have something they could add to the tracks for extra grip?
Quebec, Canada
Joined: November 19, 2011
KitMaker: 1,389 posts
Armorama: 1,388 posts
Posted: Thursday, December 06, 2012 - 01:12 AM UTC
Have I seen some ice cleats that looked like that?...Maybe.
Modeling...
I rest my case.
Utah, United States
Joined: May 27, 2003
KitMaker: 1,026 posts
Armorama: 654 posts
Posted: Thursday, December 06, 2012 - 02:40 AM UTC
I know--they're Zimmerit applicators!

Build 'em better than the box art!
Utah, United States
Joined: May 27, 2003
KitMaker: 1,026 posts
Armorama: 654 posts
Posted: Thursday, December 06, 2012 - 06:24 AM UTC
Love Handles!
As in: I really enjoy making grab bars and hatch handles. And headlight wiring conduit.


Keith
Build 'em better than the box art!
New York, United States
Joined: March 08, 2010
KitMaker: 3,662 posts
Armorama: 3,078 posts
Posted: Thursday, December 06, 2012 - 09:43 AM UTC
Ok guys my problem has been solved

I will be attempting to model KT 332 which is hear in the states and I have found this photo of the rear of 332 as the Americans were loading it onto a trailer

both of the rear flaps were missing as well as some sections of the side skirts
So here is where I am at now

road wheels are assembled jut not on yet and hull is dry fit to the lower


as you can see in the original photo the tow cable is a little twisted so i heated it a bit and gave it a twist
I also added a piece of wire for the light

hopefully i will get more done later tonight
Active Campaigns on the bench:
Operation Fall Gelb - Pz.Kpfw. IV Ausf. C
Engineering the Future - M-26 Recovery Vehicle
115 Campaigns completed
Maine, United States
Joined: February 11, 2011
KitMaker: 1,654 posts
Armorama: 1,565 posts
Posted: Thursday, December 06, 2012 - 11:02 AM UTC
John...You color looks good to me,what did you use for a mix?
Sal...Can I say it looks good, NOW ? Cause it does

I'm also glad you solved your missing parts problem.
Keith... Handles look good,Man.I think that adding them is the most easy and cheap thing to do to inprove a model.Don't forget to drill out your hatch cover lift tube

If I can do it in 1/72,I know you can do it
Jeff T.
The building lamp is lit.Build'em if you got'em.
United States
Joined: February 01, 2009
KitMaker: 1,233 posts
Armorama: 557 posts
Posted: Thursday, December 06, 2012 - 11:57 AM UTC
Keith---great work on those handles. Its amazing how much more realistic they look when you do a simple super detail job like that. Very cool.
Sal--Good call on fixing the fender problem. Most of the pictures I have seen, half of 'em are either bent, shot off or non-existent. Thats a great B&W pic you posted.....really portays the badass lines of the Royal Tiger.
Regards, Ian
It is a fact that under equal conditions, large-scale battles and whole wars are won by troops which have a strong will for victory, clear goals before them, high moral standards, and devotion to the banner under which they go into battle.
-Georgy Zhukov
New York, United States
Joined: March 08, 2010
KitMaker: 3,662 posts
Armorama: 3,078 posts
Posted: Thursday, December 06, 2012 - 12:34 PM UTC
Hey Jeff and Ian thanks for the complements, wait a minuet there Jeff T. is that piece suppose to be hollow if so I will have to go drill mine out
Active Campaigns on the bench:
Operation Fall Gelb - Pz.Kpfw. IV Ausf. C
Engineering the Future - M-26 Recovery Vehicle
115 Campaigns completed
Ontario, Canada
Joined: March 25, 2010
KitMaker: 514 posts
Armorama: 261 posts
Posted: Thursday, December 06, 2012 - 05:16 PM UTC
As for the tracks, they are not guide horns, could be ice cleats though very small. Wish that they gave instructions. The photos on the box do not show them installed, nor their drawings.Will check their web site. thanks for the assistance. Hobby Boss has removed them from their web site, no longer available.
Maine, United States
Joined: February 11, 2011
KitMaker: 1,654 posts
Armorama: 1,565 posts
Posted: Friday, December 07, 2012 - 09:59 AM UTC
Quoted Text
Hey Jeff and Ian thanks for the complements, wait a minuet there Jeff T. is that piece suppose to be hollow if so I will have to go drill mine out
Sal,heres the only pic I can find showing the tube in question.It's just barely in the pic on the right hand side ,middle

It's on a JagdTiger,which I'm building,but should be the same for a KT, I think.Can anybody help with this?
From what I understand,the crew inserted a crowbar to help them lift the cover because it was so heavy
Jeff T.
The building lamp is lit.Build'em if you got'em.
Queensland, Australia
Joined: October 02, 2008
KitMaker: 658 posts
Armorama: 629 posts
Posted: Friday, December 07, 2012 - 10:50 AM UTC
Sal
I appreciate the artistic licence involved in twisting the cable, but in reality the real thing was about 32mm thick, and consequently VERY unlikely to twist!
Regards
Rob
Queensland, Australia
Joined: October 02, 2008
KitMaker: 658 posts
Armorama: 629 posts
Posted: Friday, December 07, 2012 - 10:54 AM UTC
Jeff
Regarding the engine hatch lifting handle - you're quite correct. Given that the hatch was 40mm armoured steel, the crew could definitely have needed the crowbar to lift it. My back hurts just thinking about lifting it without some lever assistance!
Regards
Rob
United States
Joined: February 01, 2009
KitMaker: 1,233 posts
Armorama: 557 posts
Posted: Friday, December 07, 2012 - 11:34 AM UTC
Started on my Dragon Royal Tiger last night. Wheels are on and I got the chassis weighted with lead weights and modelling clay and then test fitted the upper hull. I forgot what a great kit this is and the hull fit seems very good. I will be using the 18-tooth sprocket wheel for this one too.
Regards, Ian


It is a fact that under equal conditions, large-scale battles and whole wars are won by troops which have a strong will for victory, clear goals before them, high moral standards, and devotion to the banner under which they go into battle.
-Georgy Zhukov
New York, United States
Joined: March 08, 2010
KitMaker: 3,662 posts
Armorama: 3,078 posts
Posted: Friday, December 07, 2012 - 03:56 PM UTC
Active Campaigns on the bench:
Operation Fall Gelb - Pz.Kpfw. IV Ausf. C
Engineering the Future - M-26 Recovery Vehicle
115 Campaigns completed
Queensland, Australia
Joined: October 02, 2008
KitMaker: 658 posts
Armorama: 629 posts
Posted: Friday, December 07, 2012 - 06:18 PM UTC
Sal
No, probably just me . . . How on earth did they manage that, I wonder?!!!
Regards
Rob
Ontario, Canada
Joined: March 25, 2010
KitMaker: 514 posts
Armorama: 261 posts
Posted: Saturday, December 08, 2012 - 01:35 AM UTC
Sal that tube at the rear of the deck is for the radio mast extensions.
Maine, United States
Joined: February 11, 2011
KitMaker: 1,654 posts
Armorama: 1,565 posts
Posted: Saturday, December 08, 2012 - 01:16 PM UTC
Rob and Sal... Ha,so I was right about the lifting tube

I like it when I'm right.Doesn't happen very much any more.
About the cable,they will do that if they are loaded to the point of almost breaking.It looks as if at some point in time it was wrapped around something and REALLY worked.
Ian... Nice work Dude,You should think about adding a wading kit to it though,cause if it needs to cross any water,with all that weight, it's goin' to the bottom
Next up,got some more paint work done.
WHO SAYS YOU CAN'T BRUSH PAINT TAMIYA? 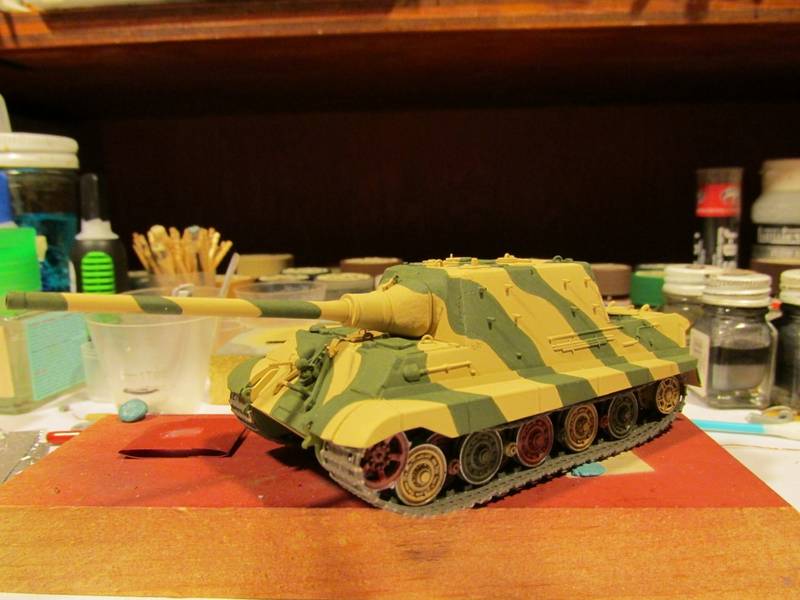

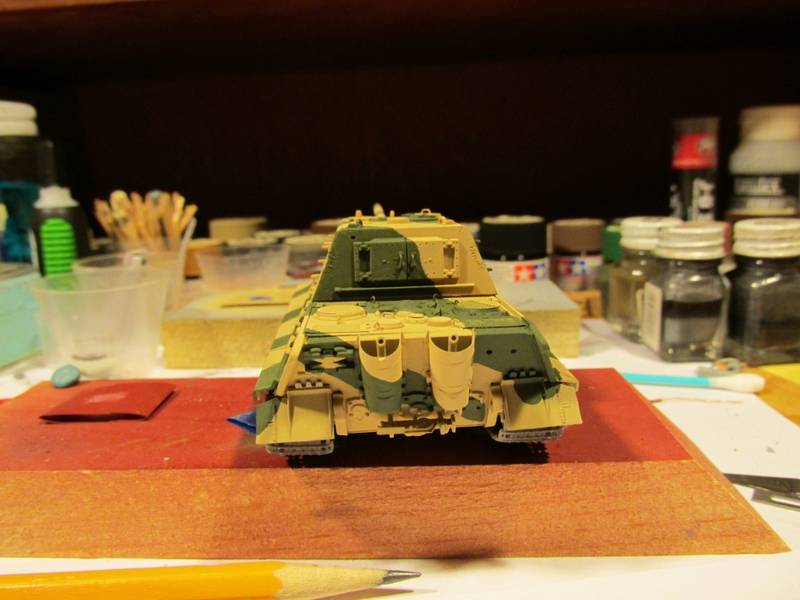
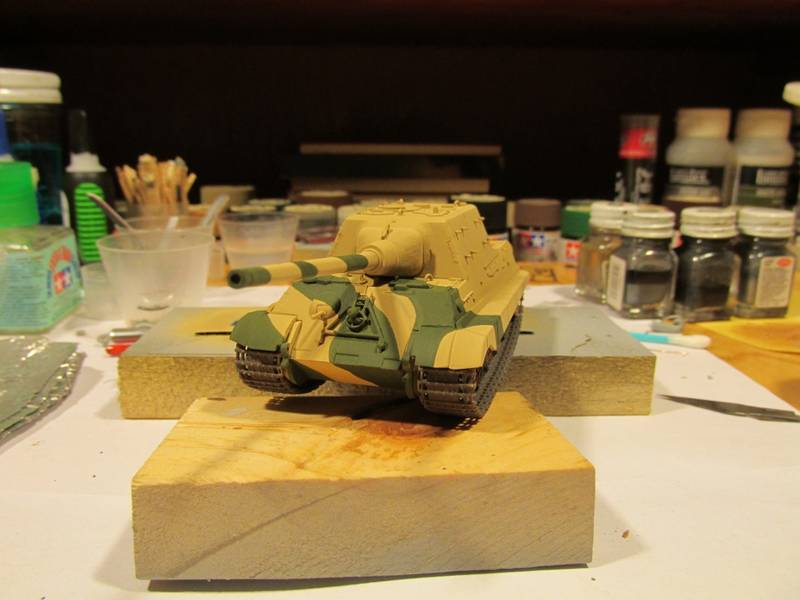
Any questions?
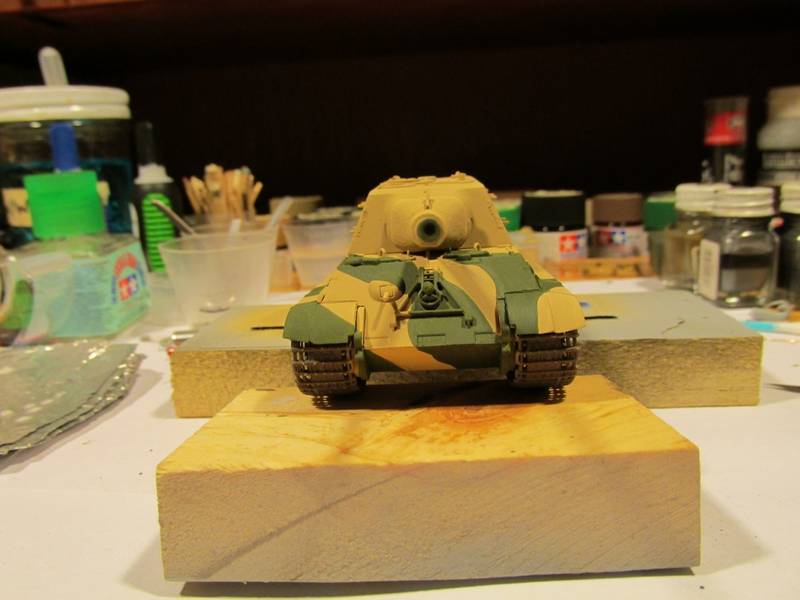
Didn't think so
I think it came out pretty well.All comments welcome.Jeff T.
The building lamp is lit.Build'em if you got'em.
United States
Joined: February 01, 2009
KitMaker: 1,233 posts
Armorama: 557 posts
Posted: Saturday, December 08, 2012 - 01:24 PM UTC
Looks good Jeff. Like a tracked metal house with a 5 inch gun in it. No wonder the power trains in those things gave out so often. My KT may sink to the bottom but you can bet all the wheels will be resting on the tracks.
Best wishes, Ian
It is a fact that under equal conditions, large-scale battles and whole wars are won by troops which have a strong will for victory, clear goals before them, high moral standards, and devotion to the banner under which they go into battle.
-Georgy Zhukov
Maine, United States
Joined: February 11, 2011
KitMaker: 1,654 posts
Armorama: 1,565 posts
Posted: Saturday, December 08, 2012 - 01:51 PM UTC
Quoted Text
Looks good Jeff. Like a tracked metal house with a 5 inch gun in it. No wonder the power trains in those things gave out so often. My KT may sink to the bottom but you can bet all the wheels will be resting on the tracks.
Best wishes, Ian
Ian..You're right on both counts Bub
Mine kind of reminds Me of a Hollywood Starlett."a little top heavy"

Jeff T.
The building lamp is lit.Build'em if you got'em.
CMOT
Editor-in-Chief England - South West, United Kingdom
Joined: May 14, 2006
KitMaker: 10,954 posts
Armorama: 8,571 posts
Posted: Saturday, December 08, 2012 - 02:21 PM UTC
I have given Tom the go ahead to build his Trumpeter Kit 378 Gechutzwagen Tiger fur 17cm kanone 72(sf)for this campaign so there will be a very large vehicle being built here as well.
New York, United States
Joined: March 08, 2010
KitMaker: 3,662 posts
Armorama: 3,078 posts
Posted: Saturday, December 08, 2012 - 03:15 PM UTC
Quoted Text
Rob and Sal... Ha,so I was right about the lifting tube I like it when I'm right.Doesn't happen very much any more.
About the cable,they will do that if they are loaded to the point of almost breaking.It looks as if at some point in time it was wrapped around something and REALLY worked.
WHO SAYS YOU CAN'T BRUSH PAINT TAMIYA?
All comments welcome.Jeff T.
Jeff, the tube was drilled out so it dont matter what it was used for but its hollow now
Nice job with the Tamiya paints did you thin them out if so what did you use
and how coats did that take


Active Campaigns on the bench:
Operation Fall Gelb - Pz.Kpfw. IV Ausf. C
Engineering the Future - M-26 Recovery Vehicle
115 Campaigns completed
Utah, United States
Joined: May 27, 2003
KitMaker: 1,026 posts
Armorama: 654 posts
Posted: Saturday, December 08, 2012 - 06:52 PM UTC
@Sal--Thanks for the link to the pics. It will definitely come in handy. Your KT is looking good, twisted cable and all.
@Jeff T.--Lift tube hole is all drilled out. For a 'boring' task it was kinda fun.

And nice work on the camo job. That is one big vehicle!
@Ian--interesting use of weights, I was wondering what you were up to. At first I thought you were replicating the tonnage in scale! Now I know what you were doing. I've laid medium sized books on the top of mine to do the same thing.
Lots of great work all around. I've participated in lots of campaigns, but this is my first 'group build' and it is interesting to see many if us at the same stage, and very cool to hear the advice being shared (such as on the lift tube drilling).
Thanks Everyone!,
Keith
Build 'em better than the box art!


