_GOTOBOTTOM
Armor/AFV: Braille Scale
1/72 and 1/76 Scale Armor and AFVs.
Hosted by Darren Baker
Neubau-Fahrzeug No. 3-5
tread_geek
Visit this Community
Ontario, Canada
Joined: March 23, 2008
KitMaker: 2,847 posts
Armorama: 2,667 posts
Posted: Monday, July 02, 2012 - 09:10 AM UTC
Greetings Everyone!

IF many will recall I did a partial build review of the NbFz No. 3-5 some time ago.


For those that haven't seen it you can find the review HERE.

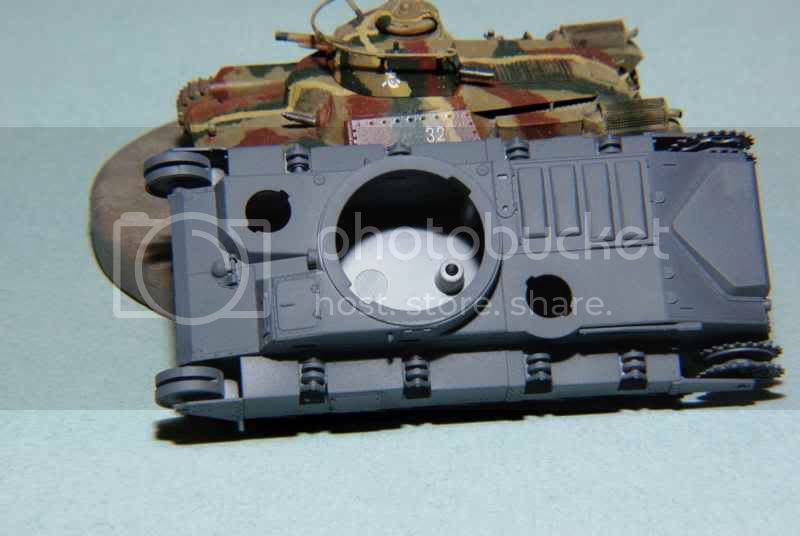
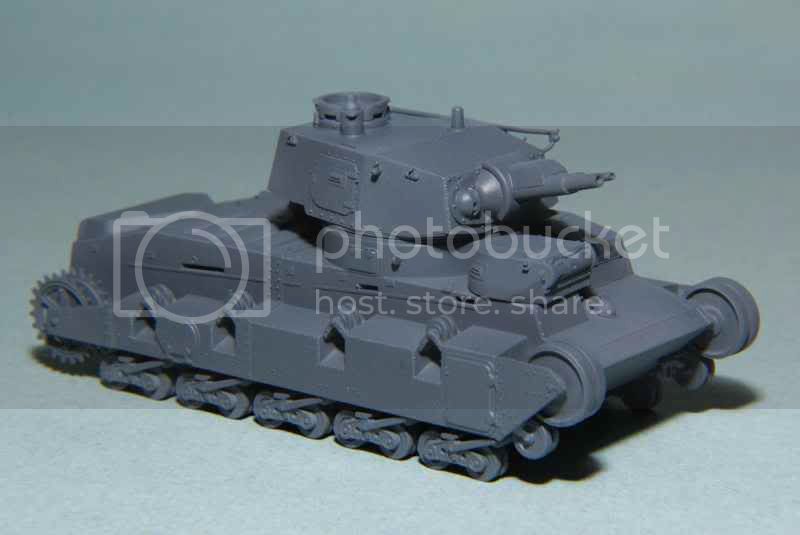
I've entered this beast in the Armour Between the Wars campaign so have started making some progress on completing it. As I mentioned in the review there is only one hole on one side of the lower turret ring for a small light but none on the other. You'll need to determine a good location for it and then drill out a hole for the second light.

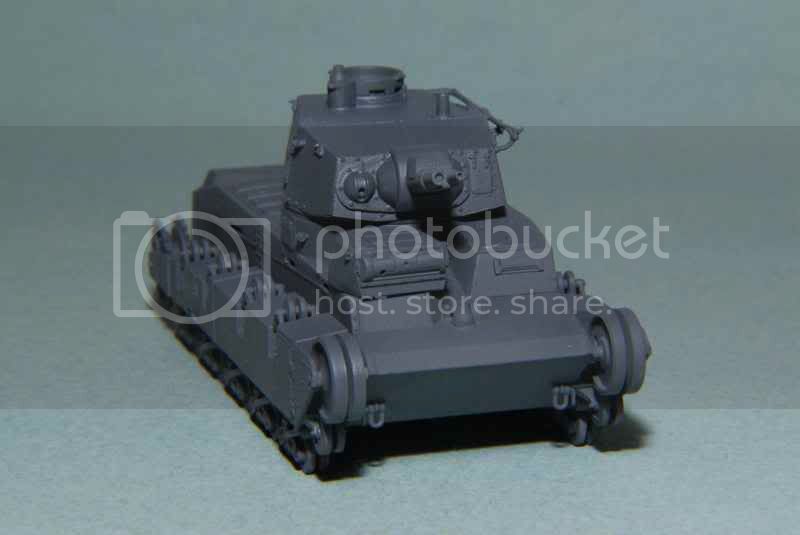
Hole on the left side.


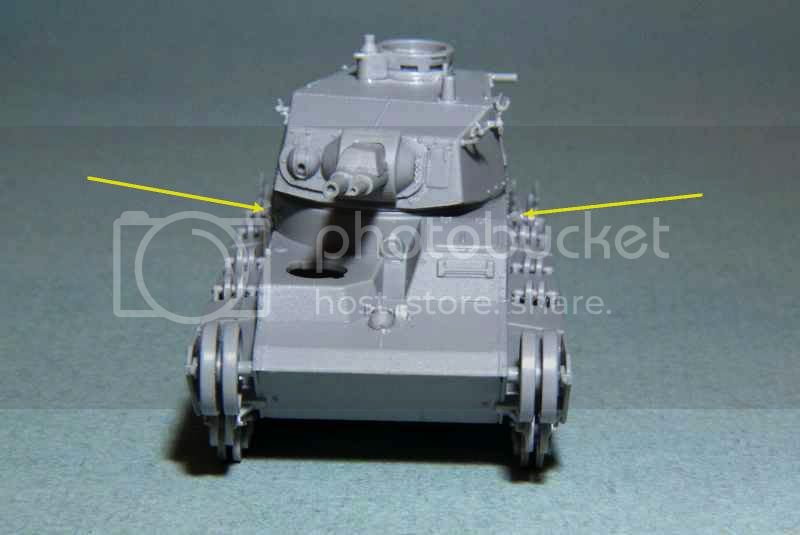
Hole drilled on the right side for the light.


The arrows in the image below show both lights attached.


Next you'll see a side view with the left light glued. Also shown is part A29 that I noted in the review is almost microscopic in size. This particular part has been knocked off at least four times while handling the beast.You'll need some super fine jaw tweezers to hold this thing.


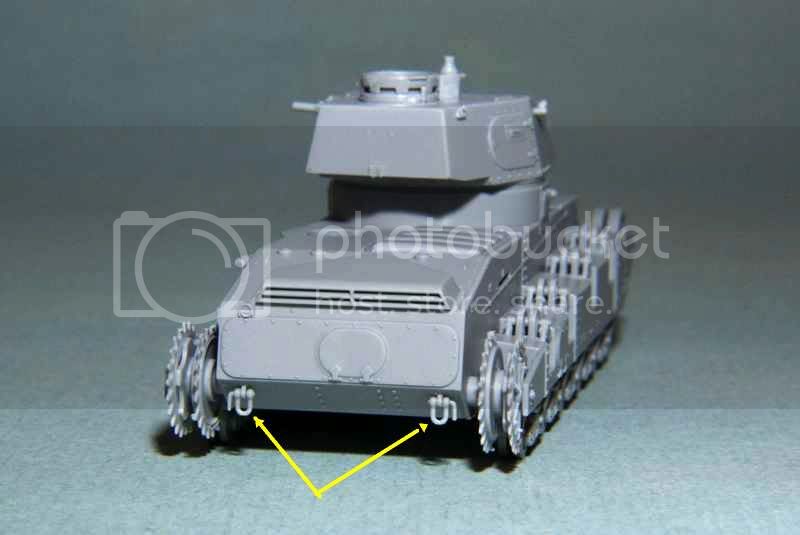
The towing shackles are also quite small but surprisingly beautifully detailed.


With that done I turned my attention to completing the last small pieces for the antenna on the main turret. Most pictures of this beast all show it in the stowed position so that's how I posed mine. WARNING - the hole in the mounting stub is far too shallow for the antennas mounting pin. You'll need to drill it down about a half millimetre. Here it is mounted.


One further warning is that all those dinky parts on the turret and hull easily break off. I had a few happen when handling the tank so you need to be doubly vigilant about where you hold things with you're fingers.

Cheers,
Jan
vonHengest
Visit this Community
Texas, United States
Joined: June 29, 2010
KitMaker: 5,854 posts
Armorama: 4,817 posts
Posted: Monday, July 02, 2012 - 11:25 AM UTC
Good man Jan, keep it coming!
BBD468
Visit this Community
Texas, United States
Joined: March 08, 2010
KitMaker: 2,465 posts
Armorama: 2,383 posts
Posted: Monday, July 02, 2012 - 01:03 PM UTC
Sweet little build Jan! I have the 1/35th scale. Ill follow your progress. Looking good.

Gary
sabredog
Visit this Community
Western Australia, Australia
Joined: July 22, 2007
KitMaker: 607 posts
Armorama: 599 posts
Posted: Monday, July 02, 2012 - 01:09 PM UTC
Picked up my kit last month and looking forward to starting once our house guest leaves shortly and gives us back our hobbyroom
weathering_one
Visit this Community
Ontario, Canada
Joined: April 04, 2009
KitMaker: 458 posts
Armorama: 456 posts
Posted: Monday, July 02, 2012 - 01:23 PM UTC
Jan,

Very glad to finally see this one continued. I've ordered one of these but it's been almost two months and still no sign of it. I will be watching this closely. Some of those parts like the little lights and such look intimidating.

Regards,
AJ
vonHengest
Visit this Community
Texas, United States
Joined: June 29, 2010
KitMaker: 5,854 posts
Armorama: 4,817 posts
Posted: Monday, July 02, 2012 - 01:28 PM UTC

Quoted Text

Jan,

Very glad to finally see this one continued. I've ordered one of these but it's been almost two months and still mo sign of it. I will be watching this closely. Some of those parts like the little lights and such look intimidating.

Regards,
AJ


I lost that little light at least 5 times. After finding it the last time I promptly dropped a bead of glue on the hull and planted the light face first into it.
SHAKY962
Visit this Community
Buenos Aires, Argentina
Joined: May 21, 2012
KitMaker: 765 posts
Armorama: 438 posts
Posted: Tuesday, July 03, 2012 - 07:06 AM UTC
Excellent start Jan...
I will follow your advances with special interest (I have the same kit and this is viewing me.....)
tread_geek
Visit this Community
Ontario, Canada
Joined: March 23, 2008
KitMaker: 2,847 posts
Armorama: 2,667 posts
Posted: Tuesday, July 03, 2012 - 07:31 AM UTC
I must say that I have been a bit surprised by the interest this "New Fabrication" has generated. My appreciation to all those that took the time and effort to comment.

@BBD468 - Gary, construction wise I believe that you might have an easier time with some of the smaller pieces than us Braille builders but I hope that some observations in this Blog may apply to any scale.

@Sabredog - Michael, I presume that you will be doing a single colour version as you have proved to be an expert in that area. While I didn't have a problem with it you might wish to watch the way the main turret base attaches to the main body. I have read a few comments at some sites that it's proved a bit of a problem.

@AJB - Don't let my warnings scare you, just take your time with your build and perhaps start your own Blog here also. It's always good to see a kit done from a different perspective.

@SHAKY962 - Thanks Jose. I hope that something in this posting will save you some trouble when it comes time to build yours.

===============================================================================

Most things that can be attached to the NbFz's body at this stage have been and it was time to lay down some base paint. It became quickly apparent that this was going to be a different exercise and experience. While not that much larger than some medium tanks, all the angles and curves on this beast meant that it might just soak up paint.

Normally a Sherman sized tank in this scale takes about 1/4 of my airbrush's paint cup. More by accident than design, I ended up preparing almost 2/3 of a cup but figured I'd put any remaining back into a bottle for later. The bottom line was that just doing the body and turrets left NOTHING! All those little nooks and crannies on the body just gobbled up the paint as there's a lot more surface area than I originally appreciated.

For anyone building this beast there is another thing to keep in mind. Unless you never want to pose the small turrets in anything other than a fixed position, you will need to file or sand out the openings as the fit without paint is tight and even more so with a thin layer. I painted the four individual pieces separately and when I tried to attach the turrets this became very evident.

Here's were it stands at the moment.


As I want to do the two colour version this may really be an interesting exercise in painting. Then there is still the fenders and a few other eternal parts to paint and attach and I don't even want to think of painting all those tiny roadwheels. This is going to take some creative thinking of what to do at what point. From the last picture you can see that the slide-moulded main guns bore is not very deep. Looks like I'll have to drill it out a bit more.

Until later,
Jan
sabredog
Visit this Community
Western Australia, Australia
Joined: July 22, 2007
KitMaker: 607 posts
Armorama: 599 posts
Posted: Tuesday, July 03, 2012 - 01:56 PM UTC
Jan

I checked the fit on Saturday and it looks good from these initial fittings. Time will tell.

I am tempted to do the dark brown/panzer grey scheme, but this monster sitting next to an early STuG III on the shelf keeps popping up in my mind.

Braille
#135
Visit this Community
California, United States
Joined: August 05, 2007
KitMaker: 1,501 posts
Armorama: 1,485 posts
Posted: Tuesday, July 03, 2012 - 07:21 PM UTC
@tread_geek – Jan,

From your close-up photographs I can see the delicate textured weld seams on both the turret and hull. This attention to detail is usually only found on the larger scale models as are the crisp surface details on the parts so for me this is a step in the right direction for Dragon. I have to say that this is a strange looking vehicle somewhat of a cross between a battleship and a WWI and WWII tank. I’ll keep dropping in to check on your progress.

Like Gary I too have a copy of this vehicle in 35th scale from Amusing Hobby and it is loaded with a ton of detail and with all of the planned projects that I have in store to do and those in progress to complete it will be a while before I get around to putting mine together so I’m thoroughly enjoying your build.

~ Eddy
tread_geek
Visit this Community
Ontario, Canada
Joined: March 23, 2008
KitMaker: 2,847 posts
Armorama: 2,667 posts
Posted: Thursday, July 05, 2012 - 09:14 AM UTC
@sabredog - Michael, I've had my eye on the second version from the top of the five colour schemes they offer. It's the one with a memorial inscription painted on the turret back commemorating the first crewman lost during the Norwegian campaign. It appears that the two colour scheme was only used with units sent there.

@Braille - Thanks for dropping by and having a look, Eddy. Yes, the weld seems are very nicely done, if perhaps a bit oversized. I'd say that these multi-turreted monsters are great for catching attention and perhaps generating lively conversation. Have a look at the picture below to see what I mean, it's from a show by a local club last year. And yes, it IS 1/72.


It's I believe a T-35 and is a resin offering. It one first in it's category and best armour of the show.

Cheers,
Jan
sabredog
Visit this Community
Western Australia, Australia
Joined: July 22, 2007
KitMaker: 607 posts
Armorama: 599 posts
Posted: Friday, July 06, 2012 - 01:42 AM UTC
Should be able to get back to the hobby room after this Saturday, so might start my kit as well. Love that T-35 as well. Be nice if that was released in injected plastic!
tread_geek
Visit this Community
Ontario, Canada
Joined: March 23, 2008
KitMaker: 2,847 posts
Armorama: 2,667 posts
Posted: Friday, July 06, 2012 - 04:00 AM UTC
Michael,

If you are going to start one of these, why not join several of us Braille builders in the Armour between the Wars Campaign. Besides myself, Jeremy (vonhengest) is building this NbFz and Erhan (erhntly) has built a Russian OT-130.

While the T-35 is not available in injection (yet) there are several resin ones around. As luck would have it, one maker of these huge Soviet tanks is in your neighbourhood. Ostmodels located in Tasmania has several multi-turreted Soviet tanks in both 1/76 and 1/72. They list the T-35 at $45. You can find information and pictures on the Henk of Holland site.


Cheers,
Jan
sabredog
Visit this Community
Western Australia, Australia
Joined: July 22, 2007
KitMaker: 607 posts
Armorama: 599 posts
Posted: Saturday, July 07, 2012 - 02:11 PM UTC
Thanks Jan, I might indeed join that campaign

I know of Ostmodels, his product is good but patchy ordering has made me resist a bit.
tread_geek
Visit this Community
Ontario, Canada
Joined: March 23, 2008
KitMaker: 2,847 posts
Armorama: 2,667 posts
Posted: Monday, December 03, 2012 - 08:46 AM UTC
It's been a while but I finally set some time aside to work on the NbFz 3-5. I started the latest camouflage attempt using successive "washes" of red-brown. Got a little tired of that and decided to tackle the running gear rubber. What a mistake! For those that haven't counted, there are 44 road wheels and 16 return rollers. To say the least, it took quite a while.


For some reason the camera lightened the grey but the red-brown is fairly close. So far the splotches are the result of three coats and I figure it'll take another one or two to get it more even.

Cheers,
Jan
weathering_one
Visit this Community
Ontario, Canada
Joined: April 04, 2009
KitMaker: 458 posts
Armorama: 456 posts
Posted: Monday, December 03, 2012 - 01:04 PM UTC
Wow, Jan, I forgot about this one! Does this mean the Pak is suspended? I never would have counted all the wheels but that is enough to challenge anyone's sanity. Glad to see this interesting beast again.

Regards,
AJ
tread_geek
Visit this Community
Ontario, Canada
Joined: March 23, 2008
KitMaker: 2,847 posts
Armorama: 2,667 posts
Posted: Tuesday, December 04, 2012 - 05:05 AM UTC
@weathering_one - AJ,

The PaK project is not suspended but will have to share my free time with this and a couple of other builds. The NbFz and a Panther D have a slightly higher priority at the moment as both are entered into campaigns that finish at the end of this month.

================================================================================================

Progress in the form of two steps forward and one step back. I thought that it was wiser to do most of the painting before putting the fenders on but I forgot that I'd only painted the underside of them. Obviously this is going to cause some issues with other areas when I do the top of the fenders.

Anyway, the important thing for those building one of these is that the tracks on my kit were a bit too short. Nothing that a bit of gentle stretching wouldn't solve. However, the way the tracks join is far from the best and will lead to a very weak joint as the contact area is barely 1 mm wide by about 3.5 mm long. This joint broke on the left track when I tried to put it on so I used gap filling CA glue to join the other track.

Another issue appears to be the fenders as their fit is rather loose and floppy, hence the use of a clamp to hold it in place in the photos below. Here's where the right side stands at the moment.


The trick is to glue the fender from about just behind the front most return roller, all the way back. The area forward of the return roller needs to be glued later to get a proper fit to the hull.

As I'm doing the separate Blog in the Braille Forum of the Dragon PaK 40 w/ Gun Crew and building the 1/72 figures that come with it, I thought it might be interesting for people to see the NbFz with a figure (figure is just primed) to give a measure of the size of this beast.


Now on to repairing the broken track and putting the other fender on.

Cheers,
Jan
tread_geek
Visit this Community
Ontario, Canada
Joined: March 23, 2008
KitMaker: 2,847 posts
Armorama: 2,667 posts
Posted: Wednesday, December 05, 2012 - 04:46 AM UTC
I did a bit of checking (measuring) and it turns out I stretched the left track a bit too much. By removing a few links I shortened the track and also had two clean and even ends to work with. Tamiya Extra Thin glue was used and while the left track was drying I proceeded to finish the right fender.

Here we see the right fender area with the various associated pieces attached. Note the small triangular shaped plate at the bow that was also added. Canadian and US 1 cent pieces for scale (diameter .75 inch (19.05mm)).


Close ups of the muffler area pieces and their orientation.


The larger two mufflers/exhausts (A35) fit quite well with a couple of pin in hole locating features. A plate with bolt heads on one side (A27) just sits between two vertical alignment ribs. The auxiliary engine exhaust (A34) has a very light attachment feature and should not be placed before the main exhaust is on and secure.

Next instalment will be the completion and attachment of the left fender.

Cheers,
Jan
BBD468
Visit this Community
Texas, United States
Joined: March 08, 2010
KitMaker: 2,465 posts
Armorama: 2,383 posts
Posted: Wednesday, December 05, 2012 - 05:14 AM UTC
Nice work Jan, that thing is so tiny! Keep it comin' man!

Gary
firstcircle
Visit this Community
England - South East, United Kingdom
Joined: November 19, 2008
KitMaker: 2,249 posts
Armorama: 2,007 posts
Posted: Wednesday, December 05, 2012 - 05:59 AM UTC
Jan, nice to see your continuing dedication, while at the same time making me slightly uncomfortable that I still have Dragon's third incarnation of this beast to pull out of the cupboard and write up. I will ensure that I refer to your experiences carefully... and see if I can think of a cunning plan to avoid painting the tyres! They ARE meant to be rubber, are they? Just noticing the box art kind of makes them look like the rest of the vehicle.
tread_geek
Visit this Community
Ontario, Canada
Joined: March 23, 2008
KitMaker: 2,847 posts
Armorama: 2,667 posts
Posted: Wednesday, December 05, 2012 - 06:57 AM UTC
{b]@BBD468[/b] - Gary,

I appreciate you droping by and commenting. Ah, come on, this beast is positively HUGE!


@firstcircle - Matthew,

It's funny that you should mention about the rubber issue because I happened to run across some pictures of the NbFz remains at a Norwegian museum. I was researching colouring of those vehicles before further painting and accidentally ran into this (For Discussion Purposes Only):


In my mind it clearly shows a strip of rubber. Now for the clincher, this is the front idler! Here is an enlargement from my box top. The arrows point out the rubber sections.


Obviously I missed the fact that the idlers also had a more modest thickness of rubber on them. Looking at the instructions it is also evident that they have the colour of the wheel rims called out as Model Master 1749 Flat Black. Of course, depending on which version your model represents, some of this *might* be different (although I somewhat doubt that)! So unless you want to coat the entire suspension area in an obscuring coat of dust, you'll have to bite the bullet...and I've got four more wheel rubber areas to paint (bringing the total to 64). I wonder how many the count would be on a Churchill!

Cheers,
Jan
tread_geek
Visit this Community
Ontario, Canada
Joined: March 23, 2008
KitMaker: 2,847 posts
Armorama: 2,667 posts
Posted: Thursday, December 06, 2012 - 10:20 AM UTC
Okay, with the exception of the machine gun barrels, this three headed monster is finally built. I've done some shade variations on the grey areas and the rest of the brown camo is next. I also still need to paint the rubber on the front idlers, but that can wait for the moment.


The only warning I have for a builder is to watch that the track teeth fit into the slot between the front idlers. The slot isn't quite wide enough and should have been widened a touch. I had already glued the fenders before I saw mine weren't wrapped tightly around the wheels. Fixing it was a pain as the area under the fender is quite tight.

Cheers,
Jan
firstcircle
Visit this Community
England - South East, United Kingdom
Joined: November 19, 2008
KitMaker: 2,249 posts
Armorama: 2,007 posts
Posted: Thursday, December 06, 2012 - 12:12 PM UTC
A rubber tyred idler... well... it's good they built these things for comfort at least, even if not to be so easy to paint when the need arose decades later to represent them in plastic.

It is an unusual looking monster, I'm thinking it would be nice to have a couple of accompanyng figures to show off the size.

I don't suppose you'd mind dropping in the link for this Nordic museum to save me the trouble of looking for it, would you please Jan? Thanks!
tread_geek
Visit this Community
Ontario, Canada
Joined: March 23, 2008
KitMaker: 2,847 posts
Armorama: 2,667 posts
Posted: Friday, December 07, 2012 - 04:13 AM UTC
@firstcircle - Matthew,

The pictures are from a fellow that visited the Gudbrandsdal Krigsminnesamling - Museum and was gracious enough to post them on his Photobucket account. You can find his gallery at Neubau-Fahrzeug Images. Just to "wet your whistle" further, have a look at this one (you can definitely see the rubber).


According to what the fellow wrote, the story goes that this tank was immobilized by a 25mm anti-tank rifle and then destroyed by the crew. According to two of my books, the tank bogged down in a stream bed after returning from an action to repel the British forces that landed at Andalsnes. While trying to free it, it suffered a catastrophic engine failure. A lack of recovery equipment and spare parts and the fact that it was blocking the way of following vehicles caused the crew to blow it up.


Quoted Text

It is an unusual looking monster, I'm thinking it would be nice to have a couple of accompanyng figures to show off the size.

.

As you might know, I am currently also working on a Blog building the PaK 40 w/ Gun Crew. Are you suggesting that I take a picture with one of those figures or perhaps a Russian Marine or two?

Cheers,
Jan
weathering_one
Visit this Community
Ontario, Canada
Joined: April 04, 2009
KitMaker: 458 posts
Armorama: 456 posts
Posted: Friday, December 07, 2012 - 08:19 AM UTC
Jan, that beasty is really taking shape. I too would be interested to see a picture of this one with a scale figure or something that we might be familiar with. Can't wait for more progress pictures.

Regards,
AJ
 _GOTOTOP