Campaigns
Where Armorama group builds can be discussed, organized, and updates posted.
Panzer 38(t) Campaign
vanize
Visit this Community
Texas, United States
Joined: January 30, 2006
KitMaker: 1,954 posts
Armorama: 629 posts
Posted: Thursday, July 04, 2013 - 08:22 AM UTC
fantastic work on yours, panzerbob! I hope mine comes out nearly so well.

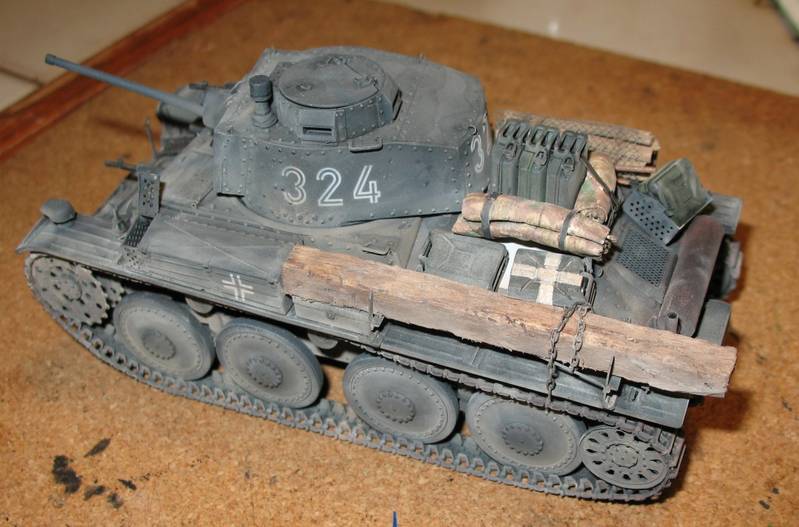
here is my current state of affairs with my Tristar 38(t):


no real challenges so far other than having to be careful to line up the suspension straight.
vanize
Visit this Community
Texas, United States
Joined: January 30, 2006
KitMaker: 1,954 posts
Armorama: 629 posts
Posted: Sunday, July 07, 2013 - 08:09 AM UTC
And lots of progress this long 4th of july weekend:


I am very worried about how weak the rear idler wheel attachment points are, but that won't matter once the tracks are on - so i won't glue the idlers on until then. Good thing these are not the band style tracks - no way they would stand up to even a little tension.

other than that, the difficulty lining up the suspension straight, and having to tweak the main gun barrel mounting a bit to get it to shoot strait, the kit is lovely and a quick build.
GregCloseCombat
Visit this Community
California, United States
Joined: June 30, 2008
KitMaker: 2,408 posts
Armorama: 2,394 posts
Posted: Monday, July 08, 2013 - 10:04 AM UTC
Nice progress Vance


1/48 Tamiya Hetzer: I did some washes and streaking. Then sponge chipped some more panzer grey on the barrel. Detail painting/touch ups to do still then the pigments


vanize
Visit this Community
Texas, United States
Joined: January 30, 2006
KitMaker: 1,954 posts
Armorama: 629 posts
Posted: Wednesday, July 10, 2013 - 03:30 AM UTC
wonderful work on the worn white-wash, greg!
vanize
Visit this Community
Texas, United States
Joined: January 30, 2006
KitMaker: 1,954 posts
Armorama: 629 posts
Posted: Thursday, July 11, 2013 - 12:10 PM UTC
dry-brushing and sludge wash done + decals:


and yes, i realize there was most likely no 4th platoon for whatever unit during the invasion on France, but I like the number and it could be made from the kit decals... and it is actually possible that there was...
jet
Visit this Community
Alberta, Canada
Joined: December 30, 2002
KitMaker: 306 posts
Armorama: 295 posts
Posted: Thursday, July 11, 2013 - 01:48 PM UTC

Quoted Text

Vance;

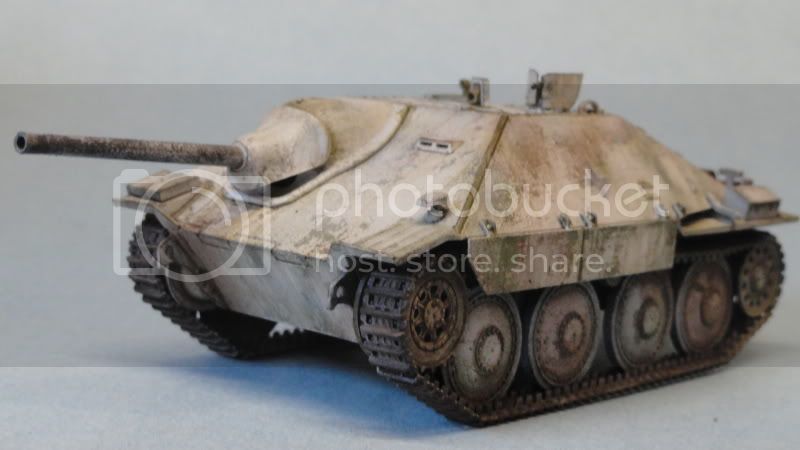
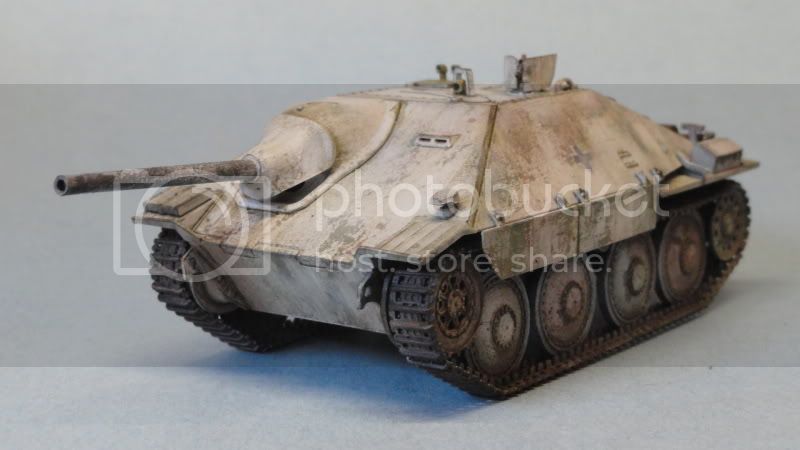
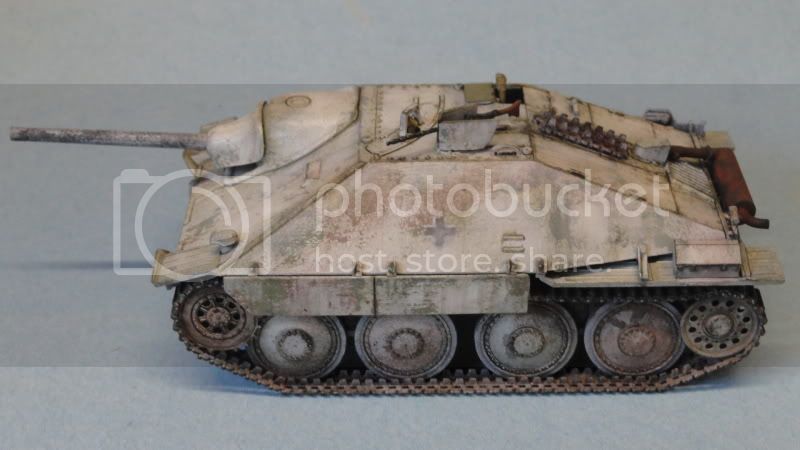
Tristar 38(t) ausf B kit? GREAT choice, by me! I have, oh, maybe 7 or 8 Tristar 38(t) kits on the stack - the B, the E/F, the G. Just fab kits and great building, IMO. I did an E/F last year based on a 1941 Russian campaign pic - 38(t) in general looked pretty lived-in during that period and often loaded with junk, and I seized the opportunity.

The original kit is full of detail and very well molded. But natch there is room to tweak and add... A wood unditching beam, some different fender boxes, bits and bobs here and there, little chains, tiny tie-down eyes welded to rivets, wires and cables. That sort of stuff.

The kit guns are super nice and don't need metal replacements on these kits - but do work on that armored housing on the MG a little to get better inside "clearance" around the barrels. I think the tracks are really very nice - a little fiddly given the tiny links, and no, they are not "workable", but they go together fine with a little patience and will really look fine on the tank - both on the ground and as spares on the hull. But do bear in mind that the tracks may be the wrong type for the B... I think all Tristar 38(t) and variant kits use a later track style than would have been seen on the stock B tank. But I could be wrong...

The B kit has that early stepped driver's glacis - a feature which was in common for Ausf A - D tanks. And with some tiny differences and details, you can use the B kit to do any of these!

I think you'll enjoy it. I do confess that I am a Tristar 38(t) fan, but so what? I'm trying to be detached and objective here!

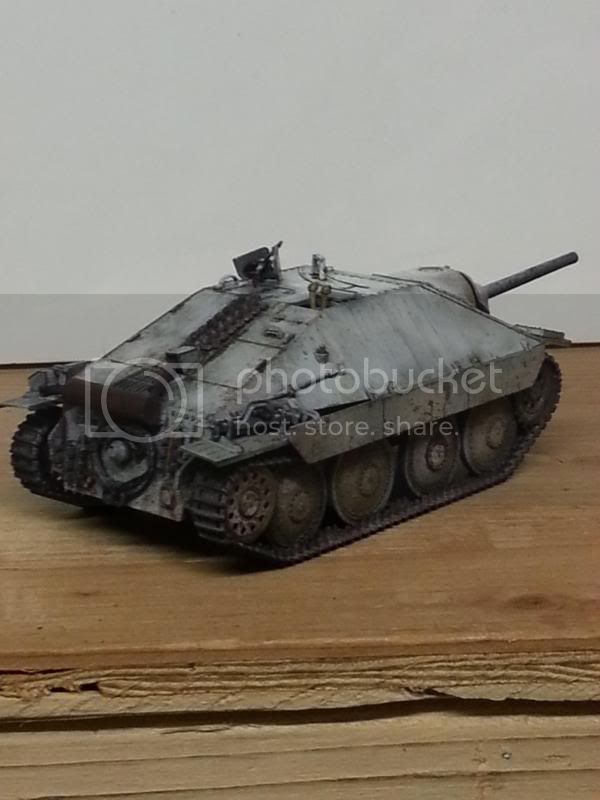
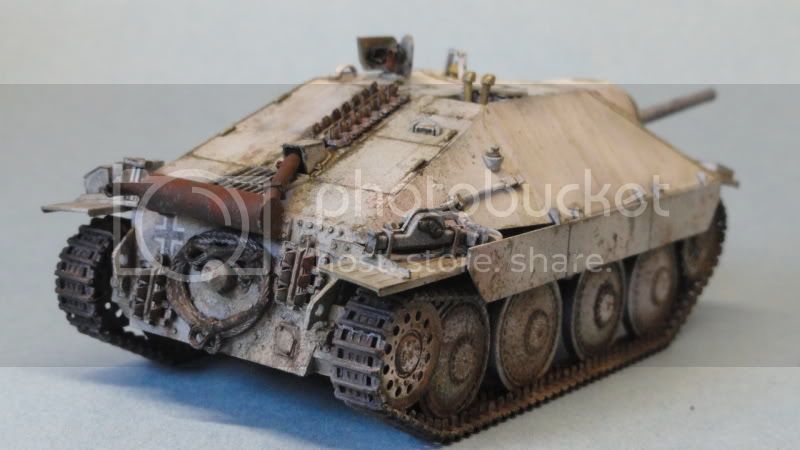
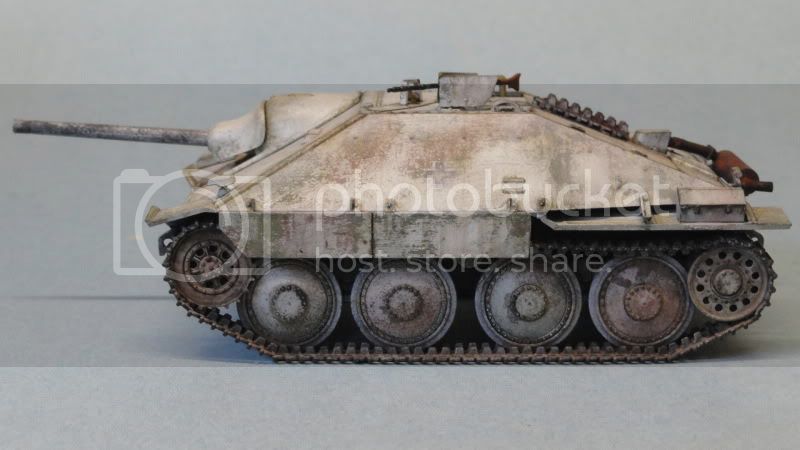
As I did my E/F before ever this campaign started, I'll just punt a pic of it in here to "plump" for Tristar 38's and head to my stash to see what 38 I'll pull up for THIS campaign. Maybe the Dragon "S"...


Cheers!

Bob


Nice work guys, I've looked in on this thread over the last few months as I too have been working on several of these early Czech/German panzer. I have found there are a number of oversights and shortcuts on the Tristar Pz 38(t). I' m away on a holiday so not at the workbench so I decided it might be good way to keep my hand in by sharing some of what I've found. I'm by no way an expert and only wish to contribute to the pool of work already shown here. Anyway here's a quote and paste from a thread I have over at my site.


Quoted Text

[quote="Jamie Tainton"][quote="Roy Schlicht"]I wish Tristar would have made the A version. That would be different and only 38(t) avail. for the Polish Campaign. I think the B can be easily enough converted by leaving off the German fittings with the most difficult part being the long tube that ran the length of the hull on the right side to the radio pot.

Roy


Actually there is a bit more to it- the problem of no rivets on the lower hull that is a common fault on Tristar Pz 38(t)s is exasperated by the fact that the front panel lines are wrong. Another major problem is that the Ausf. B version should not have a damper at the first road wheel position, this being added, according to Panzertracts, on the C model. So you need to fill the diagonal panel line and the locating depression meant for the damper on the hull side. I used CA glue and accelerator for this ( I used too much in these photos). After sanding this back you need to then to scribe a new vertical panel line that is appropriate for this early type.
Also the 4 crossbow looking assembly of leaf springs that are included are from the previous G and E/F kits, which seem to be introduced in later models than the B. So if you want to these will need some work. I utilized some extras that are included with the DML kits, which give you the option of either the later armoured type or bare version, which would be more appropriate for this early Ausfurung. (Funny none of this is mentioned in PMMS review?)I removed the center part on the Tristar suspension.Next I cut and filed the center part from the DML part and then fit and glued this onto the Tristar part. Any gaps were filled and sanded. This was then placed into the locating hole provided. Somewhat convoluted and not for the faint of heart perhaps but I'm happy with the results. I won't be troubled with any interior concerns on this build so thankfully the progress on this project should proceed rather swiftly compared to the other builds of this tank I have going else where here at Armour Workshop.


Pre drill markings


these are the different takes on the suspension parts from the various manufactures.
Starting at the 11 o'clock position is a Dragon early type. On the right clockwise is the Tamiya one from their Marders, and then the Tristar version, DML armoured version,
Maquette's really basic blob, and then finally the one from an Alan Grille kit.


[/quote]
[/quote]
jet
Visit this Community
Alberta, Canada
Joined: December 30, 2002
KitMaker: 306 posts
Armorama: 295 posts
Posted: Thursday, July 11, 2013 - 01:52 PM UTC
Next the refurbished suspension parts added as well as the unique armour plating specific to the B type.
Tristar only includes one type of front drive wheel and rear idler. the sample in front of the surrounding parts still needs to have some filler sanded to shape.


jet
Visit this Community
Alberta, Canada
Joined: December 30, 2002
KitMaker: 306 posts
Armorama: 295 posts
Posted: Thursday, July 11, 2013 - 02:00 PM UTC
So in preparation of adding the Aber PE metal fenders to this build I needed to fill in some slots meant for the kits fender mounts. I used a combo of CA glue to secure some plastic strip cut to size and then filled in missed areas with some glazing putty. This was all sanded smooth.


Now I will bring to your attention the staggering misfit found on either end of the engine covers. There are two tiny piece that go on the front and back. These should line up right up against the body of the hull but there is a rather obvious gap. Tristar are great but they also seem to make rather basic fit mistakes. I decided to simpliy the solution by just making some plastic card replacements.


panzerbob01
Visit this Community
Louisiana, United States
Joined: March 06, 2010
KitMaker: 3,128 posts
Armorama: 2,959 posts
Posted: Thursday, July 11, 2013 - 04:10 PM UTC
James;

Hey, Pard! Some nice fixes and stuff you have going there!

Depending on what one wants out of the conversion, much of what you addressed are indeed, by me, pretty simple and nice fixes to get closer to the A - the Tristar B kit does sadly let us down on account of missing lower hull rivets (which you have done super well IMO) - but for many these will be pretty much sight-unseen once those wheels and tracks are in place (No, I'm not excusing Tristar that they skipped them, but they maybe were less concerned with that area, given it being largely obscured? I, for one, am bewitched by model companies which provide detailed bits that get completely boxed - in and cannot ever be seen in almost any build - Dragon's SdKfz 251 kits with sub-floor bits and stuff come to mind - but leave off more-visible stuff!). Likewise that seam-line between side-plates, which, as you corrected it, should be perpendicular to the bottom line. Some things, like the bumper which is supplied but should not be there are the pit-falls that catch all of us! Short of seeing that not-supposed-to-be-there detail in a pub or such, we can only hope to see someone else's catch on it (your's, in this case!).

When I did up a Tristar E/F, I didn't find that ill-fit problem of those tiny end-plates on the deck lids that you found. Mine were a little fiddly, but once I got stuff lined up that gap vanished. Luck of the draw, I guess!

For some, the biggest correction issue will be those early-version open spring-mounts. My plan is to actually simply second the complete DML spring over to that Tristar suspension - while the Tristar springs are a better overall form, IMO, the only part you'll see after wheels are on is that mount, so I would skip the work and just do the minimal surgery to swap the whole part. But you certainly did get a good fix, there!

I wait with anticipation your topside work, including creation of that early Czech "combat antenna" tube on the upper hull side. IIRC, the other Czech fender mirror and antenna mounts are provided in the kit, so that side antenna tube will be the big upper fix to do (I think).

Of course, building the A version gives one a legit opportunity to paint a 38(t) in brown over gray, for the Polish and French campaigns!

The biggest overall issue, I think, will be the tracks more appropriate to A and B tanks - I think the Tristar kits all have a later track style and the early open-horn version simply isn't to be had - least not that I know of.

Great work and informative!

Bob
GregCloseCombat
Visit this Community
California, United States
Joined: June 30, 2008
KitMaker: 2,408 posts
Armorama: 2,394 posts
Posted: Thursday, July 11, 2013 - 04:46 PM UTC
Vance thanks for the comment. Your 38 is looking great. Love the rivets on them.


James you're not playing around. Very nice precision work


jet
Visit this Community
Alberta, Canada
Joined: December 30, 2002
KitMaker: 306 posts
Armorama: 295 posts
Posted: Thursday, July 11, 2013 - 05:11 PM UTC

Quoted Text

James;

Hey, Pard! Some nice fixes and stuff you have going there!

Depending on what one wants out of the conversion, much of what you addressed are indeed, by me, pretty simple and nice fixes to get closer to the A - the Tristar B kit does sadly let us down on account of missing lower hull rivets (which you have done super well IMO) - but for many these will be pretty much sight-unseen once those wheels and tracks are in place (No, I'm not excusing Tristar that they skipped them, but they maybe were less concerned with that area, given it being largely obscured? I, for one, am bewitched by model companies which provide detailed bits that get completely boxed - in and cannot ever be seen in almost any build - Dragon's SdKfz 251 kits with sub-floor bits and stuff come to mind - but leave off more-visible stuff!). Likewise that seam-line between side-plates, which, as you corrected it, should be perpendicular to the bottom line. Some things, like the bumper which is supplied but should not be there are the pit-falls that catch all of us! Short of seeing that not-supposed-to-be-there detail in a pub or such, we can only hope to see someone else's catch on it (your's, in this case!).

When I did up a Tristar E/F, I didn't find that ill-fit problem of those tiny end-plates on the deck lids that you found. Mine were a little fiddly, but once I got stuff lined up that gap vanished. Luck of the draw, I guess!

For some, the biggest correction issue will be those early-version open spring-mounts. My plan is to actually simply second the complete DML spring over to that Tristar suspension - while the Tristar springs are a better overall form, IMO, the only part you'll see after wheels are on is that mount, so I would skip the work and just do the minimal surgery to swap the whole part. But you certainly did get a good fix, there!

I wait with anticipation your topside work, including creation of that early Czech "combat antenna" tube on the upper hull side. IIRC, the other Czech fender mirror and antenna mounts are provided in the kit, so that side antenna tube will be the big upper fix to do (I think).

Of course, building the A version gives one a legit opportunity to paint a 38(t) in brown over gray, for the Polish and French campaigns!

The biggest overall issue, I think, will be the tracks more appropriate to A and B tanks - I think the Tristar kits all have a later track style and the early open-horn version simply isn't to be had - least not that I know of.

Great work and informative!

Bob


Thanks guys for the replies. I think I may have been unclear with my post. I was not
Intending to make an Ausf A, that was only something Roy alluded to
This will be a B version.
From PMMS...

Quoted Text

The assembled track runs do look impressive but it should be noted that the tracks links are the later type (Ausf.E and later) which have indentations in the side of the guide teeth. The early track fitted to Ausf.A to D 38(t)s had solid guide teeth but otherwise the same. WWII Productions have released a set of early 38(t) tracks (set #35042) with the solid guide teeth if you wish to update the tracks to the appropriate type.


jet
Visit this Community
Alberta, Canada
Joined: December 30, 2002
KitMaker: 306 posts
Armorama: 295 posts
Posted: Thursday, July 11, 2013 - 05:14 PM UTC
One thing not mentioned in the previous post with the pictures showing Tristar return rollers and DMLs and the real thing, I find Tristar a bit weak compared to the Dragon ones, specifically where the inner rim and tire join and the representation of the six tiny holes on that rims face. While the DML ones are not perfect I feel they reflect the look more faithfully, from the box. To be really accurate I would have to scratch some. I have made a RTV mold of the DML ones and will be using them on my Tristar kit.
panzerbob01
Visit this Community
Louisiana, United States
Joined: March 06, 2010
KitMaker: 3,128 posts
Armorama: 2,959 posts
Posted: Friday, July 12, 2013 - 06:38 AM UTC
Jet

Sadly, it looks to like neither T nor the D did a good job with those return rollers. MAYBE the D's being a little better, but... While T seems to not have provided that clear rim into which the rubber tire fitted, D's attempt makes this rim look like a substantial wall! IF you are going to cast some copies, maybe it would be opportune to carefully scrape/sand/file down that over-sized rim a bit when you create your master... Given as the relief of that rim in the real pics seems very modest, maybe it would come out looking good to cut a fine line edge into the face of the T roller??? I think I'll give that a try.

PS: Yes, I was actually more or less aware that you are really trying to update your B and not create the A - although everything you have done does apply to A as well as B (or at least so I believe ). So I sort of carried away. The A was almost completely the Czech stock production as it came off their assembly line right before the invasion - and the Germans collected those LT-38 and painted them in German colors to get the A. The B - the first run of 38 made after the Germans arrived - had a couple of small exterior changes - deleted that Czech tube antenna and added a Notek lamp, and moved the horn, I think... Oh, and if you are building the B Befehls, added that frame antenna (and changed radios inside - but we aren't going there in this discussion!) and blanked that hull MG mount (as does the kit).

About your hull rivet add-ons.... what did you use for those? They look pretty nice, albeit they appear a bit over-sized to my eye (but I am aware that different rivets were used in different locations, and the placements are what makes this sing, to me).

Bob
jet
Visit this Community
Alberta, Canada
Joined: December 30, 2002
KitMaker: 306 posts
Armorama: 295 posts
Posted: Friday, July 12, 2013 - 05:58 PM UTC

Bob thanks for the reply
Look at the center bolt in the real wheel. The Tristar one does not even have a bolt head represented, more just a rivet type blob. The DML has a bolt head.
The 6 holes on the Tristar one are too deep and too large in diameter, as well as being too closely spaced. The whole center section of the wheel is recessed where as the the DML one looks to be on the same plane as the tire as in the real one.

The rim on the DML one is a bit high in comparison to the real one but one could sand the profile down a bit to make it less proud. (good idea to maybe do that prior to casting ) The Tristar wheel is a sperate part to the tire and the fit and sit is not very good between the two parts. There is no rim on the Tristar item after putting them together. Or more exactly there is a bit of one here and there but the edge of the tire part part is not a crisp circle and what rim there is, is too thin and hemispherical in profile.

The trademark seems to be not needed all though the tristar one is better.

The rivets are master club and I tried to match their diameter with caliper measurements on Panzertracts scale drawings.
jet
Visit this Community
Alberta, Canada
Joined: December 30, 2002
KitMaker: 306 posts
Armorama: 295 posts
Posted: Friday, July 12, 2013 - 06:25 PM UTC
Another one of these I have going is the DML Pz 38t Ausf G with interior. I used the three PE sets from Griffon on it and a few other after market items like Modelkasten tracks. Here's a copy and paste...
BTW that s a Tristar E/F in the background that I built back when they first came out all those years ago, still not complete!


The new Panda kit is on the way as well, and I hope to perhaps scratch a nice 1/16th scale interior based on what I have learned on this build.
So in these pics you will see that I have added the last two front support/mounts to the Griffon metal fenders, and then attached the fenders tentatively to the sides of the hull.


I am contemplating replacing the front sprockets from the earlier kit from DML, as they have smaller lightening holes, which when compared to most reference photographs appear to be more accurate in size. The interior of the drive sprocket is more detailed in the ones I was going to ue and had painted but in the end not much of that would be seen anyways.


GregCloseCombat
Visit this Community
California, United States
Joined: June 30, 2008
KitMaker: 2,408 posts
Armorama: 2,394 posts
Posted: Wednesday, July 17, 2013 - 10:07 AM UTC


Sorry the camera phone pics aren't the greatest. I added touch up painting and pigments on today. I think I'll splash some tiny mud drops around and it should be about done with the 1/48 Tamiya Hetzer
GregCloseCombat
Visit this Community
California, United States
Joined: June 30, 2008
KitMaker: 2,408 posts
Armorama: 2,394 posts
Posted: Friday, July 19, 2013 - 11:50 AM UTC


I didn't do really much at all with spraying wet mud splashes. I started to and decided it would take away more then add anything. I zoomed in maybe too much on these shots or messed up the lighting, as I lost some of the scale effects in the photos. Calling it done! Thanks for the campaign John
jet
Visit this Community
Alberta, Canada
Joined: December 30, 2002
KitMaker: 306 posts
Armorama: 295 posts
Posted: Saturday, July 20, 2013 - 03:57 PM UTC
Okay so this series of pics were taking about 10 days ago- the last time I did any work on this. I basically have finished off the smoke candle dispenser, and have figured out where I will place the radio transformers.I was going to place them on the floor as in the Tristar instructions but looking at it- it would really be a hazard on the floor in my mind. Plus the wiring would be unnecessarily long to the radio sets.So I decided that a logical place would be to have them under the feet of the radio operator for the large square one and on the left wall near the radio.

Here you can see I am using my punch and die set to make the connector that goes into the radios. I need three of these.There are tiny Aber metal parts with a logo on them that get glued on top of these discs, you can barely see that one of these has been place on a plastic part ~ to the right.


Tentative placing of transformers. The narrower one needs to go on the wall. I will use some .03 ultra-thin solder to wire these up.


here is the Aber photo etch parts for the head phones. I lost two discs that needed to replaced with punched brass circles.

the boxes are Kasten Pz.Nr.24, Kasten Pz.Nr. 2a, Kasten Pz.Nr.22b,


painted


GregCloseCombat
Visit this Community
California, United States
Joined: June 30, 2008
KitMaker: 2,408 posts
Armorama: 2,394 posts
Posted: Saturday, July 20, 2013 - 05:17 PM UTC
Wow thats a great radio!
Grauwolf
#084
Visit this Community
Quebec, Canada
Joined: September 14, 2005
KitMaker: 2,485 posts
Armorama: 743 posts
Posted: Saturday, July 20, 2013 - 07:44 PM UTC
Absolutely amazing radio!...just WOW!

What punch & die set is in the photo?

Cheers,
Joe
jet
Visit this Community
Alberta, Canada
Joined: December 30, 2002
KitMaker: 306 posts
Armorama: 295 posts
Posted: Monday, July 22, 2013 - 04:07 PM UTC


This picture is from one of Dragon's 1/6th figures, which I find to be often useful to see finer points of equipment and uniform detail. It's of German AFV Headphones
Panzer head sets have a black leather covering to the metal headband. The metal fittings are painted in matt black. The "knobs" that the slide adjustments for the ear pads are mounted on are silver metal. The woven cords leading to the black bakelite radio jack were either in a dark brown or dark tan colour. The large ear pads appeared in two colours. The most common being made of black rubber and a less frequently seen version was made of a reddish brown rubber.


Since the previous shots I posted showing Aber headphones, I have stripped it all back to bare metal and replaced the beading wire that I was using which just would not sit right. I Replaced the thread with some really thin (.02mm) solder which I am tickled pink with. Just the ticket. I have used three widths of specialized hobby solder.


Also came across another aftermarket MG for the Pz 38(t) from E.T. Model


thebear
Visit this Community
Quebec, Canada
Joined: November 15, 2002
KitMaker: 3,960 posts
Armorama: 3,579 posts
Posted: Tuesday, July 23, 2013 - 02:58 AM UTC
Great work James ...Glad to see you here.

Rick
Nito74
Visit this Community
Lisboa, Portugal
Joined: March 04, 2008
KitMaker: 5,386 posts
Armorama: 4,727 posts
Posted: Tuesday, July 23, 2013 - 03:45 AM UTC
I agree... some amazing detailing.
My 38(t) Grille will require your detailing skills for sure ..

eMan
#298
Visit this Community
Hong Kong S.A.R. / 繁體
Joined: August 08, 2002
KitMaker: 1,182 posts
Armorama: 665 posts
Posted: Monday, August 12, 2013 - 12:19 AM UTC
Progress update, Cyber-Hobby 1/35 7.5cm Stu.Kan.auf Pz.Kpfw.38(t).


Lakota
#123
Visit this Community
New Mexico, United States
Joined: November 17, 2008
KitMaker: 1,202 posts
Armorama: 635 posts
Posted: Sunday, August 18, 2013 - 11:11 AM UTC
Howdy Y'all
I finished my 1/144 Dragon kit a couple of months ago but I just got the final matt varnish coat on today. It is a tiny model. Good campaign guys!
Take care,
Don "Lakota"