I've seen quite a few references to using Hornet heads and hands in figures that members have used in vignettes/dioramas, and was wondering if there was anyone out there that has made their own figures, and if so, how did they go about it?
I've got a few ideas floating around for some figures to be used in some future dios, but it is highly unlikely that anyone makes them.
Figures
Military figures of all shapes and sizes.
Military figures of all shapes and sizes.
Hosted by Darren Baker, Mario Matijasic
Scratchbuilding Figures?
AngryEchoSix

Joined: October 19, 2012
KitMaker: 93 posts
Armorama: 61 posts

Posted: Wednesday, November 28, 2012 - 05:39 PM UTC
SdAufKla

Joined: May 07, 2010
KitMaker: 2,238 posts
Armorama: 2,158 posts

Posted: Thursday, November 29, 2012 - 02:13 AM UTC
Quoted Text
I've seen quite a few references to using Hornet heads and hands in figures that members have used in vignettes/dioramas, and was wondering if there was anyone out there that has made their own figures, and if so, how did they go about it?
I've got a few ideas floating around for some figures to be used in some future dios, but it is highly unlikely that anyone makes them.
The best (and most available) book that I know of on the subject is Bill Horan's "Military Modeling Masterclass." In it, he devotes an entire chapter to sculpting.
Amazon::Bill Horan "Military Modeling Masterclass"
You can pick up a used copy pretty cheap. (BTW: The rest of the book is phenomenal and inspirational!)
Next to that, I'd suggest a look at the Historicus Forma sculpting forum:
Historicus Forma:Sculpting Forum
To give you an idea of the process, here's an excellent thread here on Armorama that incorporates several full sculpts:
Armorama:Horse Drawn Breda
Gerard's figure work on this dio is fantastic!
Rather than trying to start sculpting from scratch, I'd suggest that you do some conversions and major conversions of existing commercial figures. Most figure modelers (as opposed to professional commercial sculptors) use available heads and hands, converting them as needed, in their own sculpting.
The reason for this is that sculpting faces and hands is the most difficult work and the most demanding in regards to real talent. Guys like Rodger Saunders and Taseung Harms are really artists working in miniature.
For most figure modelers, there's really a continuum from stock figures to sculpting their own, and the techniques used for conversions are the same as used for sculpting.
HTH,
wapel00

Joined: February 25, 2012
KitMaker: 130 posts
Armorama: 127 posts

Posted: Thursday, December 06, 2012 - 08:10 PM UTC
I've made my first own figure:

I used hornet head and dragon equipment. I can say it isn't easy thing to do. I have to practise a lot.

I used hornet head and dragon equipment. I can say it isn't easy thing to do. I have to practise a lot.
jrutman

Joined: April 10, 2011
KitMaker: 7,941 posts
Armorama: 7,934 posts

Posted: Friday, December 07, 2012 - 03:09 AM UTC
Quoted Text
I've made my first own figure:

I used hornet head and dragon equipment. I can say it isn't easy thing to do. I have to practise a lot.
If that is your first then you are off to a great start! Looks like one of the HJ guys from Norrey in June44 standing next to the park wall?
J
wapel00

Joined: February 25, 2012
KitMaker: 130 posts
Armorama: 127 posts

Posted: Friday, December 07, 2012 - 05:11 AM UTC
Thanks! It's made of magic sculp - long way to perfection, it is hard for me to have even surface and make little elements. And yes - it shows the scene that you metioned - name of this guy is Klaus Schuh.


panzerconor

Joined: February 08, 2012
KitMaker: 1,271 posts
Armorama: 1,253 posts

Posted: Friday, December 07, 2012 - 06:14 AM UTC
Quoted Text
Thanks! It's made of magic sculp - long way to perfection, it is hard for me to have even surface and make little elements. And yes - it shows the scene that you metioned - name of this guy is Klaus Schuh.

I've got a book with that same photo on the cover! Always thought it would be a cool little dio to make, & you've beaten me to it hahaha. Awesome job. I'm more or less on the same boat as Ssgt O'Marines... I'm having trouble with scratchbuilding too

-Conor
francoisdunord

Joined: February 02, 2013
KitMaker: 1 posts
Armorama: 1 posts

Posted: Saturday, February 02, 2013 - 05:13 AM UTC
March 2013 Fine Scale Modeler has a very informative article on scratchbuilding figures by building a armature as a 'skeleton' and then forming the clothing.
Far beyond my meager skills but good luck!
Far beyond my meager skills but good luck!

spacewolfdad

Joined: May 23, 2010
KitMaker: 642 posts
Armorama: 593 posts

Posted: Saturday, February 02, 2013 - 08:35 AM UTC
Hi,
You could start with major conversion before full on sculpting. By that I mean use whatever head you fancy and then use the body and limbs of a stock figure to act as a basis and then 'clothe' them with a modelling putty of your choice, I use Green Stuff as it is reasonably easily worked and gives good results. I did this with my Legionnaire, Dien Bien Phu, it is a good way to get the hang of sculpting clothes and folds. Here is a link to my post...
https://armorama.kitmaker.net/forums/199702&page=1
Hope this helps,
Paul

gerarddt

Joined: January 09, 2007
KitMaker: 78 posts
Armorama: 77 posts

Posted: Sunday, February 03, 2013 - 12:57 AM UTC
Hi,
If you have a little knowledge of the French language, I made an explanation on my way to sculpt a figurine
http://www.small-tracks.org/t6127-sculpture-d-une-figurine-bis-ou-comment-j-y-arrive-aujourd-hui
Gérard
If you have a little knowledge of the French language, I made an explanation on my way to sculpt a figurine
http://www.small-tracks.org/t6127-sculpture-d-une-figurine-bis-ou-comment-j-y-arrive-aujourd-hui
Gérard
Removed by original poster on 03/14/13 - 02:15:11 (GMT).

jantkowiak

Joined: May 30, 2005
KitMaker: 113 posts
Armorama: 73 posts

Posted: Wednesday, March 13, 2013 - 02:19 PM UTC
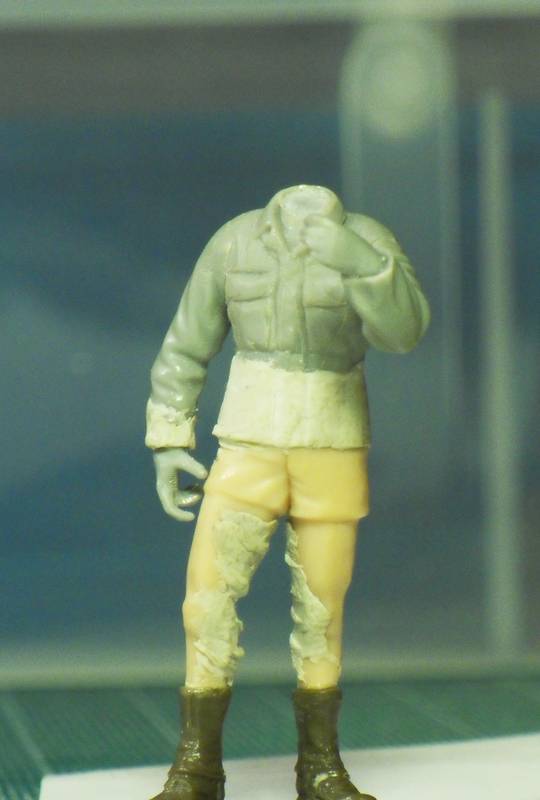
Hi. Here's a slightly different take on the figure conversion option. It's located on the far end of the figure-building continuum that Mike Roof mentioned earlier, maybe one of the last stations in "conversions" before reaching "scratchbuilds."
These are three of about 75 for a D-Day project that's been on indefinite hold for years but now is coming out again. The three shown here are among approximately 35-40 demolitions men, medics, and mission support volunteers aboard an LCM(3) bound for the beach in the first minutes of the first assault wave. Their task is clearing beach obstacles.
I've decided that every figure in the display will be converted in this way to make each one unique. I mixed and matched arms, legs, torsos, hands, boots, and heads to get the poses I wanted and then added plastic shims as needed to make them look more anatomically natural. The parts come from any set - German, NATO, anyone - and the details are shaved off or covered up in the process of outfitting them. I sculpted the M2 ammunition bag (worn like a poncho with a large pocket front and rear) with Tamiya 2-part epoxy putty but I'm not quite satisfied with the result - way too thick in scale. I have to do 30+ of these and I want them all the same. All the helmets will be Tamiya's, since the real M1s were one-size-fits-all and the difference between Tamiya's and Dragon's is pretty huge.
The group on the boat has a different group of facial expressions than the group on the beach working under intense fire.
The method is challenging but I find it easier than pure sculpting. Good luck with your project, Echo 6!
John A.
:-[ ]


All_You_Can_Kit

Joined: August 22, 2012
KitMaker: 599 posts
Armorama: 527 posts

Posted: Wednesday, March 13, 2013 - 05:58 PM UTC
Quoted Text
Hi. Here's a slightly different take on the figure conversion option...
Cool, I really learn a lot from this post, especially for the detail items and how to make the figures look so smooth after the putty applied. Thanks for sharing

Cheers
Garry

Stefan1580

Joined: November 20, 2006
KitMaker: 360 posts
Armorama: 354 posts

Posted: Wednesday, March 13, 2013 - 08:56 PM UTC
Hi,
have a look at this site too. Very nice Figures and some great SBS Photos.
lucklinkers
Greetings
Stefan
have a look at this site too. Very nice Figures and some great SBS Photos.
lucklinkers
Greetings
Stefan

Posted: Wednesday, March 13, 2013 - 09:40 PM UTC
Ola AES
I think it is great you are investigating the possibilities of creating your own figures. For the past years I have been working hard to aquire that skill and the knowledge I gained by practice, practice and even more practice makes that I now can create a figure that I can put besides a vehicle without shame.
I have done both conversion as well as full sculpts with the use of Hornet Heads, AM hands and footwear from scrapboxdefenders.
This is a conversion in the straightest sense of the word. Converted a DML Panzerwagen driver into a 1914 racecardriver.

And it started out from this

But a lot of times with good dio ideas it is neccesary to create your own figures from scratch.
This was one of my first decent figures.
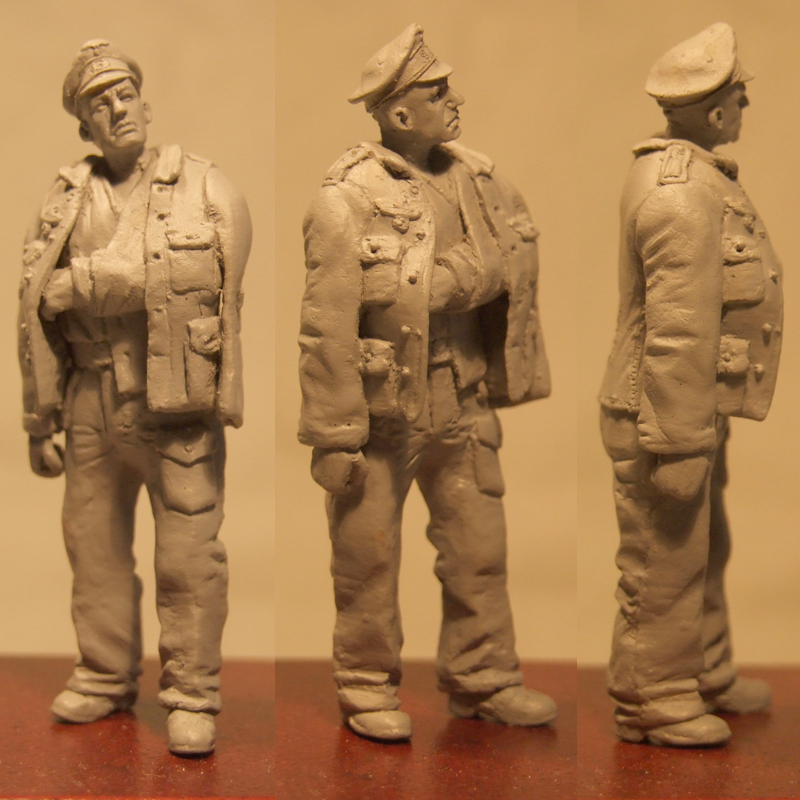
And from there it went with steady jumps
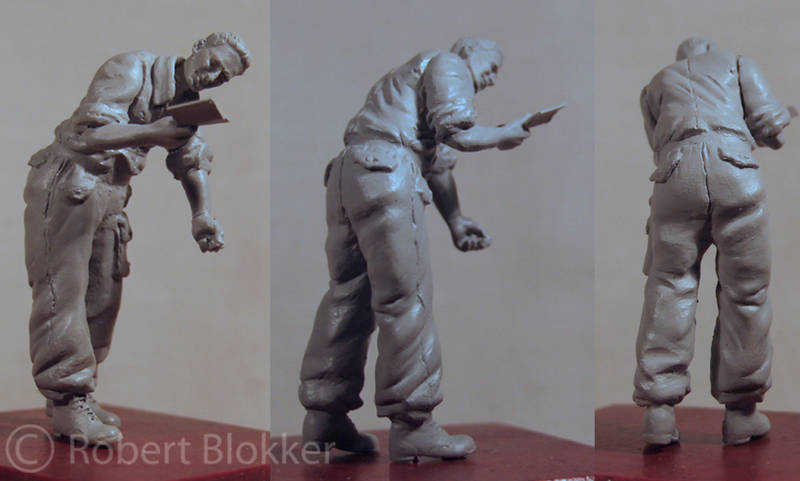
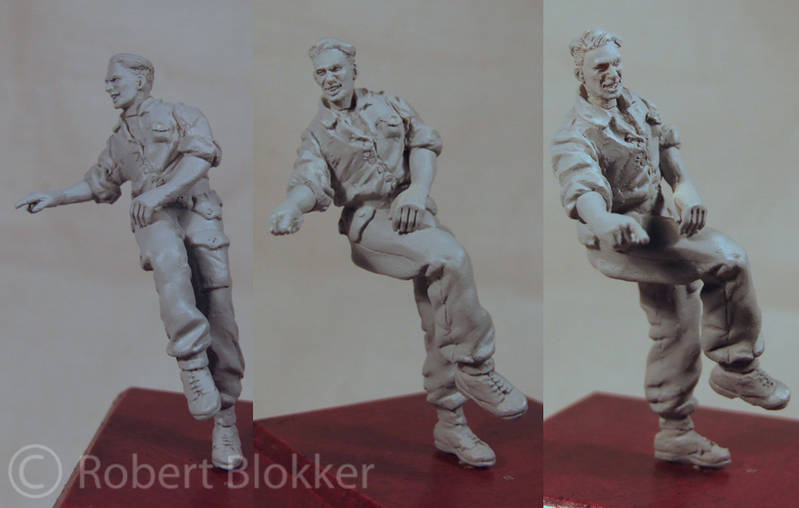
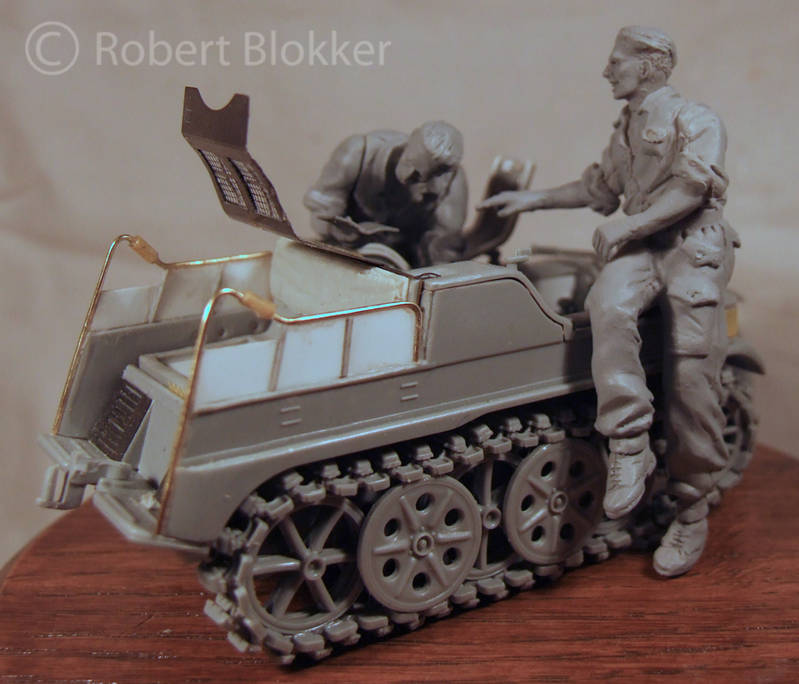
Up to one of my latest figures.


One of the things Im particularly pleased with is that I learned to create smoother surfaces. My first full sculpt was kinda rough in texture whereas the last pictures are really smooth. The racedriver conversion is also one of the later figures.
Buy the right medium. I use Magic Sculpt. I love the stuff. There probably are a lot of people who will tell you you need a gazzillion specialized tools. I have 1 sculpting tool that I bought. The rest I make myself from toothpicks. (1 with a blunt end, one with a sharp flat end, sharp triangular etc. etc.) And I use a brush and some water and you are pretty much set to go. And aside from that practice practice practice. And not being afraid to climb over a mountain of failures and keep trying it again. Eventually when you master the skill there is not a diorama or story that can't be built because of the lack of figures.
I'm currently working on an article for another site about the way I sculpt my figures and I'm planning to have some videofootage in that as well. I have been experimenting with that lately. Maybe that is of use to you.
I think it is great you are investigating the possibilities of creating your own figures. For the past years I have been working hard to aquire that skill and the knowledge I gained by practice, practice and even more practice makes that I now can create a figure that I can put besides a vehicle without shame.
I have done both conversion as well as full sculpts with the use of Hornet Heads, AM hands and footwear from scrapboxdefenders.
This is a conversion in the straightest sense of the word. Converted a DML Panzerwagen driver into a 1914 racecardriver.

And it started out from this

But a lot of times with good dio ideas it is neccesary to create your own figures from scratch.
This was one of my first decent figures.

And from there it went with steady jumps


Up to one of my latest figures.


One of the things Im particularly pleased with is that I learned to create smoother surfaces. My first full sculpt was kinda rough in texture whereas the last pictures are really smooth. The racedriver conversion is also one of the later figures.
Buy the right medium. I use Magic Sculpt. I love the stuff. There probably are a lot of people who will tell you you need a gazzillion specialized tools. I have 1 sculpting tool that I bought. The rest I make myself from toothpicks. (1 with a blunt end, one with a sharp flat end, sharp triangular etc. etc.) And I use a brush and some water and you are pretty much set to go. And aside from that practice practice practice. And not being afraid to climb over a mountain of failures and keep trying it again. Eventually when you master the skill there is not a diorama or story that can't be built because of the lack of figures.
I'm currently working on an article for another site about the way I sculpt my figures and I'm planning to have some videofootage in that as well. I have been experimenting with that lately. Maybe that is of use to you.
jrutman

Joined: April 10, 2011
KitMaker: 7,941 posts
Armorama: 7,934 posts

Posted: Thursday, March 14, 2013 - 02:05 AM UTC
I have always admired your work Robert. Who is that last figgie and in what context will he be used?
J
J
jrutman

Joined: April 10, 2011
KitMaker: 7,941 posts
Armorama: 7,934 posts

Posted: Thursday, March 14, 2013 - 02:14 AM UTC
Making your own figgies is the way to go if you want to have unique dios and vignettes. It really opens up your possibilities a lot. I have tried the armature method but I find it saves me time to use the method already suggested here and use parts of existing figs and then re-pose and modify them to your needs.
You can then duplicate any scene such as this guy taken from the picture behind him

You can then duplicate any scene such as this guy taken from the picture behind him

Posted: Thursday, March 14, 2013 - 02:16 AM UTC
Ola Jerry
Thanks for the kind words. There is a bit of backstory to that last figure. I was asked to make an article on my method of sculpting for Scale model addict. The mainsubject was going to be a young Dutch resistance fighter. And am currently working on that. However. the boy stood a bit alone and that is how this figure came to life. And it was actually finished faster because it was a relatively easier sculpt. The following thread will fill in a lot of questions I think.
"Goodbye" Teacher
I like your sculpts as well by the way. I like how you recreate pictures in scale. And I like the hair of your figure. Looks very realistic. I know it is often easier to convert an existing figure but with a lot of my ideas that is simply not possible because I can't even find figures that are close to what I'm looking for. And working with an Armature and the torso and pelvis parts from Magic Sculpt is the best way to create that unique pose quickly.
jrutman

Joined: April 10, 2011
KitMaker: 7,941 posts
Armorama: 7,934 posts

Posted: Thursday, March 14, 2013 - 02:46 AM UTC
Quoted Text
Ola Jerry
Thanks for the kind words. There is a bit of backstory to that last figure. I was asked to make an article on my method of sculpting for Scale model addict. The mainsubject was going to be a young Dutch resistance fighter. And am currently working on that. However. the boy stood a bit alone and that is how this figure came to life. And it was actually finished faster because it was a relatively easier sculpt. The following thread will fill in a lot of questions I think.
"Goodbye" Teacher
I like your sculpts as well by the way. I like how you recreate pictures in scale. And I like the hair of your figure. Looks very realistic. I know it is often easier to convert an existing figure but with a lot of my ideas that is simply not possible because I can't even find figures that are close to what I'm looking for. And working with an Armature and the torso and pelvis parts from Magic Sculpt is the best way to create that unique pose quickly.
Ah yes,I see what you are saying but there is a method to my madness. I only use the parts of older,useless figures as a sort of"thick armature" to get close to the pose I need. I then grind away all of the surface detail,at the same time getting the piece to look closer to the end result. I then finish by adding epoxy putty,etc. For me,it takes away the intermediate step of building up the armature.
Hopefully I made myself clear as I don't have a way with words. And thank you for your kind remarks,
J
Posted: Thursday, March 14, 2013 - 01:05 PM UTC
Ola Jerry
Receiving you loud and clear. I have done that as well. The reson why I stopped doing that and use the full wire armature instead is the fact that you have way more playing room to control the depth of creases and such in fabric. Some types of fabric have quite deep folds and creases which means you have to scrape off a lot of the toplayer of the old figure parts. In that case I find it easier to create the armature and go from there. That said. There is no definitive "way" to go. Everybody that sculpts figures eventually finds the way that works perfect for them. And looking at the results here and on other sites I am happy I can enjoy and admire the works of art.
Receiving you loud and clear. I have done that as well. The reson why I stopped doing that and use the full wire armature instead is the fact that you have way more playing room to control the depth of creases and such in fabric. Some types of fabric have quite deep folds and creases which means you have to scrape off a lot of the toplayer of the old figure parts. In that case I find it easier to create the armature and go from there. That said. There is no definitive "way" to go. Everybody that sculpts figures eventually finds the way that works perfect for them. And looking at the results here and on other sites I am happy I can enjoy and admire the works of art.
jrutman

Joined: April 10, 2011
KitMaker: 7,941 posts
Armorama: 7,934 posts

Posted: Friday, March 15, 2013 - 02:14 AM UTC
Cool! I hope we have not overwhelmed angry echo six with too much information!!
J
J
 |


