Hi Matt,
Your build looks quite good so far. I like the color you chose, looks good. What brand and shade did you use? I'm always on the look-out for paints that look good to me.
The MiniArt figures will go nicely with you theme. The gun barrel would have been one of the very first chores after a sandstorm. Even today, that's standard operating proceedure, and believe you-me, you NEVER get rid of the sand. I still think I have some in my teeth from Iraq three years ago!. lol I alsomlike Miniart figures, they are usually very well detaiiled and have pretty good faces and are one of the top rated plastic figure mfr's in my book.
For me, researching for a build is half the fun.
Just an FYI, only at the beginning of the campaign in North Africa, up until about July/August 1941 did the tanks/AFV's arrive in theater with the European dark grey paint. Many of the tanks that arrived in Feb/March (5th Light Division - later renamed 21st Panzer-Division) even went into combat painted in the dark grey paint. Many were even "painted" with mud until such time as a proper paint job could be performed. Needless to say, paint wasn't a high priority in the logistics log-jam, and Italian or even captured British paint paint was used. After about July-Aug 1941, a lull in the fighting finally allowed for proper maintenance and painting. At around that same time, new vehicles destined for North Africa were painted at the factory in the sand-brown base color, so no German Gray underneath. Even tanks of the 5th Panzer-Division, originally intended to be sent to the DAK, and sent to Russia instead, were painted in the sand-brown.
Happy Modeling, I'll be watvhing. The Pz. IV is one af my favorite subjects.
Oh, and btw, do you still have the turret interior for the kit? I could put it to good use with a Pz.Beob.Wg. IV I plan to start soon. Please PM me, I;m ghappty to pay postage and S/H costs for it.
Thanks,
Cory
Hosted by Darren Baker
Panzer IV E

csosus

Joined: March 21, 2011
KitMaker: 71 posts
Armorama: 49 posts

Posted: Wednesday, December 05, 2012 - 04:26 PM UTC

retiredyank

Joined: June 29, 2009
KitMaker: 11,610 posts
Armorama: 7,843 posts

Posted: Wednesday, December 05, 2012 - 04:40 PM UTC
CSOS: It is Dragon's 3 in 1 kit. The paint is MM enamel Afrika Grunbraun '41 #2099.
Thanks for all of the kind comments. Since I will be displaying the tank, I'm going to be a little chip crazy. I just perfect a new method(though I'm sure I'm not the first) to add a worn look to the paint.
Thanks for all of the kind comments. Since I will be displaying the tank, I'm going to be a little chip crazy. I just perfect a new method(though I'm sure I'm not the first) to add a worn look to the paint.

retiredyank

Joined: June 29, 2009
KitMaker: 11,610 posts
Armorama: 7,843 posts

Posted: Friday, December 07, 2012 - 12:02 PM UTC
Just a quick update. The rubber rims for the wheels are painted. However, I left them off to ease in the track assembly. I won't be able to finish it, until I have the shape of the base. A little more weathering on the left side of the turret, as if the sand was blowing against it.


I probably won't be back at it, before Christmas.


I probably won't be back at it, before Christmas.
Joel_W

Joined: December 04, 2010
KitMaker: 11,666 posts
Armorama: 1,143 posts

Posted: Friday, December 07, 2012 - 01:15 PM UTC
Quoted Text
Yeah, shipping should be done AFTER the decals.
I was reading through your build thread and wondered the same thing that Jesse posted about decaling, as any paint chipping would have also removed the painted on markings.
Joel
AFVFan

Joined: May 17, 2012
KitMaker: 1,980 posts
Armorama: 1,571 posts

Posted: Friday, December 07, 2012 - 01:56 PM UTC
Hey Matt, the chipped areas on the numbers looks good. You might want to think about toning the muffler color down though.

retiredyank

Joined: June 29, 2009
KitMaker: 11,610 posts
Armorama: 7,843 posts

Posted: Friday, December 07, 2012 - 01:59 PM UTC
Quoted Text
Quoted Text
Yeah, shipping should be done AFTER the decals.
I was reading through your build thread and wondered the same thing that Jesse posted about decaling, as any paint chipping would have also removed the painted on markings.
Joel
I have adding chipping to the decals.
Quoted Text
Hey Matt, the chipped areas on the numbers looks good. You might want to think about toning the muffler color down though.
Yes, I'm not happy with how it turned out. I'm considering painting it steel grey and adding light rust to it.
AFVFan

Joined: May 17, 2012
KitMaker: 1,980 posts
Armorama: 1,571 posts

Posted: Friday, December 07, 2012 - 03:17 PM UTC
Quoted Text
Yes, I'm not happy with how it turned out. I'm considering painting it steel grey and adding light rust to it.
No need to do that if you still want a rusted muffler. If you have a stiff flat tipped brush and some burnt sienna and dark brown paints you can try this.
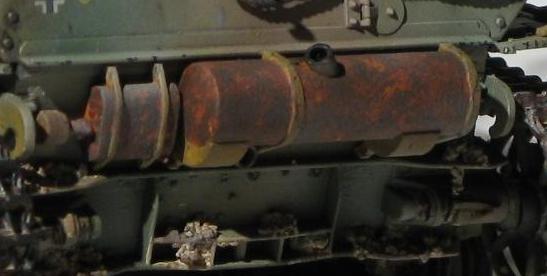
Dab just the very tip of the brush in the burnt sienna paint, touch it to a piece of paper a couple times to get rid of the excess paint, then lightly dab the muffler. Do this in random spots allowing for the brighter colors to peek through in small areas. After that drys, do the same thing with the dark brown. You'll end up with a muffler that looks a deep rust color with light rust hi-lights.
Try it on a piece of scrap plastic first to get the hang of it.
Here's one I did with a light dust coat over the rust.

By controlling the ratio of colors you can show anything from a light rust to an old heavy rust. You can also do the same technique with your base yellow color over the rust to show where it still has some of the original paint on it that hasn't been burned off yet.

retiredyank

Joined: June 29, 2009
KitMaker: 11,610 posts
Armorama: 7,843 posts

Posted: Friday, December 07, 2012 - 08:58 PM UTC
I can do you one better. I have a sponge, with which to mottle the paint on.
AFVFan

Joined: May 17, 2012
KitMaker: 1,980 posts
Armorama: 1,571 posts

Posted: Friday, December 07, 2012 - 10:23 PM UTC
Quoted Text
I can do you one better. I have a sponge, with which to mottle the paint on.
That'll work, too. I like using a small flat tip for better control. I always get sloppy when I try to use a piece of sponge.

 |


