Campaigns: Completed Campaigns
Campaigns that are completed should be grouped here.
Hosted by Richard S.
Wurf & Friends :: Rocket Weapons in WWII
ColinEdm
Staff MemberAssociate Editor
ARMORAMA
Visit this Community
Alberta, Canada
Joined: October 15, 2013
KitMaker: 1,355 posts
Armorama: 1,229 posts
Posted: Friday, January 30, 2015 - 09:52 AM UTC
Started on fixing up the launcher. Here is what it looks like OOB:

Ignition wires aren't done well, lots of flash and ejector pin marks inside the tubes, just generally not well done. I started by sanding out the insides of the tubes, some putty work and then scraping off the wires and making new ones. Still have to add the pigtails when the rockets are in place.
Namabiiru
Staff MemberAssociate Editor
MODEL SHIPWRIGHTS
#399
Visit this Community
Rhode Island, United States
Joined: March 05, 2014
KitMaker: 2,888 posts
Armorama: 1,920 posts
Posted: Saturday, January 31, 2015 - 12:29 PM UTC
I like what you've done there, Colin. Very classy upgrade.

My wee little Renault is all built and primed, ready for paint.


ColinEdm
Staff MemberAssociate Editor
ARMORAMA
Visit this Community
Alberta, Canada
Joined: October 15, 2013
KitMaker: 1,355 posts
Armorama: 1,229 posts
Posted: Saturday, January 31, 2015 - 08:45 PM UTC
Thanks Mark, that is a really neat little unit you have there! Can't wait to see it painted, I think I will have to get ones of those myself. How was the assembly?
SGTJKJ
#041
Visit this Community
Kobenhavn, Denmark
Joined: July 20, 2006
KitMaker: 10,069 posts
Armorama: 4,677 posts
Posted: Saturday, January 31, 2015 - 09:51 PM UTC
Mark, what kit is that? Interesting little Renault.

Colin, nice to see the little low budget improvements. Nice to see improvements can be done without a 100 USD investment in PE and resin sets.
Namabiiru
Staff MemberAssociate Editor
MODEL SHIPWRIGHTS
#399
Visit this Community
Rhode Island, United States
Joined: March 05, 2014
KitMaker: 2,888 posts
Armorama: 1,920 posts
Posted: Sunday, February 01, 2015 - 03:49 AM UTC
Colin, Jesper;
This is the Mirage Hobby UE-sWG 40/28 cm Wk Spr. I was told this was a good kit, but as much as I hate to say it, I found it to be a very nasty little piece of work. The plastic is extremely soft (which has it's ups and downs); it lacks a lot of detail, and what is there is not at all crisp (don't build this one on the heels of a Dragon kit, like I did); fit is problematic in some places; the tracks are literally impossible to get right; and instructions are very bad--mostly hand-drawn, unclear in some places, and flat out wrong in others. The tracks are the biggest problem. They're supposed to be link and length, but the shortest segments are actually two links long, and they simply will not go around the various small-diameter wheels (including the drive sprocket) properly. I'm hoping that if I can do the painting right I will be able to disguise the issues with the tracks.

Having said all that, apart from the tracks, it does go together pretty quickly so would make a decent weekend kit.

nng-nng
Visit this Community
Bayern, Germany
Joined: October 22, 2013
KitMaker: 380 posts
Armorama: 376 posts
Posted: Sunday, February 01, 2015 - 04:30 AM UTC
Thanks for the estimation Mark, just had a look at the prices again... seems about right for a 10 quid kit.
The problem is, it looks quite good from here... so I´m now considering getting one of them aswell
Namabiiru
Staff MemberAssociate Editor
MODEL SHIPWRIGHTS
#399
Visit this Community
Rhode Island, United States
Joined: March 05, 2014
KitMaker: 2,888 posts
Armorama: 1,920 posts
Posted: Sunday, February 01, 2015 - 05:16 AM UTC
Quite right, Fabian. Not expensive, so you get what you pay for, yes? Someone who really wanted to invest the time good I'm sure make some nice scratch-built enhancements, but I just didn't feel like putting that kind of effort into this kit. I did make a couple of small changes, the most notable being replacing the aiming post, but there are plenty of other things that could be fixed pretty easily.

panzerbob01
Visit this Community
Louisiana, United States
Joined: March 06, 2010
KitMaker: 3,128 posts
Armorama: 2,959 posts
Posted: Sunday, February 01, 2015 - 05:36 AM UTC
Mark;

Looks pretty nice so far from here!

Also looks like you actually came out OK with the various challenges posed by this little monster kit Yeah, it's a somewhat nasty little kit, but way cool anyway!

I built this one as perhaps my FIRST "modern era armor kit building experience" when I returned to styrene models after about 35 years off the hobby! 
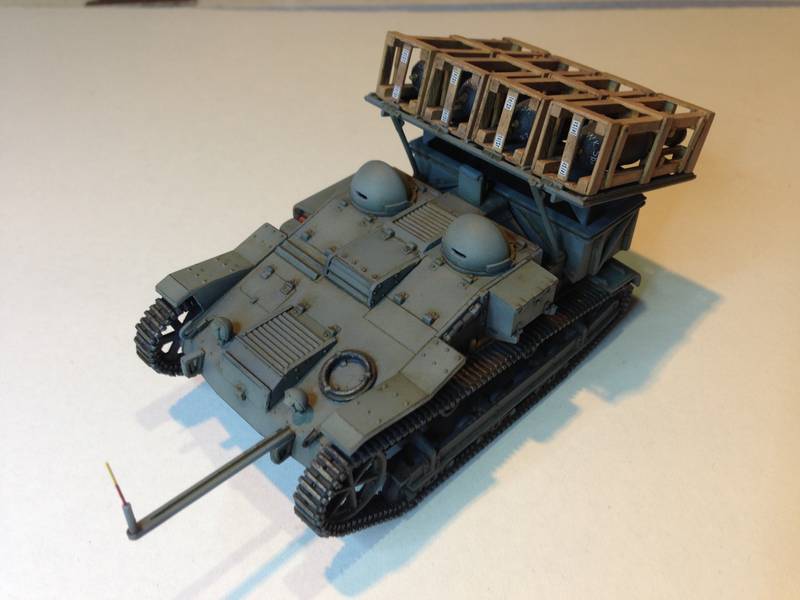
That was back in 2009... I saw this same dinky kit in a vendor's pile at the first model show I ever attended (2009) - the subject looked "WOW" (I was actually fairly informed of the variety of German WWII ad-hocs and conversions, including this particular item - of which perhaps 20 were assembled in France early - mid 1944 to equip units in anticipation of D-Day... BUT I had NEVER seen any model kit depicting this thing, so... WOW! ), and the price was seemingly "right" - guy wanted $8 for it. I jumped on.

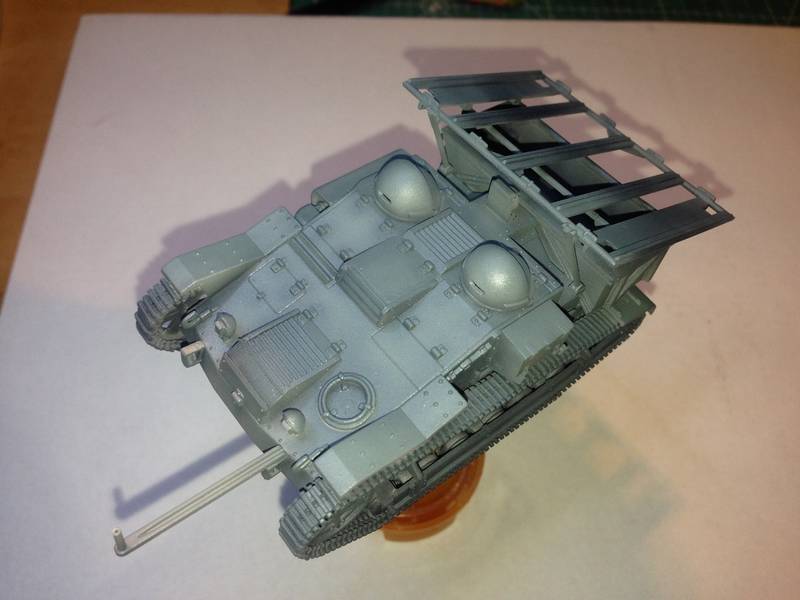
I built it - discovered all the same issues - awful tracks (but then, I had only experienced rubberbands to that point, so... ), mushy details, soft plastic. But I plead ignorance, as to that point I had last built something in about 1974 - 75, so... And that great Tamiya UE kit had yet to appear, so... Live and learn, friends, LIVE and LEARN!

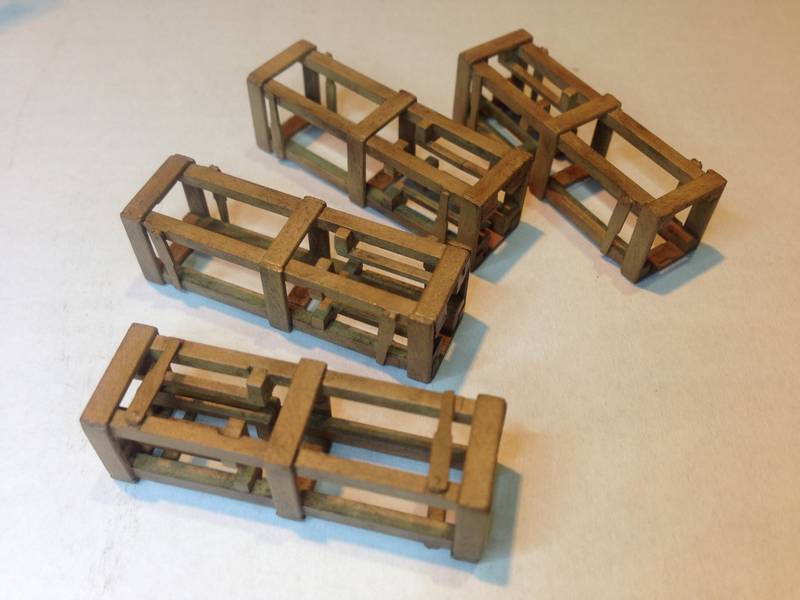
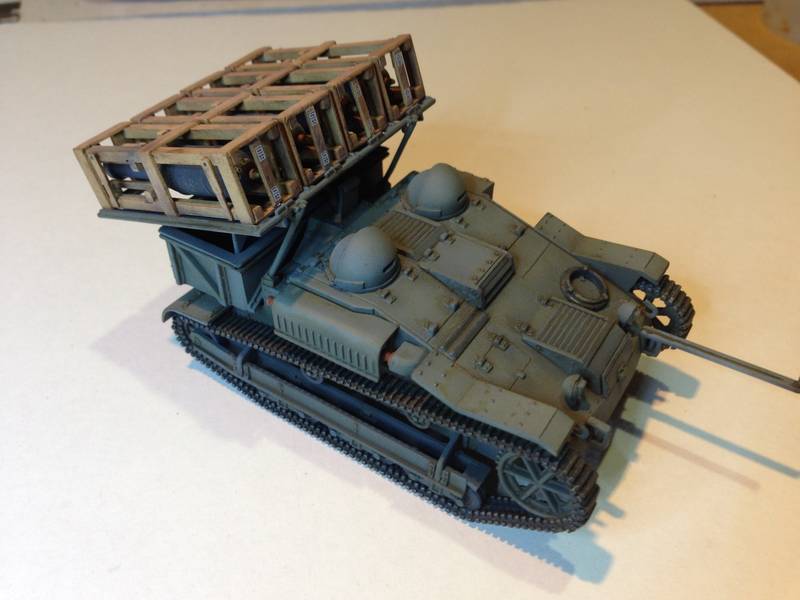
I did a LOT of scratch detailing, as I got onto the web and discovered lots of missing details. The kit actually went together OK, and the tracks went on after some fight and fuss...

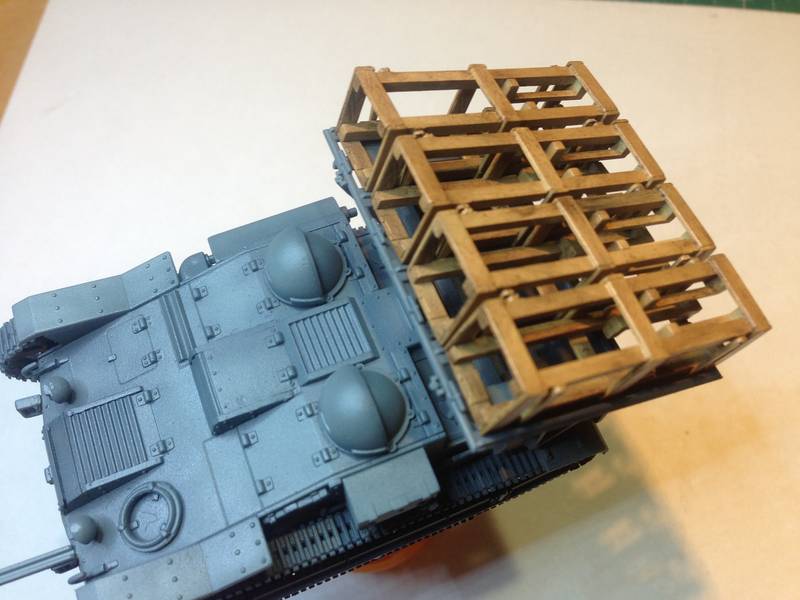
Looks like you will come out with a good-looking build, Pard! I am WAY looking forward to seeing the paint!

And, as there is a nice Dragon wurf set available... one could pretty easily do one of these using the much much better Tamiya kit - with of course still some added detail, etc.!

Bob
Namabiiru
Staff MemberAssociate Editor
MODEL SHIPWRIGHTS
#399
Visit this Community
Rhode Island, United States
Joined: March 05, 2014
KitMaker: 2,888 posts
Armorama: 1,920 posts
Posted: Sunday, February 01, 2015 - 05:43 AM UTC
Thanks for the encouragement, Bob! Call me crazy, but somehow I still like this thing, warts and all. Fortunately, my inept photography hides a lot of the warts!

ColinEdm
Staff MemberAssociate Editor
ARMORAMA
Visit this Community
Alberta, Canada
Joined: October 15, 2013
KitMaker: 1,355 posts
Armorama: 1,229 posts
Posted: Sunday, February 01, 2015 - 07:55 AM UTC
Finally onto the interior painting, primed, basecoat of Elfenbein, then detail painting. Let it cure for a day then it will be on to weathering and I can close it up.


Namabiiru
Staff MemberAssociate Editor
MODEL SHIPWRIGHTS
#399
Visit this Community
Rhode Island, United States
Joined: March 05, 2014
KitMaker: 2,888 posts
Armorama: 1,920 posts
Posted: Sunday, February 01, 2015 - 08:12 AM UTC
Looking good, Colin!

Namabiiru
Staff MemberAssociate Editor
MODEL SHIPWRIGHTS
#399
Visit this Community
Rhode Island, United States
Joined: March 05, 2014
KitMaker: 2,888 posts
Armorama: 1,920 posts
Posted: Monday, February 02, 2015 - 03:39 AM UTC
Got a good start on painting last night.

I used Vallejo German Grey for pre-shade (I already had the AB loaded to do the rockets). Base coat is Tamiya Light Grey with a bit of Field Grey added.


For the rocket crates I mixed up roughly equal amounts of Tamiya Desert Yellow, Flesh, and White, then brushed on AK Dark Mud pigment to get the grain effect.


Being my first real attempt at wood grain with this technique, I'm generally pretty satisfied with the result; however, to my eye it looks more like stained wood (great if I were making dollhouse furniture) than the rough-sawn timber I was going for. I'm really loath to try to re-do these because they are quite a pain to spray and pigment, so I wanted to hear everyone else's opinions. Are they passable? Bear in mind, they're still pretty shiny because everything has been over-sprayed with Future to lock the pigment down and protect the paint.

For reference here's what things look like with the crates mounted on the hull.


WTY?

SGTJKJ
#041
Visit this Community
Kobenhavn, Denmark
Joined: July 20, 2006
KitMaker: 10,069 posts
Armorama: 4,677 posts
Posted: Monday, February 02, 2015 - 08:46 PM UTC
Colin, nice progress.

Mark, I thought this might be the Mirage kit, but looked too good, so I thought that maybe I missed a release somewhere. You certainly did a good job on it.
I agree on your wooden frames, They look a bit varnished. However, the wood grain is not that pronounced in this scale, so I think you are pretty close. A flat coat and I think you are fine.
Namabiiru
Staff MemberAssociate Editor
MODEL SHIPWRIGHTS
#399
Visit this Community
Rhode Island, United States
Joined: March 05, 2014
KitMaker: 2,888 posts
Armorama: 1,920 posts
Posted: Tuesday, February 03, 2015 - 03:24 AM UTC
Thanks, Jesper. Yes, they are certainly too shiny because they only have the Future sprayed on them to seal the pigment. Still need to get the decals on before finishing up with matte varnish. My real concern was over whether the grain is too dark to look like natural wood. Think I'll probably go with it anyway...

ColinEdm
Staff MemberAssociate Editor
ARMORAMA
Visit this Community
Alberta, Canada
Joined: October 15, 2013
KitMaker: 1,355 posts
Armorama: 1,229 posts
Posted: Tuesday, February 03, 2015 - 09:28 AM UTC
Mark, you and I seem to be the only active ones in this campaign at the moment! Looking good for such an inexpensive kit. I think the wood frames will look just fine once you have some flat on them.

Completed weathering of the interior with some washes, pigments and chipping:


Closed up the hull, this is how it looks through the rear doors:
Namabiiru
Staff MemberAssociate Editor
MODEL SHIPWRIGHTS
#399
Visit this Community
Rhode Island, United States
Joined: March 05, 2014
KitMaker: 2,888 posts
Armorama: 1,920 posts
Posted: Tuesday, February 03, 2015 - 09:37 AM UTC
Thanks, Colin.

You're right--feels a little lonely doesn't it? I guess most folks don't really feel the pressure to do much until the final months, but I've got too many other campaigns I have to get cracking on.

Love what you've done with the interior of your sdkfz. You'll need to mount a little spy cam in there so people can view your work....

Removed by original poster on 02/04/15 - 04:38:00 (GMT).
SGTJKJ
#041
Visit this Community
Kobenhavn, Denmark
Joined: July 20, 2006
KitMaker: 10,069 posts
Armorama: 4,677 posts
Posted: Tuesday, February 03, 2015 - 08:55 PM UTC

Quoted Text

Thanks, Jesper. My real concern was over whether the grain is too dark to look like natural wood. Think I'll probably go with it anyway...


I think you should as well. They will look good and realistic.

Mark and Colin, you guys are the front runners in this campaign. The rest of us will follow. You have set the bar high with your work, hopefully we can reach that benchmark.
Namabiiru
Staff MemberAssociate Editor
MODEL SHIPWRIGHTS
#399
Visit this Community
Rhode Island, United States
Joined: March 05, 2014
KitMaker: 2,888 posts
Armorama: 1,920 posts
Posted: Wednesday, February 04, 2015 - 03:05 AM UTC
Decals applied...check.
Tracks painted...check.
Details painted...check.
Raw umber oil wash...check.
Shovel handle painted...oops...go back...check.
Siting post installed...check.
Matt varnish on rockets and satin varnish on hull...check.
Mike Charlie!


Noticed in the photos the siting post was a bit out of skew...have gone back and corrected that.

ColinEdm
Staff MemberAssociate Editor
ARMORAMA
Visit this Community
Alberta, Canada
Joined: October 15, 2013
KitMaker: 1,355 posts
Armorama: 1,229 posts
Posted: Wednesday, February 04, 2015 - 06:22 AM UTC
Well done!
Namabiiru
Staff MemberAssociate Editor
MODEL SHIPWRIGHTS
#399
Visit this Community
Rhode Island, United States
Joined: March 05, 2014
KitMaker: 2,888 posts
Armorama: 1,920 posts
Posted: Wednesday, February 04, 2015 - 06:29 AM UTC
Thanks, Colin! Overall I'm rather pleased with the result in spite of starting with a very rough (but inexpensive!) kit. Looking forward to seeing the progress on your Maultier.

panzerbob01
Visit this Community
Louisiana, United States
Joined: March 06, 2010
KitMaker: 3,128 posts
Armorama: 2,959 posts
Posted: Wednesday, February 04, 2015 - 07:34 PM UTC
UE with Wurf NICELY DONE, Mark!

It's a rough little kit (I know... ) but you have indeed pulled it together quite respectably

I had a little chuckle over your finding that your targeting rod was on a bit crooked! I'll bet that the real things may well have ended up that way! Not that it meant a whole lot to aiming this device... "aiming" takes on a whole different spin when one is dealing with pointing one's tracked ride in the direction of the target, followed by launching a bunch of un-guided and somewhat less-than-consistent and accurate rocket-bombs! This sort of thing was called an "area effect weapon" for a reason!

I love seeing folks do these - I enjoyed this little monster, crude and funky as it is - and plan myself to take a wing at a couple more (RPM kitted the other known version of this UE wurf track - along with the similar contraption built on the Lorraine L-37 tractor... 2 more crude-but-cool kits!).

When I went for this monster, I found a period photo of Rommel inspecting one ca June 01 1944... That one came in the period mottled tricolor (BTW; this photo was used to loosely create the box-art - without some of the details and wearing a gray coat...). I tried (perhaps at best modestly) for that look, with a few (OK, several) scratch mods, etc. I found myself less able than you were to get those tracks to come out ok...

One of the things I found actually most lacking in this kit was the missing driver's aiming "sights" that were attached in front of his dome. Another was the apparent lack of any "fittings" to adjust the ramp or platform angle - those two posts at the front of the ramp were telescoping tubes - it was the way to change the nominal range of the bombs...

So I did try to fix up those, along with that awful "tow cable ring"...!

FWIW:


Thanks for sharing your great little wurf!

Now that you have seen and conquered this one... time to go to the next RPM wurfer!

Bob
Namabiiru
Staff MemberAssociate Editor
MODEL SHIPWRIGHTS
#399
Visit this Community
Rhode Island, United States
Joined: March 05, 2014
KitMaker: 2,888 posts
Armorama: 1,920 posts
Posted: Thursday, February 05, 2015 - 03:34 AM UTC
Yours looks great, Bob.

There were lots of things I noticed that I said to myself, "I really should fix that"--and yes, the the so-called tow cable is so laughable. I'm almost regretting not re-doing it, but the truth is I really needed to get cracking on my build for the Whole Hog campaign, which I know is going to be a long one. This one was more of a "screw it--let's see how it turns out" sort of a build. My biggest concern going in was that I have never been able to do wood grain even remotely decent-looking prior to this, and I knew that was going to have to be a stand-out feature on this tank. Pressure!

ColinEdm
Staff MemberAssociate Editor
ARMORAMA
Visit this Community
Alberta, Canada
Joined: October 15, 2013
KitMaker: 1,355 posts
Armorama: 1,229 posts
Posted: Saturday, February 07, 2015 - 10:58 PM UTC
So she's ready for primer! Hull is just dry fit on chassis. replaced a few more bits and bobs on the outside with some spare parts and some Aber clamps. Just have to mask off the interior now.


ColinEdm
Staff MemberAssociate Editor
ARMORAMA
Visit this Community
Alberta, Canada
Joined: October 15, 2013
KitMaker: 1,355 posts
Armorama: 1,229 posts
Posted: Monday, February 09, 2015 - 08:59 AM UTC
Got some paint on...now decals and weathering...