Academy 1:35 Wirbelwind - Quick weekend build
Møre og Romsdal, Norway
Joined: December 03, 2012
KitMaker: 300 posts
Armorama: 285 posts
Posted: Monday, January 07, 2013 - 08:37 AM UTC
Hi everyone!
I grew impatient while waiting for my varnish to arrive, so I started on one of my cheap kits I have in my stash. Most of the assembly is done, with a few things to paint before gluing them together. Getting ready to prime the parts and this is the before shot:
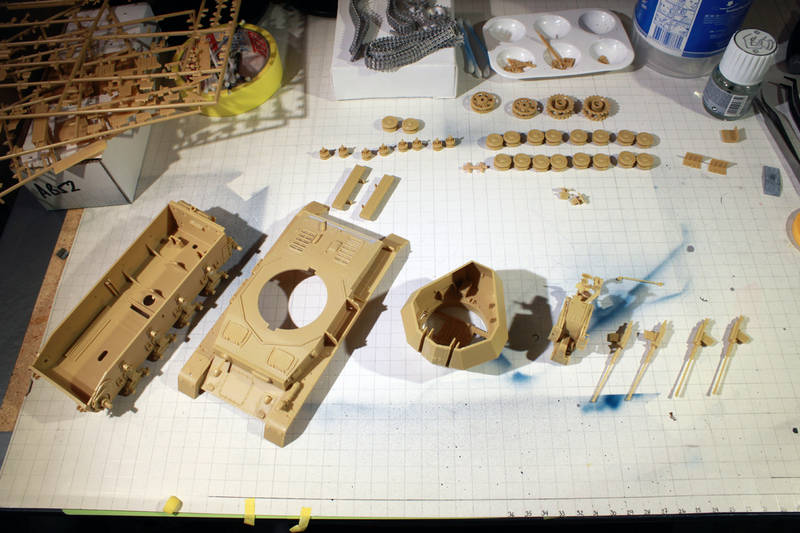
I noticed that the Academy kit is a bad copy of the Tamiya kit, with one huge gap in the rear of the engine doors. Gave me an opportunity to trying putty for the first time, too.
Since this is a cheap and somewhat shoddy kit, I'd like to use to opportunity to take requests for any crazy/silly/experimental camos that you would like to see applied to this "Wirby". Can't guarantee that I have the colors for it, but if I do, I'll give it a try!
Any suggestions?
Arkansas, United States
Joined: June 29, 2009
KitMaker: 11,610 posts
Armorama: 7,843 posts
Posted: Monday, January 07, 2013 - 09:33 AM UTC
Dunkelgelb and schokolate braun tiger stripes.
Ideals are peaceful. History is violent.
North Carolina, United States
Joined: May 17, 2012
KitMaker: 1,980 posts
Armorama: 1,571 posts
Posted: Monday, January 07, 2013 - 09:57 AM UTC
This wouldn't be too bad of a kit to try a hard edged scheme on. Plenty of nice flat panels on it.
Hope they did a better job molding the wheels than they did on their early Mk IV kits.
Møre og Romsdal, Norway
Joined: December 03, 2012
KitMaker: 300 posts
Armorama: 285 posts
Posted: Tuesday, January 08, 2013 - 07:07 AM UTC
I've ordered a few more colors, among them the Late War 1945 color set from AK. A hard edge scheme with tiger stripes could be fun to try out.
@AFVFan: The wheels are identical to those made by Tamiya.
North Carolina, United States
Joined: May 17, 2012
KitMaker: 1,980 posts
Armorama: 1,571 posts
Posted: Tuesday, January 08, 2013 - 08:36 AM UTC
Quoted Text
@AFVFan: The wheels are identical to those made by Tamiya.
That's good to know. The ones they used on their early Mk IV kit were actually tapered towards the edge with poorly marked hub rims.
Møre og Romsdal, Norway
Joined: December 03, 2012
KitMaker: 300 posts
Armorama: 285 posts
Posted: Friday, January 11, 2013 - 08:13 AM UTC
It appears that I might have been lying to you regarding the road wheels. Closer inspection reveals tapering on about half of the road wheels, but the hubs themselves are on par with Pz IV hubs from my two Dragon kits.
Møre og Romsdal, Norway
Joined: December 03, 2012
KitMaker: 300 posts
Armorama: 285 posts
Posted: Saturday, January 12, 2013 - 05:20 AM UTC
The Wirby is primed and first layer of base color is on. I accidentally picked the wrong yellow from my shelf; used Tank Dark Yellow instead of Dark Yellow. It's a bit more greenish than I had imagined.

I was planning on painting the turret as well, but the compressor overheated and I'll let it cool off. Looks like I need to apply another layer to get a nice coverage.
Arkansas, United States
Joined: June 29, 2009
KitMaker: 11,610 posts
Armorama: 7,843 posts
Posted: Saturday, January 12, 2013 - 05:54 AM UTC
That looks more like Tamiya yellow green. Should mate well with brown, if you plan on going that route.
Ideals are peaceful. History is violent.
Møre og Romsdal, Norway
Joined: December 03, 2012
KitMaker: 300 posts
Armorama: 285 posts
Posted: Saturday, January 12, 2013 - 08:26 AM UTC
Airbrushed the turret with Dark Yellow, but I still think it needs to be toned down a bit.

Tried various ratios of light grey added to the dark yellow and I ended up with something similar to the dunkelgelb that Bill Plunk used on his Wirbelwind. Not quite sure which is the historically correct one, though.
Arkansas, United States
Joined: June 29, 2009
KitMaker: 11,610 posts
Armorama: 7,843 posts
Posted: Saturday, January 12, 2013 - 08:54 AM UTC
I would suggest adding a couple of filters of lighter tan shades. I managed to salvage a turret this way. I painted the tank dunkelgelb and ruined the finish on the turret. Went back and sprayed it with a Tamiya color. Big difference. I then added an overall filter and one just to the turret. Looks great, now.
Ideals are peaceful. History is violent.
Møre og Romsdal, Norway
Joined: December 03, 2012
KitMaker: 300 posts
Armorama: 285 posts
Posted: Saturday, January 12, 2013 - 11:21 PM UTC
Took the time to set up mu humongous light tent and shoot some photos with proper white balance:

These are the actual colors on the Wirbelwind. Which one would be preferable?
Arkansas, United States
Joined: June 29, 2009
KitMaker: 11,610 posts
Armorama: 7,843 posts
Posted: Sunday, January 13, 2013 - 12:02 AM UTC
I would go with the color you painted the turret.
Ideals are peaceful. History is violent.
North Carolina, United States
Joined: May 17, 2012
KitMaker: 1,980 posts
Armorama: 1,571 posts
Posted: Monday, January 14, 2013 - 10:44 AM UTC
I'll second that opinion. The hull color is just too green for me.
Møre og Romsdal, Norway
Joined: December 03, 2012
KitMaker: 300 posts
Armorama: 285 posts
Posted: Tuesday, January 15, 2013 - 09:13 AM UTC
Repainted the hull with Vallejo Dark Yellow, along with the drive sprockets and idlers. I also applied the camo with AK Interactive Chocolate Brown. Forgot to use a hard edge scheme and I really overdid the front of the vehicle, but it's not too shabby for my first free-hand with airbrush:

Did experience some problems with the AK color being a tad too thick for my best AB and ended up overspraying a lot. Looks like I'll have to invest in a better AB.
The guns and wheels are all painted too, along with the inside of the turret. All that is left of the basecoating is to finish some details on the tools and decide which tracks I'll go for.
North Carolina, United States
Joined: May 17, 2012
KitMaker: 1,980 posts
Armorama: 1,571 posts
Posted: Tuesday, January 15, 2013 - 06:56 PM UTC
Quoted Text
Did experience some problems with the AK color being a tad too thick for my best AB and ended up overspraying a lot. Looks like I'll have to invest in a better AB.
You could try a higher air pressure setting, or thin the paint a little. Either option may solve your problem.
Arkansas, United States
Joined: June 29, 2009
KitMaker: 11,610 posts
Armorama: 7,843 posts
Posted: Tuesday, January 15, 2013 - 08:20 PM UTC
I highly recommend an Iwata airbrush. However, I learned on a Badger 150. The 150 is good for learning and has three different spray options (fine, medium, large). Like the camo. You can make it hard edged pretty easily. Just hand brush the brown along the edges of the sprayed camo.
Ideals are peaceful. History is violent.
Møre og Romsdal, Norway
Joined: December 03, 2012
KitMaker: 300 posts
Armorama: 285 posts
Posted: Saturday, February 09, 2013 - 07:30 AM UTC
Been a while since my last update on this build, but I've put it on hold until my new airbrush arrives.
Decided I didn't like the camo and that my current airbrush is good enough, so I've invested in a Iwata HP-C Plus that I'm expecting in a week or two.
In the meantime I've painted the idlers, wheels, sprockets and return rollers in their base colours.

Started with airbrushing the road wheels with Vallejo Black to simulate rubber and then used a template mask to airbrush the hubs with Vallejo Dark Yellow. Sprockets, idlers and return rollers received their Dark Yellow as well.
Will be doing the pioneer tools but besides that, I'll work on my Panzer I until the new Iwata arrives.
Møre og Romsdal, Norway
Joined: December 03, 2012
KitMaker: 300 posts
Armorama: 285 posts
Posted: Saturday, March 02, 2013 - 11:27 AM UTC
New airbrush arrived and a new update!

The camo came out okay, a few ugly places here and there. I guess I just need more practice doing freehand airbrushing.
Added rusting to the muffler and painted the MG barrel for the radioman.
Still need to add the spare tracks and tow cables. Then it's on to decals and weathering at last. Looking forward to finish this kit.. the "weekend build". No such thing.
Arkansas, United States
Joined: June 29, 2009
KitMaker: 11,610 posts
Armorama: 7,843 posts
Posted: Saturday, March 02, 2013 - 12:27 PM UTC
It always takes some practice, using a new airbrush. From what I can see, the paint turned out fine. I believe that the jack block should be natural wood. I don't think Germany would waste resources to stain it.
I have the Iwata HP-C Plus. It has served me faithfully for its life. This being a few years. I think you will really like it. After every use, I run half of a cup full of acetone through it. This keeps it operating a peak performance. I only have to break it down once every 15 uses.
Ideals are peaceful. History is violent.
Queensland, Australia
Joined: December 19, 2012
KitMaker: 74 posts
Armorama: 68 posts
Posted: Tuesday, March 05, 2013 - 07:53 PM UTC
I reckon your paint scheme turned out well mate. I am keen to see the finished product. By the way, did you encounter any major fit issues with this kit?
"Allow me to be the first to offer Dr. Johnson my most sincere contrafibularities! I am anaspeptic, frasmotic, even compunctuous to have caused him such pericombobulation." - BlackAdder
Møre og Romsdal, Norway
Joined: December 03, 2012
KitMaker: 300 posts
Armorama: 285 posts
Posted: Tuesday, March 05, 2013 - 09:30 PM UTC
Thanks. The build is going great, and I'm done with adding bits and pieces to the hull. Applied a gloss coat and decals yesterday, and next up is the weathering by filters and washes before I finish up with pigments.
Hoping to get some done today and I'll post some pics when I get back home from work.
Regarding the fit issues; yes I had one major fit issue with the rear plate and the engine deck. There was a huge gap between those two parts and I had to use putty to seal it. It's the grey area on the back of the engine deck in the first picture in this thread. It's a cheap copy of an old Tamiya kit so I wasn't expecting much from this particular kit either.
Møre og Romsdal, Norway
Joined: December 03, 2012
KitMaker: 300 posts
Armorama: 285 posts
Posted: Wednesday, March 06, 2013 - 06:45 AM UTC
As promised; current status of the Wirbelwind build.

Møre og Romsdal, Norway
Joined: December 03, 2012
KitMaker: 300 posts
Armorama: 285 posts
Posted: Friday, March 08, 2013 - 10:40 AM UTC
Aaaaand I'm done! That's it! Finished! No more fiddling with this thing. I am so tired of this build and I'm so happy to have cleared my workbench, making room for better kits and (hopefully) less frustration.


I know the tracks aren't muddied like the suspension. I know that one of the barrels has a red tint from the primer.. there are a lot of things that are half-assed on this build, but I'm so happy that I won't be doing anything else on this one.
I have learned a lot from this though. Thanks for the feedback during the build!
Arkansas, United States
Joined: June 29, 2009
KitMaker: 11,610 posts
Armorama: 7,843 posts
Posted: Friday, March 08, 2013 - 10:48 AM UTC
Ah! You are finally done with your weekend build...

You made it look good, if not quite finished. I'll be pushing three armored cars off my bench, this weekend. Making room for the panzers.
Ideals are peaceful. History is violent.
Møre og Romsdal, Norway
Joined: December 03, 2012
KitMaker: 300 posts
Armorama: 285 posts
Posted: Saturday, March 09, 2013 - 11:27 AM UTC
Thanks, Matt! There's nothing like having cleared the workbench after months of work. Looking forward to start on some campaigns for the first time.


