_GOTOBOTTOM
Dioramas
Do you love dioramas & vignettes? We sure do.
End of Days - Berlin, April 1945
Barbarossa
Visit this Community
United Kingdom
Joined: August 25, 2005
KitMaker: 216 posts
Armorama: 215 posts
Posted: Monday, January 14, 2013 - 08:44 AM UTC
Hi everyone,
Well a new year, a new project, so here's mine for this year 2013...., which will probably take the entirety of 2013...!! Usually I make 2-3 dios a year, but made abit of space to try something abit bigger for a change....
This is going to be a dio of a street in Berlin 1945, in the final few days of the Reich as the Russians advance on the Reichstag. Firstly though I have to give some credit to
"Am Ende steht der Sieg - Berlin 1945", https://armorama.kitmaker.net/forums/147725&ord=&page=5
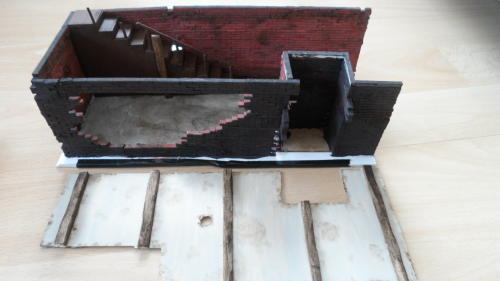
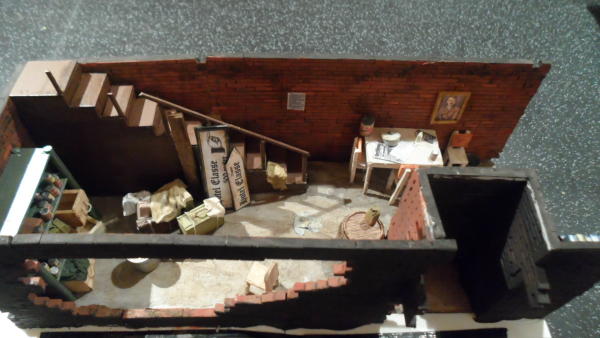
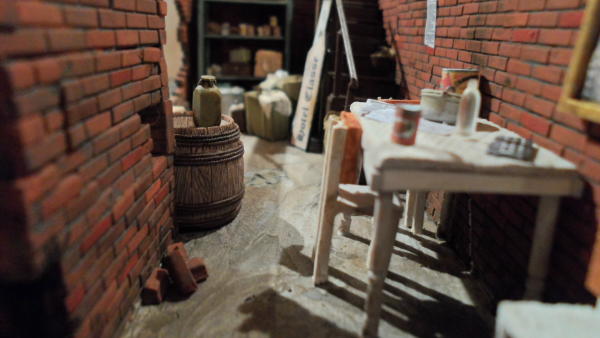
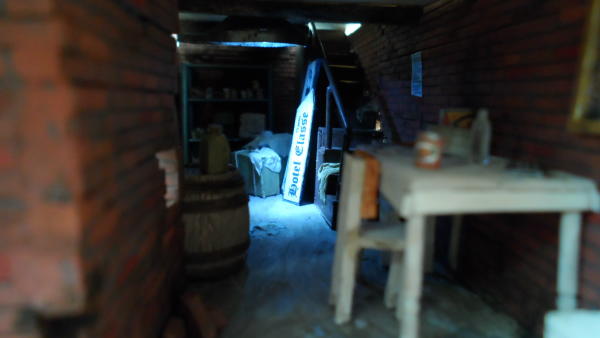
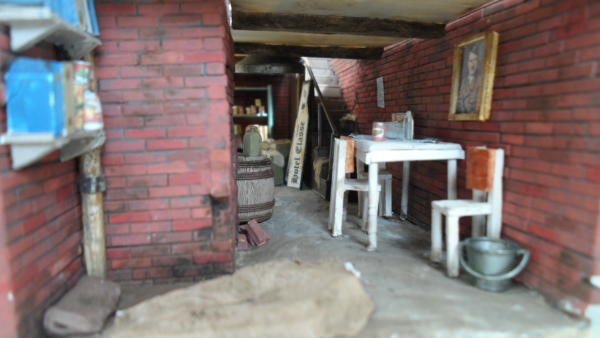
for planting the seed for the idea. His excellent model gave me the inspiration for this one, based on the 2 levels, incorporating part of a U-bahn station into the scene. This then opened up the thought of using the space to put a cellar from the house above in the opposite rear right hand corner sheltering civilians from the fighting above.
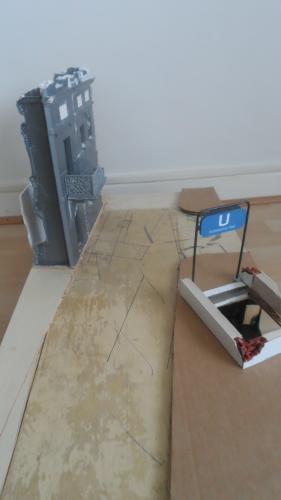
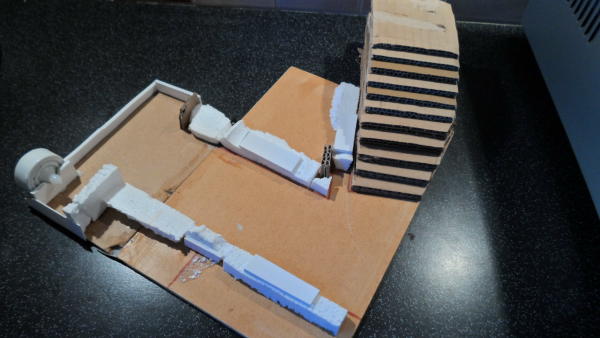
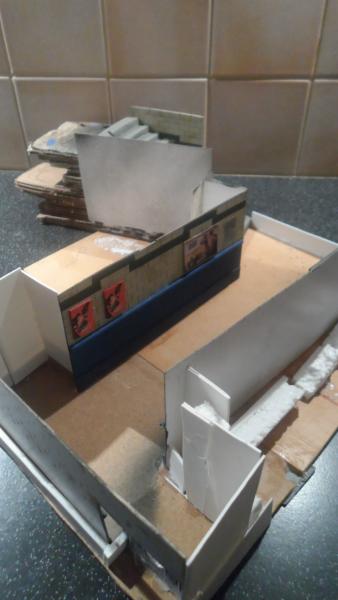
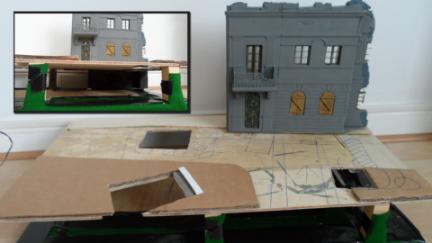
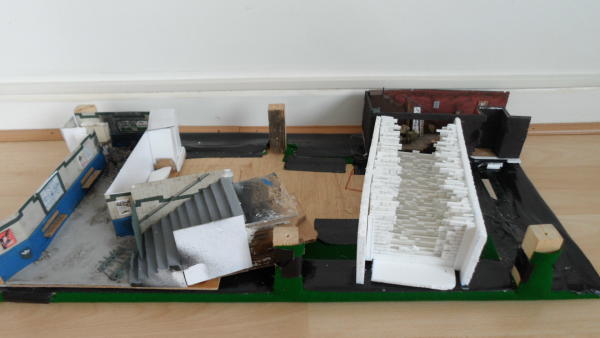
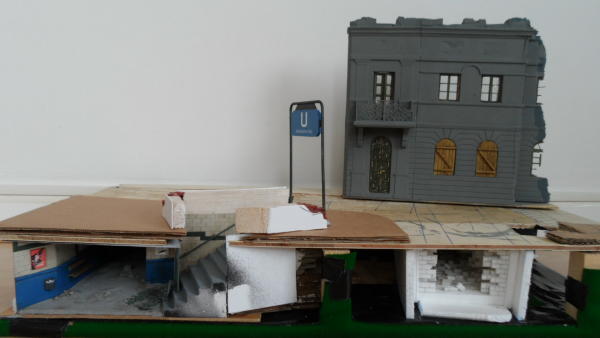
The picture below gives an idea into how I'm hoping everything fits


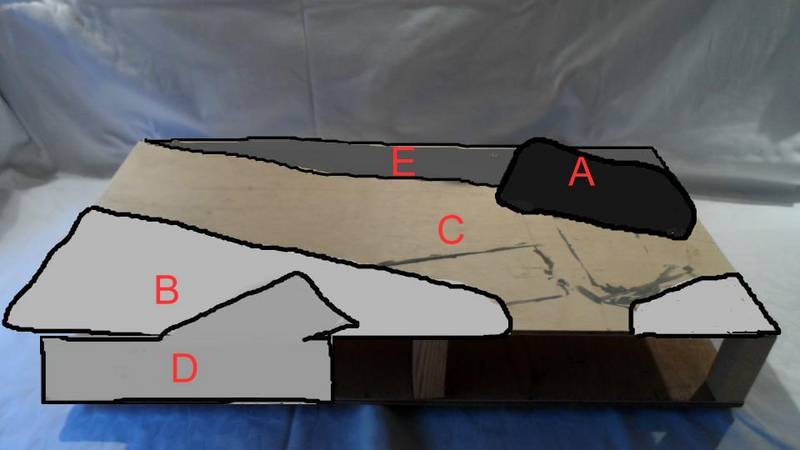
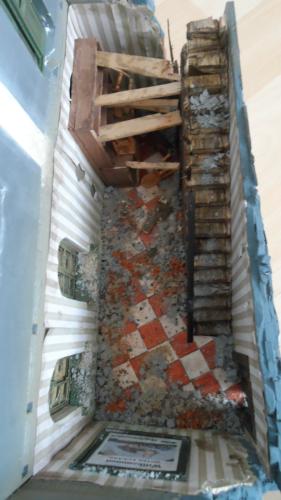
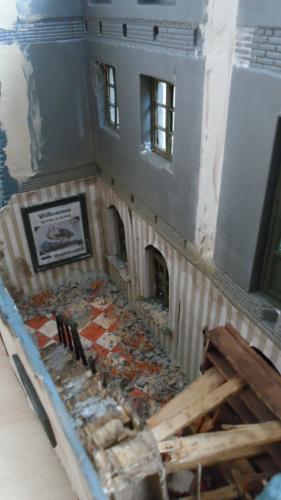
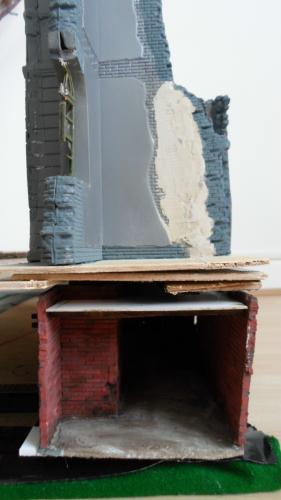
A is the position where the cellar will go underneath the larger building, sheltering the civilians from the fighting above.

B is part of a small plaza, featuring benches, a tabac, possibly afew planted small trees & an advertising kiosk.

C is the road, with a small crater to the left above the damaged station. The street to the right will have a barricade, with perhaps an MG42 nest, or small 37mm anti tank. They'll also be a car somewhere, but probably no AFV's???

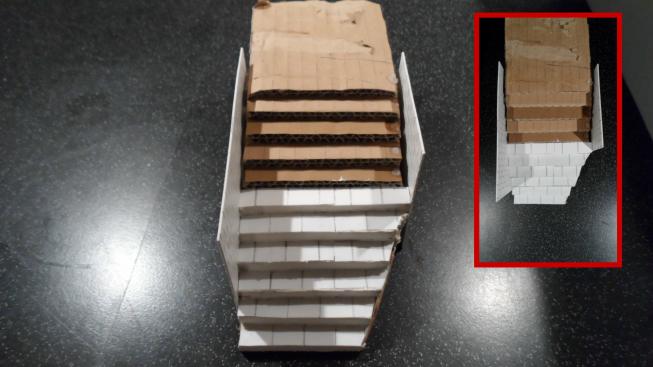
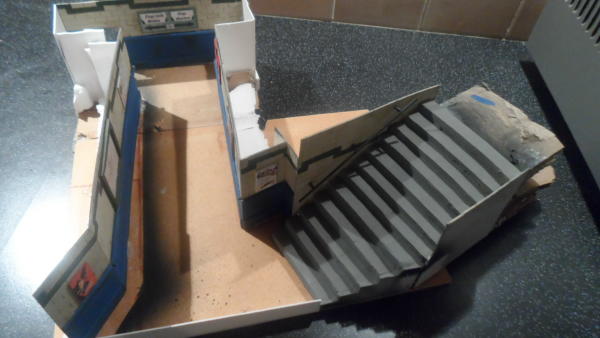
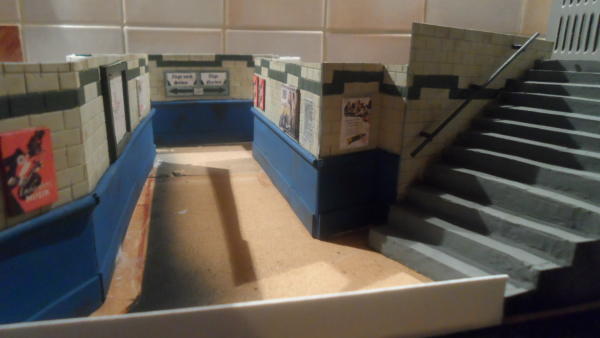
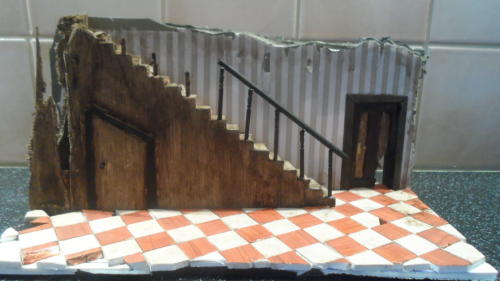
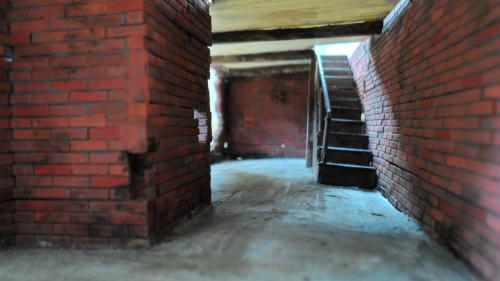
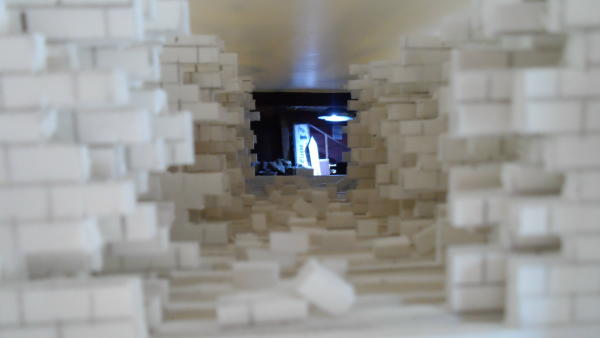
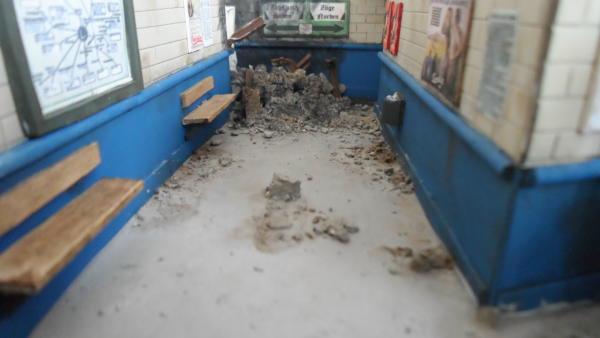
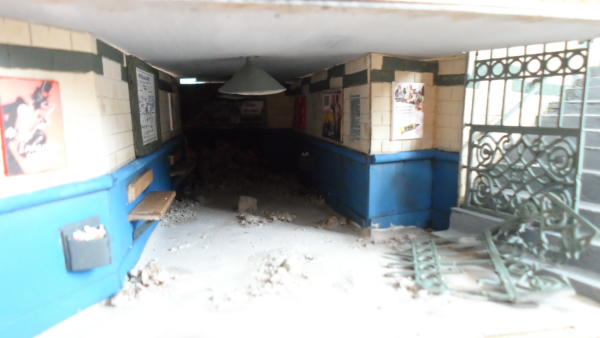
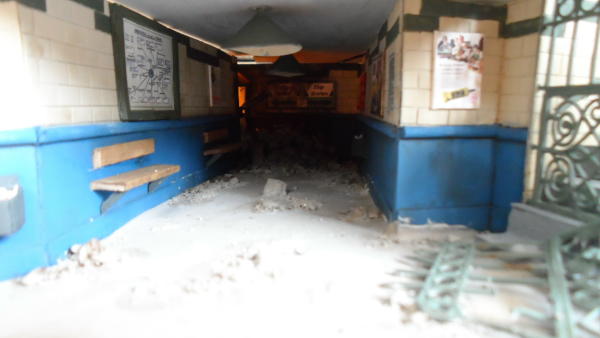
D is the entrance to the U-bahn, with the steps leading down to the cut away section of the station, with a tunnel leading to the rear, with damage to the left hand side.

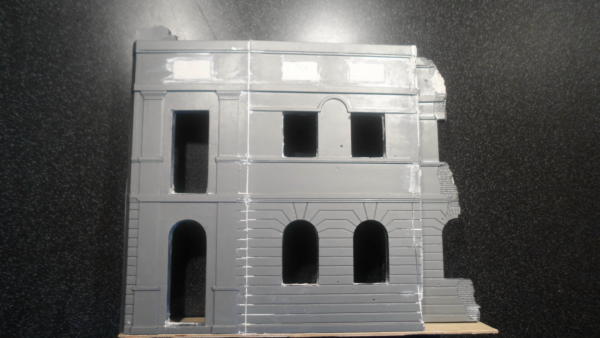
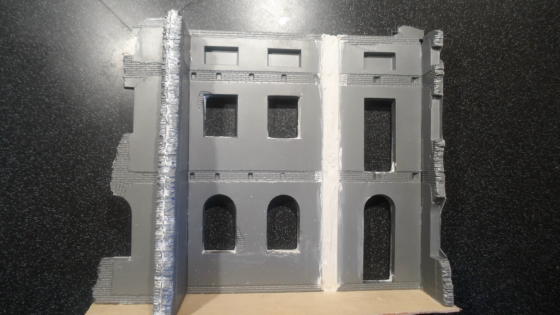
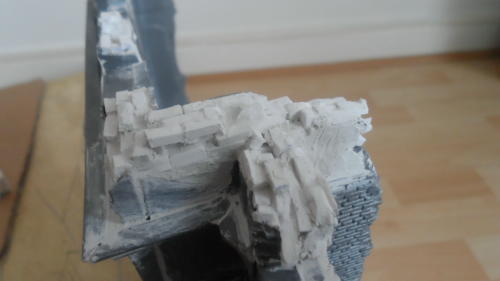
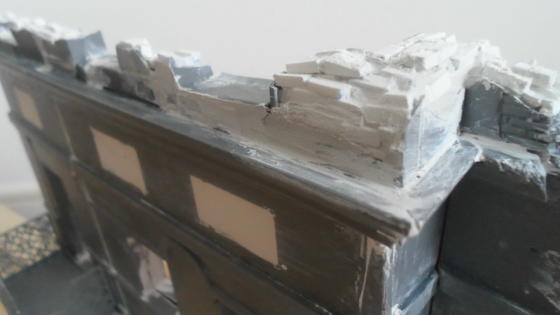
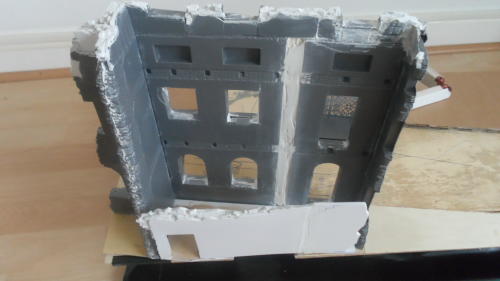
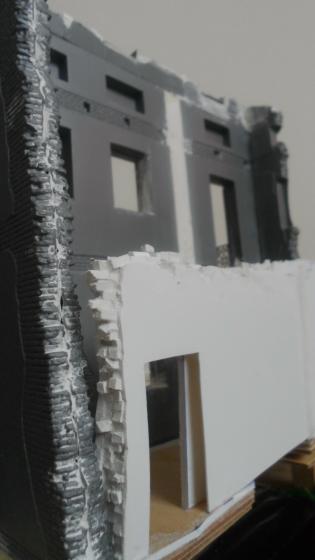
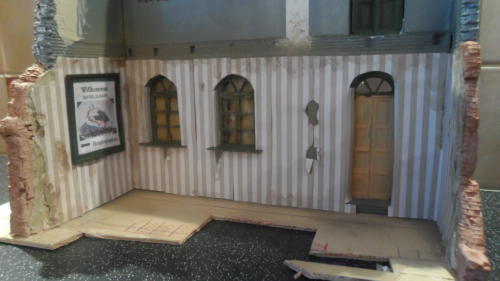
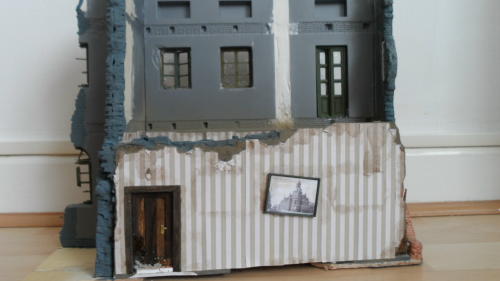
E is the strip where the buildings will go, bombed out, and holding the last few defenders of the city. The buildings will be from Miniart.


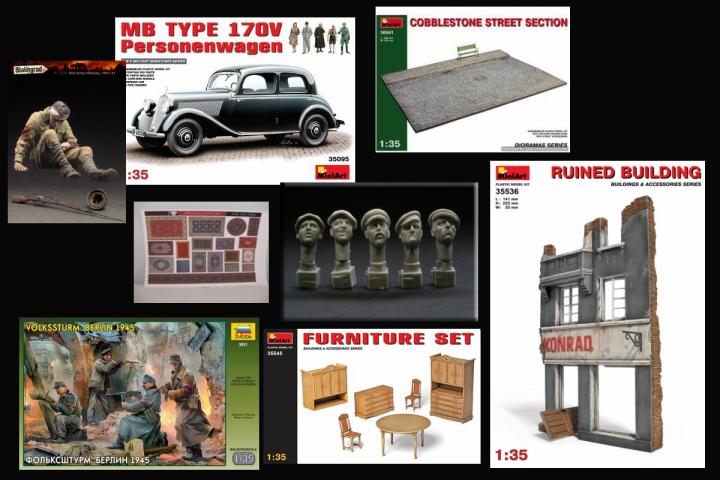
Above are a selection of the models I'm intending to use...
Miniarts MB Type 170v personenwagon, cobblestone street section, furniture set, ruined building, Lithuanian city building & civilian set.
Masterbox's Counterattack, Soviet infantry
Stalingrad's Russian figures
Plus Models Tabak
Zeveda's volkssturm Berlin 1945
Hornet Heads - civilians
Reality in Scale's Kiosk & Carpets

The overall size 'was' 60x30", but after just putting together the 'Lithuanian building', I've had to extend by afew inches rear & right, to allow for a more reasonable sized road. This building will also be built straight, as opposed to a corner model as it should be.
Overall, they'll be round about 20 figures in total, with the Russians comming in from the left, on the street & in the station, German's in the buildings.


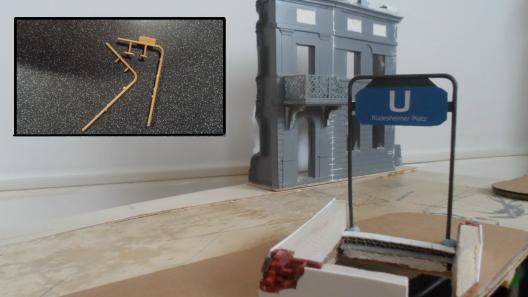
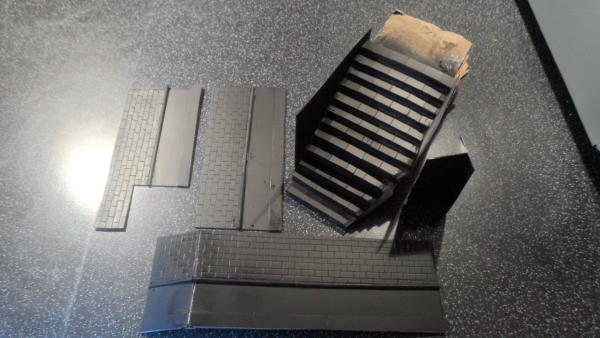
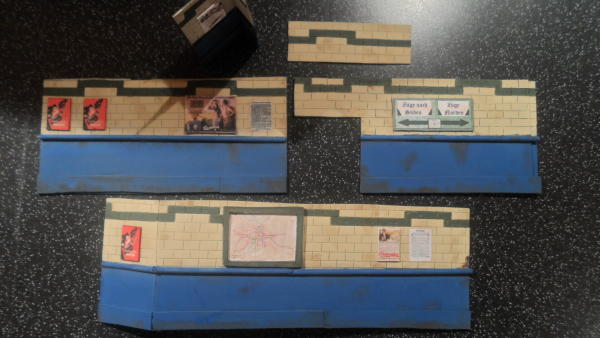
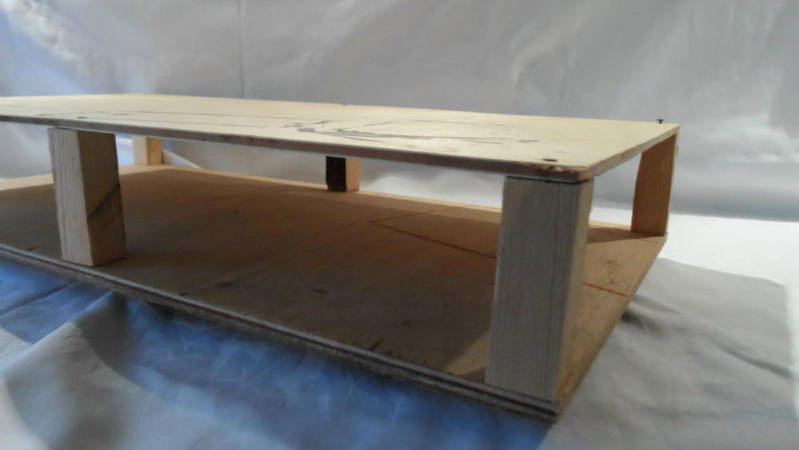
How the entrance to the station is 'hoping' to look.., now to begin!! All ideas, advice & comments more than welcome...
Thanks for reading

Simon.
War_Machine
Visit this Community
Washington, United States
Joined: February 11, 2003
KitMaker: 702 posts
Armorama: 385 posts
Posted: Monday, January 14, 2013 - 09:27 AM UTC
I like your plan for this one. It's always nice to see another modeller who gets ambitious with dios the way I do. Helps convince myself that I'm not as nutty as I sometimes fear I am. I'll be keeping my eyes on this one.
jrutman
Visit this Community
Pennsylvania, United States
Joined: April 10, 2011
KitMaker: 7,941 posts
Armorama: 7,934 posts
Posted: Tuesday, January 15, 2013 - 02:57 AM UTC
Very ambitious plan. I hope that you don't get bogged down in details and never finish this. That is what usually happens with me.
J
spartan01
Visit this Community
California, United States
Joined: December 25, 2011
KitMaker: 314 posts
Armorama: 244 posts
Posted: Tuesday, January 15, 2013 - 08:45 PM UTC
like your idea I am doing something similar the figures you have are a nice touch I wish you the best of luck
Tiger_213
Visit this Community
California, United States
Joined: August 10, 2012
KitMaker: 1,510 posts
Armorama: 1,443 posts
Posted: Tuesday, January 15, 2013 - 09:20 PM UTC
Sounds interesting, I'll be watching....
JSoltoft
Visit this Community
Fyn, Denmark
Joined: December 09, 2008
KitMaker: 95 posts
Armorama: 79 posts
Posted: Tuesday, January 15, 2013 - 09:27 PM UTC
Looking forward to following this build. I like your choice of figures and buildings.
- Johan
strongarden
Visit this Community
Florida, United States
Joined: May 14, 2012
KitMaker: 730 posts
Armorama: 624 posts
Posted: Thursday, January 17, 2013 - 12:30 PM UTC
Simon - This is a nice idea and I really like your plan. My comments echo the others here, and will enjoy following your progress.
Cheers
Dave
dcmotor81
Visit this Community
Russia
Joined: October 02, 2012
KitMaker: 2 posts
Armorama: 2 posts
Posted: Thursday, January 17, 2013 - 04:16 PM UTC
If you want to us Masterbox's kit you'll need to modify figures - the uniform in 1945 was different or find another figures.
Plasticbattle
#003
Visit this Community
Donegal, Ireland
Joined: May 14, 2002
KitMaker: 9,763 posts
Armorama: 7,444 posts
Posted: Friday, January 18, 2013 - 04:35 AM UTC
Sounds very ambitious ... but also very interesting. Good luck with it.
Barbarossa
Visit this Community
United Kingdom
Joined: August 25, 2005
KitMaker: 216 posts
Armorama: 215 posts
Posted: Thursday, January 24, 2013 - 05:41 AM UTC
Hello once again.....
Firstly, thanks for the response & positive comments....... no pressure then.....

Jerry - don't think there's much chance of getting bogged down & not finishing this one...., the beauty of this one is there's so many different elements, if one gets abit tedious, there's another 4 or 5 projects to work on....

Started work firstly on the first major building, the entrance to the U-Bahn station, and on the basic street layout.
As mentioned before, I wanted to have the 'Miniart Lithuanian City Building' built straight, as opposed to the original corner design. This wasn't too bad to convert, abit of filler here & there. I left off the right hand external wall for now, as that wall is going to lead onto the next building.


I set the building onto a seperate wooden base, so it would be easier to build & paint. The top part I changed too, it was supposed to be a flat tearrace, with small windows. Wanted though to give the impression of a much taller 'city' building, having been toppled over, so built up part of a new wall, and added cut plastic bricks & mortar to try and give that impression. I filled in the 3 small windows at the top, & will raise the internal second floor to be a similar height as the first.


Had abit of a think on the U-Bahn sign, and came up with the idea of using a sprue, trimmed & put together with more plastic card. The sign itself was done by computer, using a similar blue paint around the edge to blend it all in. It still needs to be weathered with oil paints, but pleased with how it turned out.
The basic stret layout can be seen in the pics, the 'platz' on the right, the street with the row of buildings on the back. The platz will be covered with large plastic paving slabs, cemented in with plaster. Benches & a Tabak on one end, an advertising kiosk on the other small corner.


Once all the plaster has dried, I'll sand down to hoefully reveal the broken brickwork & mortar. Below is how the right hand side will look, with plastic card surrounding most of the sides, with the cellar exposed towards the back.


Decided to make this building into a small hotel, although obviously restricted by depth, need to build a staircase from the groundfloor to allow access to the cellar below. Built a small internal wall to support the stairs, should look ok once decorated....., only to be covered in dust & rubble no doubt..!!

Thanks all for reading, will keep working on the interior of this one, as well as start the U-Bahn station......
Cheers for now

Simon.
exer
Visit this Community
Dublin, Ireland
Joined: November 27, 2004
KitMaker: 6,048 posts
Armorama: 4,619 posts
Posted: Thursday, January 24, 2013 - 08:15 AM UTC
Great idea and nice work so far. One thing though-The Soviet figures you plan on using - both the Masterbox and the Staligrad ones, are wearing early style uniforms which are different to those worn in 1945. The uniforms changed in 1943 and the gymnastiorka had a different collar and shoulder boards
Biggles2
Visit this Community
Quebec, Canada
Joined: January 01, 2004
KitMaker: 7,600 posts
Armorama: 6,110 posts
Posted: Thursday, January 24, 2013 - 09:28 AM UTC
If that's the case, you could change the concept 'slightly' and make it Stalingrad. But then you would have to change the German figures.
Barbarossa
Visit this Community
United Kingdom
Joined: August 25, 2005
KitMaker: 216 posts
Armorama: 215 posts
Posted: Thursday, January 24, 2013 - 10:35 PM UTC
Thanks guys,


Quoted Text

One thing though-The Soviet figures you plan on using - both the Masterbox and the Staligrad ones, are wearing early style uniforms which are different to those worn in 1945. The uniforms changed in 1943 and the gymnastiorka had a different collar and shoulder boards


To be honest Pat & Yuri, I didn't really put too much thought yet into the Soviet figures, I've already got the 'Stalingrad' 2, really thought they'd fit in well & I've never used that company before, but the 'MasterBox' ones perhaps I'll think again, the poses would've been ideal....., but modifying them too much I would struggle with perhaps....the figures though seem still along way off yet, plenty time to shop around....

Thanks again,
SIMON.
Plasticbattle
#003
Visit this Community
Donegal, Ireland
Joined: May 14, 2002
KitMaker: 9,763 posts
Armorama: 7,444 posts
Posted: Thursday, January 24, 2013 - 10:47 PM UTC
Great start Simon. The Miniart building loooks great. Do what you can to reove the seam on the brick work where the two halves are joined. This will become very noticeable when painted.
Quasimofo
Visit this Community
New York, United States
Joined: November 30, 2012
KitMaker: 105 posts
Armorama: 87 posts
Posted: Saturday, February 02, 2013 - 12:25 PM UTC
Looking forward with great interest to this project, especially your handling of the U-bahn station entrance. I'm planning a Checkpoint Charlie 1961 dio with the Stadtmitte station using a similar approach as you have going. But seeing your progress has given me some ideas for building up the base I hadn't considered...great work!

Just curious...what station did you pick for your U-bahn sign? Can't make it out, but it looks like....."something" Platz.
Barbarossa
Visit this Community
United Kingdom
Joined: August 25, 2005
KitMaker: 216 posts
Armorama: 215 posts
Posted: Tuesday, February 05, 2013 - 09:02 AM UTC
Hello everyone......

Have been working recently now on the U-Bahn station..., using wood, plastic card & cardboard. Having used references from the net, tried to create something quite realistic for the time.

Bill - I decided to use the station name "Rüdesheimer Platz", as this was a station open at the time of the war, and being a 'Platz' it gave me a reason to use the scene with the tabak, benches etc....
Didn't however go down the route of trying to recreate the real station entrance, street & buildings etc.. as they would've been at that time, I just used the station name....
I marked the basic station layout on a wooden base, using polystrene & cardboard. The pièce de résistance you may notice is the little plastic candle on the left hand side. It's battery operated, with access to it from the back of the dio, and will be out of sight from the viewer. It's then going to be obstructed futher with rubble etc.. from the ceiling, and once the roofs on, it should look quite atmospheric as a small fire glowing at the rear of the station...


It only took '4' attempts to get the steps right I measured the height from the wooden base upto street level on the model, then just started on the steps, 1 by 1 using thick corragated cardboard. The sides were then added, and plastic strips for the steps stuck on over the cardboard. I used plaster to cover the edges.
The sides of the station walls were made up of plastic card, tiles marked out using a ruler & craft knife, and everything sprayed black.


The walls were then airbrushed with various colours, then weathered with oil paints. I made some signs & advertisments from that era on the computer, stuck them onto card & painted the sides to match the front. The larger rail map on the wall I've changed since the photos were taken, as it looks too modern for the time. The replacement one is much better.


On the last photo, the gap at the bottom is again for the candle, which can be turned off/on from the rear, but which I still needed to be able to remove completely to change the bulb eventually. No good blocking it in entirely....

Next up is to lay the 'concrete' floor down in the station, make the station ceiling (along with said rubble) , add afew more extras, like a bench or two & a bin, & then crack on with the building across the street.....
Thanks again for reading, all advice & ideas most welcome!!
Cheers for now,

SIMON.
Kinggeorges
Visit this Community
Barcelona, Spain / España
Joined: August 31, 2005
KitMaker: 1,380 posts
Armorama: 845 posts
Posted: Tuesday, February 05, 2013 - 11:17 PM UTC
WOAOUH !
That looks really promising. It looks like winter is bringing some massive nice dioramas on Armorama !
Best and good luck
Julien
1stjaeger
Visit this Community
Wien, Austria
Joined: May 20, 2011
KitMaker: 1,744 posts
Armorama: 1,727 posts
Posted: Wednesday, February 06, 2013 - 12:01 AM UTC

Have to agree with Julien....that looks VERY promsing indeed!!

Projects like this keep people on the forum!

Cheers

Romain
War_Machine
Visit this Community
Washington, United States
Joined: February 11, 2003
KitMaker: 702 posts
Armorama: 385 posts
Posted: Wednesday, February 06, 2013 - 10:52 AM UTC
It looks like you're off to an excellent start on what promises to be a real show stopper when it's done. Keep up the great work.
Barbarossa
Visit this Community
United Kingdom
Joined: August 25, 2005
KitMaker: 216 posts
Armorama: 215 posts
Posted: Wednesday, March 06, 2013 - 05:19 AM UTC
Hi everyone,
well never thought it'd be another month before I updated any new photo's, but this dio seems to be one of the ones you spend 2-3 hours on, then sit back & think...., what have I actually achieved in that time...??? Anyway, slowly & surely it's beginning to come together. Had every intention of continuing the U-Bahn station next, but the 'Hotel' ground floor, windows & cellar took over.
Firstly have to mention I just bought Laszlo Adoba's book 'Let's build a diorama 1' https://armorama.kitmaker.net/review/4767
and this has proved invaluable to what I'm 'trying' to achieve on this project, with advice from flooring to rubble, windows to clay brickwork, can't recommend it enough!!
So for the ground floor of the first building, I made a seperate base to build the staircase on to make life easier. The stairs were aligned with the underneath so they'd be parallel with the cellar stairs below them. The stairs were made from thin wood from a fruit box, then painted it with thinned oils. I coloured 2 seperate pieces of plastic card with oil paints for the floor, then cut them into even squares & glued them to the base. Any gaps were usefully covered with bricks & rubble. The idea was the occupants had barricaded themselves into the building, so the ground floor windows were covered up, and the door was blocked by a scratch built cabinet, with afew chairs & wooden planks thrown in.


The wallpaper was taken from a wallpaper website, re-sized, & printed onto a sheet of paper in strips. Then applied as normal wallpaper. Made a couple of framed prints for the walls, and extended the sides of the MiniArt building with some rolled strips of clay, scribed to blend in with the original brickwork.


Finally, a light oil wash on the wallpaper to take the 'fresh' look off, & a scattering of pre-painted crumbled plaster & brickwork.


The cellar's taken a good 10 days to put together (on&off) using old tamiya bricks from an old diorama. Again built it on a seperate base, with a gap at the front to be seen from the front of the final model, as well as from the side. Made the staircase out of plastic card, along with the ceiling & balsa wood bemas. The floor has been plastered. The bricks were dry brushed on, then picking out afew individulas. Oil washed everything, some places more than others.


The view from the side. Obvioulsly it all lokks alittle rough around the edges, but that'll all be covered in black plastic card at the end. Made a hole in the ceiling for a small light bulb to go, being connected to a room on the ground floor to turn on & off. Scratchbuilding afew bits of furniture now for the cellar, as well as awaiting the misfortunate occupants eventually.....(8 civilians)


Not much happening from the front at the moment, made 2 new holes, the one on the left in the road being a small shell hole, the one on the lower right corner will be a small MG pit, connected to the street blockade.
Next on that everlasting 'Things to do list' is finish the cellar, build the first floor of the Hotel, & finish off the station's ceiling & debris.

Many thanks for reading, any advice or ideas more than welcome......
Cheers for now,
SIMON.
FAUST
#130
Visit this Community
Noord-Holland, Netherlands
Joined: June 07, 2002
KitMaker: 8,797 posts
Armorama: 4,190 posts
Posted: Wednesday, March 06, 2013 - 06:36 AM UTC
I really enjoyed reading through this post. I like people who can work on a project as big as this. I know myself very well and I know for certain that If I ever would try my hand at this it would have stranded halfway.

love the progress so far. The cellar parts are really convincing as is the first floor of the Hotel. Awesome job. Looking forward to the following updates.
lespauljames
Visit this Community
England - South West, United Kingdom
Joined: January 06, 2007
KitMaker: 3,661 posts
Armorama: 2,764 posts
Posted: Thursday, March 07, 2013 - 10:05 AM UTC
really ambitious and great work, i love the small touches here and there. they are what will bring the piece together at the end!
Barbarossa
Visit this Community
United Kingdom
Joined: August 25, 2005
KitMaker: 216 posts
Armorama: 215 posts
Posted: Thursday, March 28, 2013 - 08:16 AM UTC
Thanks James & Robert for your comments....., much appreciated

Hello again everyone,
managed to get quite abit done over the last few weeks, concentrating on everything 'below ground' so I can eventually get the base stuck down & the sides glued on.
Have finished off the interior to the cellar, making most of the items from scratch.


Bought a small light from a 'minatures website' and attached it to the cellars light. It was basically a light bulb attached to a battery case with a 10cm wire. The switch will eventually be inserted into a piece of furniture in the above Hotel. The light was a little to 'direct' to be perfect, but it still looked effective enough...


Have ordered the civilians to arrive next week, thinking of having only 5 now in the cellar..... To show a glimpse of the cellar from the front of the dio (as well as mainly from the side)I decided to have a small opening, and instead of a basic 'hole or gap', I cut out rows of plastic sheet to give a brick effect. It will all be painted black afterwards to match the rest of the plastic surround, but it just shows the viewer there's more to see than just from the front.


The floor of the U-Bahn station has been cemented, benches & waste bins added, then the debris & roof from the station. The debris was pre-painted plaster crumbled up & oil washed. The 3rd photo shows the 'glow' from the battery candle hidden at the back. Unfortunately the fire glow is too subtle, & needs more light to give a good silhouette of the debris & the figures comming out of the darkness, so have ordered another light identical to the cellar, although this one 'glows' & is used for dolls house fireplaces.....
The gates to the station entrance were just made from Miniart spare parts....., everything else is plastic card.


Hoping then to get the figures in the cellar, finish oil washing the station, paint the rows of bricks black along with the plastic sides & glue the top layer to the bottom...,
& then the street can begin.......


Thanks for looking, all comments & critiques more than welcome.....
Cheers for now,
SIMON.
jrutman
Visit this Community
Pennsylvania, United States
Joined: April 10, 2011
KitMaker: 7,941 posts
Armorama: 7,934 posts
Posted: Thursday, March 28, 2013 - 08:25 AM UTC
Very very very nice bro!! Love the muli-dimension aspect of it.
J
All_You_Can_Kit
Visit this Community
Jakarta Raya, Indonesia
Joined: August 22, 2012
KitMaker: 599 posts
Armorama: 527 posts
Posted: Thursday, March 28, 2013 - 11:02 PM UTC
Hello Simon, a very stunning work!! Surely I hope that my post will not be the end for me to watch on your diorama building progress Also I admire your talented touch on the detail of underground rooms and items. I will keep watching on this, keep up your best work!

Best regards


Garry
 _GOTOTOP