_GOTOBOTTOM
Constructive Feedback
For in-progress or completed build photos. Give and get contructive feedback!
936A2 In progress
heliman
Visit this Community
New York, United States
Joined: June 14, 2010
KitMaker: 702 posts
Armorama: 604 posts
Posted: Sunday, February 03, 2013 - 11:50 AM UTC
I wanted to share my progress pics of the M936 wrecker. I used the Italeri 923 for the base, eduard PE, RM wrecker conversion, CMK engine, and piles of styrene bits adding missing details, or fixing broken resin.

The kit was shelved for a couple yrs, and finally reached pre shading ! I chose the kit to model a truck I drove during my yrs on Ft Hood as a mechanic . Any feedback appreciated !

Here we go..


heliman
Visit this Community
New York, United States
Joined: June 14, 2010
KitMaker: 702 posts
Armorama: 604 posts
Posted: Sunday, February 03, 2013 - 11:59 AM UTC
The front bumper winch details, I added bolts, the popular vise, and the counter weight trays along the frame. The vise was missing the handle, so .020" rod repaired it.


'

I removed the plastic radiator, and installed the PE grille.


dry fitting...hundereds of times !


The tires from the above pic are RM's Michelin tires. They were missing the CTIS valve stem shields, so 15 thou rescued me


I'm still working out the "rawl" light bar location, more to follow ! Thanks for any feedback!

Jeff
heliman
Visit this Community
New York, United States
Joined: June 14, 2010
KitMaker: 702 posts
Armorama: 604 posts
Posted: Sunday, February 03, 2013 - 12:12 PM UTC
I almost forgot the cab!!! The PTO console was added, the levers are straight pins ! The wiper motors air lines are brass wire.The steering wheel is still being detailed w/ wire


Also fine solder created the hydralics for the boom, a couple model car fittings were added for the compression fittings!


Thanks for looking
heliman
Visit this Community
New York, United States
Joined: June 14, 2010
KitMaker: 702 posts
Armorama: 604 posts
Posted: Friday, February 08, 2013 - 01:59 PM UTC
The 936 is finally in paint! Now comes the fun part of turning all the sub assembly's into one very heavy shelf queen.

I noticed a few stray minor repairs from the pics above..so touch up's are underway. amazing how pics show unseen flaws !


Mother hooked me up w/ a shelter box for a cool little load for the crane, just need a set of chains falls, and paint!
heliman
Visit this Community
New York, United States
Joined: June 14, 2010
KitMaker: 702 posts
Armorama: 604 posts
Posted: Friday, February 08, 2013 - 02:10 PM UTC
camera battery died before loading the pics..heres the load..


I also found a great video of an operator cycling the boom, and noticed a series on markings along the boom. I'll assume it's to inform jib operator how far it's extended?


Using an app "scale mate " from my phone, transfered the 1 ft sectioned into a scale .342 " I measured this out on paper,and transfering this to the boom sections.


this next part was fun..the small arrow on the boom, drawn on Tamiya tape, and a quick mask later readied me for paint.


Enjoy the pics !
heliman
Visit this Community
New York, United States
Joined: June 14, 2010
KitMaker: 702 posts
Armorama: 604 posts
Posted: Friday, February 08, 2013 - 02:20 PM UTC
whoops!! A quck review of the prime portal pics showed my stowge box was incorrect, so out came the razor saw! I remade the box w/ .020 bits, and adjusted the location of the latch and lock. boy I really gotta stop looking for issues!

The lock was made from plastic stock, drilled , and fine wire was used for the loop . I added a small( tiny ) tab and attached the lock. Pretty gung ho now, the lock actually swings!


Storm Nemo left a NASTY gift in my driveway so I guess updates have to wait!
MrRoo
Visit this Community
Queensland, Australia
Joined: October 07, 2002
KitMaker: 3,856 posts
Armorama: 2,984 posts
Posted: Friday, February 08, 2013 - 03:07 PM UTC
very nice work. Your attention to detail is fantastic. Well done!
mother
Visit this Community
New York, United States
Joined: January 29, 2004
KitMaker: 3,836 posts
Armorama: 1,370 posts
Posted: Friday, February 08, 2013 - 04:51 PM UTC
Wow Jeff that is looking great, I need to get mine finished someday (not) lol! So will this be at the BuffCon show in April; and it's cool that your mother was able to have helped out

Happy Modeling,
Joe
paul51
Visit this Community
Hamilton, New Zealand
Joined: January 03, 2010
KitMaker: 159 posts
Armorama: 158 posts
Posted: Friday, February 08, 2013 - 06:08 PM UTC
very cool,nice job so far
retiredyank
Visit this Community
Arkansas, United States
Joined: June 29, 2009
KitMaker: 11,610 posts
Armorama: 7,843 posts
Posted: Friday, February 08, 2013 - 11:27 PM UTC
I'm surprised it took this long for feedback. Great idea on the levers! I have some pins that would work well, for this. How is the Italeri kit?
210cav
Visit this Community
Virginia, United States
Joined: February 05, 2002
KitMaker: 6,149 posts
Armorama: 4,573 posts
Posted: Saturday, February 09, 2013 - 12:27 AM UTC
Jeff-- outstanding workmanship!
Garry Owen
DJ
heliman
Visit this Community
New York, United States
Joined: June 14, 2010
KitMaker: 702 posts
Armorama: 604 posts
Posted: Saturday, February 09, 2013 - 01:20 AM UTC
@ Matt- thanks for the feedback. the Italeri kit isn't too bad! Its molded in a very light gray..prolly been refreshed recently. The cab is all Italeri minus the seats, thats all I used of the CMK set! The is missing the recent truck updates, but overall a good base for mmy build. It has a straight frame..thats all I ask!

@ Joe- yeah my mother has been very helpful along the build! lol Thanks agin bro for the new cab roof, love the hard top! The shelter was a great idea! Yeah..it's planned to have it for buffcon..should be trouble for your SEE ! J/K

Thanks everyone for the comments..its a great driver to finish the kit, hopefully its off for clear today.

I also need to thank Miloslav for producing this conversion. The kit is very detailed, and encompasses all the small parts of the vehicle. the mold is showing it's age, theres a fair amount of cleanup, but nothing too daunting

anyone know of a decal sheet that includes the acetylene markings? The tank is very prominent along the bed!
heliman
Visit this Community
New York, United States
Joined: June 14, 2010
KitMaker: 702 posts
Armorama: 604 posts
Posted: Sunday, March 03, 2013 - 01:19 PM UTC
The finish line has FINALLY been crossed....I'm callling this one DONE!!! I heard a picture is worth a thousand words, anyone who knows me...well, I can talk...so here's a few pics of my build. Let's take a walk around HHC 800 stationed at my motor pool circa 1999.

any feedback is welcome.


retiredyank
Visit this Community
Arkansas, United States
Joined: June 29, 2009
KitMaker: 11,610 posts
Armorama: 7,843 posts
Posted: Sunday, March 03, 2013 - 01:28 PM UTC
I'm speechless. Great work and an excellent finish! This should be a lesson in what can be done with Italeri kits.
heliman
Visit this Community
New York, United States
Joined: June 14, 2010
KitMaker: 702 posts
Armorama: 604 posts
Posted: Sunday, March 03, 2013 - 01:31 PM UTC
I chose Archer generic data plates for the operators "gondola"...these baby's really are nice!


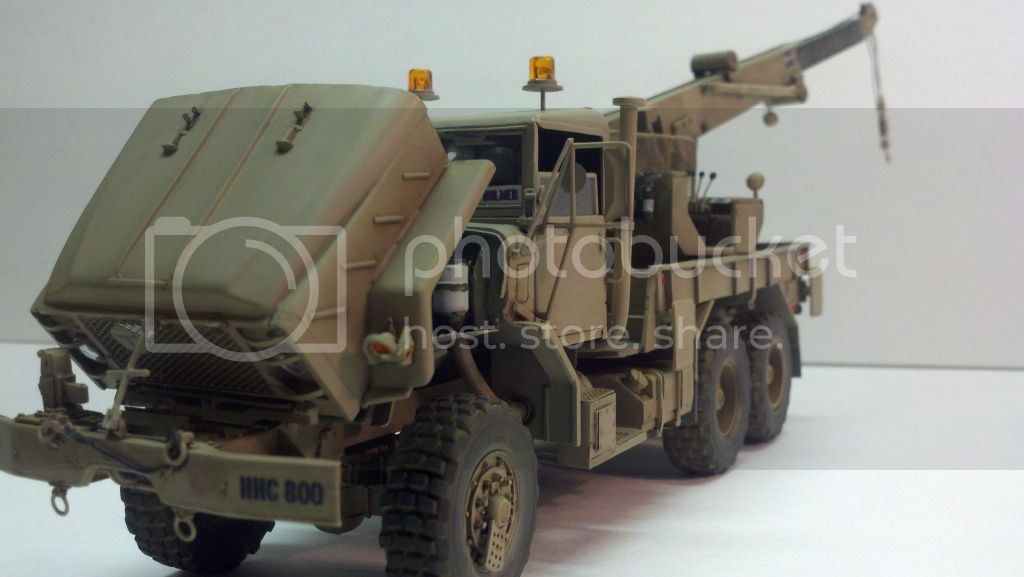
The bumper numbers were created using MS paint, and Bare Metal brand decal paper. Also the names on the windshield glass...yeah..I'm driving this one now!


The RAWLS lights were built using 5mm LED lights from Radio Shack, sanded to a reasonable height, dipped in Tamiya clear orange, and let dry. The light bar was a simple unit made from plastic sqare rod, w/ angled gussets


last but not least..I called in a favor to my buddy Bill who has an uncanny ability to scratchbuild. I was missing the spades and really thought the build unfinished unless I could add them. Well, a few minutes later..and a tasty beverage, I had my spades...THANKS Bill!!


Now the build is complete..hope ya like the build!
heliman
Visit this Community
New York, United States
Joined: June 14, 2010
KitMaker: 702 posts
Armorama: 604 posts
Posted: Sunday, March 03, 2013 - 01:36 PM UTC
Matt- I'm humbled ! This build was prolly my most emotional build, I spent tons of time w/ the real one!
HeavyArty
Visit this Community
Florida, United States
Joined: May 16, 2002
KitMaker: 17,694 posts
Armorama: 13,742 posts
Posted: Sunday, March 03, 2013 - 01:48 PM UTC
It came out great. Very nice job. I have the Hobby Fan version and need to get going on it too. Maybe yours will inspire me to do so.
Pytagoras
Visit this Community
Møre og Romsdal, Norway
Joined: December 03, 2012
KitMaker: 300 posts
Armorama: 285 posts
Posted: Monday, March 04, 2013 - 03:17 AM UTC
That's looking pretty damn nice! Lots of nice details, both parts and paint wise.
Steel_Spektor
Visit this Community
Queensland, Australia
Joined: December 19, 2012
KitMaker: 74 posts
Armorama: 68 posts
Posted: Wednesday, March 06, 2013 - 08:10 PM UTC
Great effort on this piece mate. Everything looks spot on, well done.
retiredyank
Visit this Community
Arkansas, United States
Joined: June 29, 2009
KitMaker: 11,610 posts
Armorama: 7,843 posts
Posted: Thursday, March 07, 2013 - 01:12 AM UTC
Builds like this are what keep me learning. I don't want to be good. I wan't to be the best. It seems that I still have some ways to go.
heliman
Visit this Community
New York, United States
Joined: June 14, 2010
KitMaker: 702 posts
Armorama: 604 posts
Posted: Friday, March 08, 2013 - 06:46 AM UTC
Thanks everyone for the positive feedback ! I always admire everyones level of detail..and try to incorporate them into my builds. Most of the time...my brain has a great idea, but the hands refuse to follow along...
 _GOTOTOP