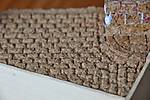
OK, so I have given it a little thought and have decided (for the most part) on what I will build for the campaign. I plan to depict a scene from WWII showing a blown bridgehead. I am still yet to decide exactly what I want this scene to display, but have committed to the basic premise and layout of the dio. The bridge and pavement will be scratch-built mostly from polystyrene and cork. I haven't been down to the hobby store yet and so haven't decided what vehicle to include, but it will likely be a motorcycle of some sort (probably German). I have a couple of ideas for the figure/s so far, but might keep that a secret for the time being.
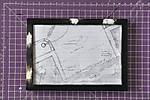
PHOTO #1
This shows the basic layout inside a 4" x 6" photo frame which will be used as the base for this build. Ignore the putty - this will be sanded back and painted over to hide the holes in the frame.
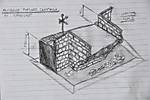
PHOTO #2
This is a rough sketch of how it should look when finished.
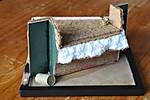
PHOTO #3
After couple of hours of messing about this morning, here are some of the materials from which I will build the bridge and pavement. The plastic container is full of small pieces of cork which will eventually become the cobblestones for the roadway.
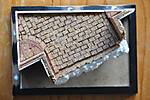
PHOTO #4
The bridge starts to take shape. This photo shows the bits and pieces from PHOTO #3 dry-fit together.
I expect to have some time tomorrow to drop by the hobby store, so will post more in a few more days on what I have decided. Thoughts/comments/suggestions are welcomed.
Campaigns
Where Armorama group builds can be discussed, organized, and updates posted.
Hosted by Darren Baker, Richard S.
The Postcard challenge
turkeyshot
New South Wales, Australia
Joined: February 06, 2012
KitMaker: 138 posts
Armorama: 133 posts
Joined: February 06, 2012
KitMaker: 138 posts
Armorama: 133 posts
Posted: Friday, August 02, 2013 - 04:34 PM UTC
Posted: Friday, August 02, 2013 - 10:34 PM UTC
Quoted Text
I don't regarding space. I've never understood "dios" with a vehicle on a minimal landscaped, picture-frame base that is so small that the subject is overhanging the edges of the wood frame. Of course, there is no story being told here, but I find the overly tight arrangement questionable - it kind of negates the whole reason for having a base, and certainly doesn't add anything.
@ Charles that is actually a misinterpretation of what I said... If the vehicle with no reason whatsoever overhangs the base then it is too small. A reason to do that can be to give an idea of movement. I experimented with it for this in progress piece and to me it works very well
But as said... You should never use more room then neccesary for what you want to tell. That does not mean you have to use less space. I usually work like this... I think up a cool idea for a dio. Then collect the vehicle(s) and the figures which I then built. And then when those are all nearly build then I start working out the composition on a piece of paper. Moving everything around till I have the best visible composition. When I have decided that (and that can take several days) I draw a square or a circle around it and that will subsequently be the dimension of the base.
With the challenge of this campaign it is actually harder because you have to think the other way around because you are given an exact base and everything you choose from vehicles, figures and story must fit exactly within that space.
@ Jason..
I don't see any pictures
Looking forward to seeing your work sounds like you have already been busy.
turkeyshot
New South Wales, Australia
Joined: February 06, 2012
KitMaker: 138 posts
Armorama: 133 posts
Joined: February 06, 2012
KitMaker: 138 posts
Armorama: 133 posts
Posted: Friday, August 02, 2013 - 11:07 PM UTC
Quoted Text
@ Jason..
I don't see any pictures
Looking forward to seeing your work sounds like you have already been busy.
Really? I can see them. Can someone else please let us know if you can see the pics or not. Cheers.
Posted: Friday, August 02, 2013 - 11:19 PM UTC
Ola Jason
I checked your post with reply and quote and there are indeed picture links in there which go to onesixtwarriors.com but somehow they don't show up. Even when I copy the link and paste it in a new browserscreen it doesn't load but that very well may be a temporarily problem with that particular site.
steph2102
Isere, France
Joined: April 23, 2011
KitMaker: 735 posts
Armorama: 606 posts
Joined: April 23, 2011
KitMaker: 735 posts
Armorama: 606 posts
Posted: Friday, August 02, 2013 - 11:35 PM UTC
hello, here is my progress. there I'll have to change a bit my project puique the driver and passenger can not fit (they have legs too long and poorly positioned).
I do not understand, Miniart build the figures that do not fit in their vehicles (I already had the same problem with the Dingo scout car).
steph
I do not understand, Miniart build the figures that do not fit in their vehicles (I already had the same problem with the Dingo scout car).
steph
turkeyshot
New South Wales, Australia
Joined: February 06, 2012
KitMaker: 138 posts
Armorama: 133 posts
Joined: February 06, 2012
KitMaker: 138 posts
Armorama: 133 posts
Posted: Friday, August 02, 2013 - 11:48 PM UTC
Strange ... I can see the pics using Firefox, although not when using IE or Chrome. Oh well. I have uploaded the pics to my gallery here on Armorama, so they should be visible now. Please let me know if you can see them.
PHOTO #1
This shows the basic layout inside a 4" x 6" photo frame which will be used as the base for this build. Ignore the putty - this will be sanded back and painted over to hide the holes in the frame.
PHOTO #2
This is a rough sketch of how it should look when finished.
PHOTO #3
After couple of hours of messing about this morning, here are some of the materials from which I will build the bridge and pavement. The plastic container is full of small pieces of cork which will eventually become the cobblestones for the roadway.
PHOTO #4
The bridge starts to take shape. This photo shows the bits and pieces from PHOTO #3 dry-fit together.
Thoughts,comments, and suggestions are welcomed. Cheers.
Posted: Saturday, August 03, 2013 - 12:41 AM UTC
@ Steph
That is a really nice and clean built on that Bantam. I like it a lot. Pitty that the figures do not fit into it. It is a continuous problem for many manufacturers. DML also had their share of problems with the drivers for their SdKfz 250's and 251's Only with surgery the driver fitted in. I gues they have tried to make figures that can be used also in other vehicles resulting in a bad fit. I have Miniart's Merc L1500 with a full crew So i will keep your problems in mind.
@ Jason
That could indeed be the problem. I'm still one of those people happy enough with Internet Explorer. But with your fix now I can see your work. That looks pretty good. That base is pretty well thought out and your work so far is looking good as well. That promises a lot for the future
I got a little update in the form of a link with the progress to my builtlog of the T-20. I decided to keep it separate from the Campaign thread because that should deal with the diorama instead of every builtstep of the vehicle. Plus I reviewed it and promised in the review to make a builtlog out of it. So here goes. In the bottom link you can find all the progress so far of the T20
The T-20 Monologue builtlog
Bluestab
South Carolina, United States
Joined: December 03, 2009
KitMaker: 2,160 posts
Armorama: 1,906 posts
Joined: December 03, 2009
KitMaker: 2,160 posts
Armorama: 1,906 posts
Posted: Saturday, August 03, 2013 - 04:01 AM UTC
I agree with Robert about space. It's easy to go overboard and use too big a base. The problem is that you then have to fill the dead space. That said, empty areas can be used to add to the diorama's setting/storytelling. In that case, the empty space isn't really empty.
I'm hit-or-miss on diorama layouts of late. A lot of it is over-thinking an idea and/or just dropping more and more details into a project. There's a balance of sorts between detailed and cluttered. It's always easier to go with a bigger base. This campaign is forcing me to work within a set area...which I think will serve me well. Even if it was a larger base area, like a standard sheet of paper, there'd still be alot of the same layout issue to address.
Jason,
I cannot see the pictures in your original post as well. I'm using Firefox. My guess is that you can see it because the images are in your browser cache. That said, I think your piece is looking good. It'll be interesting to see it all come together.
Steph,
Looking good.
I'll probably be getting back on track in the next day or two. I managed to wrap up assembly on a couple of other campaigns and those are now ready for paint. I'll take a break on those before painting them.
Posted: Saturday, August 03, 2013 - 04:52 AM UTC
@ Alex
You are right about that... I often have to hold myself back as well with adding too much stuff to the scene. To the point where it looks like the Soldiers in the scene were compulsive hoarders. It does not happen that often anymore but with every piece I add in a dio I wonder if it adds anything to the scene. If not then it gets booted out. I have had it in some cases that halfway during the construction I stopped.. .Looked at my own work. immediately started hating it and took a boxcutter and cut out the only piece that I actually liked. The Motorcyclist driving up that bank is a nice example of it. It used to be a big diorama with a Soviet tank stuck in a ditch next to a blown up wooden bridge and the tank is used as base for a make shift bridge. And I started and the idea was good. And at one point I thought... what the hell am I doing? I found it too big. Too much empty space to fill. So I cut out the 6cm by 6cm piece with the motorcyclist and the rest got binned.
thewrongguy
Ontario, Canada
Joined: October 17, 2002
KitMaker: 448 posts
Armorama: 306 posts
Joined: October 17, 2002
KitMaker: 448 posts
Armorama: 306 posts
Posted: Saturday, August 03, 2013 - 07:19 AM UTC
@Jason
I really like the looks of that bridgehead. I've wanted to build something similar myself in the past, but didn't have the skill set. I'll be watching your build with a lot of interest.
Cheers
Jeff
I really like the looks of that bridgehead. I've wanted to build something similar myself in the past, but didn't have the skill set. I'll be watching your build with a lot of interest.
Cheers
Jeff
bronzey
England - South East, United Kingdom
Joined: January 06, 2012
KitMaker: 300 posts
Armorama: 256 posts
Joined: January 06, 2012
KitMaker: 300 posts
Armorama: 256 posts
Posted: Saturday, August 03, 2013 - 11:16 AM UTC
Jason
I do like your bridge, looks like a great use of space.
Rob
The motobike dio looks very interesting and yes, having it hang over the edge adds a level of dynamic movement, very action like feel.
Steph
Clean build on your jeep, strange how I was working on my Chinese jeep before coming on here and the first post I looked at was your stretched jeep!
Ok so my update, haven't done much, but made a decision, going to drop the fork lift, as much as I like her she takes up too much space and draws you away from what you should be looking at. But not wanting to lose the industrial feel to the area I am replacing it with the 'pump truck' that came with the kit and a wooden pallet.
Also, to tackle the stone requirement, I have found a wishing well, on order and waitong for it.
Bronzey
velotrain
Massachusetts, United States
Joined: December 23, 2010
KitMaker: 384 posts
Armorama: 320 posts
Joined: December 23, 2010
KitMaker: 384 posts
Armorama: 320 posts
Posted: Saturday, August 03, 2013 - 12:32 PM UTC
[/quote] Charles that is actually a misinterpretation of what I said... If the vehicle with no reason whatsoever overhangs the base then it is too small. A reason to do that can be to give an idea of movement. [/quote]
Robert - I think I phrased my response poorly. I wasn't so much disagreeing with what you said (as I don't really - despite what I wrote), but looking at it from the opposite situation. It was partly triggered by seeing many examples of what I felt were under-sized bases on some site (I think photos from a show) over the past week. I forget where it was, but just did a quick image search, and this was the closest example that I could find:
I can understand if others disagree, but I don't see what would be lost if the vehicle were rotated so it all fitted on/over the base. I don't see anything being gained (i.e. "movement") by it overhanging the edges. I think what happens for me is that it lowers the sense of the dio being a "separate reality", and the interface with the frame sort of reminds me, "oh yeah, it's just a model". It's deprived of it's own separate space to exist in. YMMV
I agree that your motorcyclist does an excellent job of showing the positive aspects of "breaking the plane", and it would be less effective / dramatic if it was fully contained. However, that driver looks much too calm for someone doing a wheelie on a steep upslope - a little too much power and he's going over backwards ;-)
Since I am so often critical, I will add a photo of a diorama that I really like, which I just found a few hours ago - it's from Euro Militaire 2009.
Some may feel that it's too big or busy. I'll admit there's so much going on that the eye doesn't know where to go to first - there is no one central point of focus. On the other hand, I admire the sculptural and spatial qualities. I love the way the many levels step down to the sea. It's unfortunate that so many dio's only use a single level. There are maybe a half-dozen small scenes contained within it. I enjoy the complexity of it; I find it very satisfying to look at - macro or micro.
There are lots of small details, but I don't have the feeling that they were added just because they were available - as I often have with, say - a shop scene, where tools are carelessly (unrealistically?) left all over the place, or an unpacked engine is sitting on a shelf: waiting for what? This is the dio that inspired the above comments, from the same show.
I'll gladly admit it's very well conceived and executed - I particularly like that he included some of the roof trusses. However, I can't help but feel that it's just a bit "over the top" - but that may just be me. Somehow I experience that I have more freedom to enjoy the port scene in my own way and time, but with the workshop I feel that I am more directed / controlled. With the port I can somehow use my own imagination more, while in the workshop everything appears to be completely settled - could it just be the difference between outdoors and indoors, the larger space depicted?
The misguided idea (which Alex addresses) that the more stuff you cram in to a scene, the better it is? Here, in the port scene, the details are at logical locations - the truck bed, the loading dock, the pier, and the open submarine hatch. It could be argued that there is too much sitting on the pier - if it is intended for the sub, why hasn't it been loaded already?
The diving scene at the bottom could be a diorama by itself (as could other elements), but I think it helps balance the activity across the whole entity. It also helps frame what could be considered the main activity - on the pier and the sub deck. The upper level, while part of the primary action (the crane lift), also plays this framing role. I would want to view this with my eye at the level of say, the loading dock, but that should be the case with any well-done scene.
Perhaps what I like best is the concept. It's obvious that the person designing / building this has put a lot of thought - and skill - into all phases of the process. That is also true for the workshop, but it just doesn't appeal to me as much.
Charles
Copperalis
United Kingdom
Joined: October 20, 2007
KitMaker: 52 posts
Armorama: 45 posts
Joined: October 20, 2007
KitMaker: 52 posts
Armorama: 45 posts
Posted: Saturday, August 03, 2013 - 11:24 PM UTC
Good afternoon
I've decided to join this one, and am going with the Academy IED Gun Truck Humvee. In light of the posts above, it is going to be a tight squeeze, but I am hoping that I can give the diorama some height to elevate it.
Box and sprue picture below:
I've decided to join this one, and am going with the Academy IED Gun Truck Humvee. In light of the posts above, it is going to be a tight squeeze, but I am hoping that I can give the diorama some height to elevate it.
Box and sprue picture below:
Posted: Sunday, August 04, 2013 - 01:09 AM UTC
Welcome to the postcard challenge Andrew. Hope you are going to have a lot of fun. You picked an interesting vehicle to join and I did some calculating and it comes in at around 13 cm long and 6 something wide. I'm looking forward how you are going to fill that space.
@ Alex Bronze
I like the looks of that pallet truck. That will look good when painted up and maybe with a load of boxes on that pallet it will be the right accessory for the dio.
@ Charles
I kinda guessed something like that. yes there are a lot of people who use too small bases. But I think in a lot of cases it is more a matter of not thinking out the composition well enough. In the case of the 251 with the soldiers jumping out I think that is not the best composition either. For my taste it is way too close to the border of the base. But I will bet a lot of money on it that the builder is proud as a peacock on his or her own work and got a price to boot. There is only a small handfull of people who live of what they build. And the majority builds because they like to. And just as in any branch of art you have differences in skill level and vision. I can live with that. Not every painter is Rembrandt but every painter just like Rembrandt at 1 point started out with a pencil.
I like that diorama of the U-boot being loaded. It is well balanced. I like the different levels in it. I think if you want to do a scene like that you will have to use that much space. A crane like that needs quite some space and the U-boot is in it's natural element.
The Workshop diorama is also a nice piece of workmanship allthough it is kinda like a normal scene it is done a 100 times or more and they all look the same to me. What puzzled me is what the origin of the garage was. Is it a garage in America, Is it a German garage? There is not direct hint of that but the pile of various Panzer spareparts kinda contradict with the Sherman.
Returning to my earlier comment... Not everybody is a Rembrandt on modelling. And that is just as well. The world would become incredibly boring. Most people never thought much about composition or basesize. Maybe it never occurred to them or maybe they never gave it a thought. I'm art schooled and am a Designer/art director by trade. I have had massive teachings on the subject of builtup and composition. So for me it became an automatism.
And I hope with this little challenge to get people thinking about it. Because with a space as small as a postcard it is a neccesity to distill the whole scene to the absolute minimum and still bringing over the story.
On the subject of the motorcycle. From this angle it indeed looks like he is relaxing cruising to the top of the bank. But he actually stands on his footpegs and is raised a bit from the seat.
velotrain
Massachusetts, United States
Joined: December 23, 2010
KitMaker: 384 posts
Armorama: 320 posts
Joined: December 23, 2010
KitMaker: 384 posts
Armorama: 320 posts
Posted: Sunday, August 04, 2013 - 08:41 AM UTC
[quote]I plan to depict a scene from WWII showing a blown bridgehead. quote]
Jason - When I saw this dio, I had to think of your project - although yours will likely be busted in a more traditional manner.
velotrain
Massachusetts, United States
Joined: December 23, 2010
KitMaker: 384 posts
Armorama: 320 posts
Joined: December 23, 2010
KitMaker: 384 posts
Armorama: 320 posts
Posted: Sunday, August 04, 2013 - 09:34 AM UTC
Robert -
> I like that diorama of the U-boot being loaded.
After a lot of searching for other photos of it, I found a front view by the builder, Heiner Sander.
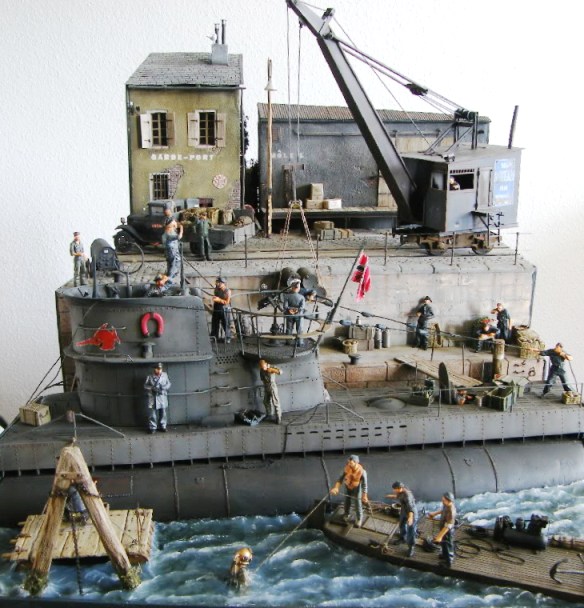
However, this view tends to lose the depth somehow, as the layers are compressed, with some foreshortening going on. His figures are interesting characters, but the clothes often seem a bit too smooth, shiny and plastic-y.
> I think if you want to do a scene like that you will have to use that much space.
Unless it is done in 1:87 or 1:72! However, I think it may be possible to achieve that level of spatial complexity, or even geater, within our postcard footprint, and I'm busy thinking of how best to accomplish that. Since you are challenging us to try new things, I may need to go post-apocalyptic - while zombies have no appeal for me.
Does "what-if" fall within the guidelines?
> What puzzled me is what the origin of the garage was.
I was guessing French, but for no particular reason; it's definitely a central European building style, and you would never find such a structure in the US. I wish we could read some of the things on the wall in the machine shop area. It looks like the No Smoking sign is English, but I don't know why. It is very nicely done, but unlike the other dio it doesn't show any imagination/creativity, although I believe it did win gold in dios - vs. the French scene. I don't actually know how they can do any work on the tank, as there is so much junk on the floor around it.
I also found a front view of that dio:
> the pile of various Panzer spareparts kinda contradict with the Sherman.
Which supports my belief that the creators of such scenes are more interested in adding as much junk as they can, and the logic of what they add is only secondary - at best.
It almost seems like a "garage for tanks", with non-military guys working on one tank at a time - at least there is only one bay.
> So for me it became an automatism.
I knew you were an A.D. and liked your design for the leaning, racing motorcycles, but for me I'd have to say that it's something I'm conscious of from an architecture / sculpture background, but that doesn't at all make it automatic. BTW - do you post images of your completed small dios, or only tease us with WIP? I recall your saying that you had been working on that other one for some time.
Most of my ideas for the campaign started by thinking of how I could maximize the space available through height, and ways to create drama, and then I thought about what sort of scenes/objects appeal to me. I often have to remind myself that a military component is required.
I found one scene that has relevance for our campaign, although I suspect the judges didn't like it.
You can maybe get away with a small section of a submarine, but here one of the butt-ends is right in the viewer's face. At least the Atlantic fellow had the sense to cover the cut end with fascia, suggesting that it was no longer part of the scene, but here that is unclear - even with the engraved plaque. It sure looks like that sailor over the side is painting rusty lines on the hull ;-)
> From this angle it indeed looks like he is relaxing cruising to the top of the bank.
I was commenting based on the very calm facial expression, with no indication of tension, or concentration.
Posted: Sunday, August 04, 2013 - 09:27 PM UTC
Ola Charles
The front view of that U-boot dio looses depth because the whole dock up to the level of the houses is all in the same color. Very monotonous. Still I like it though. And I''m wondering which U-boot he used if this is 1:35. I have a 1:35 waterline model of a U-boot in resin but pricewise that seems a bit steep if you cut it up for that.
I haven't seen any close up of the figures themselves from that diorama but are they all shiny or are a few figures shiny?
And you are right that you can make a smaller diorama in smaller scale of this however 1:72 or smaller is not everybodies cup of tea.
To answer your question. "Post Apocalyptic"/"Zombies" and "what- if" are perfectly acceptable for this challenge.
Returning to the mystery garage I kinda get the feel for what we are looking at. It seems that the guy in the overalls is being interviewed by a (modern) camerateam making this a modern garage where vehicles are being restored. I still have to say that the workmanship on that diorama is very good. I like it when people take care to finish off the sides in a neat way. However I still am puzzled a bit by the heap of Panzer Spares while they are working on a Sherman. And I had not even seen the crates and assorted junk behind the tank which is kinda asking for trouble and injuries.
One interesting question would be if it scored just as high when the clutter was not added to it. The judges might have found it too clean. Even though in real life any garage would try their best to keep stuff clean around their workspaces.
Hehehe here comes the answer from the world's most easily distracted man... I am always working on several projects at the same time. And I usually got a bunch more on the shelves waiting to get finished. Sometimes they get on hold because I screwed up painting and at the time couldn't be bothered to fix it. So I put it back for another time to be finished. It can be because I broke parts or because I have to order new stuff for it or because I have to sculpt figures. There are numerous reasons why a project gets on the backburner but eventually every now and then one gets finished. So what you might think of as teasing is only a direct effect of my extremely slow building pace which lies just above that of Continental drift. The dio with the leaning motorcycles by the way is currently on hold because I'm designing a complete decal set with sponsordecals for it of all non existent future companies
I think the last picture you showed with the midget sub is not too bad either allthough I don't like it much that all the angles seem to be running parralel to the edges of the base. which makes it a whole lot less dynamic. Also the ship while pretty well made does not add much to the diorama. I think the diorama would have been nicer and more interesting to watch if it was cut off just behind the bollard with the number 3 below it only showing the cay, with the crane lowering the midget sub
Ah but that is just because he is a well trained pro at scaling banks on motorcycle. It doesn't show it much in this picture but in the meantime it is already painted up and he is quite serious looking.
The front view of that U-boot dio looses depth because the whole dock up to the level of the houses is all in the same color. Very monotonous. Still I like it though. And I''m wondering which U-boot he used if this is 1:35. I have a 1:35 waterline model of a U-boot in resin but pricewise that seems a bit steep if you cut it up for that.
I haven't seen any close up of the figures themselves from that diorama but are they all shiny or are a few figures shiny?
And you are right that you can make a smaller diorama in smaller scale of this however 1:72 or smaller is not everybodies cup of tea.
To answer your question. "Post Apocalyptic"/"Zombies" and "what- if" are perfectly acceptable for this challenge.
Returning to the mystery garage I kinda get the feel for what we are looking at. It seems that the guy in the overalls is being interviewed by a (modern) camerateam making this a modern garage where vehicles are being restored. I still have to say that the workmanship on that diorama is very good. I like it when people take care to finish off the sides in a neat way. However I still am puzzled a bit by the heap of Panzer Spares while they are working on a Sherman. And I had not even seen the crates and assorted junk behind the tank which is kinda asking for trouble and injuries.
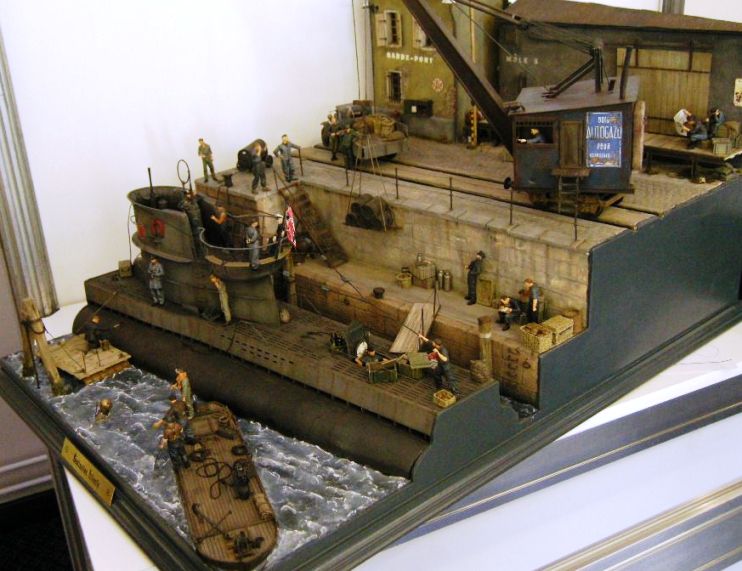
One interesting question would be if it scored just as high when the clutter was not added to it. The judges might have found it too clean. Even though in real life any garage would try their best to keep stuff clean around their workspaces.
Quoted Text
BTW - do you post images of your completed small dios, or only tease us with WIP? I recall your saying that you had been working on that other one for some time.
Hehehe here comes the answer from the world's most easily distracted man... I am always working on several projects at the same time. And I usually got a bunch more on the shelves waiting to get finished. Sometimes they get on hold because I screwed up painting and at the time couldn't be bothered to fix it. So I put it back for another time to be finished. It can be because I broke parts or because I have to order new stuff for it or because I have to sculpt figures. There are numerous reasons why a project gets on the backburner but eventually every now and then one gets finished. So what you might think of as teasing is only a direct effect of my extremely slow building pace which lies just above that of Continental drift. The dio with the leaning motorcycles by the way is currently on hold because I'm designing a complete decal set with sponsordecals for it of all non existent future companies
I think the last picture you showed with the midget sub is not too bad either allthough I don't like it much that all the angles seem to be running parralel to the edges of the base. which makes it a whole lot less dynamic. Also the ship while pretty well made does not add much to the diorama. I think the diorama would have been nicer and more interesting to watch if it was cut off just behind the bollard with the number 3 below it only showing the cay, with the crane lowering the midget sub
Quoted Text
I was commenting based on the very calm facial expression, with no indication of tension, or concentration
Ah but that is just because he is a well trained pro at scaling banks on motorcycle. It doesn't show it much in this picture but in the meantime it is already painted up and he is quite serious looking.
turkeyshot
New South Wales, Australia
Joined: February 06, 2012
KitMaker: 138 posts
Armorama: 133 posts
Joined: February 06, 2012
KitMaker: 138 posts
Armorama: 133 posts
Posted: Monday, August 05, 2013 - 03:24 PM UTC
Hi guys, thanks for the kind words on what I have come up with so far. Your encouragement means a lot. It is also good to see some of the progress on your builds.
Robert - I like what you have done with you motorcyclist. So much movement and action for such a small dio. Which motorcycle is that BTW (I recently ordered a Tamiya NZ-350 for use in my build)? Also, I just checked out the build log for your T-20: Awesome work! That paint job has really brought her to life.
Steph - Nice work on the jeep so far; it is too bad about the figure not fitting.
Bronzey - That's a nice clean build on the pallet jack. I look forward to seeing some more.
Andrew - Welcome aboard mate. I look forward to seeing what you can do with that gun truck.
Meanwhile, on my side of the fence, I have managed a little more work on the dio since my last post. Sadly, my visit to the hobby store over the weekend proved fruitless and I have instead ordered the vehicle and figures online. I guess I can keep on working on the base while I am waiting for them to arrive. Here's an update of where I am now...
PHOTO #5
Since my last post you can see that I have built the arch under the bridge by gluing a thin sheet of cork to the underlying foam structure to create the curve. The walls were created with thick cardboard for rigidity, to which I glued a few layers of thin cork sheet to build up the desired thickness. I have also laid the roadway, sidewalks and cobblestones.
PHOTO #6
Another shot from above showing the overall layout and the cobblestones and sidewalks now glued into place. Once dry the cobblestones will be roughed up with the point of a needle file to add some texture (see subsequent photos), and I still need to add another layer of cork to the walls to depict the stonework.
PHOTO #7
Another front view showing the cobblestones now finished (see below for more detail) and the beginnings of the laying of the stonework.
PHOTO #8
A detail shot showing the cobblestones and sidewalk.
PHOTO #9
Another detail shot. This one shows the work done to the stonework thus far. Once dry, the stones will be roughed up using the same technique already used on the cobblestones to make them look more natural.
Thoughts/comments/suggestions are welcomed. Cheers!
velotrain
Massachusetts, United States
Joined: December 23, 2010
KitMaker: 384 posts
Armorama: 320 posts
Joined: December 23, 2010
KitMaker: 384 posts
Armorama: 320 posts
Posted: Monday, August 05, 2013 - 06:36 PM UTC
Great technique on the cobbles! After the first photo I wondered what you were going to put on them to provide texture, but now I see that they have their final form and only need color.
Posted: Monday, August 05, 2013 - 08:55 PM UTC
@ Jason
That is some sterling work you got there. It will not be for too long before I will have to start the cork work on my diorama. A factory wall and part of the backyardfloor. Very inspirational work and once painted up that will look awesome. What do you use for filler between the cobbles?
Thanks by the way for the compliments on both the motorcyclist dio and the T-20. I'm pretty pleased with how the vehicle for this campaign is progressing. I think it is pretty fun to see how different the approaches are between the enlisted modelers in this Challenge. And some pretty good work has shown up here. Great job guys.
turkeyshot
New South Wales, Australia
Joined: February 06, 2012
KitMaker: 138 posts
Armorama: 133 posts
Joined: February 06, 2012
KitMaker: 138 posts
Armorama: 133 posts
Posted: Tuesday, August 06, 2013 - 12:25 PM UTC
Thanks Robert, I am really happy with the way that this is gradually coming together. I have only used this technique once before (on my first dio attempt - see my ongoing build log HERE), but the results are great. I use a thin mix of ordinary builders spackle to grout between the bricks and cobbles: I slap it on with a spatula to fill all of the gaps and then wipe off all of the excess with a damp sponge. It works great. Credit for the technique goes to Carlos Elias (AKA Blockhaus). I look forward to seeing what you will produce... based on your sketch, it should be great!
velotrain
Massachusetts, United States
Joined: December 23, 2010
KitMaker: 384 posts
Armorama: 320 posts
Joined: December 23, 2010
KitMaker: 384 posts
Armorama: 320 posts
Posted: Tuesday, August 06, 2013 - 12:26 PM UTC
Quoted Text
And I''m wondering which U-boot he used if this is 1:35. I have a 1:35 waterline model of a U-boot in resin but pricewise that seems a bit steep if you cut it up for that.
And you are right that you can make a smaller diorama in smaller scale of this however 1:72 or smaller is not everybodies cup of tea.
See http://modelerssocialclub.proboards.com/thread/2871 for some info and dtail photos.
He used: http://tinyurl.com/l97xdf7
I'm searching for supplies to give a 1:87 version a go - we'll see how much I can fit in. No naval figures available, so I'll have to fudge those.
bronzey
England - South East, United Kingdom
Joined: January 06, 2012
KitMaker: 300 posts
Armorama: 256 posts
Joined: January 06, 2012
KitMaker: 300 posts
Armorama: 256 posts
Posted: Thursday, August 08, 2013 - 09:13 AM UTC
Hello guys,
Ok so had a good few hours to myself and started to do some more work on this project, I did have a wishing well that I was going to use as my stone item but once I put it on there it looked stupid, higher than the van and taking up far too much space, so I primed the pallet jack and the van, then gave the van its 1st coat in blue, so this is my mock up so far, bare in mind that the EOD soldier still has its resin block on him to make painting abit easier, the van will be level when finished, just wanted idea of how its going to look, enjoy and all comments welcome as always!
Bronzey
steph2102
Isere, France
Joined: April 23, 2011
KitMaker: 735 posts
Armorama: 606 posts
Joined: April 23, 2011
KitMaker: 735 posts
Armorama: 606 posts
Posted: Thursday, August 08, 2013 - 09:53 AM UTC
turkeyshot
New South Wales, Australia
Joined: February 06, 2012
KitMaker: 138 posts
Armorama: 133 posts
Joined: February 06, 2012
KitMaker: 138 posts
Armorama: 133 posts
Posted: Thursday, August 08, 2013 - 10:47 AM UTC
Those builds are looking good fellas.
Bronzey - what do you have in mind for your stonework? A small section of brick wall behind the pallet jack perhaps? That could make it look like the van is parked in an alley (that would also kill the scratch-build bird while you are at it). You've done a great job on cleaning up the hack on that van BTW.
Steph - thanks for the encouragement mate. That little base of yours is coming together nicely. You've got some great varied texture in the foreground. I look forward to seeing more of her.