_GOTOBOTTOM
Constructive Feedback
For in-progress or completed build photos. Give and get contructive feedback!
Some crude zimmerit.
raypalmer
Visit this Community
Ontario, Canada
Joined: March 29, 2010
KitMaker: 1,151 posts
Armorama: 51 posts
Posted: Thursday, March 07, 2013 - 04:02 PM UTC
This is my first tank. I intentionally bought a cheap and rough kit. Tamiya 1/35 Panther Ausf A. I've collected PE, a turned (incorrect) barrel, and new tracks.

I'm intentionally just playing with this kit to learn. So far I've learned to buy AM zimmerit!

I tried Drydex, and DAP before buying this "clay mache" air drying product. It's exceedingly crude and way off scale but I think I'm going to settle with it. This is a non-serious attempt after all. I'm mostly keen on adding the pe, and playing with heavy weathering.


KoSprueOne
Visit this Community
Myanmar
Joined: March 05, 2004
KitMaker: 4,011 posts
Armorama: 1,498 posts
Posted: Thursday, March 07, 2013 - 04:38 PM UTC
yeah that's cool. A "non-serious attempt " subscription to any hobby is a healthy approach to it.
I've subscribed to see the heavy results


FlorinM
Visit this Community
Bucuresti, Romania
Joined: August 01, 2011
KitMaker: 385 posts
Armorama: 211 posts
Posted: Thursday, March 07, 2013 - 04:56 PM UTC
A piece of advice: let the stuff dry for 7-10 minutes (experiment for the right time) before applying the pattern, it will look much, much better!
AFVFan
Visit this Community
North Carolina, United States
Joined: May 17, 2012
KitMaker: 1,980 posts
Armorama: 1,571 posts
Posted: Friday, March 08, 2013 - 03:25 AM UTC
That actually doesn't look too bad, except the thickness. If you could thin it a bit, it'd be just fine.

I've used artist modeling paste with some pretty nice results.
Plasticbattle
#003
Visit this Community
Donegal, Ireland
Joined: May 14, 2002
KitMaker: 9,763 posts
Armorama: 7,444 posts
Posted: Friday, March 08, 2013 - 09:17 PM UTC

Quoted Text

That actually doesn't look too bad, except the thickness. If you could thin it a bit, it'd be just fine.


Have to agree with Bob. Just scrape it off and start again. Dont give up now .... keep developing it, or your test kit will go to waste. The indents in the zimmerit should show the plastic colour to keep the scale. Keep moving the bulk of the material so this can happen. And have some reference images at hand ... will help a lot to keep the pattern more realistic.
raypalmer
Visit this Community
Ontario, Canada
Joined: March 29, 2010
KitMaker: 1,151 posts
Armorama: 51 posts
Posted: Saturday, March 09, 2013 - 12:32 AM UTC
Should I be using milliput?
AFVFan
Visit this Community
North Carolina, United States
Joined: May 17, 2012
KitMaker: 1,980 posts
Armorama: 1,571 posts
Posted: Saturday, March 09, 2013 - 12:41 AM UTC

Quoted Text

Should I be using milliput?


You could, but what you already have looks like it'll work fine, if you can spread it thinner. As Florin suggested you may have to wait a few minutes for it to start setting up before working with it. You may want to experiment on a piece of scrap plastic to get an better idea of that. Like Frank inferred, this is a learning experience that you want to take advantage of. You're on the right track.
raypalmer
Visit this Community
Ontario, Canada
Joined: March 29, 2010
KitMaker: 1,151 posts
Armorama: 51 posts
Posted: Saturday, March 09, 2013 - 04:51 PM UTC
If at first you don't succeed...

Anyway I tried milliput. I was astonished to see it's made in the land of my fathers. Something still comes from Wales!

The milliput was brought in because the clay mache had a fatal flaw, the surface cures very quickly, as a result one can't wait (as advised) and then apply zimmerit as a crunchy top layer forms.

So here it is. I think milliput is the best way forward for me. I'm going to let this harden and then brush it, steel wool it, sand the edges and then prime it. Then probably tear it off and do it again. Maybe, I'm not sure.


AFVFan
Visit this Community
North Carolina, United States
Joined: May 17, 2012
KitMaker: 1,980 posts
Armorama: 1,571 posts
Posted: Sunday, March 10, 2013 - 03:29 AM UTC
That's a vast improvement Richard. You obviously found the limitations of the other stuff as far as zim goes, but all was not lost on it. In using it, you also found what it worked like. Maybe in the future it'll have it's uses as mud or some other diorama fodder.
Il_Colonnello
Visit this Community
Modena, Italy
Joined: March 08, 2012
KitMaker: 140 posts
Armorama: 140 posts
Posted: Monday, March 11, 2013 - 03:29 PM UTC
Hello to all friends of Armorama, in our club we use instead the pyrography to engrave the zimmerit on the armor of our tanks.
This is a very precise method when the incision is made with a firm hand and when it also possesses a good transformer with variable voltage (to adjust the temperature of the tip of the pyrograph, depending on the type of plastic of the model).
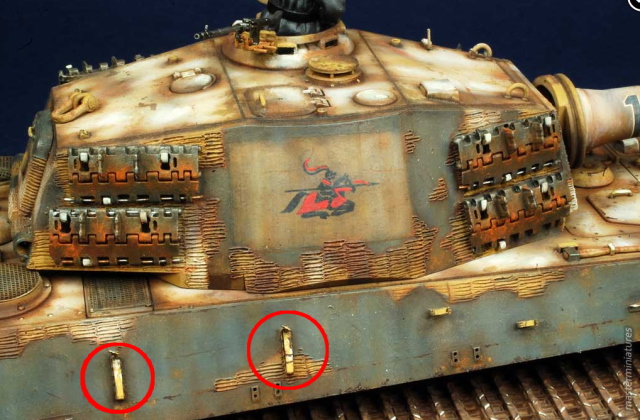
In addition, with this method is very easy to make even the peeling of zimmerit, reproducing the pieces that fly off when the tank is hit by bullets of small caliber or it hits obstacles.
Here are some examples of zimmerit engraved with pyrograph by a friend of our association:

http://www.masterminiatures.it/gal/tiger-late-naked.php

http://www.masterminiatures.it/gal/panther-barkmann.php

Some tips to make a good zimmerit with pyrograph:
- Try the engravings on a hidden part of the model before you start on the hull. These tests are useful to find the right temperature to be used for not affect too much or too little plastic and to calibrate the width and the depth of the incisions;
- Use a chisel tip and do not engrave the plastic with the entire blade but engrave lightly on the plastic just the tip of this type of blade as if to draw a thin line;
- Drawing with a grease pencil the outlines of the areas of peeling, while respecting the general trend of the zimmerit;
- At the end, to pass gently through a few brush lightly moistened with nitro solvent to soften the edges of the zimmerit.
I hope I have been of help to our friends at Armorama.

Other models with zimmerit achieved with this method in our site.

Cheers - Gianfranco
AFVFan
Visit this Community
North Carolina, United States
Joined: May 17, 2012
KitMaker: 1,980 posts
Armorama: 1,571 posts
Posted: Monday, March 11, 2013 - 06:00 PM UTC
Man, whoever did that Panther is really well versed in the technique! That thing looks great.
raypalmer
Visit this Community
Ontario, Canada
Joined: March 29, 2010
KitMaker: 1,151 posts
Armorama: 51 posts
Posted: Tuesday, March 12, 2013 - 08:37 AM UTC
Jeesum Crow Gianfranco! I need to get a wood burning kit, that's phenominal stuff.

Well, here's mine. It ain't a Steinway but it'll do...


Looking forward to finishing the build, I've got more PE for this tank than I've ever used times about twenty. Going to be an education.
AFVFan
Visit this Community
North Carolina, United States
Joined: May 17, 2012
KitMaker: 1,980 posts
Armorama: 1,571 posts
Posted: Tuesday, March 12, 2013 - 02:15 PM UTC
That turned out pretty good, Richard. Most importantly, you seemed to have kept the pattern consistent.

Hopefully you've got the zim thinned down enough where it won't get in the way of the PE parts. If it turns out that there is a problem, a little extra work may be called for in shimming the PE to the proper height. Crossing my fingers for you.
Il_Colonnello
Visit this Community
Modena, Italy
Joined: March 08, 2012
KitMaker: 140 posts
Armorama: 140 posts
Posted: Tuesday, March 12, 2013 - 08:21 PM UTC
Hi Richard,
if you look at the zimmerit of the first model that I have posted it done by one of our friends in the club, it compared with the second which has a zimmerit printed directly on the plastic from the company, it was made after many, many trial and error and lots and lots of models.
Only with a continuos training and the consequent improvement techniques allows everyone to improve their work.
In addition, it's also essential to study new solutions, new ways to solve the various problems and never get tired of trying to improve themselves and to find their own style.
Besides, if the model likes to you, it likes to the whole world ...
Keep it up and we will soon see another your masterpieces.

Cheers - Gianfranco
raypalmer
Visit this Community
Ontario, Canada
Joined: March 29, 2010
KitMaker: 1,151 posts
Armorama: 51 posts
Posted: Wednesday, March 13, 2013 - 05:20 AM UTC

So I want fighting with my PE (one huge set of E.T. model detail as well as E.T. shurtzen) and I realized I wasn't going to win. The E.T. stuff is the thinnest PE I've ever come across, I can't handle it right now. So, seeing as it's actually meant for the Dragon Ausf A, not this one. I'll just save it for down the road.

I did use the turned barrel, and some Tamiya PE (nice and thick). I have the magic tracks and boy are they fun on a bun. How do you guys do it, just gingerly place them on the wheels and douse them with tenax??

Anyway, I did the rusty primer as that seems to be the common wisdom. In my case old fashioned Testor's Glass Vial, "Rust."


AFVFan
Visit this Community
North Carolina, United States
Joined: May 17, 2012
KitMaker: 1,980 posts
Armorama: 1,571 posts
Posted: Wednesday, March 13, 2013 - 03:21 PM UTC
Richard - for the track assembly check out this:

https://armorama.kitmaker.net//features/1737

I use a similar method, but use Testors cement and glue them together link by link. The key is the template to keep them straight an a LOT of patience! Once you do a couple of sets, you can knock them together pretty quickly.

Sorry to hear of the PE problems. In most cases, I actually prefer the thinner stuff because it's easier to work with. Do you own a bending tool, or are you just using tweezers and pliers? I can tell you, a tool makes a world of difference.

Il_Colonnello
Visit this Community
Modena, Italy
Joined: March 08, 2012
KitMaker: 140 posts
Armorama: 140 posts
Posted: Wednesday, March 13, 2013 - 09:53 PM UTC
Hi Richard,
to correctly assemble the parts in PE, especially the racks for the tools outside of the hull, you have to keep in mind that they weren't covered with zimmerit so, when you apply the putty - or even when using the system of pyrography - don't should apply it evenly on the whole armor but you have to skip those parts where these are attached to the hull, so then you can paste them correctly on steel, as in reality.
Here's an example:


As you can see in the red circles, when it was engraved - or applied - the zimmerit, the points where they should be applied the PE details have not been engraved (in your case should not be covered with putty).
Finally, because you have painted all the tank with the "rust" color and without removing the turret and the rollers? The zimmerit was a high grip pasta similar to cementite, so it was gray and if you do not disassemble these parts before painting then you can not paint them well.
I reccomend, these are only advices and not criticism but, as I already wrote above, if the model likes to you, it likes to the entire world.
You have been shown to have a good manual dexterity, so all of we are waiting your great progress on your models. You're such a talented and creative modeller. Bravo!

Best regards - Gianfranco
raypalmer
Visit this Community
Ontario, Canada
Joined: March 29, 2010
KitMaker: 1,151 posts
Armorama: 51 posts
Posted: Friday, March 15, 2013 - 03:52 PM UTC
So I'm forging ahead, this is fun and easy! I should always take this laissez-faire approach... The scheme is totally unapologetically fictional. Just playing around.

I'm just pensive about the tracks... but we'll see. I have a plan of attack now at least, (thanks for the link Bob).

Here's how it stands, I blended the camo with a thin coat of panzer yellow, and then glossed it with a bit of testors flat white blended in the gloss (airplane habit). Then a grey oil wash.


AFVFan
Visit this Community
North Carolina, United States
Joined: May 17, 2012
KitMaker: 1,980 posts
Armorama: 1,571 posts
Posted: Saturday, March 16, 2013 - 05:03 AM UTC
The camo pattern turned out great! No apologies needed for the it, Richard. A fair number of tanks were repainted in the field. There are many examples of non-factory patterns in photos from through out the war.

Here's one of my favorites. Don't know how well it worked, but I love the Picasso influence.

[/url]
 _GOTOTOP