G'day all. I am fairly new to this hobby and would like some advice on color.
I am currently building a German AT gun 1/35 scale. I have 2 wooden ammo boxes and 6 AT shells to paint. I want a wood color for the boxes and a brass/copper color for the ammo. I am using Tamiya acrylics. I bought XF-6 for the ammo but it is too bright and X-9 for the boxes but it is too dark. I tried to lighten/darken these colors but the result was bad.
Does Tamiya make realistic wood and brass acrylics? Or do I need to look elsewhere?
AFV Painting & Weathering
Answers to questions about the right paint scheme or tips for the right effect.
Answers to questions about the right paint scheme or tips for the right effect.
Hosted by Darren Baker, Matthew Toms
Wood and brass/copper color using Tamiya

Steel_Spektor

Joined: December 19, 2012
KitMaker: 74 posts
Armorama: 68 posts

Posted: Wednesday, March 20, 2013 - 06:15 PM UTC
Posted: Wednesday, March 20, 2013 - 10:12 PM UTC
Hi Luke,
Re: Wooden boxes / handles -- its a 3-step process for me using Tamiya colors.
1. Start with a base color of Desert Yellow (XF59).
2. When dry, I'd paint Clear Orange (X26) over it, painted un-evenly to simulate grain / shift in color.
3. Lastly, to take off the gloss effect, you'll need to apply a matte or flat clear coat.
Try, and see if it works for you. I can vary the wood colors by changing the base such as Buff (XF57) or Dark Yellow (XF60), but will always top it with X26 and the clear flat coat.
Cheers,
Tat
Joel_W

Joined: December 04, 2010
KitMaker: 11,666 posts
Armorama: 1,143 posts

Posted: Thursday, March 21, 2013 - 03:40 AM UTC
For realistic looking wood, I usually use a base coat of either Tamiya XF-57 Buff or a lighter shade of XF-55 Deck Tan. Once dry I prefer to lightly brush on tube oils. Usually I opt for Burnt Sienna or Raw Umber. Let it set up for a few min, then using a clean damp brush (mineral spirits), start to remove the excess, till I get the effect I'm looking for.
Joel
Joel
imatanker

Joined: February 11, 2011
KitMaker: 1,654 posts
Armorama: 1,565 posts

Posted: Friday, March 22, 2013 - 08:58 AM UTC
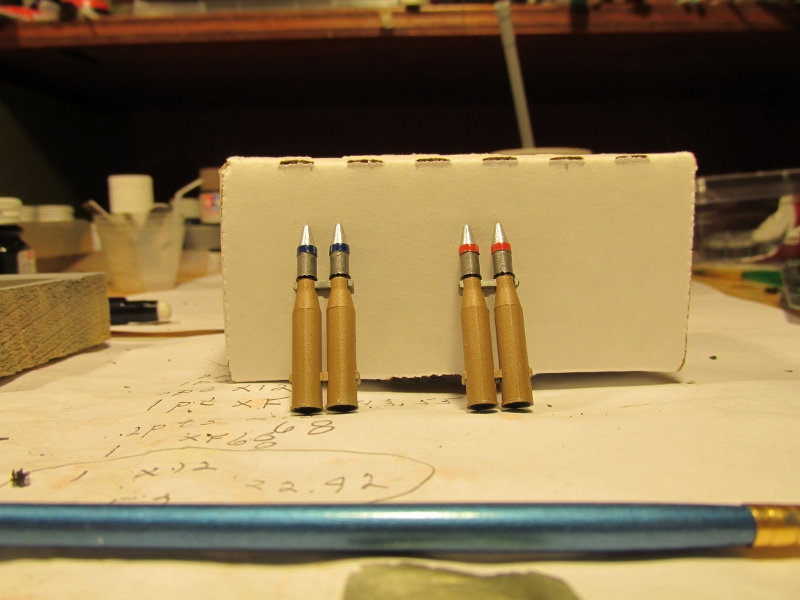
Luke,Welcome to Armorama.Talk about good timing,I just had to do some tank rounds for a build I'm doing and came up with this.
1 part X-12 Gold Leaf to 1 part XF-52 Flat Earth.Here's what it looks like...
I think it looks pretty good.Hope this helps you out Jeff T.
1 part X-12 Gold Leaf to 1 part XF-52 Flat Earth.Here's what it looks like...

I think it looks pretty good.Hope this helps you out
 Jeff T.
Steel_Spektor

Joined: December 19, 2012
KitMaker: 74 posts
Armorama: 68 posts

Posted: Saturday, March 23, 2013 - 09:20 PM UTC
Thanks for your replies fellas. I will be trying your methods in the next couple of days and will post a few photos of the results. Cheers.
 |


