_GOTOBOTTOM
Constructive Feedback
For in-progress or completed build photos. Give and get contructive feedback!
Korean War, Armored Jeep
Manchu34
Visit this Community
Missouri, United States
Joined: March 08, 2002
KitMaker: 493 posts
Armorama: 361 posts
Posted: Sunday, May 12, 2013 - 06:14 PM UTC
Finally got the Tamiya kit for this conversion. I've examined the below photos of this armored jeep, made some drawings to work out the fine details, etc.

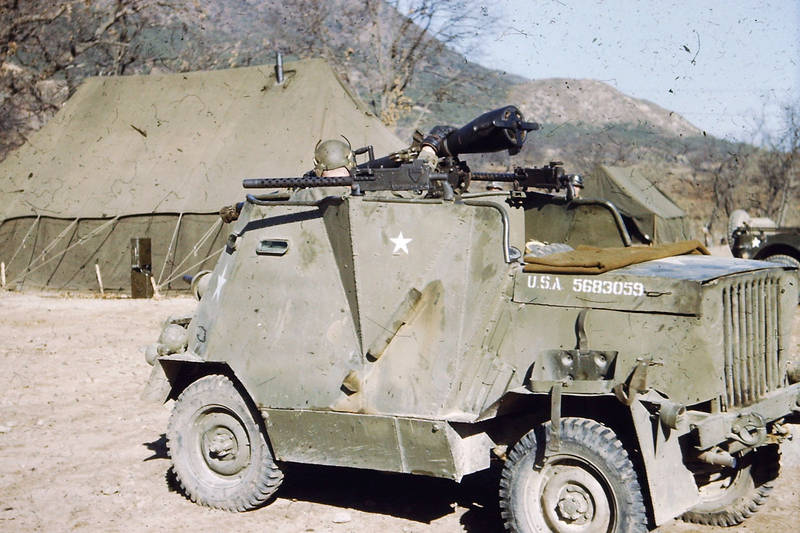
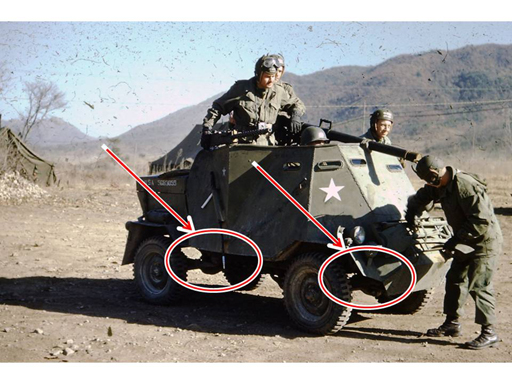
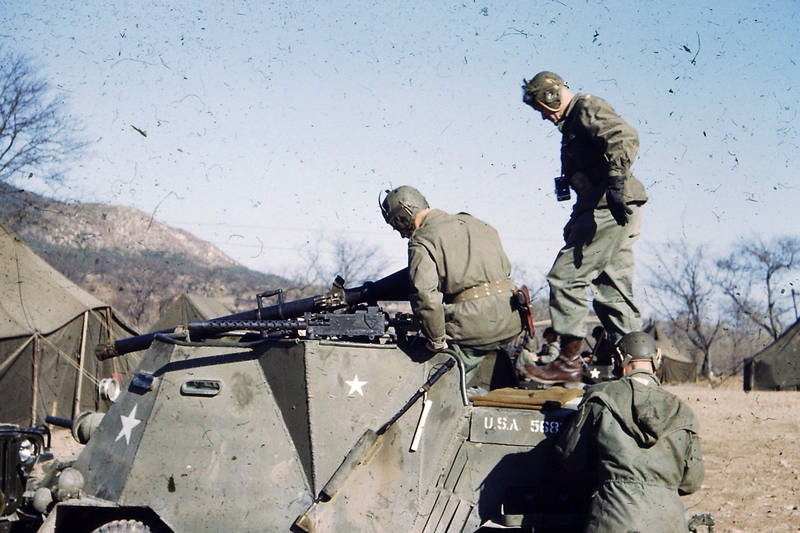
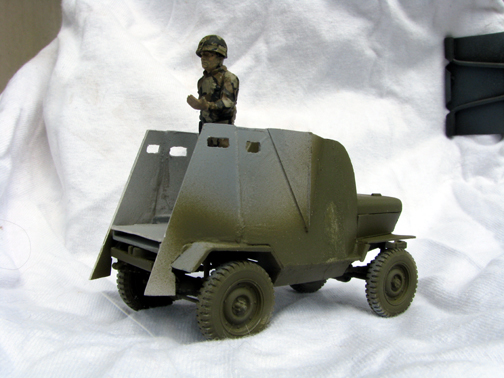
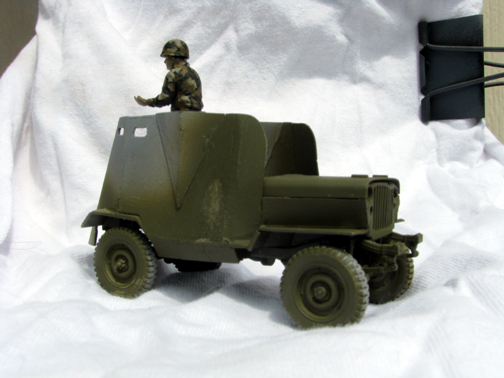
Brief history of the actual jeep. The jeep was modified to add armor plating. It's was constructed by members of the 17th Infantry Regiment, 7th Infantry Division. It was used during the Korean War.

I would serve in this same regiment for nearly 5 years. My goal is to have this completed for our reunion in Sept at New Orleans, LA.

Below are 2 of the 5 photos a good friend from the regiment provided me. He obtained them from a member of the 17th Infantry who took the photos


Manchu34
Visit this Community
Missouri, United States
Joined: March 08, 2002
KitMaker: 493 posts
Armorama: 361 posts
Posted: Sunday, May 12, 2013 - 06:21 PM UTC
The hardest parts in figuring out what they did was the fact that they had the engine in the rear. Yet, the axles were in the correct location. What I mean is that the photos show the front axle is towards the new front and the rear axle was under the engine.

During my dry fitting of the axles in revers location, the rear axle would not fit properly under the engine nor would the drive shafts fit.

As I examined the original photos, I noticed a large amount of space between the axles and the body. I then tried different ways to achieve this with the model. I discovered the only possible solution I could figure was that they place the axle under the springs and not above. The below photo I marked the areas I am referring to.

Manchu34
Visit this Community
Missouri, United States
Joined: March 08, 2002
KitMaker: 493 posts
Armorama: 361 posts
Posted: Sunday, May 12, 2013 - 06:25 PM UTC
Here I've started the actual building of all the armor attached. Not having any plans or photos showing how the interior looked. I had to guess as to how it was built. With the angles and locations of the armor, I figured they removed most of the body. Which is what I did.

By placing the axles below the springs, the photos of the model are fairly close to the height of the actual jeep.


Calahan
Visit this Community
Kansas, United States
Joined: October 09, 2005
KitMaker: 89 posts
Armorama: 85 posts
Posted: Monday, May 13, 2013 - 04:30 AM UTC
This looks like a real fun conversion. These are some photos I've never seen. I'd imagine you'll need to use quite a bit of your creative license on the interior. Which isn't a bad thing, my recommendation is for you to build it like you were welding in the field.
Manchu34
Visit this Community
Missouri, United States
Joined: March 08, 2002
KitMaker: 493 posts
Armorama: 361 posts
Posted: Monday, May 13, 2013 - 08:46 AM UTC

Quoted Text

This looks like a real fun conversion. These are some photos I've never seen. I'd imagine you'll need to use quite a bit of your creative license on the interior. Which isn't a bad thing, my recommendation is for you to build it like you were welding in the field.


Except for the digital photos my friend sent me, the only other image of this vehicle in in a video (motion picture conversion) someone found on youtube or ebay. It appeared for about 10 or 15 seconds.

Yes, right now I'm going to have to use creative license for the interior. I'm hoping that when I take it to the 17th Infantry Regiment Reunion, at least 1 Korean War veteran will remember this jeep and provide corrective comments. If that happens I'll build another one with the details I'm provided.
18Bravo
Visit this Community
Colorado, United States
Joined: January 20, 2005
KitMaker: 7,219 posts
Armorama: 6,097 posts
Posted: Monday, May 13, 2013 - 09:36 AM UTC

Quoted Text

... I discovered the only possible solution I could figure was that they place the axle under the springs and not above.


Well that's how we do it in Texas. Looking good so far.
Manchu34
Visit this Community
Missouri, United States
Joined: March 08, 2002
KitMaker: 493 posts
Armorama: 361 posts
Posted: Thursday, May 23, 2013 - 03:09 PM UTC
Here an update of my work. It took me about 2 hours to create the templates I would use to cut the plastic sheet. It would take me another 3 or 4 hours of fine tuning each piece of plastic. Sanding down portions, recutting the sections, gluing, etc. Still have to do some more sanding to make everything smooth like the original

Manchu34
Visit this Community
Missouri, United States
Joined: March 08, 2002
KitMaker: 493 posts
Armorama: 361 posts
Posted: Tuesday, May 28, 2013 - 09:24 AM UTC
Current update on the project. Basically have the exterior completed, less the frontal armor plate and the rear portion of the rear fender.

I'm leaving the front plate off to all me to create some type of interior. Once that is done, I'll attach the front plate.

Comments are more than welcomed. They are desired!!!


windysean
Visit this Community
Wisconsin, United States
Joined: September 11, 2009
KitMaker: 1,917 posts
Armorama: 735 posts
Posted: Tuesday, May 28, 2013 - 10:31 AM UTC
Awesome work so far. Keep it going.
-Sean H
Manchu34
Visit this Community
Missouri, United States
Joined: March 08, 2002
KitMaker: 493 posts
Armorama: 361 posts
Posted: Tuesday, May 28, 2013 - 03:08 PM UTC

Quoted Text

Awesome work so far. Keep it going.
-Sean H


Thanks Sean.
F3066
Visit this Community
Victoria, Australia
Joined: November 20, 2004
KitMaker: 71 posts
Armorama: 55 posts
Posted: Thursday, May 30, 2013 - 05:39 AM UTC
getting there ....
im about 1/2 way through this build myself... found those 5 existing pics and the screen grab and out with the plastic and the knife ....this jeep was a serious bit of gear.
F3066
Visit this Community
Victoria, Australia
Joined: November 20, 2004
KitMaker: 71 posts
Armorama: 55 posts
Posted: Wednesday, June 05, 2013 - 02:32 AM UTC
heres a test shot stuffed if I know photobucket wont work

Manchu34
Visit this Community
Missouri, United States
Joined: March 08, 2002
KitMaker: 493 posts
Armorama: 361 posts
Posted: Tuesday, June 25, 2013 - 03:57 PM UTC
Can't see any photo or link to the gallery their in.
F3066
Visit this Community
Victoria, Australia
Joined: November 20, 2004
KitMaker: 71 posts
Armorama: 55 posts
Posted: Sunday, June 30, 2013 - 01:31 AM UTC
http://www.network54.com/Forum/110741/message/1370526111/WIP+korean+war+armored+jeep
Manchu34
Visit this Community
Missouri, United States
Joined: March 08, 2002
KitMaker: 493 posts
Armorama: 361 posts
Posted: Thursday, August 01, 2013 - 04:33 PM UTC

Quoted Text

http://www.network54.com/Forum/110741/message/1370526111/WIP+korean+war+armored+jeep


Just noticed your reply and the link. It worked this time. I love what you did. Your's is looking better then mine turned out. Have to take pictures of it and post it.

BTW, did you use any templates for the various sections of the armor plates?

I'm already planning on redoing it come fall. I'm attending this year's 17th Infantry Regiment Association's reunion and I'll be bringing the model to it. I'm hoping there's some Korean veteran that remembers it and can give me some insight in regards to the build and provide details that the pictures don't show.

Btw, if you want and don't have the photo showing the actual US numbers I've got the photo that has it clearly. I can provide it to you.

Going to send you a message here in regards to the build.
 _GOTOTOP