Hi,
I was looking to bust into the modern armour genre with some quality figures. As the modern infantryman wears hugely complicated cammo patterns these days I was thinking about using the various decal sheets that are available on todays market.
However, I have never used these cammo sheets before & was wondering what they were like to work with.
Could you let me know what I might be letting myself in for, please?
Thanks very much.
Joe.
Figures
Military figures of all shapes and sizes.
Military figures of all shapes and sizes.
Hosted by Darren Baker, Mario Matijasic
Camouflage decals. Pros & cons?
joegrafton

Joined: October 04, 2009
KitMaker: 1,209 posts
Armorama: 1,143 posts

Posted: Saturday, May 18, 2013 - 01:56 AM UTC
parrot

Joined: March 01, 2002
KitMaker: 1,607 posts
Armorama: 1,581 posts

Posted: Sunday, May 19, 2013 - 01:55 AM UTC
Hi Joe,
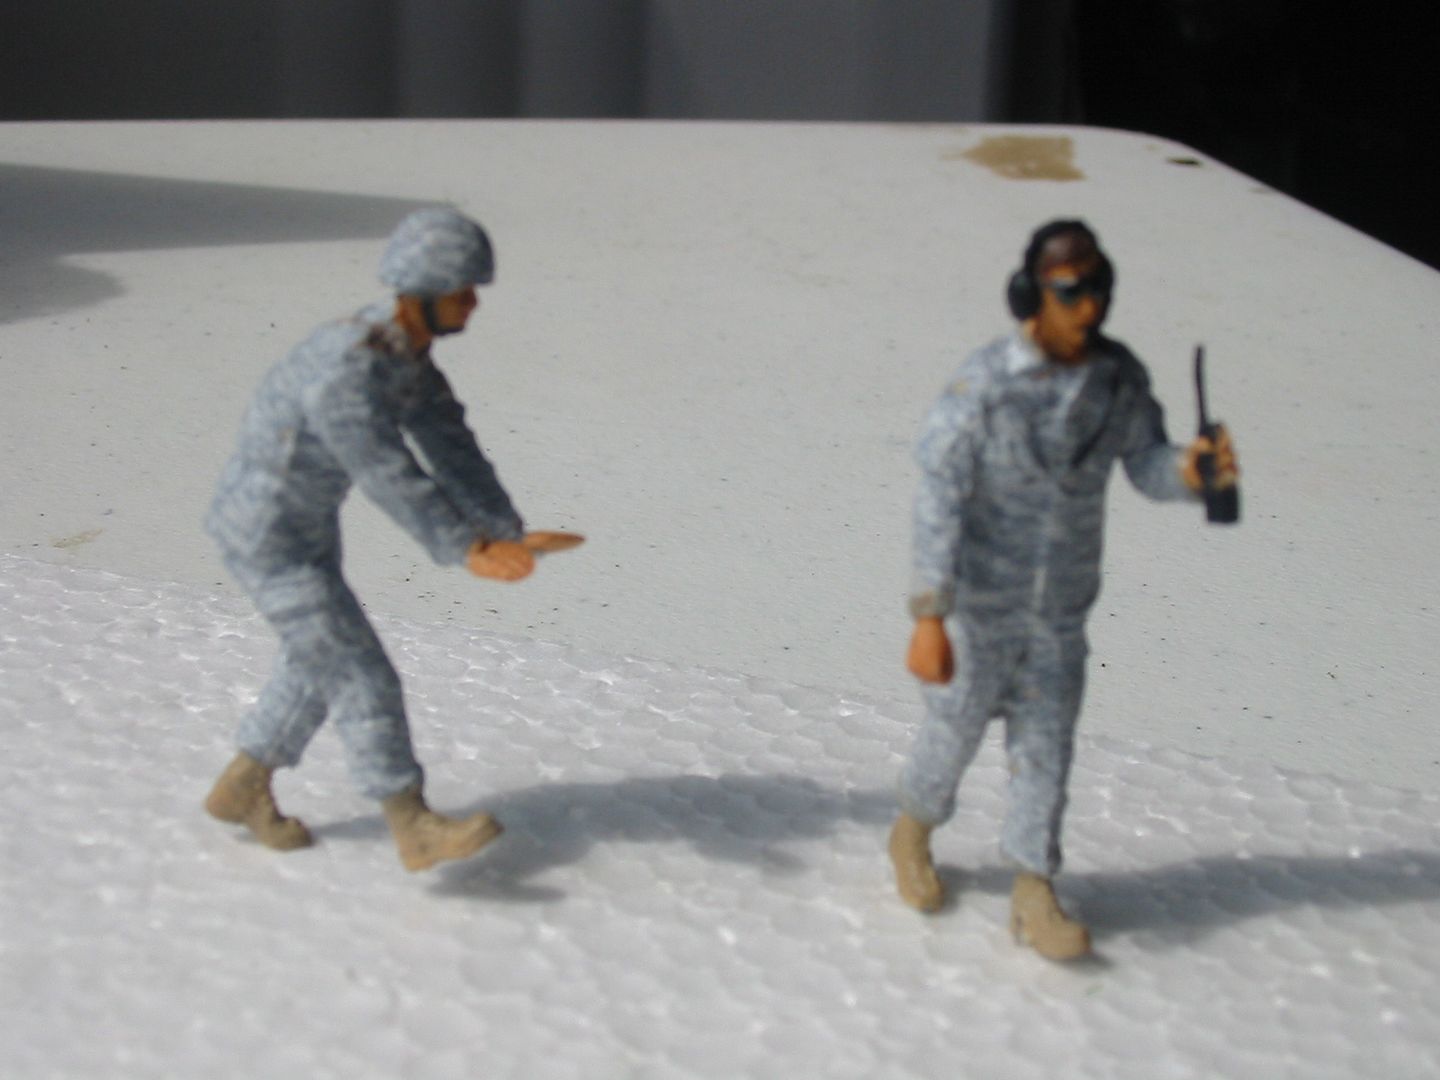
From my experience they're not a lot of fun.Mind you I have only used 2 manufactures.The first attempt was with Trumpeter.A complete disaster.They wouldn't stick and constantly just fell apart.I gave up on them and ended up painting.Second was from Dragon that came with the Drone kit.Now these,to my surprise,worked very well.I believe it must be the difference in quality.Takes some time,but the results are good.First I give the figure a coat of Future and let dry,that doesn't take long.Cut the decal in small pieces,ie 2-4 strips for an arm.Apply setting solution to each part your going to apply the decal.I use a facial tissue to remove moisture and the gently roll a Q-Tip over it to get into creases.Finaly a coat of softener and dab with a soft brush.I will post a pic later today so you can see the result.
Tom


Posted: Sunday, May 19, 2013 - 02:12 AM UTC
Sounds interesting, Tom. I have stayed away for these decals simply because I expected disaster. It seems like it might be worth a try.
Do you apply the decals before you put the figure together?
Looking forward to see the pictures.
Do you apply the decals before you put the figure together?
Looking forward to see the pictures.


Quasimofo

Joined: November 30, 2012
KitMaker: 105 posts
Armorama: 87 posts

Posted: Sunday, May 19, 2013 - 02:28 AM UTC
Hi Joe-
I can only partially speak from experience since I've only used camo decals once and I designed and printed them myself, rather than buying from a manufacturer. Since no one seems to make decals for the East German Strichtarn pattern I needed, I made them myself. But the system and techniques for applying them will be similar to anything you would buy ready-made.
To echo what Tom said, a good gloss coat is a must...I use Future as well, applied with an airbrush. I took the approach of also applying the decals in small pieces, but cut and applied them as the fabric panels would appear on the actual piece of clothing. This way not only are you working in small pieces which is infinitely easier, but you also replicate where seams on the actual article of clothing are. I also left things like pockets and pocket flaps for last, cutting small pieces to match the dimensions of those items on the figure. I highly recommend having good photo refs (or an actual article of clothing) of the uniform you are trying to replicate to be able to match the seams, direction of the pattern and such.
Work in small sections, like part of an arm or a leg, and after applying your decal solvent and let it dry before doing anything else. It takes much longer this way, but you'll be less likely to disturb the decal while it's setting and ruin it. On area like an elbow, where the bend in the joint is extreme, I found it easiest to just put a strip or two in that area down then let it set, rather than try and do the whole area at once. Sure it takes longer, but there is much less cursing.
I also agree that the quality of the decal makes all the difference. With all the folds, ridges and details on a figure, a thin, flexible but resilient decal film is a must. One benefit of printing them yourself is you have control over the materials used and can use a better quality decal film.
Camo decals do take FOREVER to apply...my first effort at this was on three figures and it took me an entire weekend of almost non-atop work. But, the results are well worth the effort, especially when you consider the difficulties of trying to pant some of the camo patterns out there.
Hope this bantering helps!


Quasimofo

Joined: November 30, 2012
KitMaker: 105 posts
Armorama: 87 posts

Posted: Sunday, May 19, 2013 - 02:34 AM UTC
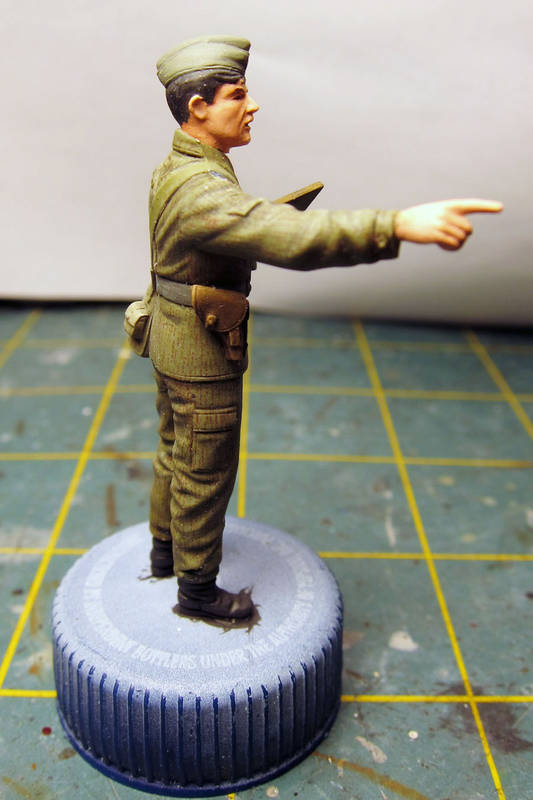
Thought it might help to show a few examples off the figures I applied camo decals to using the method I described:
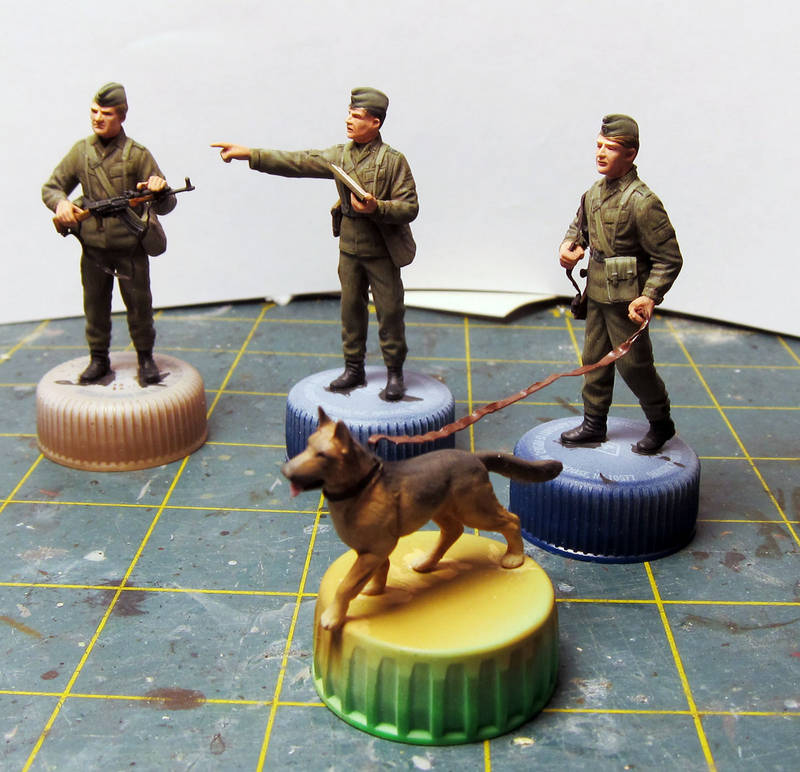
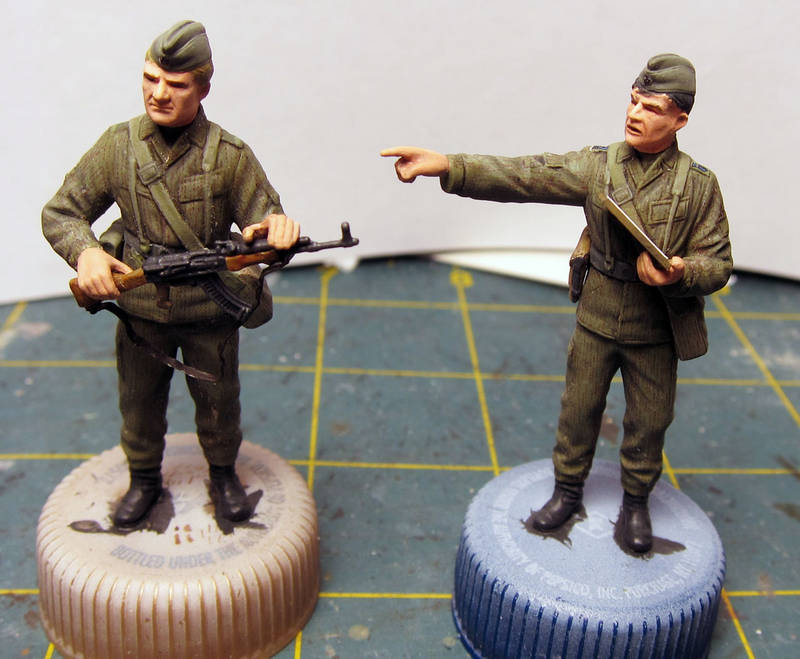
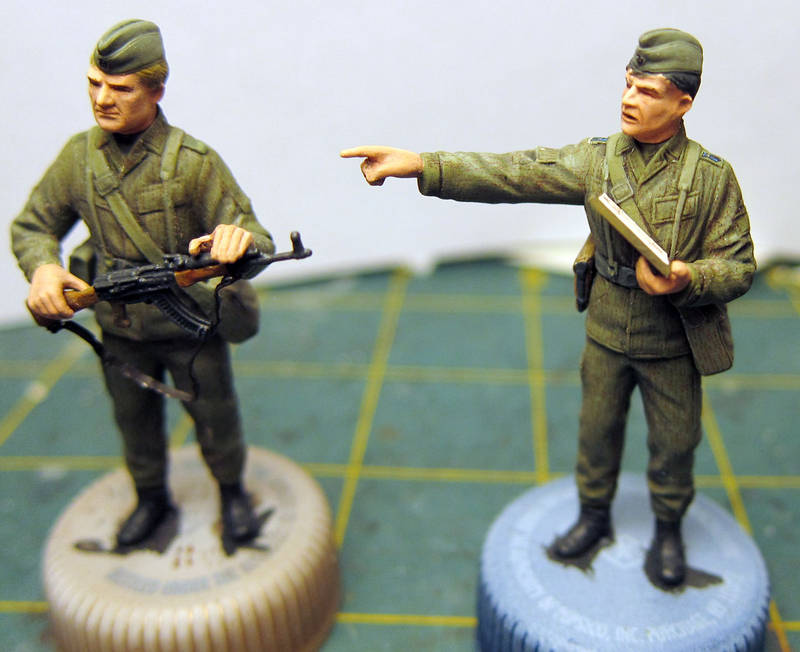
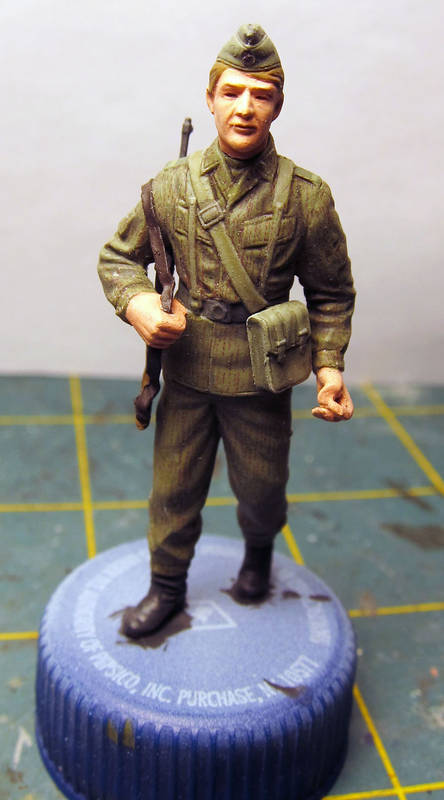
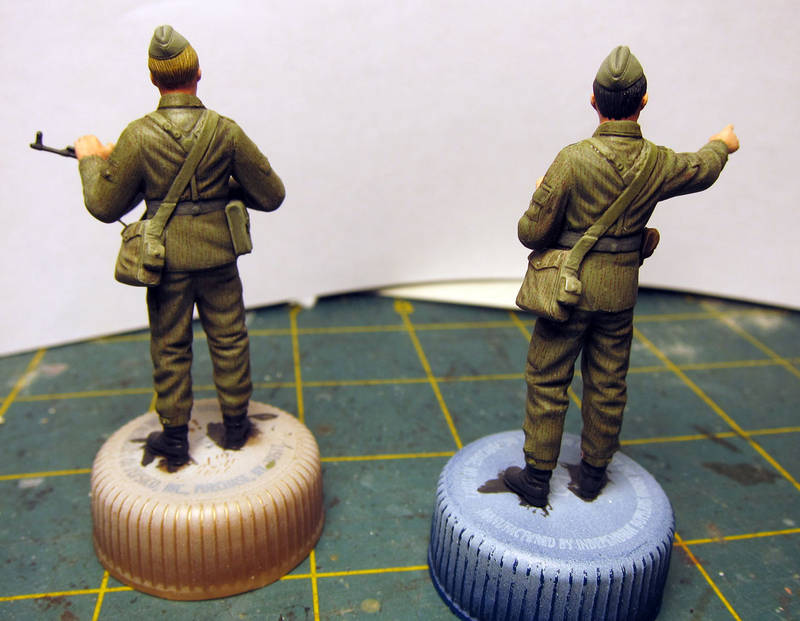


ComaBlack

Joined: September 19, 2010
KitMaker: 194 posts
Armorama: 148 posts

Posted: Sunday, May 19, 2013 - 03:37 AM UTC
Just to echo Tom some more, don't bother with Trumpeter camo decals. They just break up into tiny pieces as soon as you try and bend them around a leg or set them down around detail. FSM also had good results with the Academy/Dragon ACU decals when they reviewed the drone Tom mentioned.
Bill, I think your figures look amazing. I'm also partial to the various 'rain drop' patterns. Can you give us a bit more technical details on how you printed your decals? Ie: brand/type of paper, type of ink, and most especially how you scaled it so accurately. Many a time I have browsed Camo-pedia for reference and just wished to print instead.
Bill, I think your figures look amazing. I'm also partial to the various 'rain drop' patterns. Can you give us a bit more technical details on how you printed your decals? Ie: brand/type of paper, type of ink, and most especially how you scaled it so accurately. Many a time I have browsed Camo-pedia for reference and just wished to print instead.

Quasimofo

Joined: November 30, 2012
KitMaker: 105 posts
Armorama: 87 posts

Posted: Sunday, May 19, 2013 - 04:19 AM UTC
Simon-
Thanks for the kind words! These were the first figures I'd done in at least 15 years, so I was pleasantly surprised with how they turned out...even more so having used camo decals for the first time. There seemed something a bit "unnatural" about spraying figures with a clear gloss coat. :-)
As for how I made the decals, I'd be happy to share how I did them. For the pattern, I sort of cheated...I have an old East German field shirt that I bought at a Berlin flea market years ago. I scanned a square section of the back into Photoshop at 600dpi, then adjusted the curves/levels to get rid of the green-gray background so that just the brown stripes remained. There was a trace of the green left, but it was light enough that once reduced it would disappear.
Once I had the colors where I wanted, I measured an arm length from a figure and used that as a gauge for how to scale down the pattern. This was still a rough measurement but once I had the scan turned into an actual pattern for print, I could fine tune it then.
I reduced the pattern scan to match my figure measurement, then defined the scan as a Photoshop pattern. In a new document I filled the page with the new Photoshop pattern and did a test print on plain white paper. I then trimmed off a section and placed it against a figure piece to see how it scaled. The first shot was still too big so I scaled the image down a bit more. It was a little trial and error, but it only took a couple of tries to get it right. I actually made the stripes a but above scale because the smaller I reduced the pattern the closer the lines were getting and I didn't want them to close in altogether and get lost.
Once I had the pattern the right size, I took the current, scaled down file I'd been working with and defined a new Photoshop pattern from that. In another new document, I filled the entire page with that new, scaled down pattern. I printed another test sheet on plain paper, placed it on a figure, and BAM! I was good to go. The last thing I did was to slightly darken the pattern by bringing the mid-levels down few points. I was afraid that after applying a final flat coat the pattern might get lighted by the the flat finish and disappear. Glad I did that, because my hunch was right. The tone of the lines did shift a bit lighter after Dullcote was applied.
The first photo below shows the first printed decal sheet. It was printed on my Xerox Phaser 6500 laser printer with just plain paper settings. I've had trouble with using other paper settings in the past...I think the fuser gets too hot using some paper settings and the toner doesn't bond to the decal paper. The plain paper setting seems to work every time. Your mileage may vary. I should mention that it's much better to feed decal paper to a laser printer via the manual feed.
I used Expert's Choice clear laser decal paper for the simple fact it was what I had on hand. I had planned on just testing with this and trying some other brands if I didn't like it, but I was blown away by how thin and flexible the Expert's Choice was. I can't recall for sure, but I don't believe I used a sealer coat on this decal sheet. I just applied the decal in small sections as described previously, onto a cured coat of Future. The second image shows one figure partially decaled. You can see how I left the cargo pockets on the pants empty. I added them later along with the pocket flaps, so the pattern would not match the rest of the leg, to simulate the way the actual uniforms are stitched together.
That's more or less the Reader's Digest version of how I did these. I'm sure I could get even more technical, but I don't want to hijack the thread nor put anyone to sleep! :-)
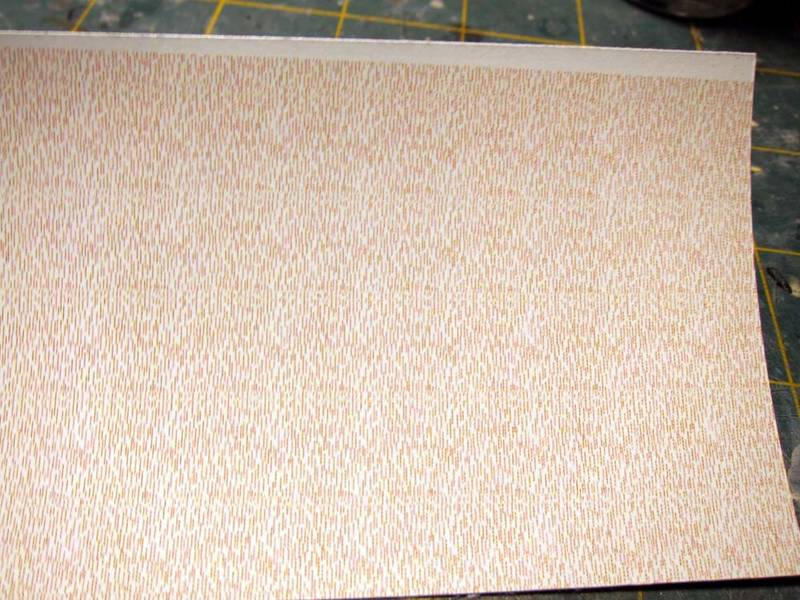
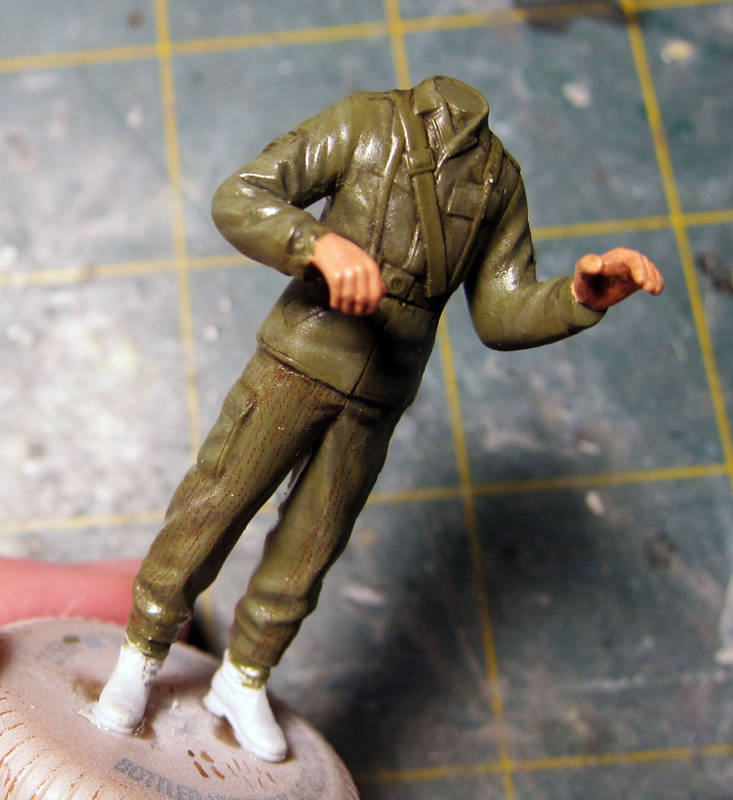


parrot

Joined: March 01, 2002
KitMaker: 1,607 posts
Armorama: 1,581 posts

Posted: Sunday, May 19, 2013 - 06:21 AM UTC
Hey Jesper,
The Dragon figures I did after they were they were put together,but I was so happy with them and there was plenty of the decal left,I used it on some others.From that I learned that if the arms are close to the body it would have been better to decal them before attaching.Also Bill is right and I forgot to mention that doing one area and letting it set for a while makes the job much easier or the area you just did can shift when applying more.PS Bill.I wish I could do what you describe,but it took me forever just to figure out a better way to post photos on here.
Tom
parrot

Joined: March 01, 2002
KitMaker: 1,607 posts
Armorama: 1,581 posts

Posted: Sunday, May 19, 2013 - 09:37 AM UTC
Posted: Sunday, May 19, 2013 - 10:04 AM UTC
I have done some of the camo decals and all I could add is to use lots of the decal softener (Micro sol or other similar brands). Lots of patience until the decal starts to conform. Work in very small areas and wait for things to get soft. One trick I have tried is to loosely drap the decal on an arm or leg and not try to press it in, just soak it with the decal solution. Then gently lower the whole figure into a medicine container and close the lid. Leave this overnight and get the decal soft and work it into the folds the next day. Repeat until it looks like the cloth uniform. There is still much touch up painting needed. Also shadow and shading with paint (I use enamels) but the decal gives a consistent pattern. Just my 2 cents.


Trisaw

Joined: December 24, 2002
KitMaker: 4,105 posts
Armorama: 2,492 posts

Posted: Sunday, May 19, 2013 - 11:45 AM UTC
So one needs a gloss coat before applying the decals? Could Testors Gloss Coat from a spay can work just as well?
I have Future, but I never sprayed it from an airbrush before and as such I don't know how to clean up the airbrush after spraying Future.
I have Future, but I never sprayed it from an airbrush before and as such I don't know how to clean up the airbrush after spraying Future.
joegrafton

Joined: October 04, 2009
KitMaker: 1,209 posts
Armorama: 1,143 posts

Posted: Sunday, May 19, 2013 - 07:47 PM UTC
Peter,
Use 'future' straight from the bottle & clean up with 'windex' afterwards.
For those that dont have 'windex@ in their country then mix some blue windscreen cleaner with household amonia at about a 4:1 ratio.
Works a treat!
Joe.
Use 'future' straight from the bottle & clean up with 'windex' afterwards.
For those that dont have 'windex@ in their country then mix some blue windscreen cleaner with household amonia at about a 4:1 ratio.
Works a treat!
Joe.
joegrafton

Joined: October 04, 2009
KitMaker: 1,209 posts
Armorama: 1,143 posts

Posted: Sunday, May 19, 2013 - 07:50 PM UTC
Okay, so I'm starting to think that it sounds a whole lot 'easier' to paint the figures from what you're all saying!
Applying these decals sound like a real chore to me!
Mabye I'll buy one sheet & give it a go & see what happens.
Thanks for all your replies. You've been a great help!
Joe.
Applying these decals sound like a real chore to me!
Mabye I'll buy one sheet & give it a go & see what happens.
Thanks for all your replies. You've been a great help!
Joe.
Maki


Joined: February 13, 2002
KitMaker: 5,579 posts
Armorama: 2,988 posts

Posted: Sunday, May 19, 2013 - 07:56 PM UTC
I have used several different camo decals, but I was far more satisfied with painting the figures... even ACU which is extremely annoying to paint by hand. I found decals really hard to work with, usually covering all the tiny details sculpted on the figure, no matter how thin the carrier film was.
There are some really cool examples of decals here, so you might try it yourself and see how well they perform. My experience with them was not positive at all.
Mario
There are some really cool examples of decals here, so you might try it yourself and see how well they perform. My experience with them was not positive at all.
Mario
prophecy

Joined: November 09, 2010
KitMaker: 158 posts
Armorama: 157 posts

Posted: Sunday, May 19, 2013 - 10:31 PM UTC
Try Crossdelta Decals. They work like a charm. Use them with Micro Sol, then they cover no details.
I think the decals in the academy drone are also from Crossdelta. You can order crossdelta from Luckymodel.
Example:


I think the decals in the academy drone are also from Crossdelta. You can order crossdelta from Luckymodel.
Example:


parrot

Joined: March 01, 2002
KitMaker: 1,607 posts
Armorama: 1,581 posts

Posted: Sunday, May 19, 2013 - 11:52 PM UTC
amoz02t,
Decals look good,but off topic,that has got to be the best launched rocket i've ever seen.
Tom

Decals look good,but off topic,that has got to be the best launched rocket i've ever seen.
Tom


Posted: Monday, May 20, 2013 - 12:36 AM UTC
With all the work, cost and risk involved with decals, it would be as worthwheile to focus on improving your painting skills. You still got to learn to paint anyway, because no matter how good the camo turns out, the face is the deciding factor (in my opinion) regarding a figure. There may not always be a camo decal you want, or as I read above, it may not always work out like you thought. 

Biggles2

Joined: January 01, 2004
KitMaker: 7,600 posts
Armorama: 6,110 posts

Posted: Monday, May 20, 2013 - 02:51 AM UTC
How do you do shading and highlighting on the decals? With glazes or washes? You wouldn't want to obscure the fine camo pattern. 

Trisaw

Joined: December 24, 2002
KitMaker: 4,105 posts
Armorama: 2,492 posts

Posted: Monday, May 20, 2013 - 05:45 AM UTC
How do you place the decals around pouches, gear, and straps? Do you have to cut it to size or overlap it and then cut around the gear and pouches?
And if you miss a spot, do you do patchwork by cutting a small camouflage section? I wonder how the pattern will look with all these patchwork patches.
And if you miss a spot, do you do patchwork by cutting a small camouflage section? I wonder how the pattern will look with all these patchwork patches.

retiredyank

Joined: June 29, 2009
KitMaker: 11,610 posts
Armorama: 7,843 posts

Posted: Monday, May 20, 2013 - 09:10 AM UTC
I'm thinking of using Shinsengumi decals, for some German SS figures. Does anyone know the quality of these decals? I'm not quite where I want to be, as far as the face goes. But, a poorly painted uniform is very noticeable. And, I'm trying to save my eyesight for pe details. 

grimmo

Joined: January 17, 2006
KitMaker: 752 posts
Armorama: 569 posts

Posted: Monday, May 20, 2013 - 06:37 PM UTC
Quoted Text
I'm thinking of using Shinsengumi decals, for some German SS figures. Does anyone know the quality of these decals? I'm not quite where I want to be, as far as the face goes. But, a poorly painted uniform is very noticeable. And, I'm trying to save my eyesight for pe details.
They are well worth getting. i have used them on some
USMC figures, and work a treat.
prophecy

Joined: November 09, 2010
KitMaker: 158 posts
Armorama: 157 posts

Posted: Monday, May 20, 2013 - 06:53 PM UTC
Quoted Text
How do you do shading and highlighting on the decals? With glazes or washes? You wouldn't want to obscure the fine camo pattern.
I use thinned Black Grey from Vallejo and a fine brush for shades.

Vodnik

Joined: March 26, 2003
KitMaker: 4,342 posts
Armorama: 3,938 posts

Posted: Monday, May 20, 2013 - 07:02 PM UTC
Quoted Text
Here's the Dragon pics.
It's Academy, not Dragon.
Posted: Tuesday, May 21, 2013 - 01:41 AM UTC
Quoted Text
amoz02t,
Decals look good,but off topic,that has got to be the best launched rocket i've ever seen.
Tom

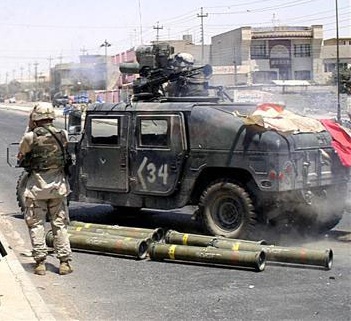
 Thank you Tom! That is the Voyager brand PE and resin of the TOW mounted with some clear stretched sprue and a little cotton (both ends of the pipe). I was trying to model the 101st firing on Qusay and Uday in Mosul, Iraq, on July 22, 2003
  Thank you and Happy modeling!
parrot

Joined: March 01, 2002
KitMaker: 1,607 posts
Armorama: 1,581 posts

Posted: Tuesday, May 21, 2013 - 09:20 AM UTC
Quoted Text
Quoted TextHere's the Dragon pics.
It's Academy, not Dragon.
Sorry,I stand corrected,your right.
Tom
 |


