

How do you paint 1/35 Weapons? hand brush, Airbrush, primer, weathering..........?
Any opinion will help.
Thank you
Jay
Hosted by Darren Baker
How do you paint 1/35 Weapons?

hliu24

Joined: November 19, 2010
KitMaker: 798 posts
Armorama: 797 posts
Posted: Thursday, June 06, 2013 - 01:56 PM UTC

retiredyank
Joined: June 29, 2009
KitMaker: 11,610 posts
Armorama: 7,843 posts
Posted: Thursday, June 06, 2013 - 02:04 PM UTC
I hand brush weapons. I primer them black. I use a lighter shade of brown, really tan, on the edges of the butt and bottom of the stock. You don't want to add too much. Painting 1:35 weapons is very simple. They aren't large enough to weather. JMHO I am sure others do it differently. Oh, and the barrel should be black or gunmetal. This is, of course if it has been painted with a camouflage pattern.


18Bravo
Joined: January 20, 2005
KitMaker: 7,219 posts
Armorama: 6,097 posts
Posted: Thursday, June 06, 2013 - 02:10 PM UTC
Quoted Text
Oh, and the barrel should be black or gunmetal. This is, of course if it has been painted with a camouflage pattern.
I'm not sure why. If I camouflage a weapon I'm not going to leave the barrel unpainted...


hliu24
Joined: November 19, 2010
KitMaker: 798 posts
Armorama: 797 posts
Posted: Thursday, June 06, 2013 - 02:21 PM UTC
Thx, Matt
Let me find a example, how about this guy? how you approach it?

From https://en.wikipedia.org/wiki/File:M4w-att.jpg
Jay
Let me find a example, how about this guy? how you approach it?
From https://en.wikipedia.org/wiki/File:M4w-att.jpg
Jay

didgeboy
Joined: September 21, 2010
KitMaker: 1,846 posts
Armorama: 1,509 posts

Posted: Thursday, June 06, 2013 - 03:57 PM UTC
carefully.
In all seriousness I would start with a faded black. Add gun metal to any exposed non painted metal parts and add wear and tear as necessary. I usually dry brush on the metal colours then go back with a really thinned black or what ever weapon base colour you are using. Just remember that your 1/35 scale weapon is basically what you would see in an actual sized weapon at c35 feet. While you might see some shine probably not too much. Having said that there are some that choose to go for the hyper realism. Good luck and remember, practice makes perfect. Cheers.
In all seriousness I would start with a faded black. Add gun metal to any exposed non painted metal parts and add wear and tear as necessary. I usually dry brush on the metal colours then go back with a really thinned black or what ever weapon base colour you are using. Just remember that your 1/35 scale weapon is basically what you would see in an actual sized weapon at c35 feet. While you might see some shine probably not too much. Having said that there are some that choose to go for the hyper realism. Good luck and remember, practice makes perfect. Cheers.

Trisaw
Joined: December 24, 2002
KitMaker: 4,105 posts
Armorama: 2,492 posts
Posted: Thursday, June 06, 2013 - 04:35 PM UTC
After washing the gun first, I spray primer for resin guns because without primer, the acrylic paint often flakes off resin. For plastic, I just paint straight onto the plastic often with no primer.
Be careful because 1/35 guns have delicate detail so don't spray primer too heavily and don't paint too thickly or the trigger guard and front sight will be filled with paint.
I often paint my guns straight black and use gunmetal only for the magazine. Because the 1/35 gun is so small, IMHO no sheen or shine is going to show on the matt barrel or receiver. After all, isn't metal sheen discouraged in the Military? Even most magazines are black or show very little metallic sheen.
For Woodland or Desert as18Bravo's photo shows, I just paint straight Medium Green or Desert Tan and then after that's thoroughly dry, I apply a thin wash of lighter colors to camouflage the piece. I then wash the entire gun with thin black and drybrush with a lighter color. The results look quite nice.
I only use gloss for the scopes and sights. I just find using gunmetal or chrome black makes the 1/35 gun look too toy-like with all these different colored parts. In 120mm, fine, the gun could be painted different colors, but at 1/35 scale, I often leave the gun, sights, grenade launcher, and barrel one color.

DrButterfingers
Joined: June 06, 2013
KitMaker: 16 posts
Armorama: 7 posts
Posted: Thursday, June 06, 2013 - 05:07 PM UTC
Agree with most, esp Trisaw. RE that M4. The receiver in scale black - really like German grey, to contrast the black stock and handguards. The only "gunmetal" anywhere would be WEAR marks on the railed foregrip, maybe some dings on the receiver or carry handle but not real visible in 1/35 so I generally skip. Generally most of the guns I see have way too much silver on them. Stylistically, if you like that, all yours. It's just not how most AR/M16/4 whatevers are going to look. Even Vietnam guns weren't stripped down to bare metal. That pic one is pretty worn!
Magazines are parkerized so can be different shade of grey. Some are finished aluminum, a very fine metallic paint could be used, but usually appears overscale. Those magazines are rare in current operations. Magpuls and polymers rule the day. They come in black, earth, green, gray.
The stock can be earth for just something different, just like all the plastic bits. That's kind of a popular mod. Generally supposed to be magpul (or friends) type parts but most 1:35 aren't that specific to manufacturer.
You could rim the M203 with a pencil if hollow muzzle. If not, try to hollow it out. That is a 40mm hole... The handgrip is black plastic, no variation unless painted.
For unique, only thing to add RE painted gun. Let's say painted in theatre. Paint gun black, then very thin airbrush or brushed sand "yellow." Come back and highlight edges with black pencil or drybrush black. This represents the edge-wear very common to theratre guns coated in Krylon as a quick camo job. More elaborate camo very very difficult to replicate in 1:35 esp on AR with many surfaces. Shadow painting alone covers most surfaces. More doable on M24, M1a/M14 rifles. Some have grassland camo jobs that would be appreciable in 1;35.
retiredyank
Joined: June 29, 2009
KitMaker: 11,610 posts
Armorama: 7,843 posts
Posted: Thursday, June 06, 2013 - 09:36 PM UTC
Quoted Text
Quoted TextOh, and the barrel should be black or gunmetal. This is, of course if it has been painted with a camouflage pattern.
I'm not sure why. If I camouflage a weapon I'm not going to leave the barrel unpainted...
Meant "has not".

bravo04tango
Joined: May 26, 2011
KitMaker: 46 posts
Armorama: 40 posts

Posted: Thursday, June 06, 2013 - 11:23 PM UTC
Over all NATO black, picking out details with various shades of silver/steel then buff with mig or vallejo steel pigments. Accessories picked out in semi gloss or flatblack. All plastic stocks or hand guards picked put in semi gloss black. Camo:paint weapon in pattern then drybrush lightly with NATO black then steel. I like migs track wash for filthy guns.

WARCLOUD

Joined: March 31, 2012
KitMaker: 280 posts
Armorama: 274 posts

Posted: Thursday, June 06, 2013 - 11:51 PM UTC
depends entirely on your period and nationality of weapon. WW2 had a lot of variety. Modern weapons tend to have a lot of black, unless it's Soviet era which still saw a lot of wood..Modern US weapons are mostly black or dark grey parkerized, with ABS and polymer stocks and grips. recently though, manufacturers have been producing desert tan weapons (FN most prominently).
I do 99% WW2 subjects...
I do 99% WW2 subjects...

amoz02t

#192
Joined: November 25, 2009
KitMaker: 1,383 posts
Armorama: 1,281 posts

Posted: Friday, June 07, 2013 - 12:07 AM UTC
My AR has green Hogue grips...
http://images.search.yahoo.com/search/images?_adv_prop=image&fr=yfp-t-900-s&va=hogue+grip+ar+15
I like the black and grey washes to bring out contrasts and add interest to long black barrels.
 Mostly...Have fun!
http://images.search.yahoo.com/search/images?_adv_prop=image&fr=yfp-t-900-s&va=hogue+grip+ar+15
I like the black and grey washes to bring out contrasts and add interest to long black barrels.
Mostly...Have fun!hliu24
Joined: November 19, 2010
KitMaker: 798 posts
Armorama: 797 posts
Posted: Friday, June 07, 2013 - 02:16 AM UTC
Thank you all! lots of information, so far all my weapons(from long ago) look like those toy guns in the target 
May be I should buy a real AR for my REF, can't trust the pictures from internet.
Regards
Jay
May be I should buy a real AR
for my REF, can't trust the pictures from internet. Regards
Jay
hliu24
Joined: November 19, 2010
KitMaker: 798 posts
Armorama: 797 posts
Posted: Friday, June 07, 2013 - 02:22 AM UTC
Quoted Text
My AR has green Hogue grips...
http://images.search.yahoo.com/search/images?_adv_prop=image&fr=yfp-t-900-s&va=hogue+grip+ar+15
I like the black and grey washes to bring out contrasts and add interest to long black barrels.
Hi,Gillespie
look stunning to me, your workflow? I have a few live set coming...
Thank you for posing it
Jay

TacticalSquirrel
Joined: May 12, 2010
KitMaker: 546 posts
Armorama: 538 posts
Posted: Friday, June 07, 2013 - 02:52 AM UTC
I had a long post about painting weapons in the paint forum awhile back but can't find it.
In my opinion, weapons, be it .50's down to the individual weapons are where modelers get lazy. People will spent months researching bolt patterns on an RG-31 wheel, but then slap a WWII M2 on it and paint it black and call it a day. The following are my thoughts on painting weapons.
Know what the hell you are painting, do some quick research. If you rust the reciever of an M4 or do a gun metal dry brush on a G36 I'm going to look at you like you're stupid. Here is why, the M4 has an aluminum reciever, the G36 is externally all ploymer except the barrel.
Realize that modern firearms are finished in a few specific ways.
Anodizing, aluminum is anodized, this can be in different colors
Parkerizing, steel is parked, typically in various shades of grey or light black
Paint/other finish. The Berretta M9 has a proprietary black coating on the slide, Glock's are Tennifer finished, H&K uses a proprietary paint type finish on some of their firearms as well
Polymer, more and more weapons are using high strength polymers. KEEP THE METAL DRYBRUSH AWAY FROM THEM
Chrome plating, often times machine guns are visible chrome plating in high wear areas like feed trays and gas blocks.
Bluing, this drives me nuts. We haven't used blued firearms in many years. Bluing wears quickly, rusts easily, and doesn't offer good protection. When done properly, a good hot blue looks gorgeous, but it's just not useful for military weapons. And before someone nit picks me, yes i know we still have a handful of blued Winchester shotguns kicking around here and there, but with some very minor exceptions, blued firearms haven't been used since the 50's as mass issue items. I know your drill sergeant might have told you not to scrape the bluing off your M4, but just like he told you scraping it in the first place was ok, he was wrong twice, there is no bluing on an M4/M16 and there never was.
Let's take that M4 you posted above. Break it down to materials. The Stock is polymer, so keep the metal drybrushing away from it. The buffer tube is aluminum, as are the upper and lower receiver, and the rail system. The barrel and front sight base are steel. The aluminum of an M4 is anodized black and the edges wear quickly when used hard to a reveal an almost shiny aluminum underneath the anodizing. Vertical grips, most of them are plastic, paint them as such. Optics, anodized aluminum is what ACOG's and Aimpoint CCO's are made of, EoTech's have an anodized aluminum hood, the rest is plastic.
Machine guns, let's talk the common M2HB. These have a little more variety as they could be WWII vintage that's been in service and rebuilt a dozen times, to brand new SACO guns. Typically they are a grayish steel parkerizing. They do wear, and they can rust a little but any rust on a weapon would be so minuscule that you would never see it in 1/35th. Also keep in mind how they are used. We don't just mount a gun and leave it up 24/7. For example, in Afghanistan when we would go to a bigger FOB to get chow or fuel or mail or whatever, we would take down all the weapons, stow them inside the MRAP's and combat lock the trucks so we didn't have to leave a weapons guard. Some guys would remove the barrel of their M2, I didn't typically but some did. So now you have these heavy crew served weapons being banged down through the hatches and stored on the non skid covered floors, sometimes they would get walked on, banged around etc... Point is that they wear, and quick.
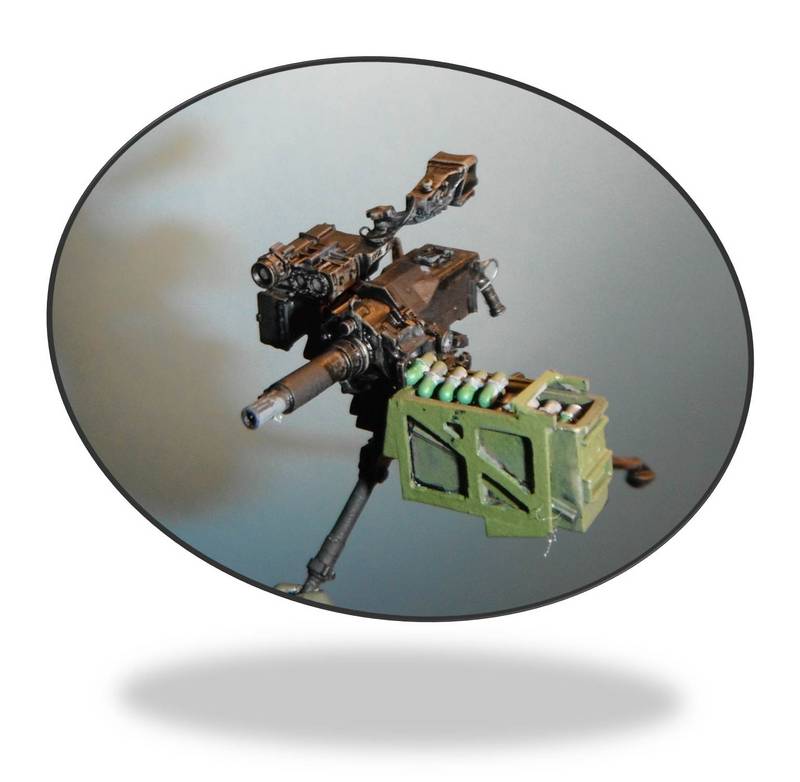
Let's look at this M249 SAW.

Look at all the different materials used on this weapon. You have black polymers, worn steel, worn aluminum, black anodized aluminum, hard plated chrome, and parkerized steel. They all wear differently. Plastic's get a bit whitish, parked steel gets glossy, anodized aluminum gets worn down to bear shiny silver aluminum, hard chrome gets polished to be a bit glossy.
Take the time to do it right and you're weapons will make your model stand out. This also translates over to the mounts, it drives me nuts to see an otherwise gorgeous model ruined (IMHO) because the builder got lazy and threw a WWII .50 cal mount onto a current vehicle that should have a Mk93 mount. I'll get off my soapbox now, hope this was somewhat helpful.
In my opinion, weapons, be it .50's down to the individual weapons are where modelers get lazy. People will spent months researching bolt patterns on an RG-31 wheel, but then slap a WWII M2 on it and paint it black and call it a day. The following are my thoughts on painting weapons.
Know what the hell you are painting, do some quick research. If you rust the reciever of an M4 or do a gun metal dry brush on a G36 I'm going to look at you like you're stupid. Here is why, the M4 has an aluminum reciever, the G36 is externally all ploymer except the barrel.
Realize that modern firearms are finished in a few specific ways.
Anodizing, aluminum is anodized, this can be in different colors
Parkerizing, steel is parked, typically in various shades of grey or light black
Paint/other finish. The Berretta M9 has a proprietary black coating on the slide, Glock's are Tennifer finished, H&K uses a proprietary paint type finish on some of their firearms as well
Polymer, more and more weapons are using high strength polymers. KEEP THE METAL DRYBRUSH AWAY FROM THEM
Chrome plating, often times machine guns are visible chrome plating in high wear areas like feed trays and gas blocks.
Bluing, this drives me nuts. We haven't used blued firearms in many years. Bluing wears quickly, rusts easily, and doesn't offer good protection. When done properly, a good hot blue looks gorgeous, but it's just not useful for military weapons. And before someone nit picks me, yes i know we still have a handful of blued Winchester shotguns kicking around here and there, but with some very minor exceptions, blued firearms haven't been used since the 50's as mass issue items. I know your drill sergeant might have told you not to scrape the bluing off your M4, but just like he told you scraping it in the first place was ok, he was wrong twice, there is no bluing on an M4/M16 and there never was.
Let's take that M4 you posted above. Break it down to materials. The Stock is polymer, so keep the metal drybrushing away from it. The buffer tube is aluminum, as are the upper and lower receiver, and the rail system. The barrel and front sight base are steel. The aluminum of an M4 is anodized black and the edges wear quickly when used hard to a reveal an almost shiny aluminum underneath the anodizing. Vertical grips, most of them are plastic, paint them as such. Optics, anodized aluminum is what ACOG's and Aimpoint CCO's are made of, EoTech's have an anodized aluminum hood, the rest is plastic.
Machine guns, let's talk the common M2HB. These have a little more variety as they could be WWII vintage that's been in service and rebuilt a dozen times, to brand new SACO guns. Typically they are a grayish steel parkerizing. They do wear, and they can rust a little but any rust on a weapon would be so minuscule that you would never see it in 1/35th. Also keep in mind how they are used. We don't just mount a gun and leave it up 24/7. For example, in Afghanistan when we would go to a bigger FOB to get chow or fuel or mail or whatever, we would take down all the weapons, stow them inside the MRAP's and combat lock the trucks so we didn't have to leave a weapons guard. Some guys would remove the barrel of their M2, I didn't typically but some did. So now you have these heavy crew served weapons being banged down through the hatches and stored on the non skid covered floors, sometimes they would get walked on, banged around etc... Point is that they wear, and quick.
Let's look at this M249 SAW.
Look at all the different materials used on this weapon. You have black polymers, worn steel, worn aluminum, black anodized aluminum, hard plated chrome, and parkerized steel. They all wear differently. Plastic's get a bit whitish, parked steel gets glossy, anodized aluminum gets worn down to bear shiny silver aluminum, hard chrome gets polished to be a bit glossy.
Take the time to do it right and you're weapons will make your model stand out. This also translates over to the mounts, it drives me nuts to see an otherwise gorgeous model ruined (IMHO) because the builder got lazy and threw a WWII .50 cal mount onto a current vehicle that should have a Mk93 mount. I'll get off my soapbox now, hope this was somewhat helpful.
TacticalSquirrel
Joined: May 12, 2010
KitMaker: 546 posts
Armorama: 538 posts
Posted: Friday, June 07, 2013 - 02:57 AM UTC
Quoted Text
depends entirely on your period and nationality of weapon. WW2 had a lot of variety. Modern weapons tend to have a lot of black, unless it's Soviet era which still saw a lot of wood..Modern US weapons are mostly black or dark grey parkerized, with ABS and polymer stocks and grips. recently though, manufacturers have been producing desert tan weapons (FN most prominently).
I do 99% WW2 subjects...
Correct, the new color dejour is Flat Dark Earth. Most new weapons are coming from the factory finished in FDE. Examples of this are the Knights Armament Company M110 SASS, the FNH SCAR-L and H, and the upper reciever groups used on the Mk18II weapon systems. This is because of how black anodized aluminum stands out at night through NOD's.
SCAR

M110 SASS

TacticalSquirrel
Joined: May 12, 2010
KitMaker: 546 posts
Armorama: 538 posts
Posted: Friday, June 07, 2013 - 03:04 AM UTC
Trisaw
Joined: December 24, 2002
KitMaker: 4,105 posts
Armorama: 2,492 posts
Posted: Friday, June 07, 2013 - 03:55 AM UTC
Another trick is detail painting. If you notice the real gun photos here, pick out areas that have different colors. Note the black rubber at the bottom of the tank tripod. Note the black on the barrel of the tan M-110. Note the gray of the M4 magazine. Note the gloss of the scope lens. Using different colors on a small 1/35 gun for details makes a huge difference. Just don't overdo it.
hliu24
Joined: November 19, 2010
KitMaker: 798 posts
Armorama: 797 posts
Posted: Friday, June 07, 2013 - 04:17 AM UTC
Steve thank you sososo much!
Jay
Jay
TacticalSquirrel
Joined: May 12, 2010
KitMaker: 546 posts
Armorama: 538 posts
Posted: Friday, June 07, 2013 - 04:57 AM UTC
Quoted Text
Another trick is detail painting. If you notice the real gun photos here, pick out areas that have different colors. Note the black rubber at the bottom of the tank tripod. Note the black on the barrel of the tan M-110. Note the gray of the M4 magazine. Note the gloss of the scope lens. Using different colors on a small 1/35 gun for details makes a huge difference. Just don't overdo it.
Yup, and don't forget the gun mounts, the Mk93 mount for the M2/Mk-19/M240 has no less than 6 stainless/chrome plated pins hanging off of it by chains. The hydraullic buffers on it are black polymer as it the flip up pin holder (technical term
 ) and they get scratched to hell and the paint discolored by the CLP and lube that get dumped on them. They can add so much to the presentation. Check out my O-GPK thread to see some more pictures of what I mean. Maybe it's because I spent so much time behind the gun, but to me many of these vehicles, HMMWV's, some MRAP's are carriers for these weapons systems, but they are so often neglected by modelers.
 How I paint them, the last one I did was the Live Resin M249. I used my airbrush to paint it a dark grey for the base color of the receiver and barrel. I then drybrushed lightly with gunmetal to wear the high spots. Then I painted the polymer parts (stock, pistol grip and heat shield) a semigloss black. Then I picked out the feed tray and gas block with chrome. Then a very light tan dry brush of the heat shield and stock. I did a heavy metal dry brushing on the butt plate and shoulder support since those wear very fast to bear metal. The nutsack (what we called the 100 round ammunition pouch) I painted in ACU, but even now the woodland ones are still very common. A light tan wash finished it up to simulate the fine dust that got all over my weapon. I modified the Live Resin EoTech 512 into an EoTech XPS which is what I had mounted on my SAW (it's pictured in the other thread) by cutting down the battery compartment and then weathered it by spraying it flat black, and hitting the edges of the hood with silver to simulate the scratched aluminum. I still have my EoTech's from deployment (I bought my own with me, I didn't steal them) so I have a readily available reference.
One other thing, don't be afraid to mix up colors. What I mean is let's take that picture of the SCAR-H above. The coated aluminum receiver is a different shade of FDE than the polymer lower receiver. The KAC M110 is a different shade of FDE than the FNH color. The Insight Flat Dark Earth polymer used in the PEQ-15/16 might not match the weapon it's mounted to. Don't be afraid to vary it up. It's not hard to find reference photos of this stuff.
If what I said doesn't make sense, let me know and I'll try to explain it in more detail.
TacticalSquirrel
Joined: May 12, 2010
KitMaker: 546 posts
Armorama: 538 posts
Posted: Friday, June 07, 2013 - 05:02 AM UTC
One more thing, ten internets to whoever can tell me what's odd about that SAW picture I posted. I just noticed it myself. 
hliu24
Joined: November 19, 2010
KitMaker: 798 posts
Armorama: 797 posts
Posted: Friday, June 07, 2013 - 05:07 AM UTC
Quoted Text
After washing the gun first, I spray primer for resin guns because without primer, the acrylic paint often flakes off resin. For plastic, I just paint straight onto the plastic often with no primer.
Be careful because 1/35 guns have delicate detail so don't spray primer too heavily and don't paint too thickly or the trigger guard and front sight will be filled with paint.
I often paint my guns straight black and use gunmetal only for the magazine. Because the 1/35 gun is so small, IMHO no sheen or shine is going to show on the matt barrel or receiver. After all, isn't metal sheen discouraged in the Military? Even most magazines are black or show very little metallic sheen.
For Woodland or Desert as18Bravo's photo shows, I just paint straight Medium Green or Desert Tan and then after that's thoroughly dry, I apply a thin wash of lighter colors to camouflage the piece. I then wash the entire gun with thin black and drybrush with a lighter color. The results look quite nice.
I only use gloss for the scopes and sights. I just find using gunmetal or chrome black makes the 1/35 gun look too toy-like with all these different colored parts. In 120mm, fine, the gun could be painted different colors, but at 1/35 scale, I often leave the gun, sights, grenade launcher, and barrel one color.
hey, peter
From what I am understanding from your post, when you paint on the resin, primer is essential, right?
Thx
Jay
hliu24
Joined: November 19, 2010
KitMaker: 798 posts
Armorama: 797 posts
Posted: Friday, June 07, 2013 - 06:22 AM UTC
If what I said doesn't make sense, let me know and I'll try to explain it in more detail. [/quote]
I am getting couple sets from Live resin, will post here when I have it, you guys can show me the options.
Thanks again steve
Jay
I am getting couple sets from Live resin, will post here when I have it, you guys can show me the options.
Thanks again steve
Jay
18Bravo
Joined: January 20, 2005
KitMaker: 7,219 posts
Armorama: 6,097 posts
Posted: Friday, June 07, 2013 - 08:47 AM UTC
Quoted Text
One more thing, ten internets to whoever can tell me what's odd about that SAW picture I posted. I just noticed it myself.
Odd or different?
This was mine:

Of course, no discussion about painting weapons would be complete without a discussion on some of these...

TacticalSquirrel
Joined: May 12, 2010
KitMaker: 546 posts
Armorama: 538 posts
Posted: Friday, June 07, 2013 - 11:22 AM UTC
Quoted Text
Quoted TextOne more thing, ten internets to whoever can tell me what's odd about that SAW picture I posted. I just noticed it myself.
Odd or different?
This was mine:
Of course, no discussion about painting weapons would be complete without a discussion on some of these...
Ah Paki Tape, I wish I could get a roll of it. It just got wierd when I started seeing it on their M16A2s and SAWs.
As for the SAW picture I posted, it's got an early barrel. Check out the flash hider and the fixed carry handle.
Trisaw
Joined: December 24, 2002
KitMaker: 4,105 posts
Armorama: 2,492 posts
Posted: Friday, June 07, 2013 - 11:55 AM UTC
Quoted Text
hey, peter
From what I am understanding from your post, when you paint on the resin, primer is essential, right?
Thx
Jay
I use primer with resin although some people don't with resin being so small at 1/35th scale. Some modelers just paint straight on the resin. The reason I prime resin, especially in larger scales, is that even after washing the resin, the resin is slick and smooth enough that paint may not stick to it when dried and touched. I've experienced that myself for unprimed resin after painting...the paint flaked off in my fingers. But this didn't happen when I primed the resin first and then painted. As such, spraying on primer first acts as a bonding agent to the resin and allows handbrushing of paint.
 |

WEB HOSTING BY


Copyright ©2021 Armorama and Kitmaker Network, a subsidiary of Silver Star Enterprises
All Rights Reserved. Please read our Conditions of Use and Privacy Policy.
All Rights Reserved. Please read our Conditions of Use and Privacy Policy.