_GOTOBOTTOM
AFV Painting & Weathering
Answers to questions about the right paint scheme or tips for the right effect.
Tips for painting tools, tow cable and etc
csakurac
Visit this Community
Ontario, Canada
Joined: February 09, 2013
KitMaker: 12 posts
Armorama: 12 posts
Posted: Tuesday, June 25, 2013 - 06:41 AM UTC
Dear friends,

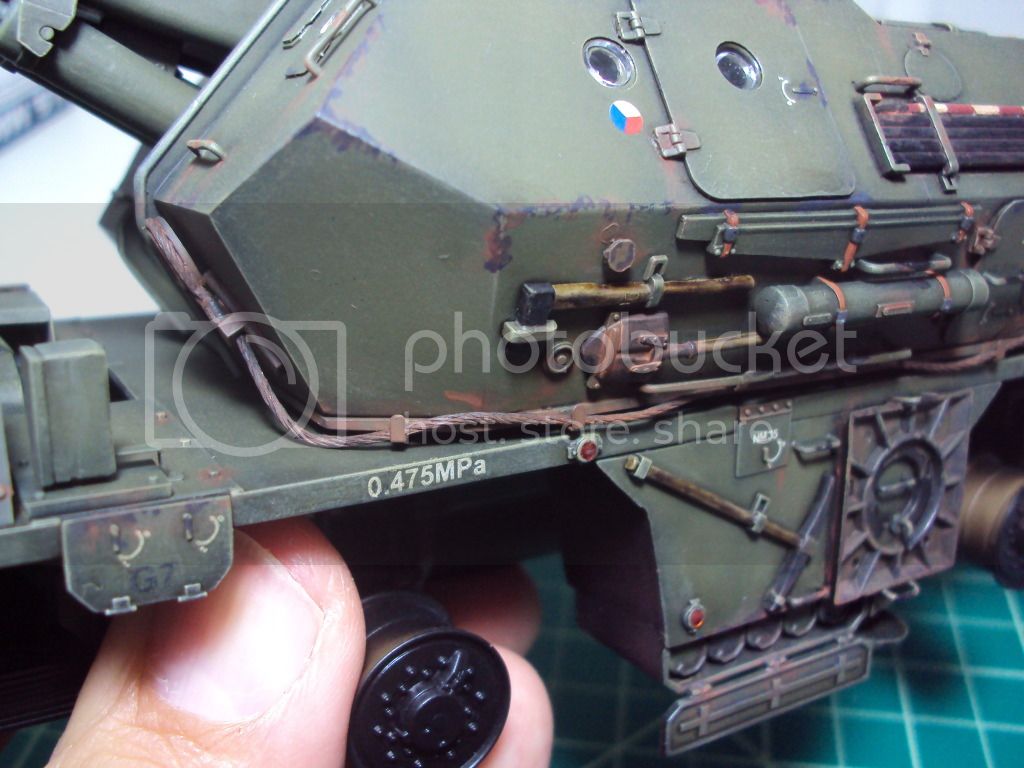
I am currently constructing a 1/35 Tiger I. As I am progressing towards the painting stage, I became curious about how to paint the tools, tow cable and other small objects.

Do you paint them before or after you assemble them onto the tank?

Is painting with hand the preferred method?

Any information and tips would be very helpful! Thank you very much!
-Jerry
mvaiano
Visit this Community
Sao Paulo, Brazil
Joined: January 24, 2012
KitMaker: 1,054 posts
Armorama: 1,050 posts
Posted: Tuesday, June 25, 2013 - 06:58 AM UTC
Hi Jerry!

I paint everything after stick in the vehicle, even after washes, filters and dry brush. I think this way the finish of the brackets will be identical to the rest of the vehicle.

I paint it by hand, using Vallejo. I paint the wood parts in dark yellow and after dry, I use bitumen to wood aspect.

The cables I paint in black, them some dry with gun metal and silver and to finnish, I use burnt siena oil to get a "rust" aspect.

The result is:


I hope this can help you

Cheers!

Marco
csakurac
Visit this Community
Ontario, Canada
Joined: February 09, 2013
KitMaker: 12 posts
Armorama: 12 posts
Posted: Tuesday, June 25, 2013 - 08:49 AM UTC
Thank you Marco!

You tip will help me greatly and the example you shown me looks awesome!
clovis899
#155
Visit this Community
California, United States
Joined: May 05, 2002
KitMaker: 774 posts
Armorama: 605 posts
Posted: Tuesday, June 25, 2013 - 09:57 AM UTC
Jerry,
Here is another tip that may help. I use a piece of scrap paper slipped behind the tool to help protect the paint job of the vehicle, really helps to reduce the amount of touch-ups that may need to be done.

Cheers,
Rick
Tojo72
Visit this Community
North Carolina, United States
Joined: June 06, 2006
KitMaker: 4,691 posts
Armorama: 3,509 posts
Posted: Tuesday, June 25, 2013 - 10:01 AM UTC
I do like Rick does,paint them on the vehicle,and slide a piece of paper underneath to ask as a mask.I use Modelmaster wood for my handles with a brown wash.
retiredyank
Visit this Community
Arkansas, United States
Joined: June 29, 2009
KitMaker: 11,610 posts
Armorama: 7,843 posts
Posted: Tuesday, June 25, 2013 - 12:01 PM UTC
The tools start off painted the same color as the tank. Some may have been replaced or showing wear, as they were used. I usually paint some the same color as the tank(show appropriate wear), a few missing and a couple replaced. I paint wear and replaced tools by hand. I have a variety of colors for wood effects. These are all MM paints, as brush painting Tamiya acryls requires more work.
didgeboy
Visit this Community
Washington, United States
Joined: September 21, 2010
KitMaker: 1,846 posts
Armorama: 1,509 posts
Posted: Tuesday, June 25, 2013 - 12:15 PM UTC
I paint separately glue them in place and then do touch ups as necessary. Trying to paint those thing on the vehicle is a test of my patience as well as skills. I think the results I achieve are pretty good and easier than trying to not get paint everywhere its not supposed to be. Cheers.
csakurac
Visit this Community
Ontario, Canada
Joined: February 09, 2013
KitMaker: 12 posts
Armorama: 12 posts
Posted: Wednesday, June 26, 2013 - 05:12 AM UTC
Thanks everyone! I learned a lot from all of you and I have a good sense on how to paint the tools now.
BruceJ8365
Visit this Community
Kansas, United States
Joined: December 25, 2012
KitMaker: 441 posts
Armorama: 441 posts
Posted: Tuesday, July 02, 2013 - 04:16 PM UTC

Quoted Text

Jerry,
Here is another tip that may help. I use a piece of scrap paper slipped behind the tool to help protect the paint job of the vehicle, really helps to reduce the amount of touch-ups that may need to be done.

Cheers,
Rick


Dang, doing models for a few decades now and never thought of that! What a great simple solution!
easyco69
Visit this Community
Ontario, Canada
Joined: November 03, 2012
KitMaker: 2,275 posts
Armorama: 2,233 posts
Posted: Wednesday, July 10, 2013 - 11:21 PM UTC

Quoted Text

Hi Jerry!

I paint everything after stick in the vehicle, even after washes, filters and dry brush. I think this way the finish of the brackets will be identical to the rest of the vehicle.

I paint it by hand, using Vallejo. I paint the wood parts in dark yellow and after dry, I use bitumen to wood aspect.

The cables I paint in black, them some dry with gun metal and silver and to finnish, I use burnt siena oil to get a "rust" aspect.

The result is:


I hope this can help you

Cheers!

Marco


nice work!
mvaiano
Visit this Community
Sao Paulo, Brazil
Joined: January 24, 2012
KitMaker: 1,054 posts
Armorama: 1,050 posts
Posted: Thursday, July 11, 2013 - 03:14 AM UTC
Hi people!

I agree Bruce!

Thank you David! You can see the complet work here

Cheers!

Marco
JPTRR
Staff MemberManaging Editor
RAILROAD MODELING
#051
Visit this Community
Tennessee, United States
Joined: December 21, 2002
KitMaker: 7,772 posts
Armorama: 2,447 posts
Posted: Thursday, July 11, 2013 - 03:39 AM UTC

Quoted Text

I use a piece of scrap paper slipped behind the tool to help protect the paint job of the vehicle


Rick, such a simple yet clever idea! That would have saved me a great deal of work in the past, and will simplify painting in the future.
AlexCaut
Visit this Community
Pyrenees-Atlantiques, France
Joined: June 16, 2013
KitMaker: 7 posts
Armorama: 7 posts
Posted: Friday, July 12, 2013 - 03:44 AM UTC
Hello Marco,

Kindly notice that you will never find rust on a armor vehicule, because, the vehicule is always in maintenance, but also because the armor is very thick, in the meantime, if you build a tank of WW2 for instance, its average fighting life is less than 10 minutes, as soon as the tank enter in the battle.
Cheers.
mvaiano
Visit this Community
Sao Paulo, Brazil
Joined: January 24, 2012
KitMaker: 1,054 posts
Armorama: 1,050 posts
Posted: Friday, July 12, 2013 - 05:09 AM UTC
Hi Alex!

I agree in part. I've seen modern vehicles with rust marks, especially near steel cables or screws. I believe it all depends on how he was mistreated.

Overall, the kit is much more beautiful with some effects.

Cheers!

Marco
 _GOTOTOP