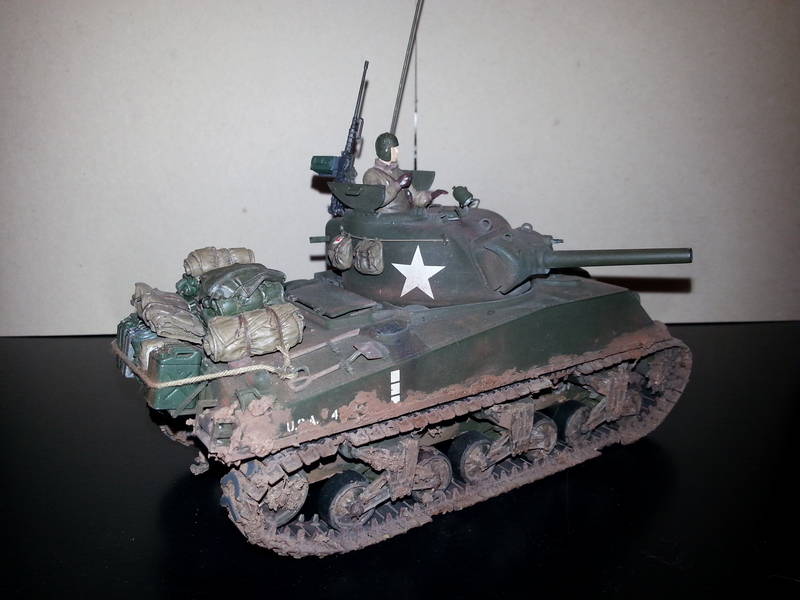
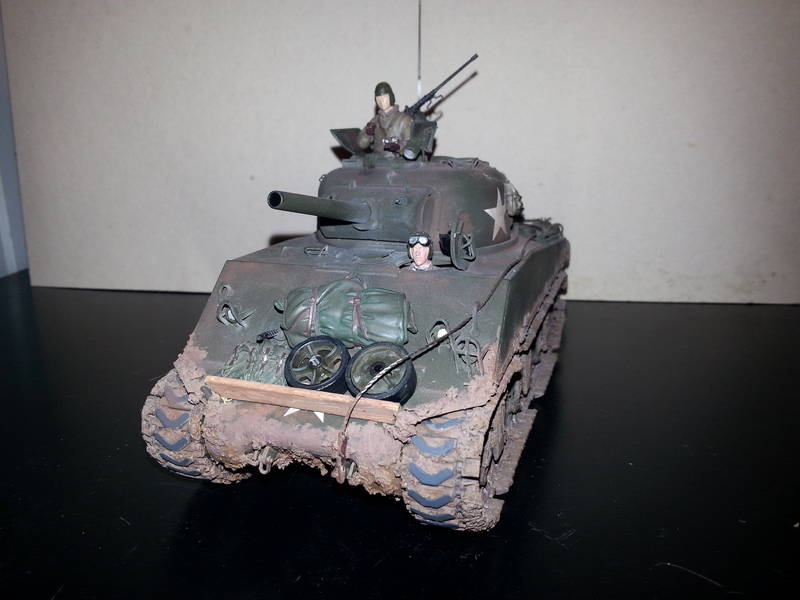
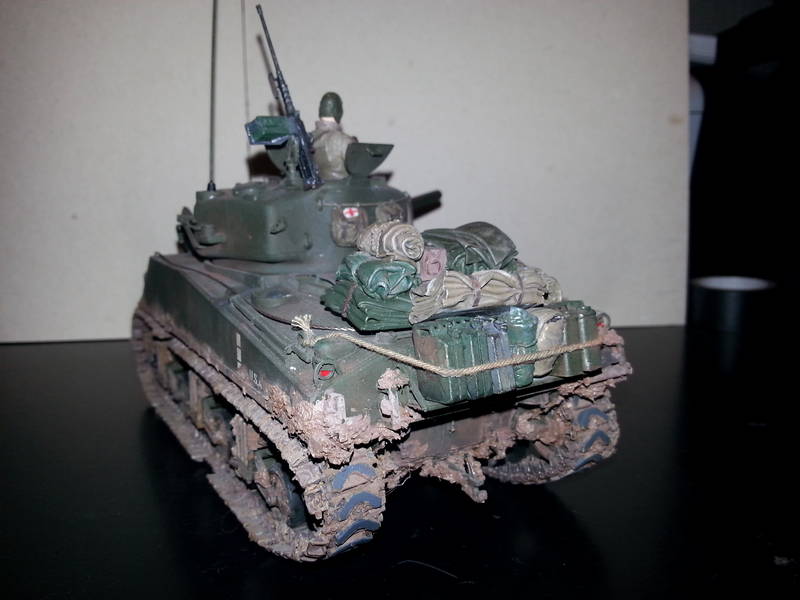
My Dragon M4 105mm Sherman. This is my first Armour kit, in many, many years. I have been lurking around here since 2006 :-). Any criticisms, tips help, and comments greatly appreciated.
Hosted by Darren Baker
My M4 105mm Sherman
boman
Auckland, New Zealand
Joined: April 26, 2006
KitMaker: 13 posts
Armorama: 9 posts
Joined: April 26, 2006
KitMaker: 13 posts
Armorama: 9 posts
Posted: Saturday, July 06, 2013 - 09:16 PM UTC
thebear
Quebec, Canada
Joined: November 15, 2002
KitMaker: 3,960 posts
Armorama: 3,579 posts
Joined: November 15, 2002
KitMaker: 3,960 posts
Armorama: 3,579 posts
Posted: Saturday, July 06, 2013 - 10:52 PM UTC
Hi Darren and welcome back! Great job on your first model in a long time .. You might want to add some dark pin washes to some of the panel lines and even to the mud to try to vary the color a bit.. keep up the good work!
Rick
Rick
Thundergrunt
California, United States
Joined: November 01, 2009
KitMaker: 657 posts
Armorama: 481 posts
Joined: November 01, 2009
KitMaker: 657 posts
Armorama: 481 posts
Posted: Sunday, July 07, 2013 - 04:06 AM UTC
Darren
Great work, I am jealous I just built my first armor kit the Tamiya M4A3. I wish it came out like yours. Can't wait to see the next one.
Euge
Great work, I am jealous I just built my first armor kit the Tamiya M4A3. I wish it came out like yours. Can't wait to see the next one.
Euge
boman
Auckland, New Zealand
Joined: April 26, 2006
KitMaker: 13 posts
Armorama: 9 posts
Joined: April 26, 2006
KitMaker: 13 posts
Armorama: 9 posts
Posted: Sunday, July 07, 2013 - 08:17 PM UTC
Quoted Text
Hi Darren and welcome back! Great job on your first model in a long time .. You might want to add some dark pin washes to some of the panel lines and even to the mud to try to vary the color a bit.. keep up the good work!
Rick
It does have some dark washes, the pics make it seem a lot brighter than it is. But I feel the mud needs some more work,
boman
Auckland, New Zealand
Joined: April 26, 2006
KitMaker: 13 posts
Armorama: 9 posts
Joined: April 26, 2006
KitMaker: 13 posts
Armorama: 9 posts
Posted: Sunday, July 07, 2013 - 08:23 PM UTC
Quoted Text
Darren
Great work, I am jealous I just built my first armor kit the Tamiya M4A3. I wish it came out like yours. Can't wait to see the next one.
Euge
Thank you. I have a little Schwimwagen too.
ericadeane
Michigan, United States
Joined: October 28, 2002
KitMaker: 4,021 posts
Armorama: 3,947 posts
Joined: October 28, 2002
KitMaker: 4,021 posts
Armorama: 3,947 posts
Posted: Sunday, July 07, 2013 - 10:30 PM UTC
Hi Darren: Thanks for sharing your model with us -- nice work! Here are some areas that could enhance this or future builds for you:
1) use your digital phots. Looking at the 2D image, you can see things your eye might otherwise miss on the real model. I see areas of your suspension and lower hull walls where you missed adding weathering/dirt/mud.
2) using pre-made stowage can be a timesaver -- but make sure you file/cut/form the items so they conform to the tank surfaces. Your pile of bedrolls/sacks, etc "floats" over the engine deck. Try to make sure everything conforms like real bags/bedrolls would
3) The inside of the turret mounted spotlamp cylinder wasn't silver but olive drab. That cylinder was a shroud to direct the light beam
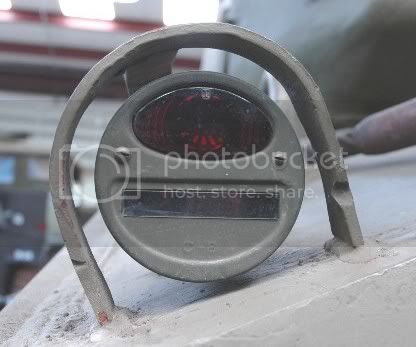
4) Here are pics of how most US-made tail lights appeared:
5) Perhaps replace the tie down rope you have across the jerry cans? It appears very out of scale. I use embroidery thread: right diameter and no "fuzziness" made by the loose fibers.
Hope these help! Keep up the good work
1) use your digital phots. Looking at the 2D image, you can see things your eye might otherwise miss on the real model. I see areas of your suspension and lower hull walls where you missed adding weathering/dirt/mud.
2) using pre-made stowage can be a timesaver -- but make sure you file/cut/form the items so they conform to the tank surfaces. Your pile of bedrolls/sacks, etc "floats" over the engine deck. Try to make sure everything conforms like real bags/bedrolls would
3) The inside of the turret mounted spotlamp cylinder wasn't silver but olive drab. That cylinder was a shroud to direct the light beam
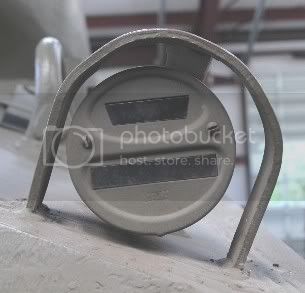
4) Here are pics of how most US-made tail lights appeared:
5) Perhaps replace the tie down rope you have across the jerry cans? It appears very out of scale. I use embroidery thread: right diameter and no "fuzziness" made by the loose fibers.
Hope these help! Keep up the good work
boman
Auckland, New Zealand
Joined: April 26, 2006
KitMaker: 13 posts
Armorama: 9 posts
Joined: April 26, 2006
KitMaker: 13 posts
Armorama: 9 posts
Posted: Thursday, July 11, 2013 - 08:49 PM UTC
Quoted Text
Hi Darren: Thanks for sharing your model with us -- nice work! Here are some areas that could enhance this or future builds for you:
1) use your digital phots. Looking at the 2D image, you can see things your eye might otherwise miss on the real model. I see areas of your suspension and lower hull walls where you missed adding weathering/dirt/mud.
2) using pre-made stowage can be a timesaver -- but make sure you file/cut/form the items so they conform to the tank surfaces. Your pile of bedrolls/sacks, etc "floats" over the engine deck. Try to make sure everything conforms like real bags/bedrolls would
3) The inside of the turret mounted spotlamp cylinder wasn't silver but olive drab. That cylinder was a shroud to direct the light beam
4) Here are pics of how most US-made tail lights appeared:
5) Perhaps replace the tie down rope you have across the jerry cans? It appears very out of scale. I use embroidery thread: right diameter and no "fuzziness" made by the loose fibers.
Hope these help! Keep up the good work
Thank you.