Hi,
I'm fairly new to making dioramas. I wanted to ask how to simulate real earth on dios? Im thinking of using earth itself (soil) but I'm not sure where to get one. I know I could easily get one from outside the house but I think they contain small insects. Also, if I use true earth, is it possible to use plaster with it or could I paint it with enamel for wet effects?
One last thing, what is the best way to put medium grasses on my dio? Maybe around up to knee level of 1/35 figures
Thanks!
Hosted by Darren Baker
Using earth on Dioramas
MeowMix

Joined: December 25, 2012
KitMaker: 34 posts
Armorama: 29 posts

Posted: Sunday, August 11, 2013 - 01:58 AM UTC
Biggles2

Joined: January 01, 2004
KitMaker: 7,600 posts
Armorama: 6,110 posts

Posted: Sunday, August 11, 2013 - 02:30 AM UTC
Hmmm...I don't think using real dirt is a good idea. You can get excellent results using Celluclay for a convincing earth texture without any work. Celluclay is simply recycled newspapers shredded and ground to a powder and is fairly inexpensive and can be found in artist's supply stores and hobby shops. Tall grass is a different story. The tallest static grass is only about a scale foot tall so you would have to use Woodland Scenics products, or similar, and plant your grass in individual clumps. You can also use sections of synthetic fur (which you would have to paint or dye) for tall grass. 


All_You_Can_Kit

Joined: August 22, 2012
KitMaker: 599 posts
Armorama: 527 posts

Posted: Sunday, August 11, 2013 - 03:32 AM UTC
Quoted Text
...and plant your grass in individual clumps.
Presentation of how to making clumps of grass as our mate Biggles2 said can be found at "Clumps of Grass" by Arvin Arbolado.
Do not say that you are a newcomer, if so, we are just the same

 Welcome Ansell and glad to know you!
  Similar with me, I'm in my hard effort to improve my skill on how to create a basic diorama. Hope it useful and don't forget to discuss and share your nice work
Kind regards from Indonesia

Garry

All_You_Can_Kit

Joined: August 22, 2012
KitMaker: 599 posts
Armorama: 527 posts

Posted: Sunday, August 11, 2013 - 03:45 AM UTC
Quoted Text
...Im thinking of using earth itself (soil) but I'm not sure where to get one...
I'm forget to share one more thing. IMO, your unsure is already in the right path, since I already prove how the real soil from my own house's backyard can not negotiate with normal temperature after a long time and furthermore, it express several BIG crack where my innocent figures stand on it!


But my happening may not always true in any areas with different condition, climate, temperature, moisture, etc. Maybe at that time, I still do not have adequate technique to manage real soil in order to show nice effect. So, my solution is simply use the modelling clay and paint it with earth color for basic installment.
Hope it also useful

Cheers
Garry
parrot

Joined: March 01, 2002
KitMaker: 1,607 posts
Armorama: 1,581 posts

Posted: Sunday, August 11, 2013 - 04:23 AM UTC
When I first started dios I tried real earth and quickly found out it doesn't work.You have to adhere it to your base, which always involves liquid and just turns the earth into a uncontrolable mess of mud.There's a ton of products out there these days that will work much better.
Tom
Tom

Posted: Sunday, August 11, 2013 - 06:20 AM UTC
It is my understanding that you can use soil as a surface scatter on a diorama but you need to put it in the oven first to destroy any wildlife including mould spores and fungus, and when used it needs to be sealed to prevent moisture getting at it and caussing shrinkage and so on. With all that said it is a cheap option but commercially available products are better as they are consistant and you know how they will behave in various conditions and usage. Another consideration is that you will be trying to replicate the look of the soil in various locations around the world and soil does look different depending on if it is a clay, sand, or chalk area that the soil comes from.

captnenglish

Joined: May 20, 2008
KitMaker: 1,184 posts
Armorama: 770 posts

Posted: Sunday, August 11, 2013 - 06:30 AM UTC
I start with a layer of a product called Sculpt-a-mold which because it is white, I generally mix in a dark paint or MIG pigments. Once that is laid in I place my rocks, twigs, etc. When all of the that is dry and set, I put a thin layer of PVA glue and sprinkle on sand (I live near a park so it is readily available) where I want some extra texture and let dry. My next step it to paint with appropriate earth tones. Lastly I add my vegatation.
jrutman

Joined: April 10, 2011
KitMaker: 7,941 posts
Armorama: 7,934 posts

Posted: Monday, August 12, 2013 - 02:34 AM UTC
Marty

Joined: June 16, 2002
KitMaker: 2,312 posts
Armorama: 1,054 posts

Posted: Monday, August 12, 2013 - 07:11 AM UTC
Real dirt can most definitely be used in a diorama. I've been doing that for many years. The trick is to use something else as the ground base (Celluclay as mentioned above is a good choice). Mix it with while glue prior to laying it down and then spread a thin layer of finely sifted dirt on top of it. If Celluclay seems a bit dry or not sticky enough, more diluted while glue can be spread around prior to applying dirt. Once everything dries you can apply acrylic washes or pastel dust to simulate color variations normally seen in dirt. 


ANT1969

Joined: April 08, 2013
KitMaker: 216 posts
Armorama: 216 posts

Posted: Monday, August 12, 2013 - 09:02 AM UTC
Quoted Text
Hi,
I'm fairly new to making dioramas. I wanted to ask how to simulate real earth on dios? Im thinking of using earth itself (soil) but I'm not sure where to get one. I know I could easily get one from outside the house but I think they contain small insects. Also, if I use true earth, is it possible to use plaster with it or could I paint it with enamel for wet effects?
One last thing, what is the best way to put medium grasses on my dio? Maybe around up to knee level of 1/35 figures
Thanks!
If you use rough grainy earth, the result will be gravelled ground due to the scale. If I may make a suggestion: for fine grainy sand use a water - wallpaper glue - tile adhesive mix. The tile adhesive is a fine-grained material. The mixture doesn't dry too quickly, there is time to shape. Of course can be painted after drying.
Regards
Antal
Audren_Dbo

Joined: June 16, 2010
KitMaker: 69 posts
Armorama: 57 posts

Posted: Monday, August 12, 2013 - 01:34 PM UTC
I generally use real soil for cover my dioramas groundwork, but beneath of them I use a mix of materials (crushed paper, celluclay, floral foam, plaster - with or without sand/earth mixed), depends of the type aspect I want to replicate.
I buy a bag with 5kg of earth for plants (organic earth called here) for R$3,00 (aprox. a dollar and half). So, is very cheap. Him comes a bit humid, so I let him dry on sun before use.
Depends on kind of ground I want to do, I use a more coarse or thin sieved earth. To replicate earth from diferent places I tint the earth with dyes and/or paint after dry.
To fix on base I use a high quality (handcraft) white glue, avoiding dilute the glue to prevent cracks.
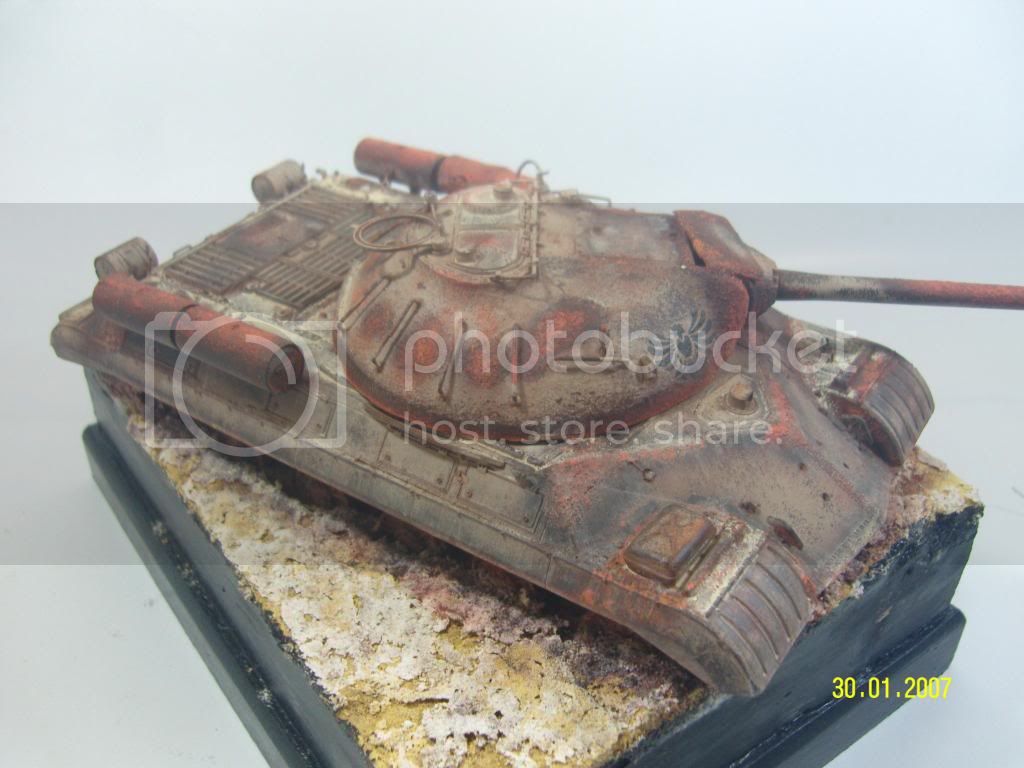
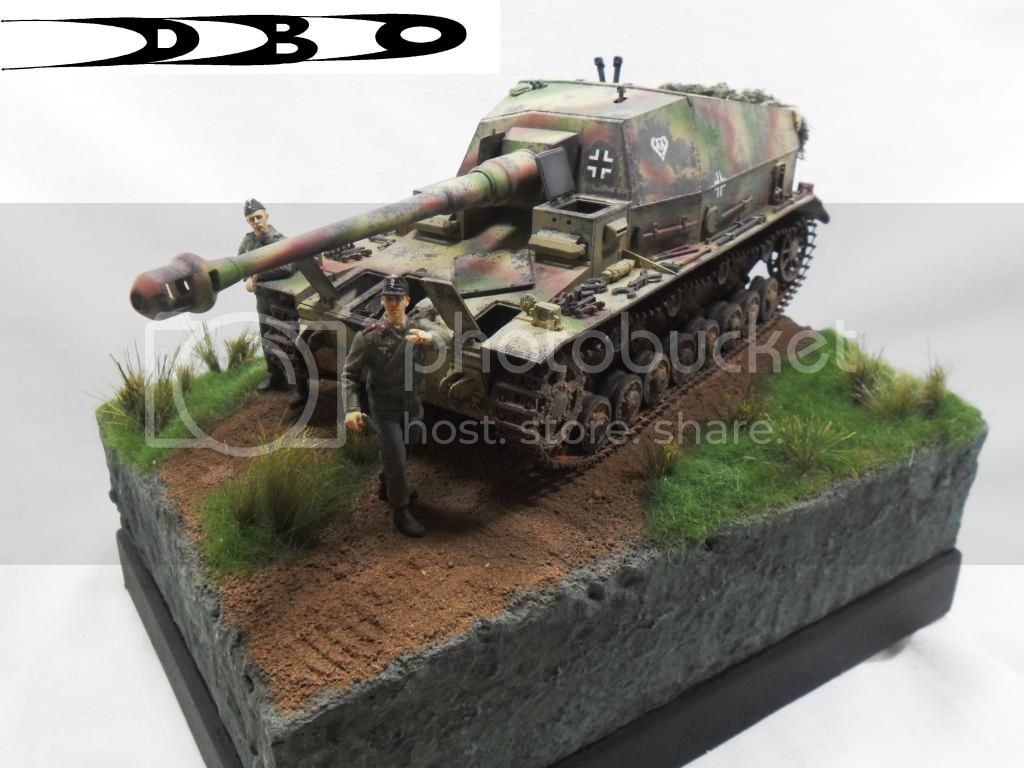
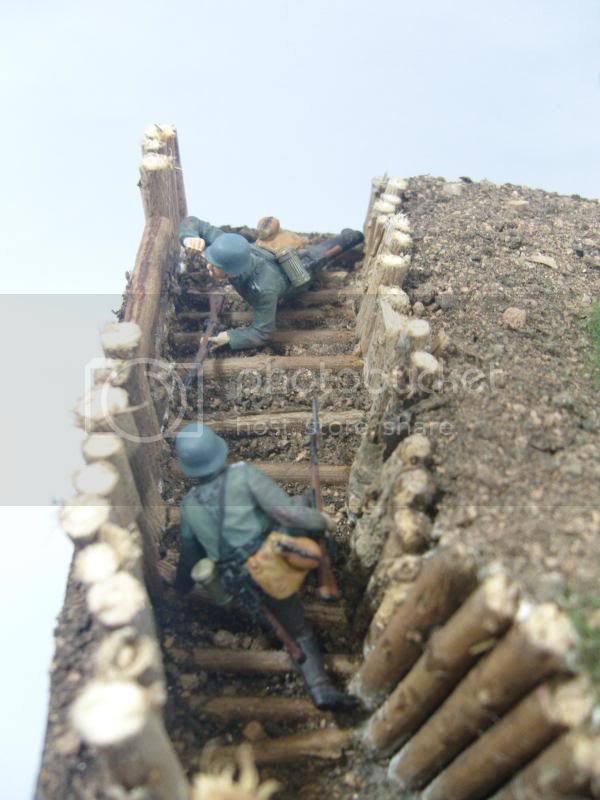
I dont have much photos of my work, but I'll show a few:

The cracked effect here was obtained adding baking soda to earth before gluing.


Here I used the natural earth, no dye, wash or paint.
One of the vantages is the variation of color, lost when you paint, and require (often) pigments to replicate.
The short grass is from Joefix, the long turfs is dyed blond doll hair.


This shots is from the unfinished work, but are the only I have (I sold him).
After this test shots, the floor on the trenchs was darkened with raw umber washes, and the ground on high areas was lightened with thin layers of sand tone to represent dry earth.

One of the my first attempts using true earth. Painted after dry with sand tones.
I buy a bag with 5kg of earth for plants (organic earth called here) for R$3,00 (aprox. a dollar and half). So, is very cheap. Him comes a bit humid, so I let him dry on sun before use.
Depends on kind of ground I want to do, I use a more coarse or thin sieved earth. To replicate earth from diferent places I tint the earth with dyes and/or paint after dry.
To fix on base I use a high quality (handcraft) white glue, avoiding dilute the glue to prevent cracks.
I dont have much photos of my work, but I'll show a few:

The cracked effect here was obtained adding baking soda to earth before gluing.


Here I used the natural earth, no dye, wash or paint.
One of the vantages is the variation of color, lost when you paint, and require (often) pigments to replicate.
The short grass is from Joefix, the long turfs is dyed blond doll hair.


This shots is from the unfinished work, but are the only I have (I sold him).
After this test shots, the floor on the trenchs was darkened with raw umber washes, and the ground on high areas was lightened with thin layers of sand tone to represent dry earth.

One of the my first attempts using true earth. Painted after dry with sand tones.
1stjaeger

Joined: May 20, 2011
KitMaker: 1,744 posts
Armorama: 1,727 posts

Posted: Monday, August 12, 2013 - 08:00 PM UTC
Hi Audren,
how come we don't see more of your fantastic work???
Keep posting..please!!

As we can see from Audren's photos, sand is not that easy to show in miniature!! In reality it is not "baked" together and does not look like a pie.
Real earth on a dio..why not (but only as the top layer of course!)! I've had brilliant results using it, but then again, there is nothing that sand(s) cannot produce just as well. I deliberately use the plural here as there are so many different kinds of sand that can all be put to good use and great effect.
I don't have much to show presently, as I've been engaged in mostly wargame painting/modelling like this over the past years, but this one might show it: different sand fixed with white glue (where would I be without it!) on top of celluclay
 [/img]
Sand is fantastic as you can paint it with cheap DIY water-soluble colours, and if you find a building under construction nearby, you could even get it for free!
Cheers
Romain
how come we don't see more of your fantastic work???
Keep posting..please!!


As we can see from Audren's photos, sand is not that easy to show in miniature!! In reality it is not "baked" together and does not look like a pie.
Real earth on a dio..why not (but only as the top layer of course!)! I've had brilliant results using it, but then again, there is nothing that sand(s) cannot produce just as well. I deliberately use the plural here as there are so many different kinds of sand that can all be put to good use and great effect.
I don't have much to show presently, as I've been engaged in mostly wargame painting/modelling like this over the past years, but this one might show it: different sand fixed with white glue (where would I be without it!) on top of celluclay
 [/img]
 Sand is fantastic as you can paint it with cheap DIY water-soluble colours, and if you find a building under construction nearby, you could even get it for free!
Cheers
Romain

ANT1969

Joined: April 08, 2013
KitMaker: 216 posts
Armorama: 216 posts

Posted: Monday, August 12, 2013 - 08:21 PM UTC
roudeleiw

Joined: January 19, 2004
KitMaker: 2,406 posts
Armorama: 2,224 posts

Posted: Monday, August 12, 2013 - 11:32 PM UTC
I am using everything "real", Earth and sands of different colors.
I am mixing the stuff with water and carpenter's glue to a nice pulp amd spread it where I want. If I want to light it up in color and speed the drying process I am adding some plaster to it. I am also occasionnally adding saw dust or cork dust to save some weight.
After all these years I did not see one insect escape from this rock hard mix! :-)
Just have fun with this
Claude
Audren_Dbo

Joined: June 16, 2010
KitMaker: 69 posts
Armorama: 57 posts

Posted: Tuesday, August 13, 2013 - 12:35 AM UTC
I used sand some times and don't get satisfied with the result, him look oversized, even sieved with very fine women's pantyhose (or women's tights, o don't know the right term). Maybe the sand here where I'm live in Brasil is too coarse. The bests results I have is with earth.
I plan to collect earth from diferent places around here, to have diferent colors to mix or use them alone.
I guess the trick to use earth is the sieving. If you sifting correctly down to scale, him look convincing. With the great benefit of don't look mono tone like painted goundwork, without using pigments. And obviously, it's cheap.
Romain and Antal, Thanks for appreciate my job. I need to post my last works.
SdAufKla

Joined: May 07, 2010
KitMaker: 2,238 posts
Armorama: 2,158 posts

Posted: Tuesday, August 13, 2013 - 02:16 AM UTC
Ansell,
Think about the top, visible layers of your ground work as textures and colors and not as real "earth" or whatever.
The emphasis should be on finding materials, natural or proprietary, that replicate, in scale, the textures and colors (adjusted for scale lighting) that fit the scene you want to build. Natural materials can be used, but they should be used with an eye towards the scale look you want to achieve and not by looking at how "natural" they look in real life.
The changes in elevation of your base can be constructed of any materials (plaster, epoxy putty, Styrofoam, carved or milled wood, etc) that are stable and which you can form to create the shapes of the land. On top of these shapes, you apply only thin texture layers to replicate bare soil, stones, roads, vegetation, etc. These texture layers are then colored to replicate those features of the scene.
Sometimes you need to apply a texture layer to your land forms, such as bare soil and small stones, color that layer, and then apply the next layer, such as low grass and weeds, and color that second layer. On top of that, you might even add a third texture layer, such as snow and ice, which also might need to be colored separately.
Natural materials, soil, sand and vegetation, can be used on your dioramas, but only if they can replicate the desired textures in SCALE. For this, you should sift the natural soil to remove the excessively large and out of scale-looking bits. You can also wash it to remove dust (which doesn't really create any scale texture) and organic bits (that might cause mold or mildew or have insects).
The sifted soil can then be graded into various sizes which can then be re-mixed to the appropriate in-scale ratios. Generally, you want more smaller scale sized textures than larger rocks and stones, so you need to remove most of the larger bits by sifting and sorting before re-using on your bases.
These tips might be useful to you:
AMPS 3013 International Show::Bases and Groundwork Seminar
HTH and happy modeling!

All_You_Can_Kit

Joined: August 22, 2012
KitMaker: 599 posts
Armorama: 527 posts

Posted: Thursday, August 15, 2013 - 02:19 AM UTC
Quoted Text
...These tips might be useful to you...
Hello Mike, I believe that these resource will be useful for not only for our friend Ansell, but also for all of us!
 Thanks for sharing, I already download and take a general look of it. Very open-minded, well visualized, and totally understandable!
Just a little bit adjustment needed with several kinds of item available in each local hobby stores at any countries over us

Cheers

Garry
 |


