Hello friends from armorama,
Its been quite some time after my last upload; here I present some pictures of the last things done in this model.
Finally I decided to use a mixture of my own with Vallejo color, I thought that with the compilation of pictures I have, and the idea of the actual representation of the tank in a humid ambient, the color should be adjusted. I used to paint with Tamiya paints, but I prefer Vallejo in this case.
So then, the colors in the pictures may be slightly different from the model seen in person, since the photo was taken indoors with not great lighting conditions, but it is a reference, and I tried to adjust to what I see. Better pictures will be uploaded once the tank is finished.
The color is a mixture of Vallejo paints:
For the JGSDF brown: Vallejo burnt umber 70941 66,6%, Vallejo white 26,6% Vallejo black 6,6%.
The JGSDF green: Vallejo US dark green 70893 64,93%, Vallejo black 25,97%, Vallejo white 9%.
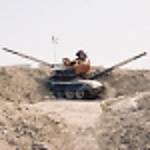
To paint the correct scheme corresponding to the tank of the first picture (idea) number 95-2907, I had to search for its pictures since every tank has a slight different scheme.
Unfortunately I was not able to find a scheme for the right side, so I used a tank of the same company with very similar scheme to the left side. That was checked because I was able to find a rear view picture of the 95-2907 with the tank turret rotated 90 degrees which helped me paint the right scheme on the turret.
After painting the scheme, I decided to do a complete wash on the model, I am not very experienced with this and this was the first time I done it, I mixed some Vallejo light-orange colors, diluted in distilled water, so then as if it was rain, I applied it with the airbrush, very very gentle and distant. I liked the effect, it made the tank colors to blend together, and it seemed the tank passed from being new to have been slightly affected by the dust.
Afterwards I applied a clear varnish coat, I committed the mistake of using a clear varnish spray that I usually use when making my own decals, I had some problems using this varnish with the airbrush too (similar frozen effect also appeared with Tamiyas clear) so next time I will use Vallejo varnishes.
The clear coat was applied so I could prepare the base for the next weathering and decals.
It was the first time I used oil paints to create the fading effect, I liked it very much, it allows lot of freedom while applying it, and I still have to retouch a little, the weathering is not finished yet, I have to apply some sand dust and other effects. No weathering over the decals yet.


For the lower part of the tank, I applied mud, which was done by refining sand and mixing it with white glue and water.

For the mud on the wheels, I mixed the refined sand with Vallejo mat varnish and still have to apply more clear varnish on the wheel edges to represent mud a little bit fresh.


I also added a little bar in the air wind sensor support.

The tank still has so many things to be done; I still cant paint the tracks since I will need at least one of them to create the track marks on the diorama.
I believe the tank will change slightly once I apply a little bit of sand dust.
My idea would be to represent something like this:

So I think the use of the different varnish tones will be the key.
I know it is a long post, however I also wanted to advise the modelers making this tank, that Tamiya apparently committed a mistake by placing the front cherry blossom emblem in the lower side of the hull, rather than above it (between the headlights), I noticed it by looking at the real pictures and the decal placement instructions.
Thanks for watching.
Until the next update!
Guillem