_GOTOBOTTOM
Constructive Feedback
For in-progress or completed build photos. Give and get contructive feedback!
Leopard 2A6 (Tamiya 1:35)
Sleepwalker71
Visit this Community
Singapore / 新加坡
Joined: August 30, 2012
KitMaker: 265 posts
Armorama: 186 posts
Posted: Monday, September 02, 2013 - 01:41 PM UTC
As I have some relieve at work after insane month - I decided to go ahead with a new build.

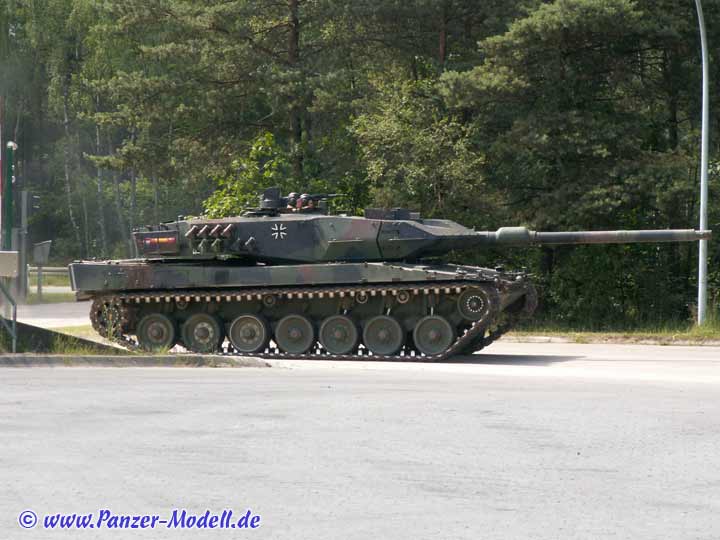
My choice is Leopard 2A6 by Tamiya with PE parts and barrel by Voyager and Ace Spade Models tracks - 2 pin version with microscopic size parts.

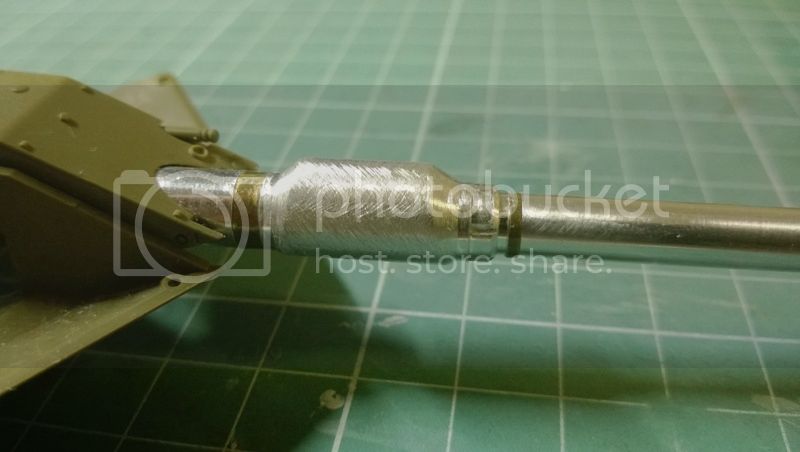
Voyager's set is a masterpiece. Insane turned barrel, some resin parts, and PE with different thickness (side covers most thick).


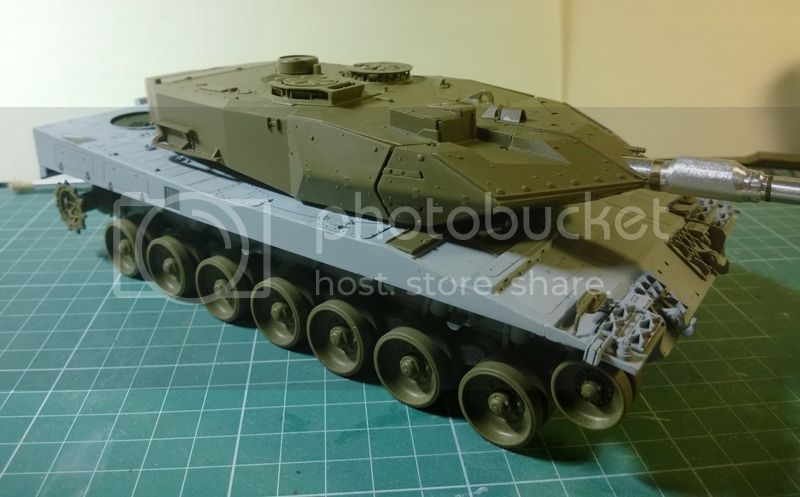
Tamiya means that model fits like glove (almost). I attached rear plate - in few places minimal putty will be required.

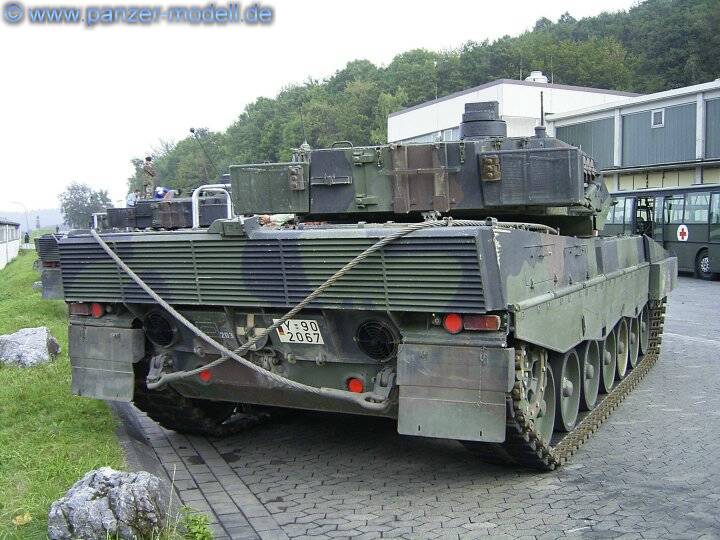
Of course I wouldn't be myself without adding some features. Firstly I drilled out exhaust ducts, added tubes behind to give some depth.
Before:

After:


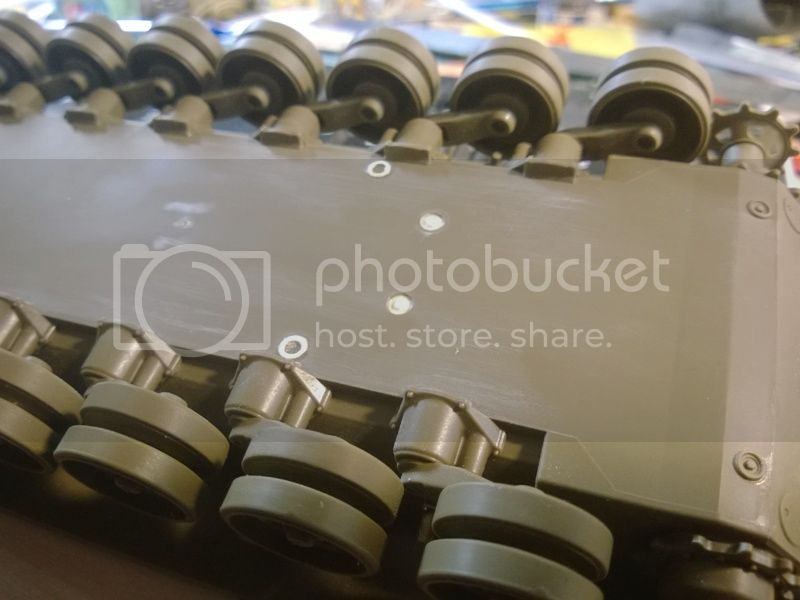
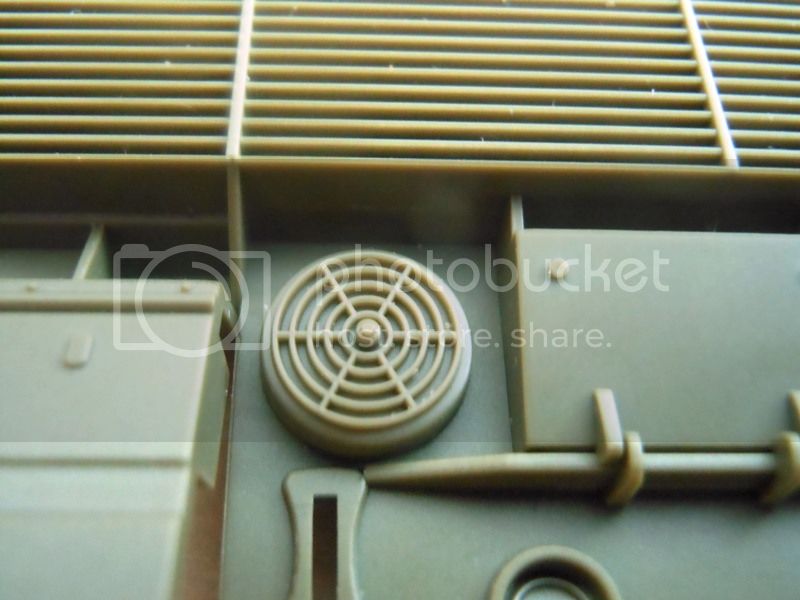
Dryfitted top cover shown clearly next feature to be added. In box version circular covers of the cooling system inlet are closed at the bottom. Voyager's parts are very fine nets and all below would be visible. I have to add imitation of the fans in the inlet - two pieces.

It will look as follows:


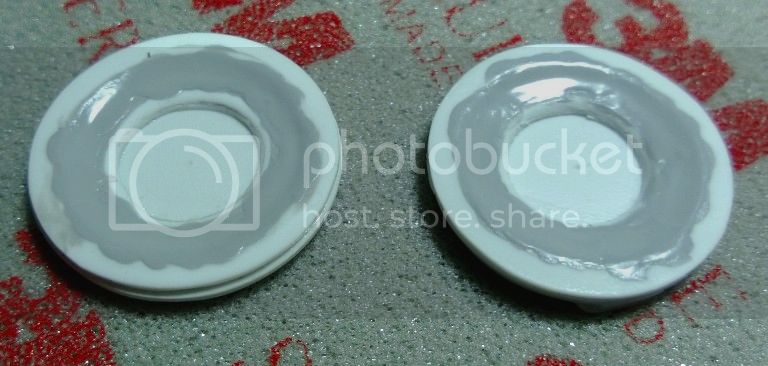
Cooling system under construction.

Circles cut out from 1mm styrene with Olfa cutting compass. Edges sanded out. Glued. Few Surfacer 500 coats applied to create smooth transition. Now (tomorrow after drying) all will be treated with 3M sponge in the background (finger in the middle and sand sand...). In the middle hole place for fan blades.

Sleepwalker71
Visit this Community
Singapore / 新加坡
Joined: August 30, 2012
KitMaker: 265 posts
Armorama: 186 posts
Posted: Saturday, September 07, 2013 - 09:31 PM UTC
Today's considerations are about abnormalities among some modelers...

After finishing the profiling the time came for the fan blades.
First attempt - styrene stripes. Poor idea since even shaped plastic pieces were disintegrating nearby the tweezer with slightest contact with Tamiya's Extra Thin


Second attempt - aluminium can. I ripped of Schweppes can (after emptying it of course). I cut out stripes (bit too wide, but it came later), profiled on the brush handle and twisted profile using pair of tweezers (about 4 hrs of work). Every fan has 14 blades (counted at the photos). Then subtle (haha) flooding with cyanoacrylic glue.

After few shots of Surfacer 1200.

Fitted.


And now the time for a Grand Conclusion. I dry fitted nets over the fan inlets. As you can see, you cannot see anything :-D


Now closing of the hull and removing of the almost all details at the top plate (to be replaced by PEs).
chnoone
Visit this Community
Armed Forces Europe, United States
Joined: January 01, 2009
KitMaker: 1,036 posts
Armorama: 1,033 posts
Posted: Monday, September 09, 2013 - 05:34 PM UTC
Hey Damian

should have shot Gerold from PSM an email he propably could send you those two spare cooling-fan-units from his spare box.

Cheers
Christopher
Sleepwalker71
Visit this Community
Singapore / 新加坡
Joined: August 30, 2012
KitMaker: 265 posts
Armorama: 186 posts
Posted: Tuesday, September 10, 2013 - 01:51 AM UTC
Thanks for the hint. Anyway these fans will be almost invisible, so they will work for me.

Some thoughts about time...

For every growing tank comes the moment when he becames a man and shaving starts. Whatever kind of shaving - of beard, by taxation office or family. Of course like true man for any imperfection masking he is not using a tissue, but putty and sanding paper.


Leopard with most of the detailes shaved off to be replaced with PEs. Touch ups will be done after Surfacer coating - in some time.
JUSTK
Visit this Community
Trinidad And Tobago
Joined: December 01, 2005
KitMaker: 91 posts
Armorama: 85 posts
Posted: Tuesday, September 10, 2013 - 01:57 AM UTC
Hi there,
Could I ask, where you got your Spade Ace tracks from? I can find only one seller in China who do not ship to half of the world. Thanks in advance.
Sleepwalker71
Visit this Community
Singapore / 新加坡
Joined: August 30, 2012
KitMaker: 265 posts
Armorama: 186 posts
Posted: Tuesday, September 10, 2013 - 02:12 AM UTC
Hi,

Look for dawngrocerystore at Ebay. Seller from China, where I got my tracks set.

Hth
Damian
JUSTK
Visit this Community
Trinidad And Tobago
Joined: December 01, 2005
KitMaker: 91 posts
Armorama: 85 posts
Posted: Tuesday, September 10, 2013 - 04:37 AM UTC
Hi Damian,
Thanks. But that is the one place I was speaking about.
Sleepwalker71
Visit this Community
Singapore / 新加坡
Joined: August 30, 2012
KitMaker: 265 posts
Armorama: 186 posts
Posted: Saturday, September 21, 2013 - 09:39 PM UTC
Scratching continues...

Tamiya proposed weird shape of the one of driver's scopes, as well out of box way of fixing of the plastic windows causes creation of the step between the scope glass and frame.


Real thing scope is rectangular with scope glass in one plane with its frame. Remaining scopes are rectangular, but again, not in plane with the frame edge. Now I'm trying to figure out how to fix it.
By the way, looking at the pictures I have found the way how scopes were cleaned - especially driver's ones. Before the scope is a nozzle with cleaning medium.

Sleepwalker71
Visit this Community
Singapore / 新加坡
Joined: August 30, 2012
KitMaker: 265 posts
Armorama: 186 posts
Posted: Friday, October 04, 2013 - 10:49 PM UTC
I got some materials regarding hull bottom and after extensive photo research conclusions are as follows.

There is no unified standard of Leopard 2A6. One can find both smoke grenade dispensers types (4+4 or 6+2), with both types of side skirts, and with or without reinforcement bars under the engine (clearly visible or not at the photos). Only chance to make more or less accurate model is to choose the real object.

I have found one - Leopard 2A6 early model with 4+4 smoke grenade dispensers, light side skirts and without hull reinforcements - tank from 5/203 Panzerbataillon (reg. plate Y902067).

Some original photos:


I added some details on the hull bottom, drainage and inspection hatches, first drilled with a file with glued in styrene disk and second with cut and sanded down pipe respectively. Size and location based on the Revell model photos.

Sleepwalker71
Visit this Community
Singapore / 新加坡
Joined: August 30, 2012
KitMaker: 265 posts
Armorama: 186 posts
Posted: Tuesday, October 15, 2013 - 06:54 PM UTC
Loud sound of the "fuuu....k" teared apart the silence of the Singaporean morning.

Reason?

Here it comes. Tamiya completely messed up placement od the track's return wheels (on the top). It is very strange that none of the reviewers didn't point it out. Probably I would not notice it either, but I started to apply welding lines on the lower hull (basing on primeportal's dismantled Leo 2A5 photos). Somethin was badly wrong...

Here is actual hull:


Here is Tamiya's version:


It is messed up, isn't it? Two wheels (on both sides) have to be moved forward as arrows show. Easy to say... moved...

Meantime I scratch made ice clutches mounts at the hull forward.
LeoCmdr
Visit this Community
Alberta, Canada
Joined: January 19, 2005
KitMaker: 4,085 posts
Armorama: 3,917 posts
Posted: Thursday, October 17, 2013 - 04:59 PM UTC
Not to diminish your suspension concerns but the return roller configuration changed during the Fifth Batch of the Leopard 2 thus altering the spacing.

Perhaps what you are seeing on the real image you posted and the Tamiya version are the two different return roller configurations.
Sleepwalker71
Visit this Community
Singapore / 新加坡
Joined: August 30, 2012
KitMaker: 265 posts
Armorama: 186 posts
Posted: Thursday, October 17, 2013 - 06:13 PM UTC
Agree - there are two configurations of the return rollers. One seen on the 2A5's and early 2A6's like here:

Late 2A6's and 2A6M's like here:

Second photo shows 2A6M with removed side skirts (not many such photos) second shorter roller support is invisible as it is just beyond photo edge. Note also lightweight rollers support with hollow design open from the bottom, while first version has full box, heavier supports.

Tamiya model represents (looking at the smoke discharges configuration) rather early model of 2A6, as my model do.
ejasonk
Visit this Community
Baden-Württemberg, Germany
Joined: October 14, 2007
KitMaker: 314 posts
Armorama: 226 posts
Posted: Friday, October 18, 2013 - 03:21 AM UTC
The 6+2 smoke dischargers are as part of the 2A6M variant. I'll follow your blog. I just have bought this kit for 3rd time today and will add some resin from Perfect Scale Modellbau to update to M for the German Leo

Sleepwalker71
Visit this Community
Singapore / 新加坡
Joined: August 30, 2012
KitMaker: 265 posts
Armorama: 186 posts
Posted: Friday, October 18, 2013 - 04:41 AM UTC
I wish If it would be so easy with Leopard 2A6 configurations... I saw a photo of 2A6M with 4+4 smoke discharges. As I mentioned before - in my opinion only way is to find the photos and build specific tank. It is very tricky anyway.
ejasonk
Visit this Community
Baden-Württemberg, Germany
Joined: October 14, 2007
KitMaker: 314 posts
Armorama: 226 posts
Posted: Friday, October 18, 2013 - 08:22 AM UTC
No. There are no M variants with the old smoke system in German Army.
LeoCmdr
Visit this Community
Alberta, Canada
Joined: January 19, 2005
KitMaker: 4,085 posts
Armorama: 3,917 posts
Posted: Friday, October 18, 2013 - 09:09 AM UTC
Here's a Bundeswehr Leopard 2A6M with the 4x4 grenade discharger configuration...

http://www.panzer-modell.de/referenz/in_detail/leo2a6m/leo2a6m.htm
ejasonk
Visit this Community
Baden-Württemberg, Germany
Joined: October 14, 2007
KitMaker: 314 posts
Armorama: 226 posts
Posted: Friday, October 18, 2013 - 07:40 PM UTC
Actually all these pictures of 2A6 with anti mine Protection and 4-4 discharger are quite old from period when A5 were updated to A6 and some A6 to A6M. Some were waiting for replacement of dischargers by next main overhaul into M versions. You will hardly find this constallation in the second half of 2000th or now, as all were updated by 2005.

So there is no 4-4 mixture for real A6M. In our Company we also did not have the mixtures after 2006, but we've shared for example the unarmored light weight skirts for training as you have in your PE set.

If you want to build the correct up to date M, go with new smoke dischargers
For earlier version back in the first half of 2000th, stay with 4-4.
Sleepwalker71
Visit this Community
Singapore / 新加坡
Joined: August 30, 2012
KitMaker: 265 posts
Armorama: 186 posts
Posted: Friday, October 18, 2013 - 08:29 PM UTC
Thanks for these clarifications.
By the way - three parallel reinforcement bars under the engine bay. Are they added when the tank is modified or they are a feature of the newly manufactured tanks?
LeoCmdr
Visit this Community
Alberta, Canada
Joined: January 19, 2005
KitMaker: 4,085 posts
Armorama: 3,917 posts
Posted: Saturday, October 19, 2013 - 02:52 AM UTC
Evgenij,

Did you serve with PzBtl 203 on the 2A6M?
ejasonk
Visit this Community
Baden-Württemberg, Germany
Joined: October 14, 2007
KitMaker: 314 posts
Armorama: 226 posts
Posted: Saturday, October 19, 2013 - 04:00 AM UTC
93 pzlehrbtl
Konigwolf
Visit this Community
Tasmania, Australia
Joined: November 06, 2009
KitMaker: 368 posts
Armorama: 321 posts
Posted: Sunday, October 20, 2013 - 12:14 PM UTC
Watching (and bookmarking) this thread with interest. I have the Tamiya 2A6 kit with voyager pro kit in my stash.
Sleepwalker71
Visit this Community
Singapore / 新加坡
Joined: August 30, 2012
KitMaker: 265 posts
Armorama: 186 posts
Posted: Saturday, October 26, 2013 - 09:39 PM UTC
Slowly ahead.
Before applying photoetched stuff I did anti-skid panels. They got some sanding during recent works and needed to be corrected. Besides doing that after all detailing would be very tricky task.

Panels... Small in contrary to the other contemporary tanks, where almost all horizontal surfaces are anti-skid coated. Masking was an interesting and time consuming task. Finally I applied liquid mask, cut out the windows over the panels with rest of the hull protected with masking tape.
Exposed panels were coated with undiluted Sufracer 500 sprayed under high pressure. It looks good but cleaning the airbrush after that is... No comments.
Well I forgot about two panels at the right edge of the hull, but I will correct this when working on turret's anti-skid coating. There will be much less masking...

Masking:

Powdering:
Sleepwalker71
Visit this Community
Singapore / 新加坡
Joined: August 30, 2012
KitMaker: 265 posts
Armorama: 186 posts
Posted: Saturday, December 14, 2013 - 01:18 AM UTC
I was about to start photoetch works on the hull, but coming soon removal to the new house stopped me for now. I started a turret then.

The 12omm gun is ready. Aluminum core with photoetched strips and resin mirror of the barrel alignment system.

This is how it looks as a whole. Glued into a lower part of the turret with some reinforcement added.


Fume ejector shield. I tried to reproduce fiber glass structure, and after some attempts I decided that most feasible option is making some scratches with rough sanding stick. I think it looks not bed, besides in this scale it shall be almost unnoticeable.


Barrel tip - I had some troubles with this part, but I hope it looks acceptable....

Sleepwalker71
Visit this Community
Singapore / 新加坡
Joined: August 30, 2012
KitMaker: 265 posts
Armorama: 186 posts
Posted: Sunday, December 15, 2013 - 01:04 AM UTC
Turret is nearly completed (sort of joke of course). Anyway main body plus some details is assembled. I removed also some details to be replaced with photoetches. My goal configuration requires all hatches closed as well as cover of the gunner sight. Turret MG in Tamiya version is shown as protected with a cover - I'm leaving it as it is. In other words it will be transportation configuration, as my final goal with this model is have a soft of beauty and the beast, or if you prefer Franziska with Leopard on the trailer. Btw it is difficult to judge what is a beauty, and what is a beast.

This is how it looks for tonight:


Sleepwalker71
Visit this Community
Singapore / 新加坡
Joined: August 30, 2012
KitMaker: 265 posts
Armorama: 186 posts
Posted: Friday, February 21, 2014 - 04:36 AM UTC
Long time no see... Well, I was changing my house meanwhile.

Since my Leo will be in transport configuration (say 90%) with reversed turret, it will be clearly visible following:


As it is easy to guess in Tamiya model that place is smooth like... Never mind. Of course I decided to change it...

So - cutting blade and jewellery files in hands (in progress):


It is a bit tricky with assembled turret, but with each hole its getting easier. Some drainage holes ahead of me, as well as change of the shape of the few panels. Meantime I'm working on PE parts, but this next time.
 _GOTOTOP