Hosted by Darren Baker
Tamiya Hetzer

Hohenstaufen

Joined: December 13, 2004
KitMaker: 2,192 posts
Armorama: 1,615 posts

Posted: Wednesday, September 04, 2013 - 04:21 AM UTC
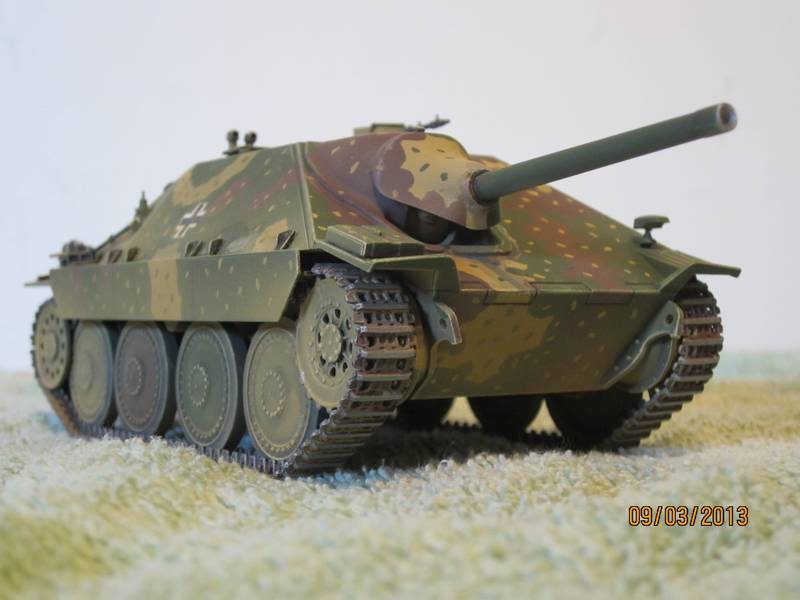
Straight from the box. Painted as the Halloville vehicle (pre-destruction). This vehicle appears in Panzer Colours, and the photo makes it clear that the "ambush" scheme was hand painted, so that's what I did. This is my first attempt at "ambush", what do you think?


newjoisey

Joined: January 31, 2013
KitMaker: 95 posts
Armorama: 95 posts
Posted: Wednesday, September 04, 2013 - 04:33 AM UTC
well done

Hohenstaufen

Joined: December 13, 2004
KitMaker: 2,192 posts
Armorama: 1,615 posts

Posted: Wednesday, September 04, 2013 - 04:39 AM UTC
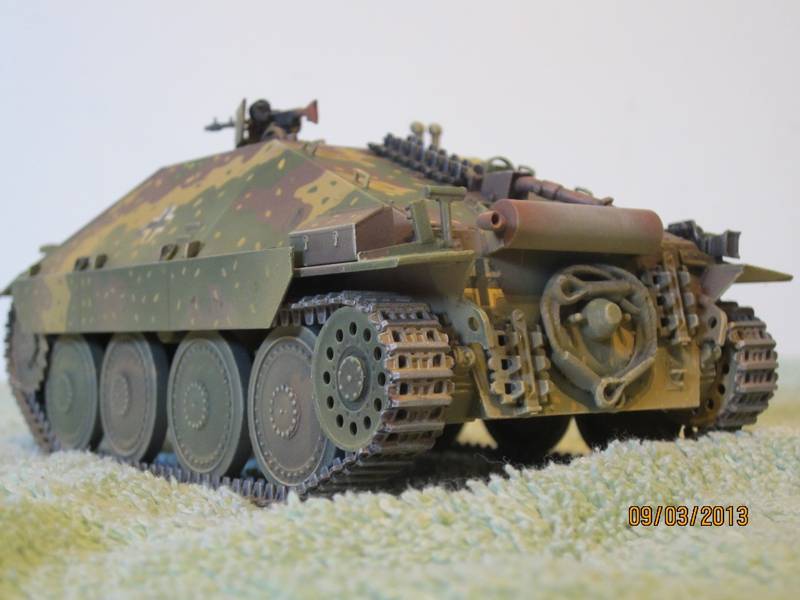
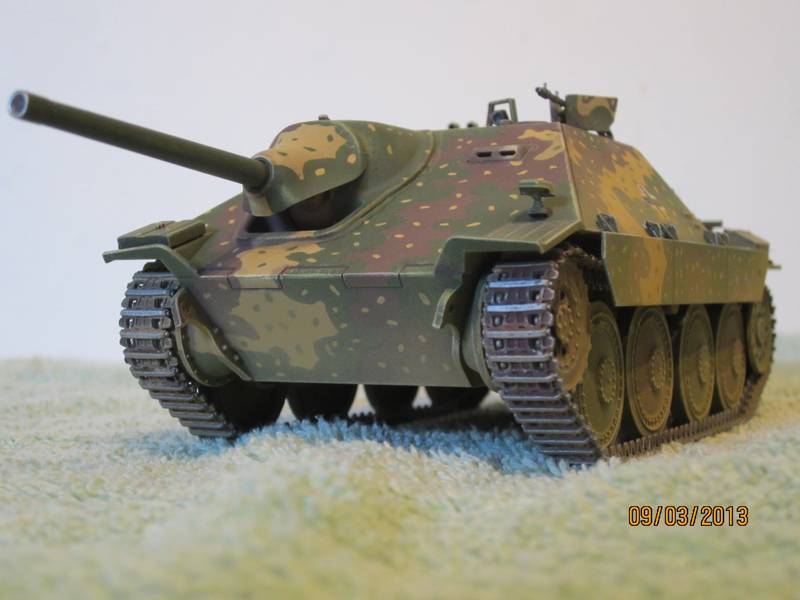
Here's a couple more pictures.


Hohenstaufen

Joined: December 13, 2004
KitMaker: 2,192 posts
Armorama: 1,615 posts

Posted: Wednesday, September 04, 2013 - 04:40 AM UTC

orangelion03

Joined: March 09, 2013
KitMaker: 176 posts
Armorama: 148 posts

Posted: Wednesday, September 04, 2013 - 04:43 AM UTC
Nice!
What paints did you use? Process?
Thanks!
What paints did you use? Process?
Thanks!

Hohenstaufen

Joined: December 13, 2004
KitMaker: 2,192 posts
Armorama: 1,615 posts

Posted: Wednesday, September 04, 2013 - 04:59 AM UTC
Thanks for the comments. Believe it or not, all my kits are painted with Humbrol enamel - I'm told it's hard to spray...

oldbean

Joined: July 05, 2004
KitMaker: 769 posts
Armorama: 461 posts

Posted: Wednesday, September 04, 2013 - 05:45 AM UTC
Steve,
Really good job! I am green with envy (and brown and yellow! With little spots )
)
Jesse
Really good job! I am green with envy (and brown and yellow! With little spots
 )
)Jesse

retiredyank

Joined: June 29, 2009
KitMaker: 11,610 posts
Armorama: 7,843 posts

Posted: Wednesday, September 04, 2013 - 07:59 AM UTC
By hand? I'm very impressed! My ab has me spoiled. How did you add the dusty weathering?

Hohenstaufen

Joined: December 13, 2004
KitMaker: 2,192 posts
Armorama: 1,615 posts

Posted: Thursday, September 05, 2013 - 07:17 AM UTC
The dusty weathering is simply overspray with Humbrol Matt 93. I start a long way away and build up to the required depth, then careful drybrush with Matt 93 with added white.

retiredyank

Joined: June 29, 2009
KitMaker: 11,610 posts
Armorama: 7,843 posts

Posted: Thursday, September 05, 2013 - 08:17 AM UTC
My mistake. I thought you painted everything, by hand.

pablo_g

Joined: October 21, 2003
KitMaker: 529 posts
Armorama: 500 posts

Posted: Thursday, September 05, 2013 - 11:49 AM UTC
Hello Steve,
Your Hetzer look very cool, it's my favorite AFV. I love the ambush camouflage.
Paweł
Your Hetzer look very cool, it's my favorite AFV. I love the ambush camouflage.

Paweł

vonHengest

Joined: June 29, 2010
KitMaker: 5,854 posts
Armorama: 4,817 posts

Posted: Thursday, September 05, 2013 - 02:21 PM UTC
I really like these kits. You have a lot of patience if you can pull off a consistent ambush pattern by hand like that. It definitely gives you greater control over the application than using salt or other methods.
Biggles2

Joined: January 01, 2004
KitMaker: 7,600 posts
Armorama: 6,110 posts

Posted: Friday, September 06, 2013 - 02:17 AM UTC
Is this Tamiya 1/48 or 1/35? 


Treadhead12

Joined: September 26, 2007
KitMaker: 162 posts
Armorama: 116 posts

Posted: Friday, September 06, 2013 - 02:38 AM UTC
Steve, very nice and like the camo pattern. I have the kit in my plastic 'mountain' and you have given me some ideas for my build, when I get to it.
Again, well done.
Again, well done.

orangelion03

Joined: March 09, 2013
KitMaker: 176 posts
Armorama: 148 posts

Posted: Friday, September 06, 2013 - 04:42 AM UTC
Thanks Steve!
Nice Norton by the way. A friend of mine has a black/gold Commando JPS that I enjoy riding sedately once in a while. I ride a Bandit 1200 with lovely brakes that work
Nice Norton by the way. A friend of mine has a black/gold Commando JPS that I enjoy riding sedately once in a while. I ride a Bandit 1200 with lovely brakes that work


Hohenstaufen

Joined: December 13, 2004
KitMaker: 2,192 posts
Armorama: 1,615 posts

Posted: Friday, September 06, 2013 - 05:15 AM UTC
Thanks for the comments guys - about the kit & the Norton! Biggles this is 1/35, sorry I should have made that clear. To clarify the painting process, I preshaded and applied the Dunkelgelb base with an airbrush. The "ambush" scheme was then painted by hand over the preshaded base - I couldn't think of any other way to do it, seeing as I needed the hard edge to the top colours. After that was completed and dried, the transfers were applied using setting solution, then the dusting was done with the airbrush. Finally the tracks were dry brushed with a mixture of silver and black to produce the gunmetal effect.
Orangelion, FYI the Norton now has a polished alloy tank and clip on handlebars - it's probably going to a Norton Owners Club Café racer day tomorrow, weather permitting. The nice yellow fibreglass tank (original) was eaten by Ethanol in modern petrol.
Orangelion, FYI the Norton now has a polished alloy tank and clip on handlebars - it's probably going to a Norton Owners Club Café racer day tomorrow, weather permitting. The nice yellow fibreglass tank (original) was eaten by Ethanol in modern petrol.
orangelion03

Joined: March 09, 2013
KitMaker: 176 posts
Armorama: 148 posts

Posted: Friday, September 06, 2013 - 07:33 AM UTC
Love the look of a polished aluminium (note spelling) fuel tank!
Hand painting the scallops is an excellent alternative to the masks available. They cost extra (as an aftermarket) and are fiddly to use (I have the Academy kit that comes with masks). I used to use Humbrol for hand-painting hard edge camo on 1/72 a/c...always went on smooth and covered well when applied over a flat base coat.
Hand painting the scallops is an excellent alternative to the masks available. They cost extra (as an aftermarket) and are fiddly to use (I have the Academy kit that comes with masks). I used to use Humbrol for hand-painting hard edge camo on 1/72 a/c...always went on smooth and covered well when applied over a flat base coat.
 |


