_GOTOBOTTOM
Armor/AFV
For discussions on tanks, artillery, jeeps, etc.
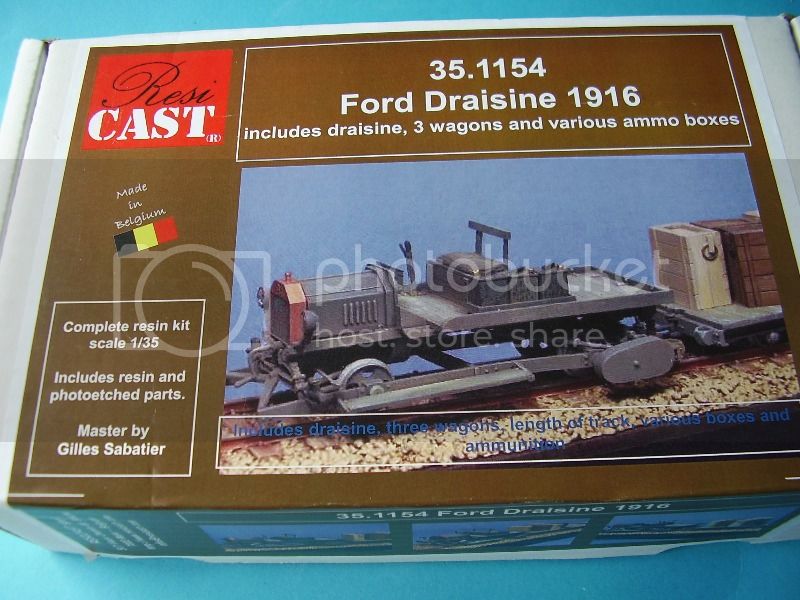
Resicast - Ford Draisine 1916
AlanL
Visit this Community
England - East Anglia, United Kingdom
Joined: August 12, 2005
KitMaker: 14,499 posts
Armorama: 11,675 posts
Posted: Saturday, September 14, 2013 - 08:22 AM UTC
Hi folks,

As the Ford T is nearing completion, next on line (no pun intended) will be this one.


Al
Plasticbattle
#003
Visit this Community
Donegal, Ireland
Joined: May 14, 2002
KitMaker: 9,763 posts
Armorama: 7,444 posts
Posted: Saturday, September 14, 2013 - 01:11 PM UTC
Looking forward to this one Alan. Somebody had a link recently to some WW1 footage taken from something similar. Was very interesting to see ... hopefully I can find it again .... as it was full of good ideas of the setting for items such as this. Have you seen it? Maybe you have a plan already?
AlanL
Visit this Community
England - East Anglia, United Kingdom
Joined: August 12, 2005
KitMaker: 14,499 posts
Armorama: 11,675 posts
Posted: Saturday, September 14, 2013 - 11:03 PM UTC
Hi Frank,

Here's the link to the original post, the link of the film is inside.

http://armorama.kitmaker.net/forums/211772

It makes for interesting viewing. The Australian War Museum have some good pictures of the Light Railways too.

Lots of dio potential that's for sure.

There is quite a lot on the internet too.

http://www.wdlr.org.uk/wdlr/

Again useful information and some suggested links.

Cheers

Al
AlanL
Visit this Community
England - East Anglia, United Kingdom
Joined: August 12, 2005
KitMaker: 14,499 posts
Armorama: 11,675 posts
Posted: Sunday, September 15, 2013 - 05:34 AM UTC
Hi folks,

Parts laid out and build underway. Thought I'd start on the small wagons first.


Hopefully heading in this direction


Al
Big-John
Visit this Community
Ohio, United States
Joined: August 12, 2010
KitMaker: 731 posts
Armorama: 711 posts
Posted: Sunday, September 15, 2013 - 01:34 PM UTC
Count me in Alan, This looks like a cool little project.
AlanL
Visit this Community
England - East Anglia, United Kingdom
Joined: August 12, 2005
KitMaker: 14,499 posts
Armorama: 11,675 posts
Posted: Tuesday, September 17, 2013 - 03:24 AM UTC
Hi folks,

A small bit of progress. Started work on the wagons. The bumpers have a square end on one side which as best I can determine goes on the inside. Fairly straight forward so far. Nice locking pins and clamps which I drilled out a bit for an easier fit.


Al
JPTRR
Staff MemberManaging Editor
RAILROAD MODELING
#051
Visit this Community
Tennessee, United States
Joined: December 21, 2002
KitMaker: 7,772 posts
Armorama: 2,447 posts
Posted: Tuesday, September 17, 2013 - 04:36 AM UTC
Alan,

That's a great start. Those lil' critters look like a fun build.

W^D Models is producing a number of LRW items in 1/76: W^D Models
AlanL
Visit this Community
England - East Anglia, United Kingdom
Joined: August 12, 2005
KitMaker: 14,499 posts
Armorama: 11,675 posts
Posted: Tuesday, September 17, 2013 - 04:18 PM UTC
Hi Fredrick,

Thanks for dropping in and the additional info on the WD Models stuff. Wrong Scale for me though.

Cheers

Al
AlanL
Visit this Community
England - East Anglia, United Kingdom
Joined: August 12, 2005
KitMaker: 14,499 posts
Armorama: 11,675 posts
Posted: Wednesday, September 18, 2013 - 04:53 AM UTC
Hi folks,

A bit of work on the tractor, assembled the main parts and started to build and test fit the frame for the track wheels.


Al
AlanL
Visit this Community
England - East Anglia, United Kingdom
Joined: August 12, 2005
KitMaker: 14,499 posts
Armorama: 11,675 posts
Posted: Friday, September 20, 2013 - 05:21 AM UTC
Hi folks,

A little bit more work on the tractor. The wheels are driven by a very basic chain affair. I've added some locking plates to the front, fuel tank and petrol can stowage rack.

I started work on making a driver using the new Ford T Driver. I need a slightly different figure, but wanted to keep the cow skin jacket but without arms, so I removed the arms and seat that come attached to the figure for the Model T, and hopefully he will work in well once I've tidied him up a bit.


Cheers

Al
AlanL
Visit this Community
England - East Anglia, United Kingdom
Joined: August 12, 2005
KitMaker: 14,499 posts
Armorama: 11,675 posts
Posted: Sunday, September 22, 2013 - 03:05 AM UTC
Hi folks,

The build of the main players is almost complete, so I've started to add a little paint.


Al

darreng
Visit this Community
England - South East, United Kingdom
Joined: January 21, 2006
KitMaker: 789 posts
Armorama: 382 posts
Posted: Sunday, September 22, 2013 - 03:15 AM UTC
Looking good Al.

Looking forward to seeing more
AlanL
Visit this Community
England - East Anglia, United Kingdom
Joined: August 12, 2005
KitMaker: 14,499 posts
Armorama: 11,675 posts
Posted: Sunday, September 22, 2013 - 05:16 AM UTC
Hi Darren,

Thanks. Added the seating and fuel cans and thinking about it I will probably leave the driver off as I have a couple of figures that would suit a loading/unloading setting which might be more interesting. Added a tractor number from the spares box and will have to see if I can get a suitable number for the side of the tractor.

Cheers

Al


AlanL
Visit this Community
England - East Anglia, United Kingdom
Joined: August 12, 2005
KitMaker: 14,499 posts
Armorama: 11,675 posts
Posted: Monday, September 23, 2013 - 06:18 AM UTC
Hi folks,

Setting the main model aside for a while the kit provides two bags of stowage for the wagons.


You get a selection of creates and shells and several open empty boxes and lids with the kit.

To add to that mix I'll also be using some additional items, small ammo boxes and rum flagons and some varied boxes to add to the scene.

Resicast make a great range of stowage items and for modelling purposes you can never have enough bits of kit.


Some of these creates will also make their way onto the Somme Dio I've neglected these past few months.

Cheers

Al
darreng
Visit this Community
England - South East, United Kingdom
Joined: January 21, 2006
KitMaker: 789 posts
Armorama: 382 posts
Posted: Tuesday, September 24, 2013 - 08:02 AM UTC
Again Al top work.
AlanL
Visit this Community
England - East Anglia, United Kingdom
Joined: August 12, 2005
KitMaker: 14,499 posts
Armorama: 11,675 posts
Posted: Tuesday, September 24, 2013 - 10:09 PM UTC
Hi Darren,

Thanks again. Only down side is the starting handle. I managed to snap both this one and the one on the Model T when cleaning them up. I will have to make replacements for both at some point.

Cheers

Al
AlanL
Visit this Community
England - East Anglia, United Kingdom
Joined: August 12, 2005
KitMaker: 14,499 posts
Armorama: 11,675 posts
Posted: Wednesday, September 25, 2013 - 10:39 AM UTC
Hi folks,

Came across another photo of the Tractor and wagons.


I'm tempted to repaint the front of the tractor in khaki, but I've added some decals so maybe not. Any thoughts?

Al
AlanL
Visit this Community
England - East Anglia, United Kingdom
Joined: August 12, 2005
KitMaker: 14,499 posts
Armorama: 11,675 posts
Posted: Sunday, September 29, 2013 - 12:36 AM UTC
Hi folks,

Started work on the wagon stowage. You certainly get enough stuff both for the wagons and for the track side.


I'm hoping to start work on the shells this afternoon and I am just waiting on a couple of missing parts to complete the 3rd wagon. I thought I'd do the wagon sequence as boxes, shells, boxes.

I have cleaned off an old base I might use for the display. Rather than have the straight across view and given the amount of track you get, I though I'd run it across the board. This will mean cutting off a small corner at each end but should make for a more interesting finish. There will be plenty of room for track-side activity and other stuff. I used the same approach when I did the 17pdr dio and having the track at an angle rather than a straight run is more pleasing at least to my eyes.


I hope to incorporate the Model T ford and possibly the RR so this should provide enough space if I choose to use both.

Cheers

Al
darreng
Visit this Community
England - South East, United Kingdom
Joined: January 21, 2006
KitMaker: 789 posts
Armorama: 382 posts
Posted: Sunday, September 29, 2013 - 12:56 AM UTC
Stunning work Al. And fast too!
geogeezer
Visit this Community
Arizona, United States
Joined: February 17, 2011
KitMaker: 263 posts
Armorama: 258 posts
Posted: Sunday, September 29, 2013 - 02:23 AM UTC
Hi Al,

Nice work on the draisine. On a normal Model T, the filler cap on the fuel tank was on top and was accessed by removing the seat. Was it different on the draisine version?

I'm rather surprised to see that they kept the steering wheel, since on trains the rails do the steering. Perhaps it was just to give the driver something to hang on to, or to protect the throttle and spark controls located underneath the wheel.

A replacement starting crank is easily made with bent wire.

I notice that the draisine in the photos has the post 1916 rounded radiator. I would expect that troops near the front would have quickly painted the early shiny brass radiator shell or at least smeared it with mud.

I don't see any sign of wheel brakes on the tractor or the wagons. I'd hate to depend on the Model T's notoriously inadequate transmission brake if I was hauling that load of artillery munitions, although the reduction provided by the chain drive would have kept the speed down.

Again, great job. Looking forward to seeing it in the diorama.

Cheers
Dick
AlanL
Visit this Community
England - East Anglia, United Kingdom
Joined: August 12, 2005
KitMaker: 14,499 posts
Armorama: 11,675 posts
Posted: Sunday, September 29, 2013 - 02:31 AM UTC
Many thanks Darren, I have more work to do yet on the boxes and just stated the shells this afternoon. I also have to add the horn to the Tractor.

The shells come marked N and O. You get fuses to add to the shells also marked N & O. So you need to sort them out once they have come form the wash. There are no instructions on the shells so you'll need to choose which fuse goes with each type of shell as there are 2 x N type fuses and 2 x O type fuses lol.

I lost at least one fuse during the photographing/washing stage, another went to the carpet monster and I was one set short of N fuses or else they vanished too.

To go with those are 6 x N type Fuse Boxes and 6 x O Type Fuse Boxes. 4 of each type of box are closed and 2 of each type are open with lids. That is also true for the packing cases. I used the photographs I took as the parts came out of the bag to sort things out, that's assuming all the bag parts belong together.

So there is a display scene with the shells also if you'd like someone adding the fuses to the cases.


I used the very scientific method of what looked right in the shell/fuse match so that probably means I got them wrong

I'll have to find out what caliber of shell they actually are as there are 4 different types.

I was wondering if the shells were a later addition to the kit as they don't feature on the original box art nor in the parts listing so both they and the boxes may have been added to the original kit to enhance the build?

Cheers

Al
AlanL
Visit this Community
England - East Anglia, United Kingdom
Joined: August 12, 2005
KitMaker: 14,499 posts
Armorama: 11,675 posts
Posted: Tuesday, October 01, 2013 - 05:55 PM UTC
Hi Dick,

Thanks for the thoughts. As far as I can tell there are two lever controls atop the steering column just under the steering wheel, which is probably why it remained in place. On the second picture you can see the drivers left hand reaching under for the LHS one.

Looking at the picture there appears to be two thin rods coming up from under the headlights so I'll have to fashion those.

On the breaks I don't see any evidence of anything but the original set up, the wheels being driven by the addition of the drive chains on either side so I suppose stopping was not a big issue lol.

I had considered painting everything green/grey but the brass adds a bit of artistic license and the military do like to have mundane things to keep a soldier busy and brass objects are a favorite The basic soldiers rule 'If it stands still paint it or polish it, if it moves salute it' !!

Cheers

Al
AlanL
Visit this Community
England - East Anglia, United Kingdom
Joined: August 12, 2005
KitMaker: 14,499 posts
Armorama: 11,675 posts
Posted: Friday, October 04, 2013 - 04:11 AM UTC
Hi Folks,

Added the horn and a replacement starting handle to the tractor, which completes the build of this part.


Cheers


Al


Oh, BTW would anyone have any thoughts on the shell colour?


AlanL
Visit this Community
England - East Anglia, United Kingdom
Joined: August 12, 2005
KitMaker: 14,499 posts
Armorama: 11,675 posts
Posted: Friday, October 04, 2013 - 07:07 AM UTC
Hi Dick,

I don't have any data on the filler cap. On the kit is faces towards the rear a little, whether they placed the tank slightly differently I can't say, but as the box is open at the back it suggests fueling without removing the seat, but it may just have lifted off.

Cheers

Al
geogeezer
Visit this Community
Arizona, United States
Joined: February 17, 2011
KitMaker: 263 posts
Armorama: 258 posts
Posted: Friday, October 04, 2013 - 07:25 AM UTC
Hi Al,

One small quibble on an otherwise excellent model. Your draisine lacks the hand brake lever shown in the box art. That lever served two purposes; to set the brakes on the rear axle and put the gearbox in neutral so the driver could get off and crank start the engine without being run over.

The fuel gauge on a Model T was a stick resembling a ruler except marked in gallons. One supposes that if the filler cap was rotated slightly off vertical, the stick's markings would have been a trifle off, but not enough to worry about.

Cheers,

Dick
 _GOTOTOP