M109A2 in MERDC Gray Desert cammo build
Severocesky Kraj, Czech Republic
Joined: October 18, 2013
KitMaker: 111 posts
Armorama: 101 posts
Posted: Tuesday, November 19, 2013 - 03:38 AM UTC
Next week will be on sale news from Black Dog
Complete interior for M-109

!!!
www.vt-models.cz 
Virginia, United States
Joined: July 17, 2006
KitMaker: 1,558 posts
Armorama: 1,159 posts
Posted: Thursday, November 21, 2013 - 02:37 PM UTC
Thanks--that's probably what I'll do to hide the misaligned bars on the rack.
Sorry for the lack of updates, but I went on vacation to Australia a couple of weeks ago, then on a business trip right after that. I'm finally back, and slammed with work. I did squeeze in one painting session, but, to my dismay, the paint I had chosen for the Sand color (FS30277)--Tamiya XF-49 Khaki, which was a good match, per the various references available on the web--turned out to be way too dark, almost as dark as Field Drab. I went ahead and ordered a bottle of Testors MM Armor Sand, which looks much lighter. It should be arriving by tomorrow, so I'll be able to paint this weekend. I did get some Field Drab paint laid down on the running gear and some unattached parts, so all was not lost.
Texas, United States
Joined: March 08, 2010
KitMaker: 2,465 posts
Armorama: 2,383 posts
Posted: Thursday, November 21, 2013 - 03:57 PM UTC
Hey Lucas, looks just as good here as it does on MSC!

Great build man.

Virginia, United States
Joined: July 17, 2006
KitMaker: 1,558 posts
Armorama: 1,159 posts
Posted: Saturday, December 14, 2013 - 02:48 PM UTC
OK, it has been a while since my last update, but I've been busy with work and family (and some modeling, too!). We took the kids to Disney World after Thanksgiving, which went well and left us exhausted (and needing a vacation from our vacation), but I've managed to squeeze in several painting sessions over the past several weeks. Here's proof!
I've done the two minor colors and one of the two major ones (the MM Armor Sand), and will tackle the final cammo color--Field Drab--this week, if all goes well. The base color on the model is Field Drab, so that makes it pretty easy. Once I've masked the Sand areas, all I'll have to do is spray over any areas that got errant overspray in the other colors.
Here are some pics of what the turret looks like right now. I haven't masked off the Sand areas yet.
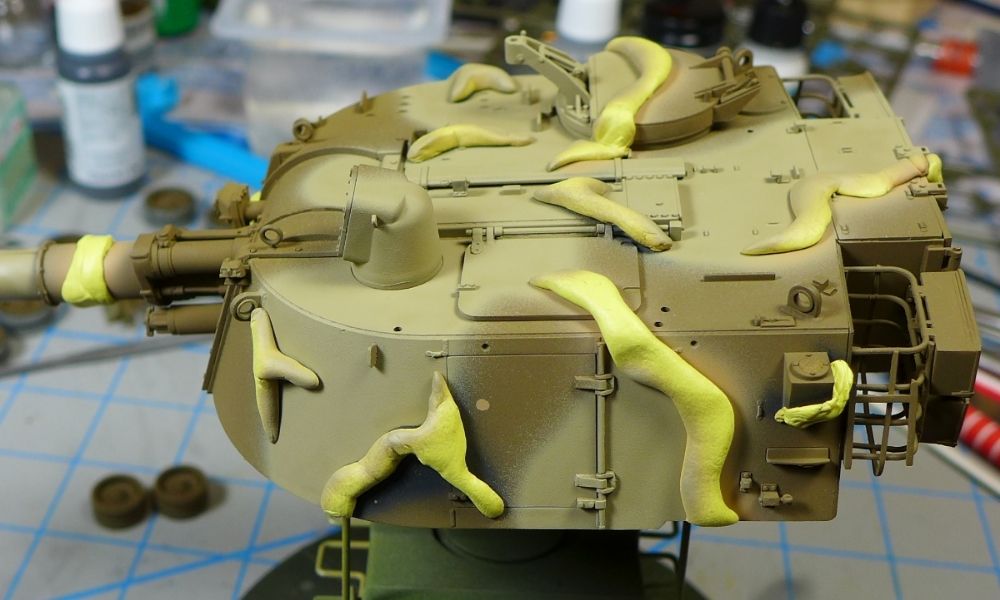
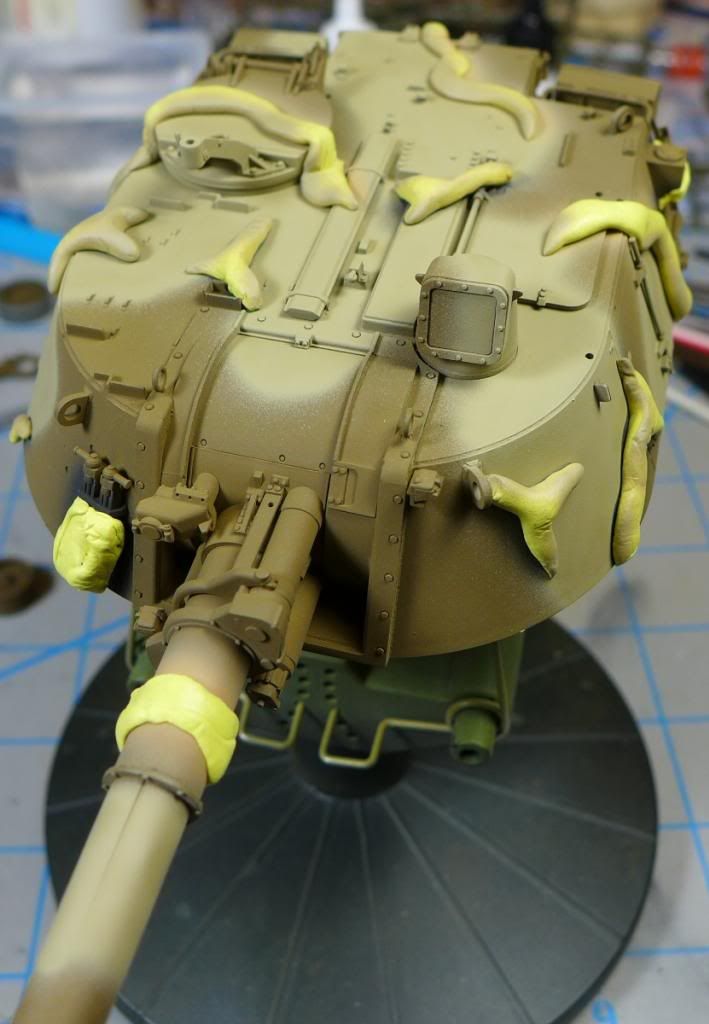
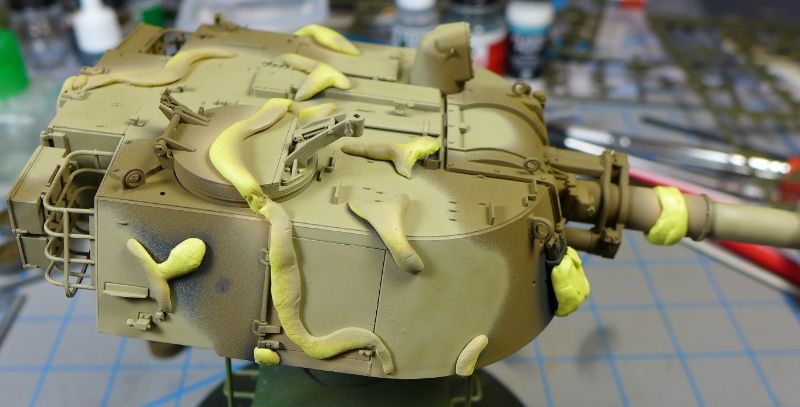
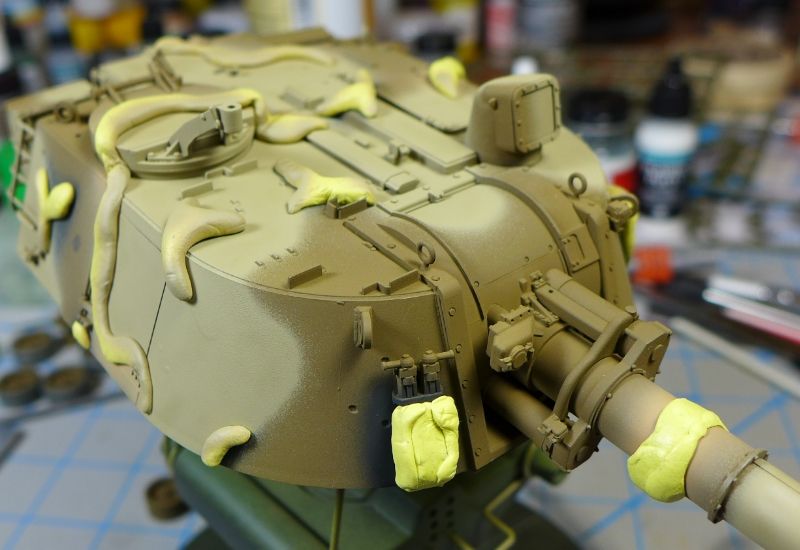
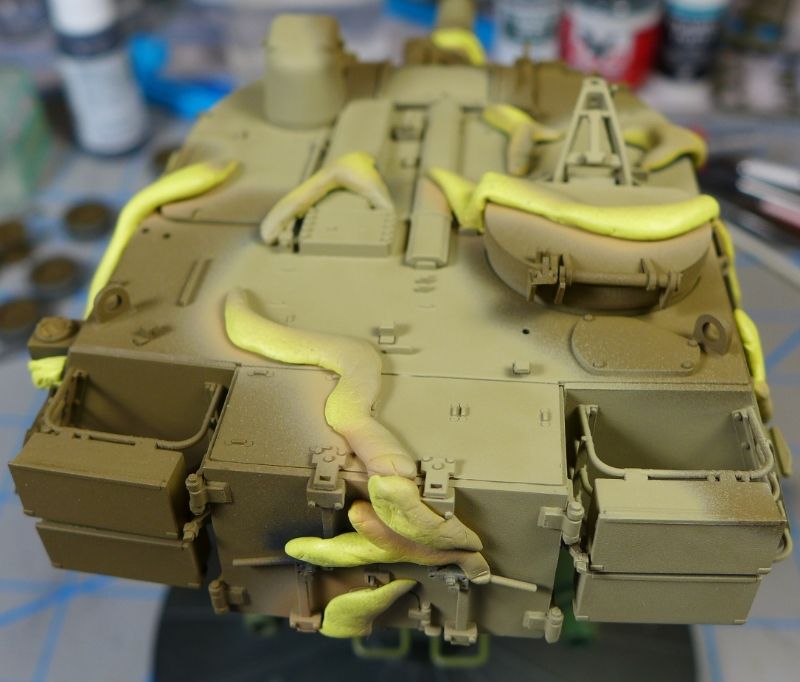
I didn't have time to take pictures of the hull, unfortunately (I'm typing this as the wife is telling me that it's time to turn in for the night). Let me know what you think.
Florida, United States
Joined: May 16, 2002
KitMaker: 17,694 posts
Armorama: 13,742 posts
Posted: Saturday, December 14, 2013 - 09:45 PM UTC
It is looking great so far. I can't wait to see how it looks with the silly putty masks removed. Keep up the good work.
Field Artillery --- The KING of BATTLE!!!
"People sleep peaceably in their beds at night only because rough men stand ready to do violence on their behalf." -- George Orwell
Showcase
New Jersey, United States
Joined: March 11, 2007
KitMaker: 872 posts
Armorama: 831 posts
Posted: Sunday, December 15, 2013 - 01:50 AM UTC
Outstanding, the rarely used color pattern looks great.
Rounds Complete!!
The Moral High Ground..a Great Place to Emplace Artillery
Michigan, United States
Joined: July 17, 2010
KitMaker: 258 posts
Armorama: 208 posts
Posted: Sunday, December 15, 2013 - 02:49 AM UTC
Looks great. I hope to start mine soon. I did pick up the AM track set from Bronco I think. I heard they were the better of the plastic sets. My LHS just got in the A6 that I picked up last week. So much good stuff out lately.
Skåne, Sweden
Joined: October 18, 2005
KitMaker: 745 posts
Armorama: 734 posts
Posted: Sunday, December 15, 2013 - 03:06 AM UTC
CU @ C4 2020
www.c4-open.se or visit at
www.facebook.com/C4Open
Virginia, United States
Joined: July 17, 2006
KitMaker: 1,558 posts
Armorama: 1,159 posts
Posted: Sunday, December 15, 2013 - 05:47 AM UTC
Thanks, guys!
Erik--I have on e of the pics (the one of the howitzer in the firing position, taken from the rear), but the other two I hadn't seen before. The one from the front actually helped me answer a couple of questions about the cammo pattern, so thanks a million!
Jeff--I got my A6 about a month ago from Hobby Easy. It came on a slow boat. It was worth the wait!
Virginia, United States
Joined: July 17, 2006
KitMaker: 1,558 posts
Armorama: 1,159 posts
Posted: Thursday, December 19, 2013 - 11:02 AM UTC
Well, I don't have any pics to post today (I'm still masking in preparation for spraying the final color), but I do have a one thing to talk about. For this build I had to go outside of my normal paint preferences and use MM enamels instead of Tamiya or Gunze Aqueous acrylics. I can't say I'm impressed with Model Master enamels. Maybe it's just me or my inexperience with this paint range, but I found MM paints to be harder to control that Tamiya or Gunze, too easy to pool and spiderweb, and hard to get a tight edge with. You can see the fuzzy edge on the Armor Sand color in the pics I posted above. What is everyone else's experience with MM enamels?
Colorado, United States
Joined: January 20, 2005
KitMaker: 7,219 posts
Armorama: 6,097 posts
Posted: Thursday, December 19, 2013 - 11:15 AM UTC
I like both MM enamels AND acrylics. I've had fewer problems with them than Tamiya Acrylics. I thin both enamels and acrylics to a milk like consistency.
A strong man stands up for himself; A stronger man stands up for others.
Admit nothing. Deny everything. Make counter-accusations.
He is not Khan who calls himself Khan. Afghan proverb
Connecticut, United States
Joined: December 20, 2013
KitMaker: 81 posts
Armorama: 80 posts
Posted: Thursday, December 19, 2013 - 12:51 PM UTC
I was never a huge fan of Model Master paints. Then again, I only used it once as a spraycan, and it made these terribble bubbles.

Connecticut, United States
Joined: December 20, 2013
KitMaker: 81 posts
Armorama: 80 posts
Posted: Thursday, December 19, 2013 - 12:54 PM UTC
What kind of clay did you use to mask the turret for the camo?
Virginia, United States
Joined: July 17, 2006
KitMaker: 1,558 posts
Armorama: 1,159 posts
Posted: Thursday, December 19, 2013 - 01:09 PM UTC
Quoted Text
What kind of clay did you use to mask the turret for the camo?
I'm using yellow poster putty--the brand name is "Handitak," but it's just another variation on the blue stuff. In fact, I ran out of yellow putty on the hull and am now using the Elmer's glue white poster putty. The masking is tedious but necessary, given that I can't seem to get a nice clean edge with the paint.
Connecticut, United States
Joined: December 20, 2013
KitMaker: 81 posts
Armorama: 80 posts
Posted: Thursday, December 19, 2013 - 02:42 PM UTC
Ok thanks. I figured it was something like that. I will be getting an airbrush soon, so I am trying to find better masking techniques.
Virginia, United States
Joined: July 17, 2006
KitMaker: 1,558 posts
Armorama: 1,159 posts
Posted: Thursday, December 19, 2013 - 11:38 PM UTC
As I get nearer to the end of the painting stage, I'm starting to think about markings for the howitzer. In talking to my friend, he said he didn't remember the specific markings on the vehicles, but he thought they might have been something along the lines of:
3/3 CAV (on one side)
HOW XX (on the other, with each gun having a number)
Can folks help me verify this info or correct it? He was in the howitzer battery of the 3rd Squadron, 3rd Armored Cavalry Regiment in the early 80s at Ft. Bliss, if that helps, since I know marking conventions vary among units and over time.
Virginia, United States
Joined: July 17, 2006
KitMaker: 1,558 posts
Armorama: 1,159 posts
Posted: Saturday, December 21, 2013 - 02:33 PM UTC
Connecticut, United States
Joined: December 20, 2013
KitMaker: 81 posts
Armorama: 80 posts
Posted: Saturday, December 21, 2013 - 04:37 PM UTC
Overall I think it came out pretty good. Too bad the camo got a little messed up. Also, I've seen people us a stylus to push down the edges of the clay/putty for a sharper edge. Although I'm not sure what kind of clay or putty they used. Too bad I can't remeber where I saw it.
Lower Austria, Austria
Joined: November 02, 2007
KitMaker: 633 posts
Armorama: 599 posts
Posted: Saturday, December 21, 2013 - 09:13 PM UTC
Good to see some paint on your M109, Lucas.
For sharper edges I personally wouldn´t use clay or blue-tac. I would cut masks from tamiya tape.
Perhaps you can easily fix your color problem with a good old paintbrush technique ;-)
Thanks for sharing.
cheers
Walter
California, United States
Joined: November 19, 2010
KitMaker: 798 posts
Armorama: 797 posts
Posted: Saturday, December 21, 2013 - 09:50 PM UTC
Really awesome work! Man
Jay
Overijssel, Netherlands
Joined: July 01, 2010
KitMaker: 1,322 posts
Armorama: 1,239 posts
Posted: Saturday, December 21, 2013 - 11:42 PM UTC
Hi Lucas,
Do not worry too much about the camo spots.
Since these vehicles were subject to quite some crew activities, also the 'repair' by hand with the help of a spray can or brush created quite some "non-military regulations" camo schemes. Just go through the internet: many vehicles show black camo spots with dark sprayed outlines, filled with relatively lighter, black handwork!
Great gun you build. But most likely, as an old M109 battery commander, I am pre occupied!
Thanks for showing your build.
New Jersey, United States
Joined: March 11, 2007
KitMaker: 872 posts
Armorama: 831 posts
Posted: Sunday, December 22, 2013 - 12:15 AM UTC
Looking good, you may be able to soften the camo edges with weathering. Many of the MEDOC patterns were not factory painted and so almost every vehicle would have imperfections.
Looks great
Rounds Complete!!
The Moral High Ground..a Great Place to Emplace Artillery
Virginia, United States
Joined: July 17, 2006
KitMaker: 1,558 posts
Armorama: 1,159 posts
Posted: Sunday, December 22, 2013 - 01:17 PM UTC
Florida, United States
Joined: May 16, 2002
KitMaker: 17,694 posts
Armorama: 13,742 posts
Posted: Sunday, December 22, 2013 - 01:27 PM UTC
The paint job looks like it turned out great to me. It should be awesome once weathered and completed. Keep up the good work.
Field Artillery --- The KING of BATTLE!!!
"People sleep peaceably in their beds at night only because rough men stand ready to do violence on their behalf." -- George Orwell
Showcase
Connecticut, United States
Joined: December 20, 2013
KitMaker: 81 posts
Armorama: 80 posts
Posted: Sunday, December 22, 2013 - 01:55 PM UTC
It looks graet so far. Good luck with the weathering

 !!!
!!!


