M109A2 in MERDC Gray Desert cammo build
Virginia, United States
Joined: July 17, 2006
KitMaker: 1,558 posts
Armorama: 1,159 posts
Posted: Saturday, October 12, 2013 - 12:55 AM UTC
Here's the log of my ongoing build. This will be a US-based vehicle in the MERDC gray desert cammo pattern, built for a friend who was in the Army in the early 80s as an artillery Lieutenant and commanded a squadron of these in a cavalry unit. He's retiring from his job now and moving away, so this is my present to him.
So far I've built the tub and started detailing it. It's been fairly straightforward, although a couple of the tub parts were slightly warped. I also noticed that the turret top was warped and straightened it out in a pot of hot water.
In any case, here are the pics of where the project stood as of two nights ago.


Pennsylvania, United States
Joined: October 16, 2006
KitMaker: 3,374 posts
Armorama: 3,126 posts
Posted: Saturday, October 12, 2013 - 02:17 AM UTC
This sounds cool...I haven't seen the desert scheme yet.
Virginia, United States
Joined: July 17, 2006
KitMaker: 1,558 posts
Armorama: 1,159 posts
Posted: Monday, October 14, 2013 - 10:47 PM UTC
It's been a few days since I posted, but I've been building off and on over the holiday weekend. I finished the hull and have done most of the gun. I left the spades movable per the instructions to facilitate painting and because I want to ask the recipient how he wants them displayed. Once we decide on the final position, I will glue them down. The only fit problems I have encountered so far were with the shocks for the idlers--they were too long. I had to shorten then a bit to make them fit correctly.
I do have one question for all of you--do you know if I should take out what look to be four ejector pins in the inside of the rear mud guards in this picture?

In any case, here are the pictures of where the model stands:
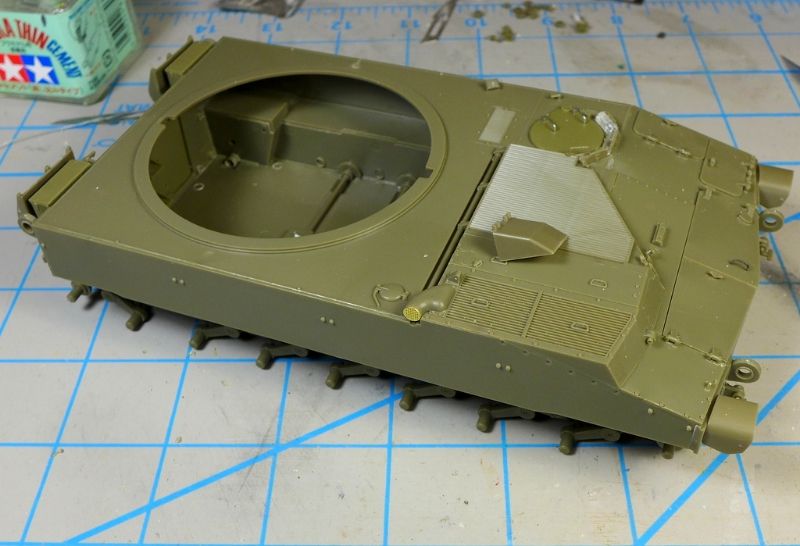
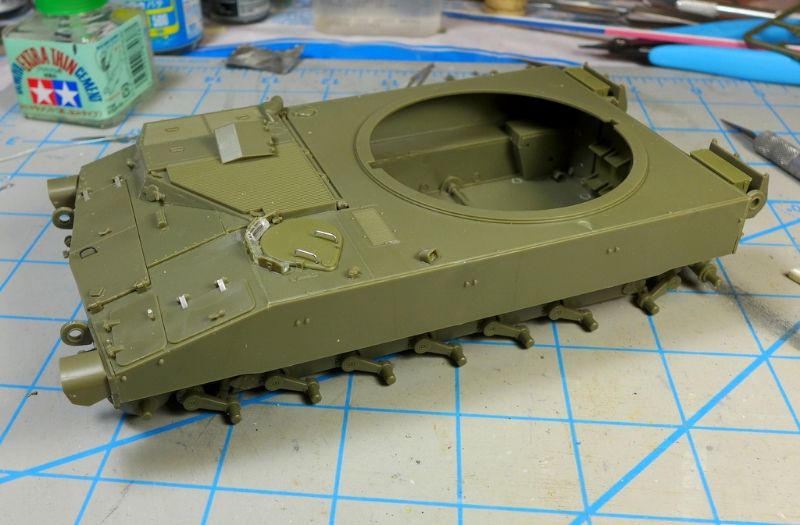
Spades down:
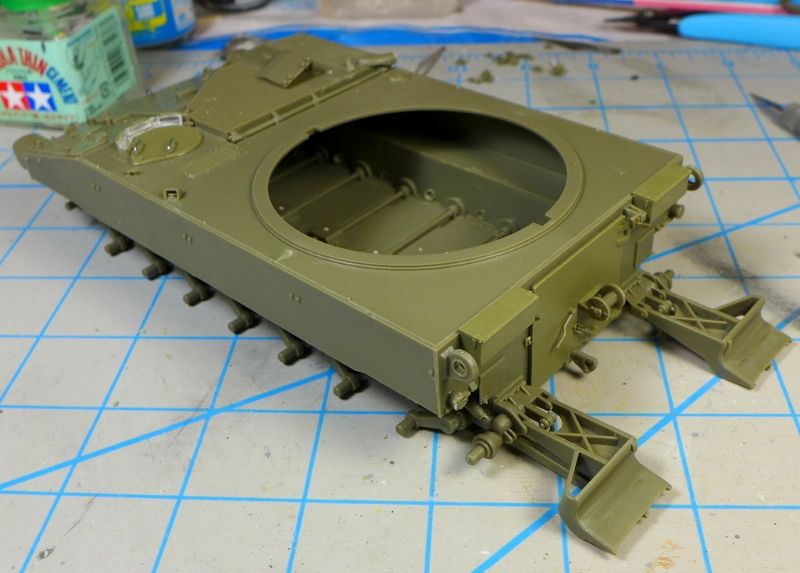
And up:
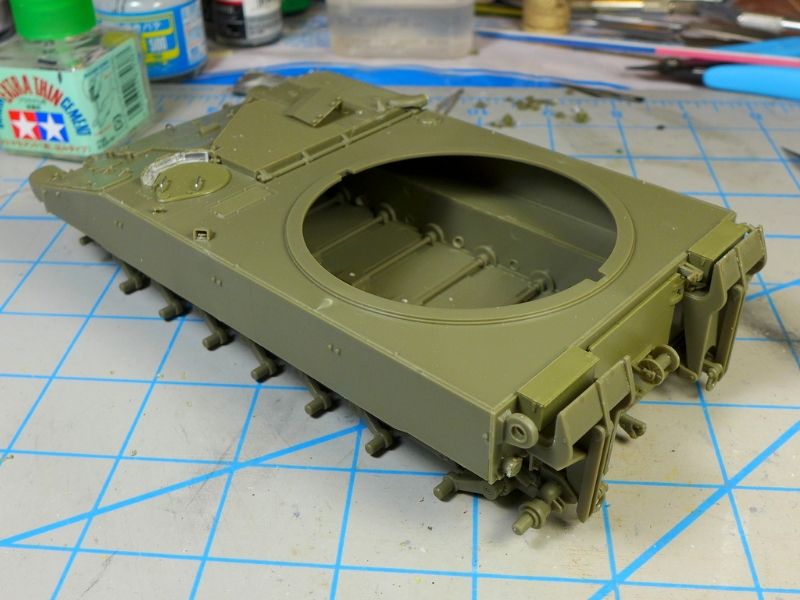
And the gun:

Overijssel, Netherlands
Joined: July 01, 2010
KitMaker: 1,322 posts
Armorama: 1,239 posts
Posted: Monday, October 14, 2013 - 11:16 PM UTC
Quoted Text
This sounds cool...I haven't seen the desert scheme yet.
And hereby the scheme for the M109!
https://sites.google.com/site/merdccamo/home/merdcpicVirginia, United States
Joined: July 17, 2006
KitMaker: 1,558 posts
Armorama: 1,159 posts
Posted: Tuesday, October 15, 2013 - 12:18 AM UTC
Thanks, Paul--I forgot to include the link to the desert scheme in my post!
Colorado, United States
Joined: January 20, 2005
KitMaker: 7,219 posts
Armorama: 6,097 posts
Posted: Tuesday, October 15, 2013 - 03:31 AM UTC
You're making excellent progress. Yes, I am amazed at the fit considering the number of parts on the hull.
As for those pins, yes they are to be removed. They're just like the ones on the rear hull panel. Remove them if they bother you.
A strong man stands up for himself; A stronger man stands up for others.
Admit nothing. Deny everything. Make counter-accusations.
He is not Khan who calls himself Khan. Afghan proverb
Virginia, United States
Joined: July 17, 2006
KitMaker: 1,558 posts
Armorama: 1,159 posts
Posted: Tuesday, October 15, 2013 - 10:05 AM UTC
Thanks, Robert. I've gone ahead and removed them.
Virginia, United States
Joined: July 17, 2006
KitMaker: 1,558 posts
Armorama: 1,159 posts
Posted: Tuesday, October 15, 2013 - 01:12 PM UTC
Well, I'm debating whether I should use the rubber band tracks that come with the kit or the aftermarket AFV Club indy link tracks. The kit is so nice it seems like a letdown to use the rubber band tracks, but I'm not sure I'll be up for indy link tracks after putting everything together. It may also slow me down too much, since I need to have this one wrapped up by early in the new year, when my friend will be moving away (he still hasn't set a move date). Any thoughts?
Colorado, United States
Joined: January 20, 2005
KitMaker: 7,219 posts
Armorama: 6,097 posts
Posted: Tuesday, October 15, 2013 - 01:16 PM UTC
Th individual tracks really don't take that long. The ends are placed on the sprue so that the links can be installed on them while they're still on the sprue. Plus they're easier to gouge out than the the rubber band tracks.
That said, for my A6 version, I'll use the kit supplied tracks as they have been corrected for that version.
A strong man stands up for himself; A stronger man stands up for others.
Admit nothing. Deny everything. Make counter-accusations.
He is not Khan who calls himself Khan. Afghan proverb
Virginia, United States
Joined: July 17, 2006
KitMaker: 1,558 posts
Armorama: 1,159 posts
Posted: Wednesday, October 16, 2013 - 12:13 AM UTC
Robert--thanks for the info. That does sound fairly straightforward. I think I'll tentatively plan to use the indy link tracks but leave myself open to the possibility of chickening out later (and let's be honest, it would be chickening out).
Virginia, United States
Joined: July 17, 2006
KitMaker: 1,558 posts
Armorama: 1,159 posts
Posted: Thursday, October 17, 2013 - 01:53 PM UTC
No pics tonight, but just a quick note to say that I had fit issues with part D1, which goes over the barrel and connects the two cylinders that are parallel to the gun. The part is slightly too long, so I had to trim one of the attachment points to make it fit. Even so, that meant that part D4 was not parallel with the barrel, as it should be, since D4's attachment point to D1 sits too far off to one side. It's not too far off, but enough to annoy me.
Pennsylvania, United States
Joined: October 16, 2006
KitMaker: 3,374 posts
Armorama: 3,126 posts
Posted: Thursday, October 17, 2013 - 02:25 PM UTC
thanks the heads up- that's the next step for me
Virginia, United States
Joined: July 17, 2006
KitMaker: 1,558 posts
Armorama: 1,159 posts
Posted: Thursday, October 17, 2013 - 11:38 PM UTC
Glad to help, Jason. The gun mount also gave me trouble last night. It just won't sit properly, as the curved gun covers rub up against the turret ring. Tonight I'll shave off some of the ring and see if that helps.
Virginia, United States
Joined: July 17, 2006
KitMaker: 1,558 posts
Armorama: 1,159 posts
Posted: Friday, October 18, 2013 - 01:54 PM UTC
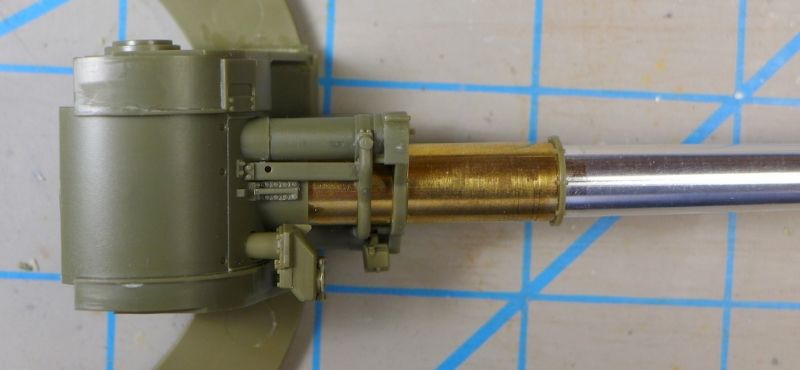
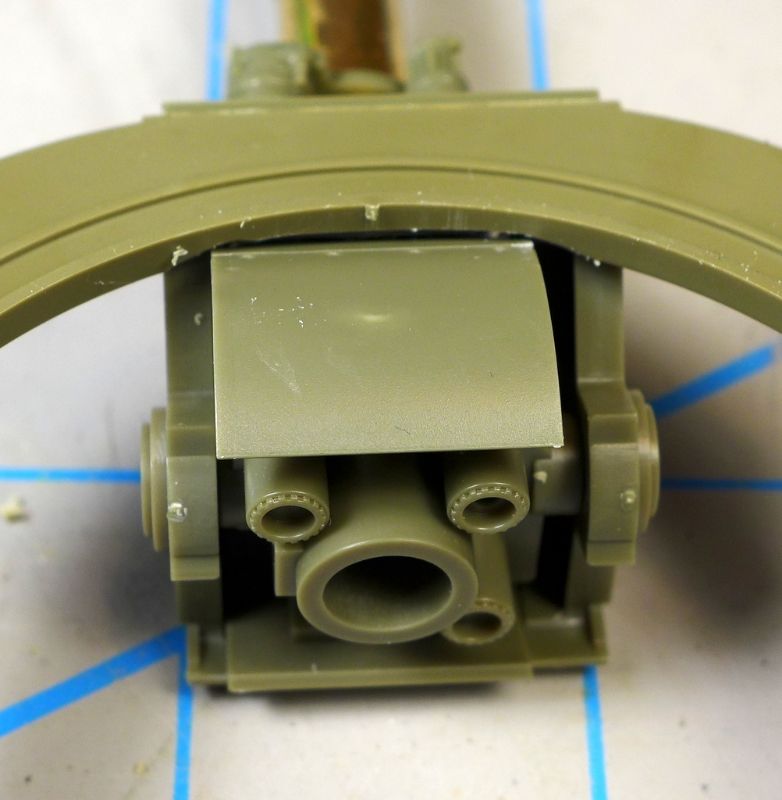
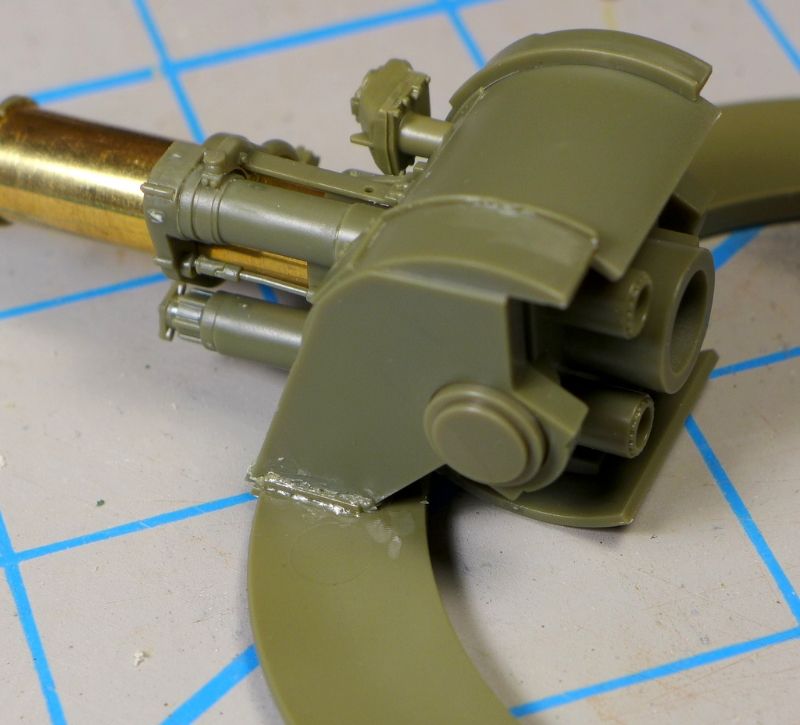
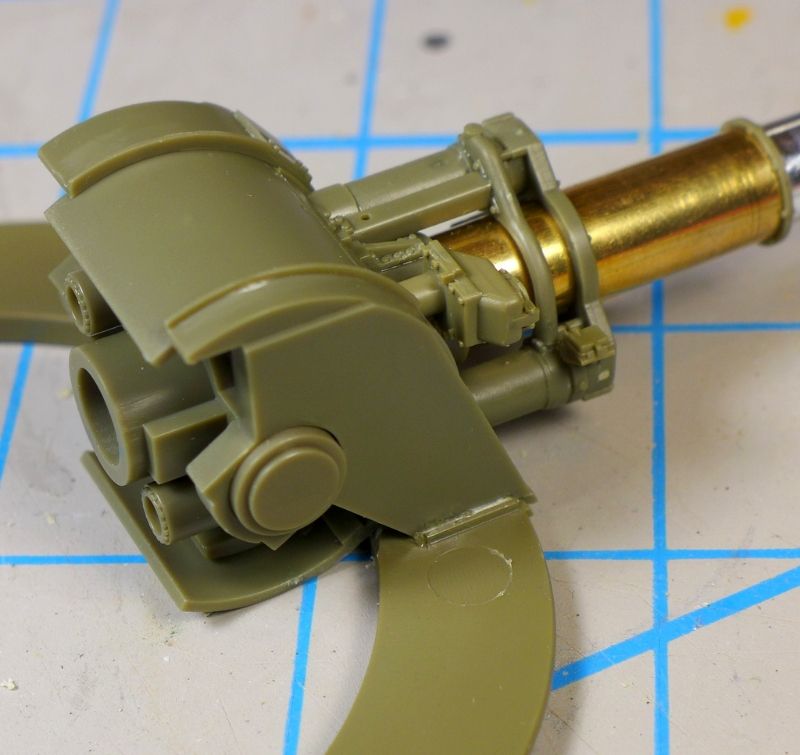
Here are some pictures of the issues I've had with the gun and cradle.
In this pic, you can see how part D4 is slightly crooked and not parallel with the gun tube because its mounting point on part D1 is too far to the side. As a result, it also misses its corresponding mounting point on the gun mantle (if I had made it align properly with that mounting point, it would be even more crooked)
In this pic, you can see how much of the turret ring I had to dig out to accommodate part D7 and make sure it could swing free. Otherwise, the cradle would not stay glued down.
In this pic, you can see the damage done when I tried to force-glue the cradle without first carving the turret ring. The left side of the cradle just popped right back out after I had glued it down with super glue and clamped it for 20 minutes. I then re-glued it with regular Tamiya Extra-thin after the adjustments and this is what it looks like now. It's an ugly scar.
The other side looks better, but is still a bit scarred from the stress.
Lower Austria, Austria
Joined: November 02, 2007
KitMaker: 633 posts
Armorama: 599 posts
Posted: Saturday, October 19, 2013 - 03:42 AM UTC
Good to see you fixed the problem. I hope I don´t face the same problem in my build.
Keep on the good work.
Cheers
Walter
Virginia, United States
Joined: July 17, 2006
KitMaker: 1,558 posts
Armorama: 1,159 posts
Posted: Saturday, October 19, 2013 - 12:39 PM UTC
Well, the basic turret structure went together like a glove after I got rid of the warpage on the turret top. Then I ran into another bit of a challenge with ill fitting parts. Part D36 is about half a millimeter too short, so it won't mate properly with its counterpart, which spans the gun mount around the mantle.
First, I'll show a couple of pics of how the gun mount fix turned out. You can't see it was a horrid mess anymore:
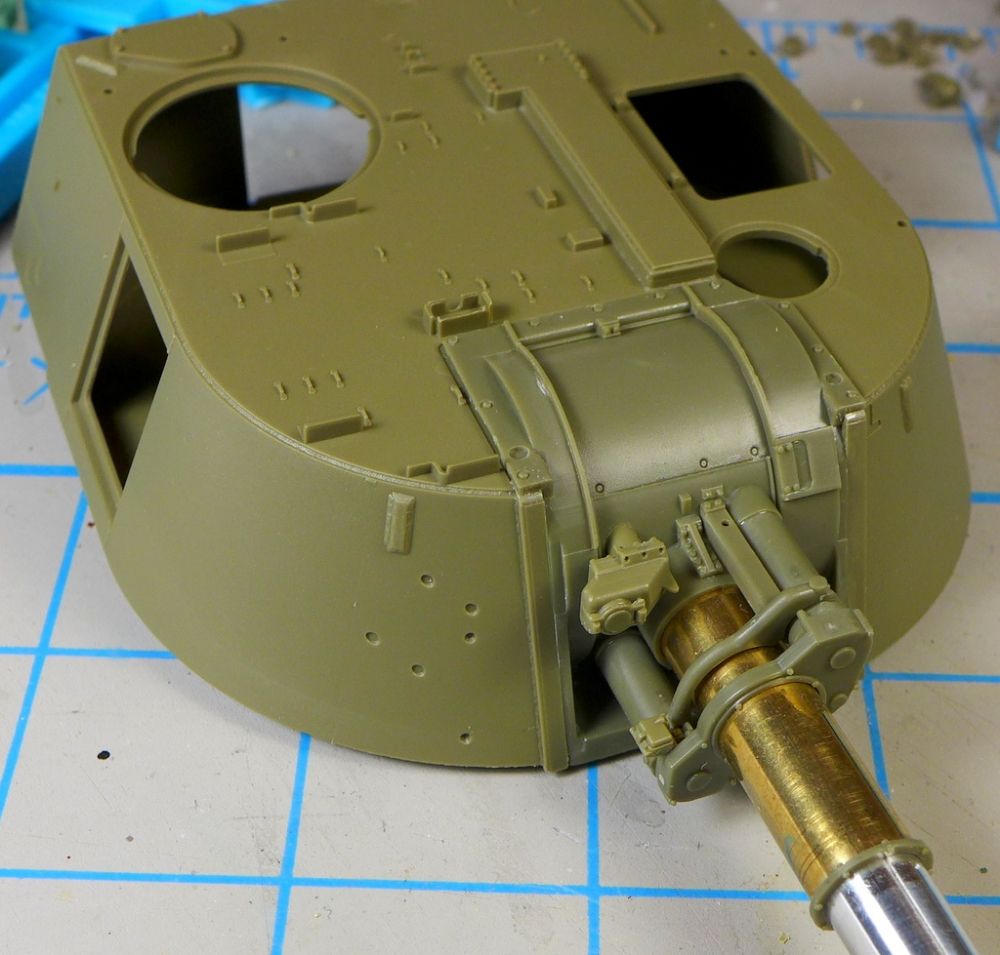
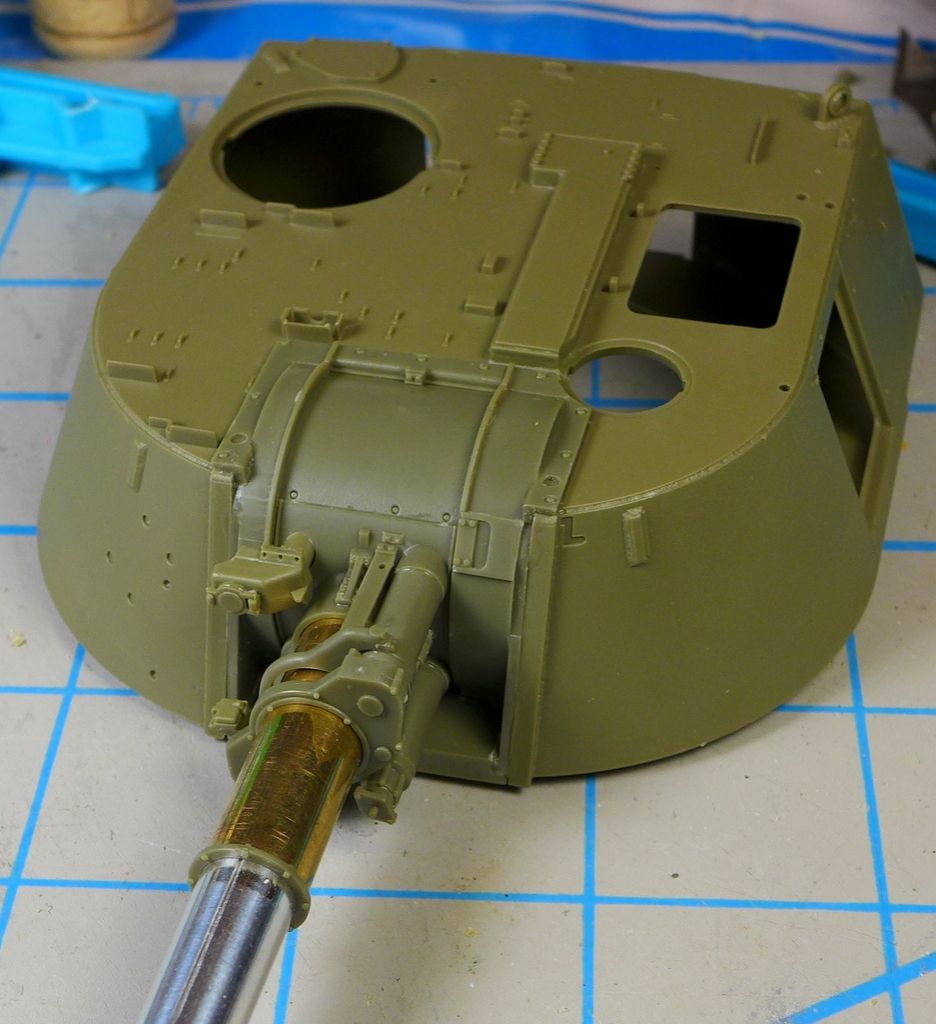
Now here's a picture of the problem part placed on top of the gun and right next to the part its supposed to mate to. You can see it is not the same width as its counterpart, so it won't fit where it is supposed to go. In addition, the part also was warped.
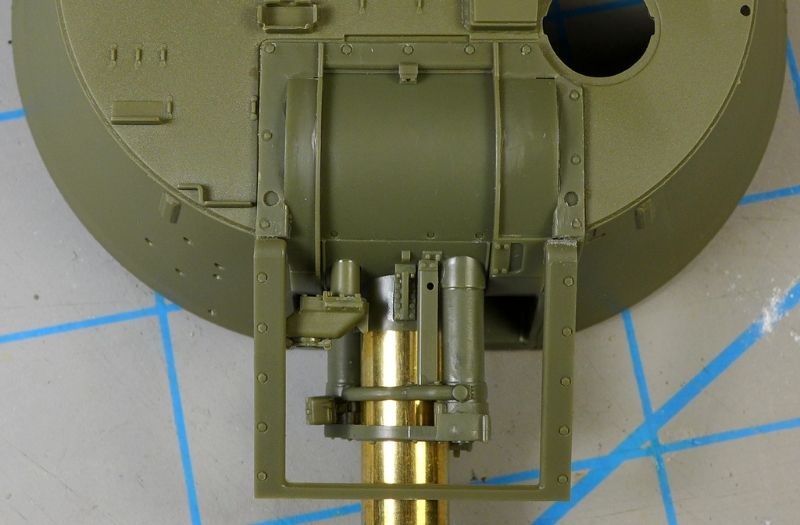
I decided to cut D36 in the middle and glue each half in place, then fill in the gap below the gun tube. Here's what it looked like after I glued each half in place, but before I clamped the warped sections down and glued them. Also notice that one half of D36 sits lower than the other. This is annoying, as it doesn't look right, but it's just the way the part is designed, unfortunately. I'm not sure I can correct this, so I'll just live with it, as it's not really that noticeable to the naked eye.

Virginia, United States
Joined: July 17, 2006
KitMaker: 1,558 posts
Armorama: 1,159 posts
Posted: Monday, October 21, 2013 - 01:48 PM UTC
I finished the repair to the mantlet and have done about half of the detailing of the turret so far. Here are a series of photos of where I am.
Some photos of the repair (before I detailed the turret) showing the scrap styrene insert and the superglue filler along the top of the turret where D36 meets its counterpart and forms a shoulder. This picture also shows how one side of D36 sits lower than the other at the bottom of the turret. This is because that side of D36 needed to slide lower on the shoulder join at the top of the turret in order to lie flush against the side of the turret, as it was shaped differently from the other side of D36.
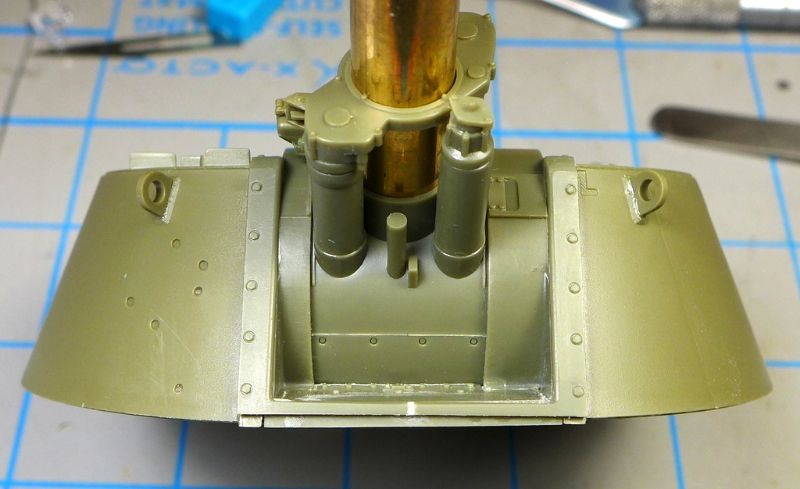
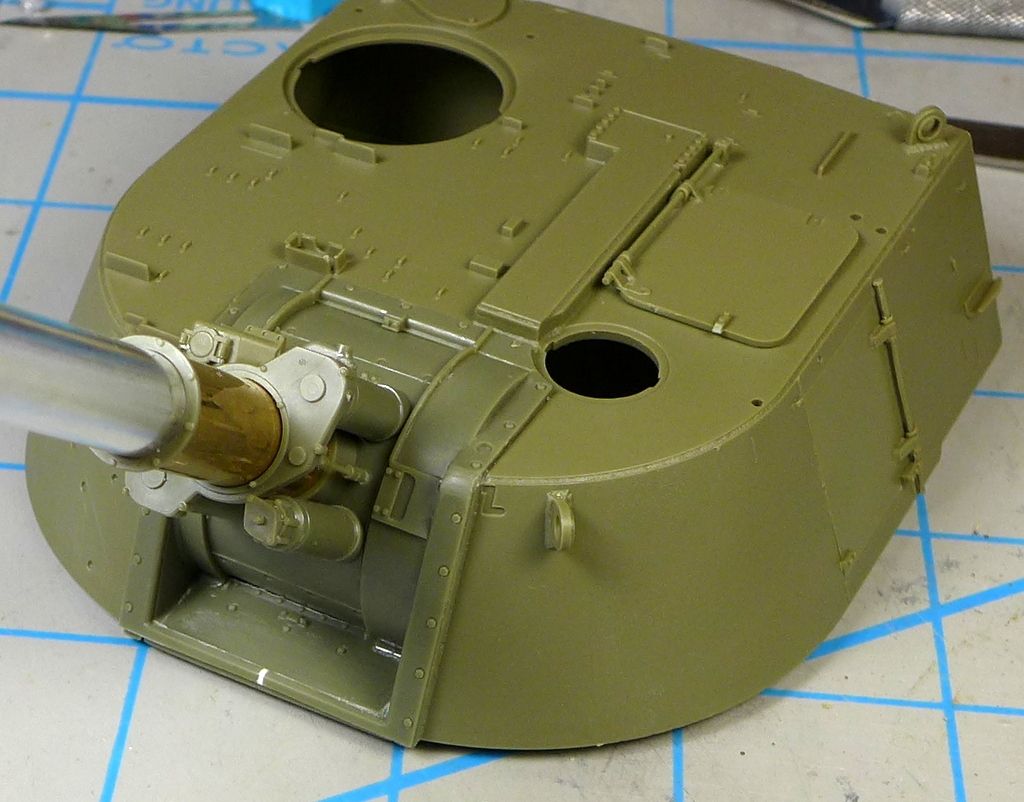
And a couple of photos of the detailed turret.
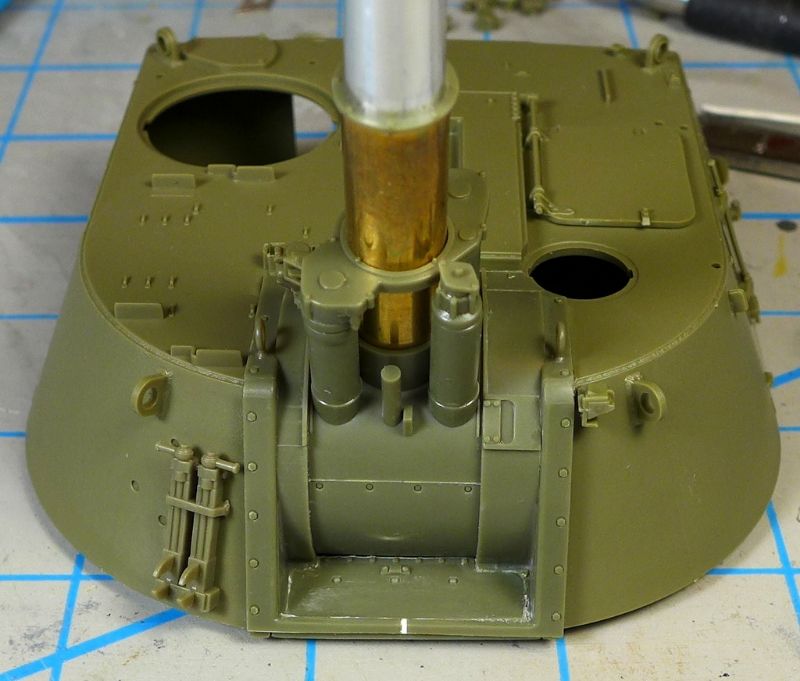
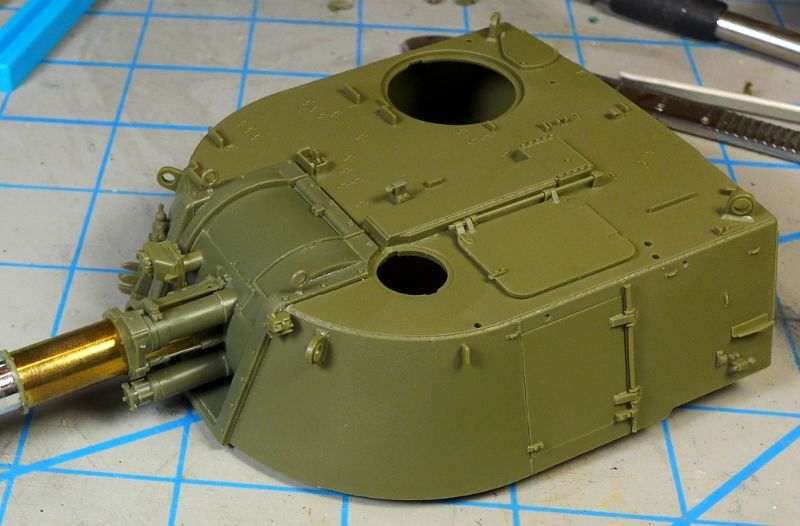
I'm going slowly because of the number of small parts. More than a dozen have flown off into the ether and led to long hunts on the workbench and the carpet. It's a bit annoying, but that's the price you pay for amazing details.
I haven't decided whether to use the radio antenna, since the few reference vehicles I have photos of don't have one.
Pennsylvania, United States
Joined: October 16, 2006
KitMaker: 3,374 posts
Armorama: 3,126 posts
Posted: Monday, October 21, 2013 - 02:39 PM UTC
coming along really nice!
Virginia, United States
Joined: July 17, 2006
KitMaker: 1,558 posts
Armorama: 1,159 posts
Posted: Monday, October 21, 2013 - 10:32 PM UTC
Thanks, Jason! I think what led to the fit issues was a bad mold of the "D" sprue. In looking around, I found a couple of other builds that mentioned fit problems in the same places I had them, and they all involve only parts from the D sprue (mostly used for the gun, gun cradle, and gun mantle). Other builders have not had such problems--and more significantly, have not reported the size mismatch in part D36--leading me to believe that at least one of the molds for sprue D was cut incorrectly. Maybe they mistakenly used a preproduction mold, who knows! In any case, I've pretty much used up that sprue now, so my hope is that the fit issues are all behind me.
Louisiana, United States
Joined: September 17, 2013
KitMaker: 28 posts
Armorama: 27 posts
Posted: Tuesday, October 22, 2013 - 02:33 AM UTC
Outstanding work so far. I'll be watching your progress. I'm happy to see a vehicle from this time period.
Virginia, United States
Joined: July 17, 2006
KitMaker: 1,558 posts
Armorama: 1,159 posts
Posted: Tuesday, October 22, 2013 - 10:01 AM UTC
Quoted Text
Outstanding work so far. I'll be watching your progress. I'm happy to see a vehicle from this time period.
Thanks! I find it interesting that there seems to be a dearth of builds from the late 70s-early 80s. They do pop up every now and then, but not very frequently.
Louisiana, United States
Joined: October 20, 2008
KitMaker: 1,069 posts
Armorama: 1,062 posts
Posted: Wednesday, October 23, 2013 - 06:20 AM UTC
"Watching with great Interest"!!!!


Building the impossible is my main goal. Build baby build never sleep!!
Virginia, United States
Joined: July 17, 2006
KitMaker: 1,558 posts
Armorama: 1,159 posts
Posted: Saturday, October 26, 2013 - 04:09 AM UTC
I finally finished detailing the turret, although I still need to build the commander's cupola and the gunner's sight. Once I do that, I'll start painting. Tools will be added after painting is done because of the complex camo pattern, and the wheels will be painted, then built, because they have a lip that makes it hard to paint them after they are assembled. Here's what the turret looks like now.
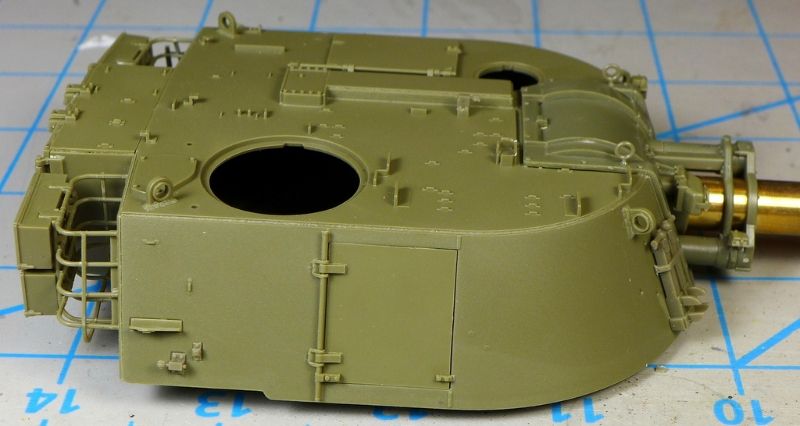
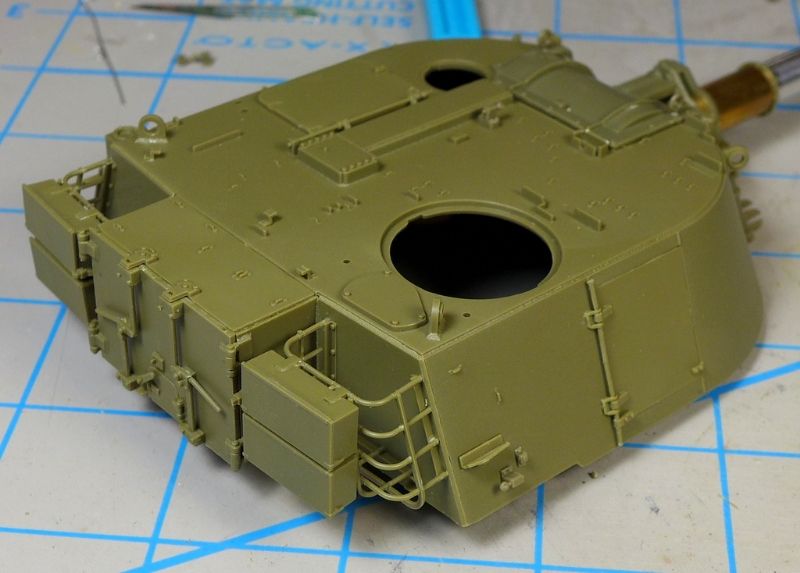
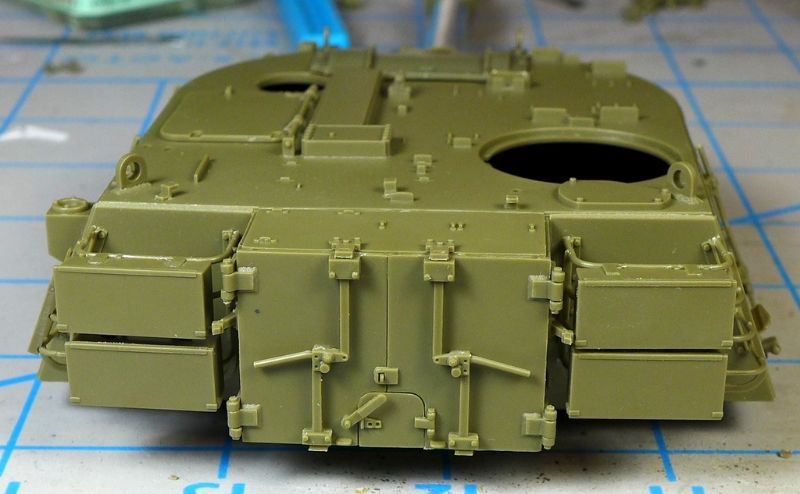
I screwed up the basket on the left side of the turret--I spaced out when putting the horizontal pieces in placed and flipped two of the three, so the vertical bars don't align and boxes are slightly out of alignment. You can see it in the last picture above and in this one below:
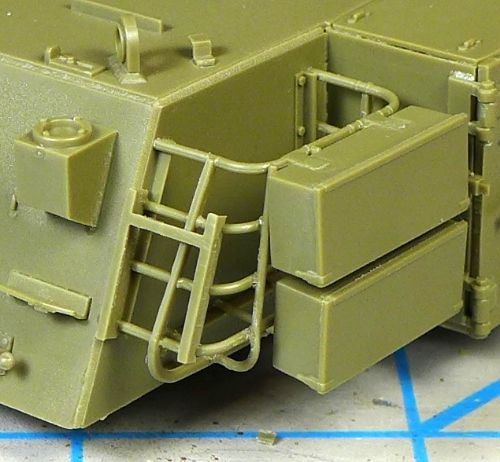
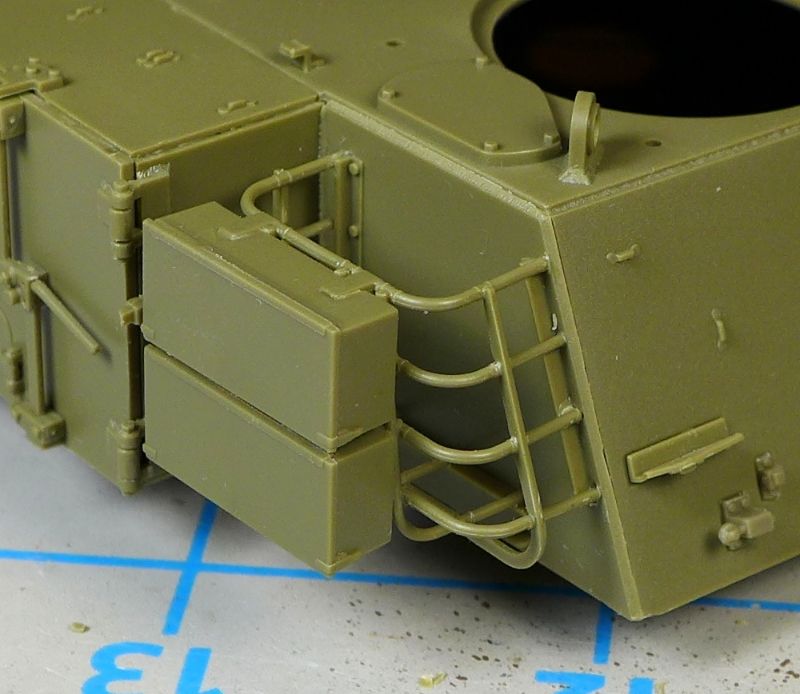
It's not horrible--I can live with it, but I'm still kicking myself for such a rookie mistake. I only realized what I had done the day after I built it, when I started on the other basket. By then, it was too late to pry it apart and correct the misalignment. I tried pushing the horizontal bar that sticks out too much in toward the back of the boxes (with very little success), and I cut off the mounting tab for the box that was visible, but that's all I could do. Here's what the other basket looks like up close.
That's all for now, folks. Let me know what you think.
Virginia, United States
Joined: July 17, 2006
KitMaker: 1,558 posts
Armorama: 1,159 posts
Posted: Wednesday, October 30, 2013 - 10:37 PM UTC
No pics for today's update, but I've finished construction (save for the roadwheels) and will now start the painting phase. I'll paint the roadwheels before assembly because of the lip they have on the inside. I'm also leaving the gun travel lock separate for ease of painting.
Louisiana, United States
Joined: September 17, 2013
KitMaker: 28 posts
Armorama: 27 posts
Posted: Sunday, November 17, 2013 - 02:19 AM UTC
I wouln't sweat the turret basket too much. Just fill it inside and out with stowage, and nobody will be the wiser. Good luck on the painting. I'll be watching with interest, as I'll be starting on my paint work in the next day or so (M60A3).


