_GOTOBOTTOM
Armor/AFV: Early Armor
WWI and other early tanks and armored cars.
Hosted by Darren Baker
1:35 Academy 35T
FAUST
#130
Visit this Community
Noord-Holland, Netherlands
Joined: June 07, 2002
KitMaker: 8,797 posts
Armorama: 4,190 posts
Posted: Thursday, October 31, 2013 - 01:18 PM UTC
I was at the LHS today and found this kit at a decent price. It has been an incredibly long time back since I built an Academy kit. Most of their subjects did not interest me all that much and what did interewst me were mostly old Tamiya molds and it lacked a bit of detail. So I usually left them where they were. But before I bought it I had a peak inside the box and thought... well that doesn't look half bad and bought it.

It is this kit. They certainly worked on their boxarts. This looks very well designed.


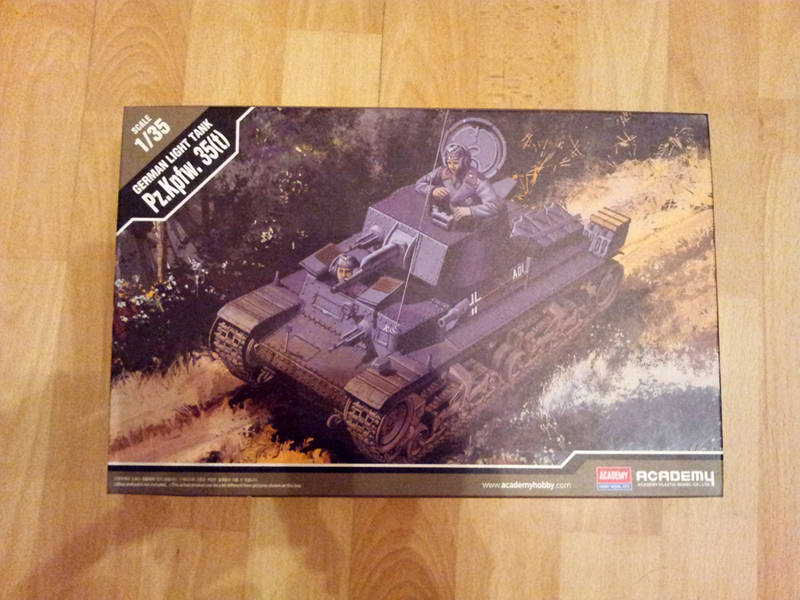
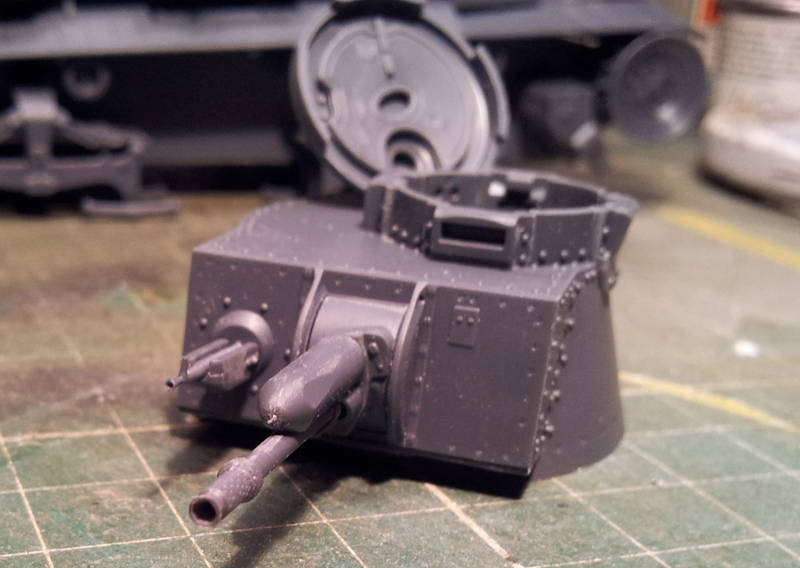
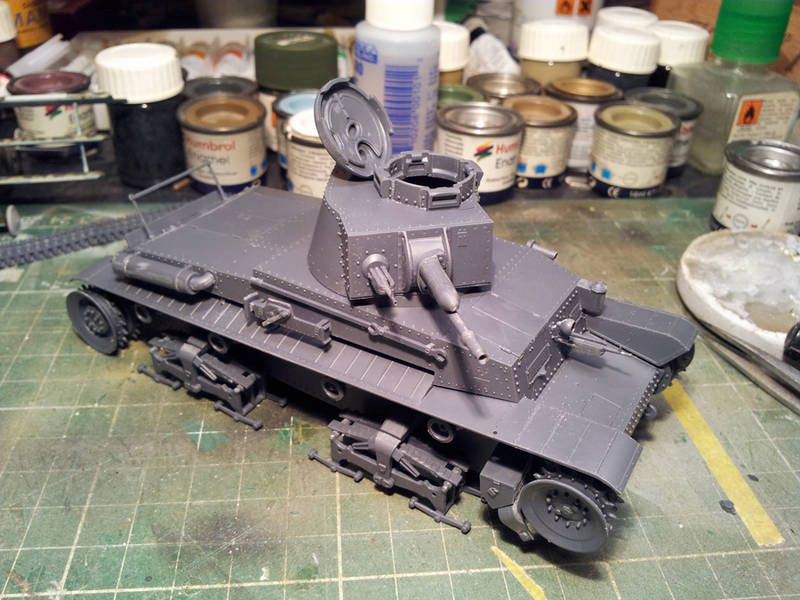
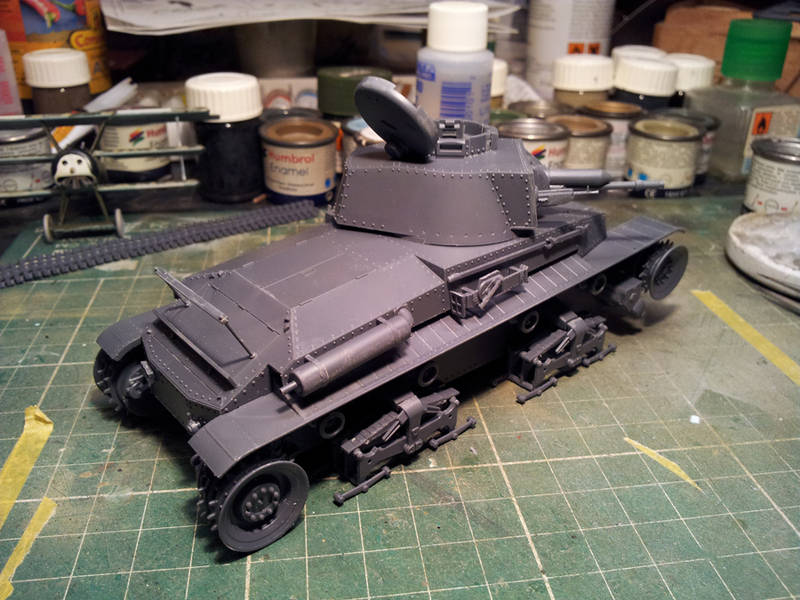
Nice kit. Really well detailed. Nice boltdetails. Length and link tracks. The top run even has tracksag nicely rendered. And it comes with 2 figures as well. One full for in the turret and one half for the driver position. and an assortment of 4 heads.

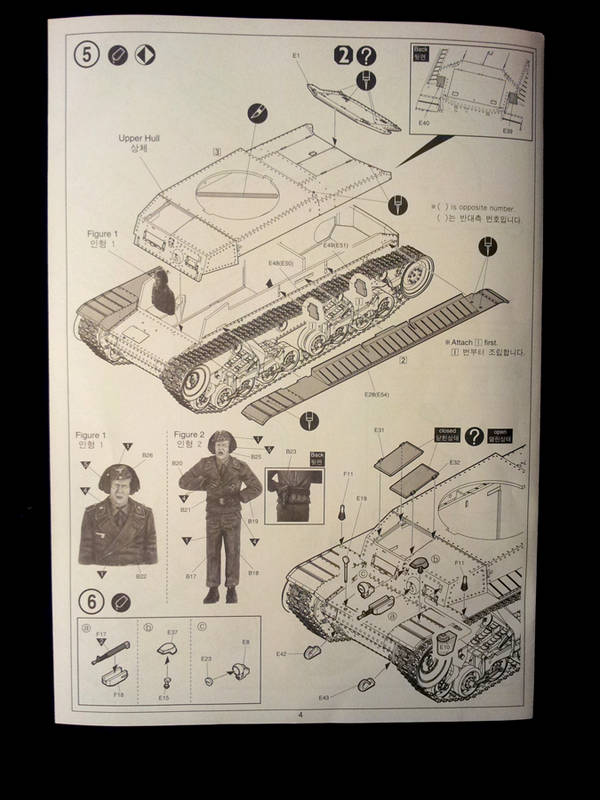
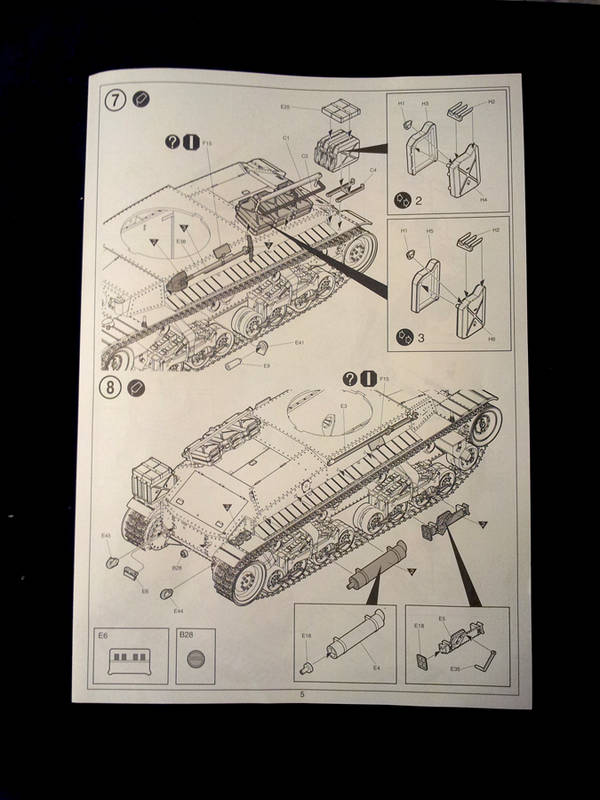
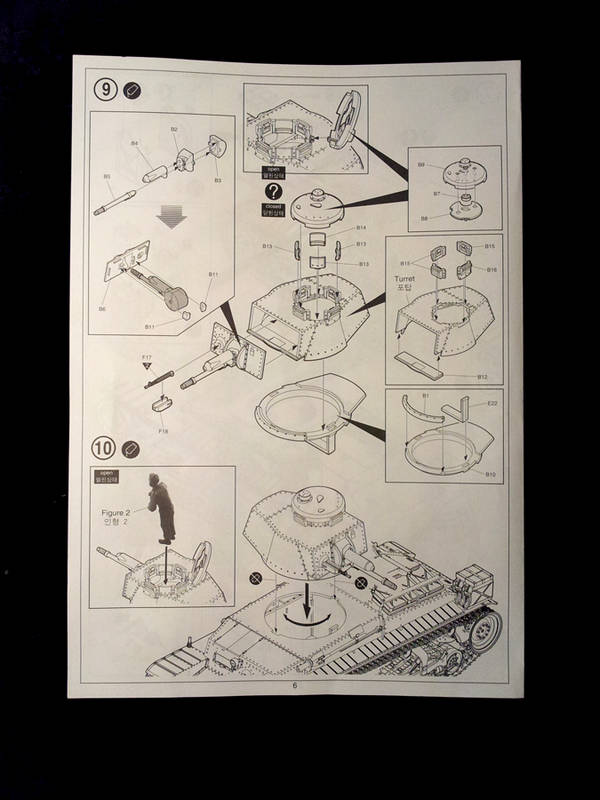
Well let's skidaddle to the first page of the assembly


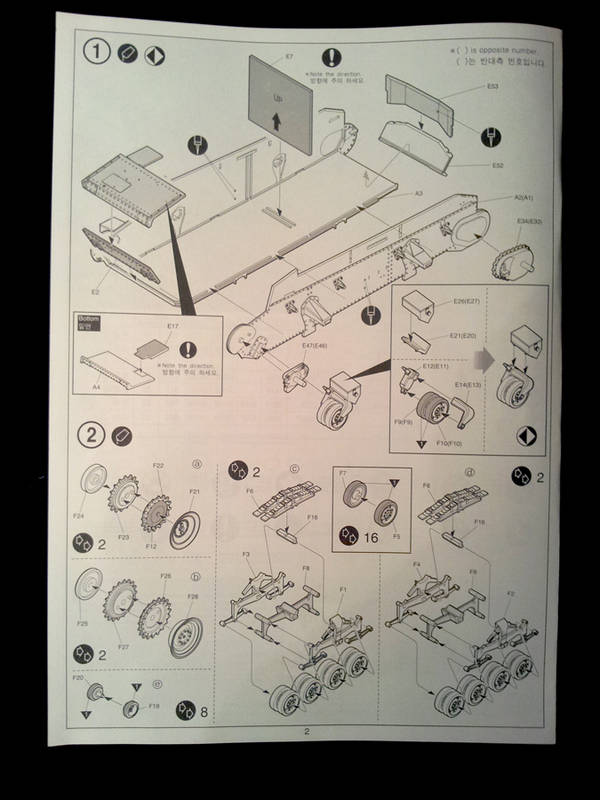
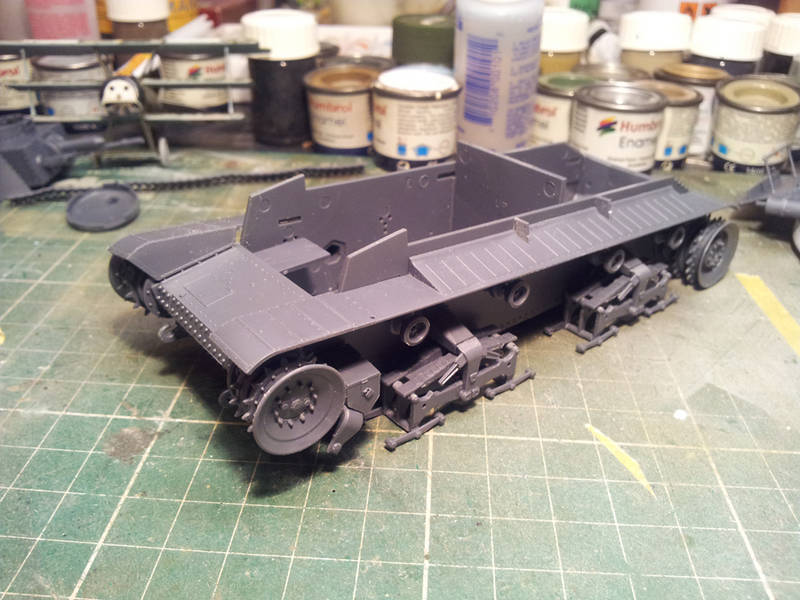
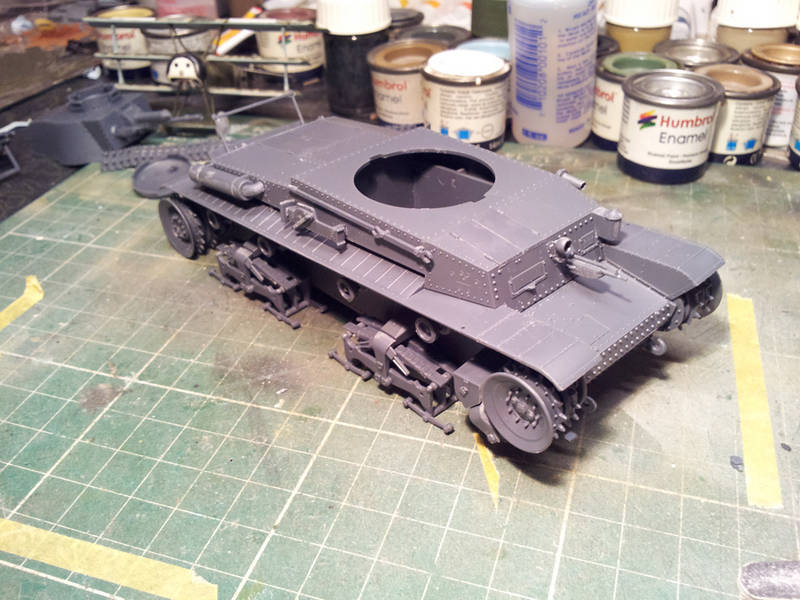
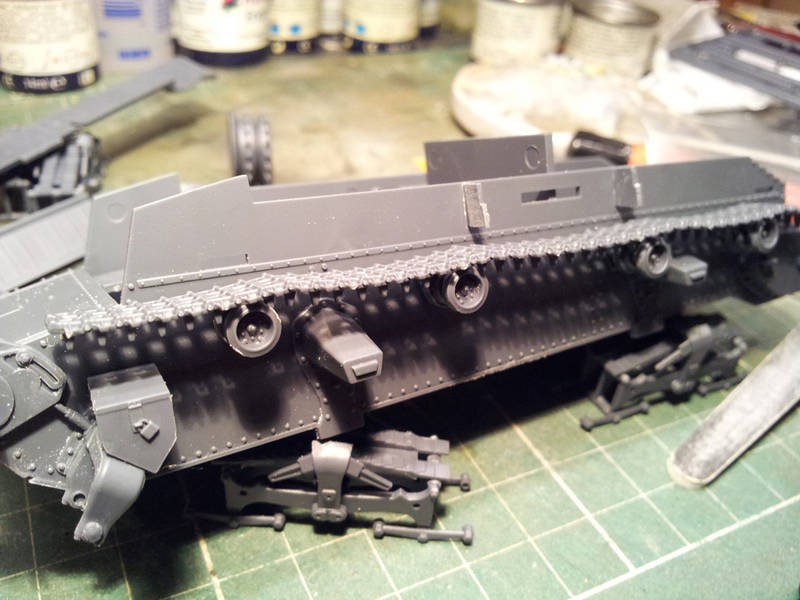
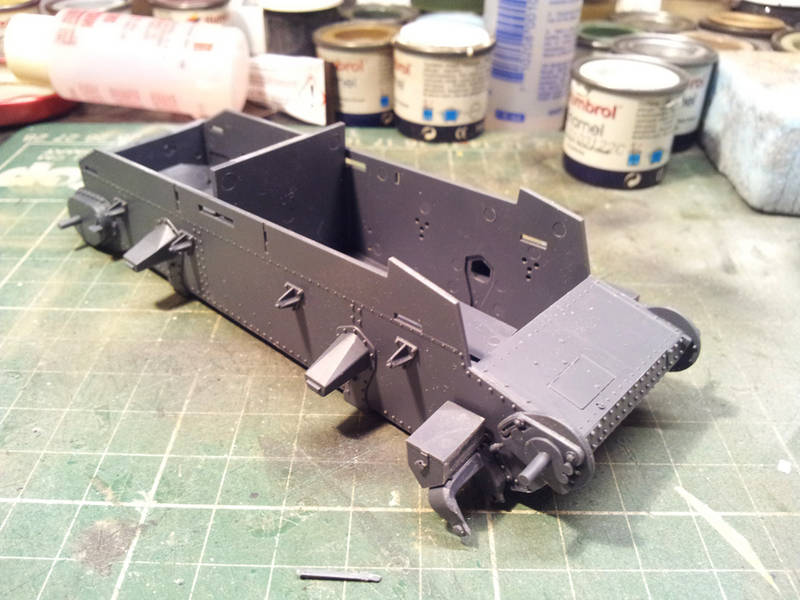
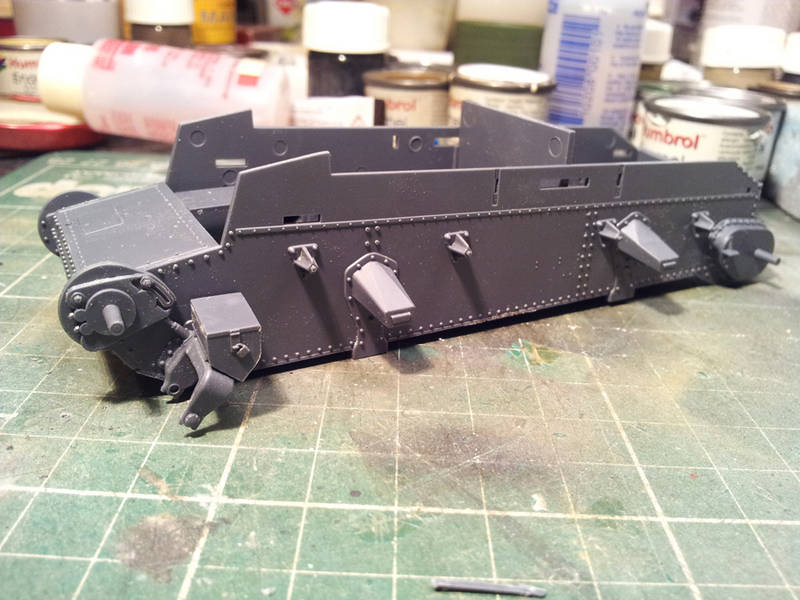
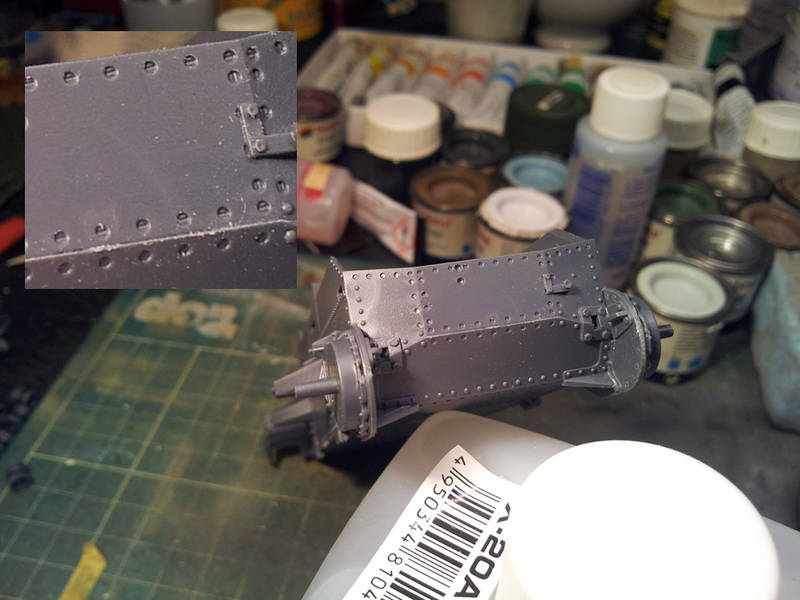
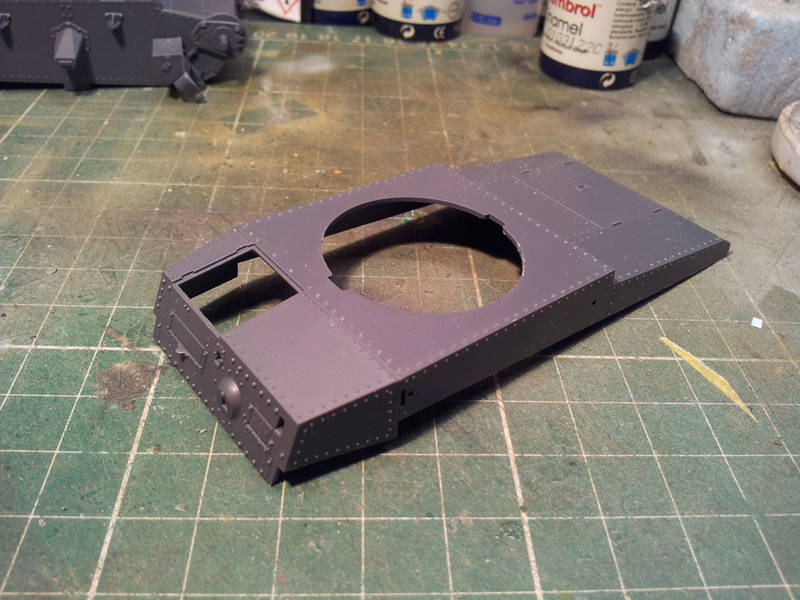
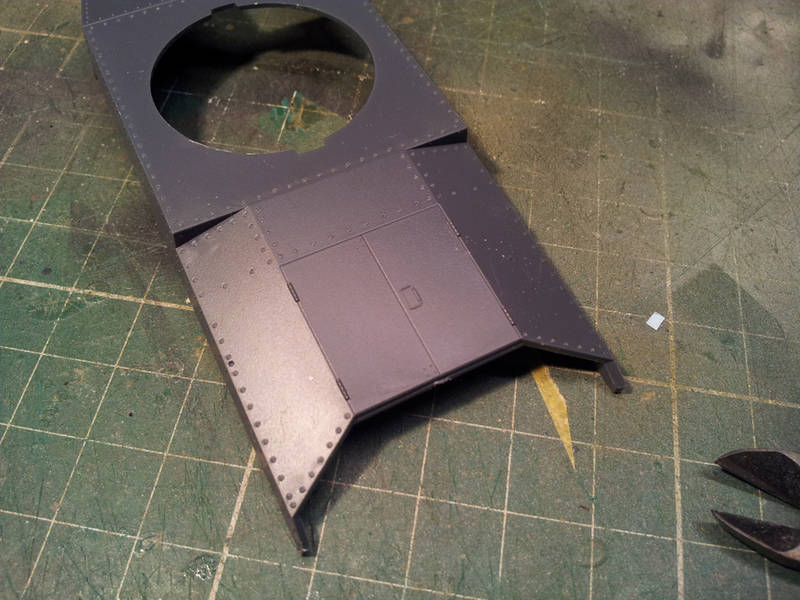
As you can see the hull tub consists of 7 plates including a sort of firewall. Additional details gets added to that. During this step you also add the baseplate for the driver. Nice bolt details all over.


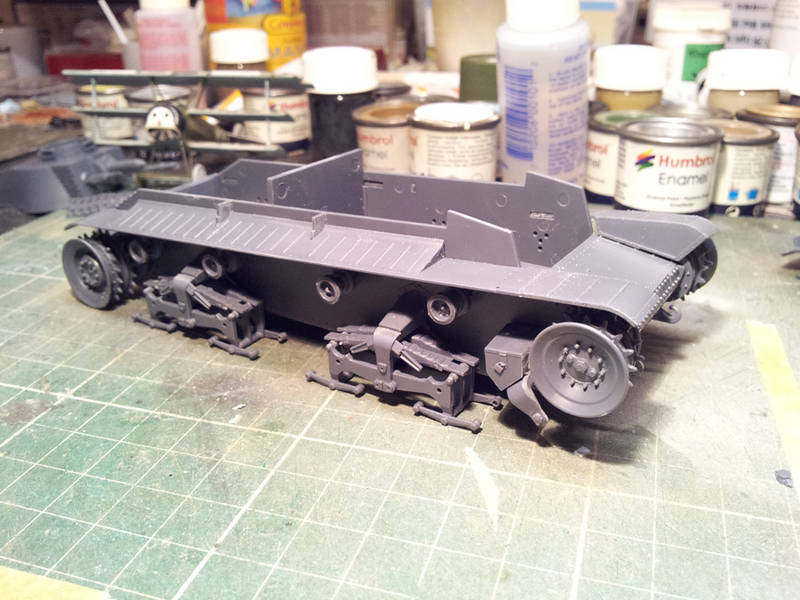
Then it was time to assemble the running gear. Each set of roadwheels is held in a construction consisting of 5 parts. All nice detailed and very crisp. One thing that is a bit odd is the pair of loeafsprings that looks to be mounted on a plate. Which I believe the 35T originally did not have. I decided to cut the outerparts of the plates off to make it less visible. The topside of the leafsprings is really nice the sides however do not show any lines to give the impression that it are separate metal plates.


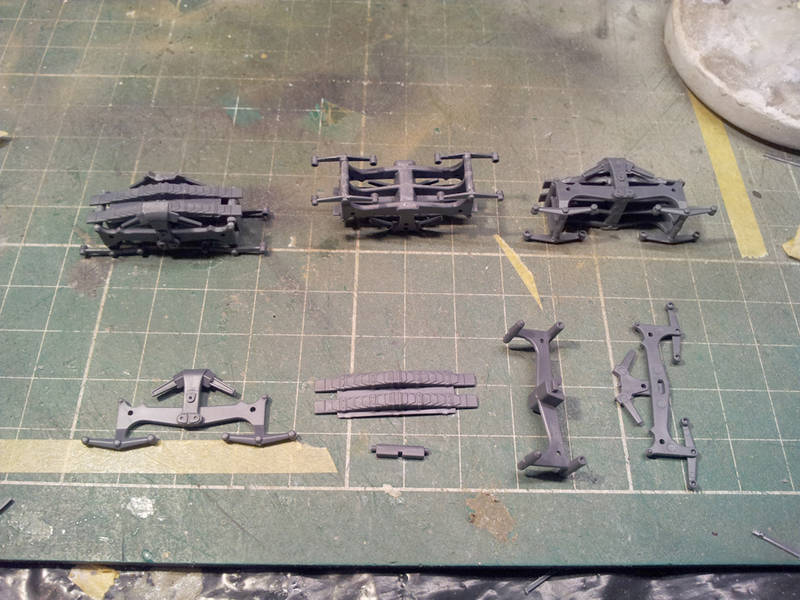
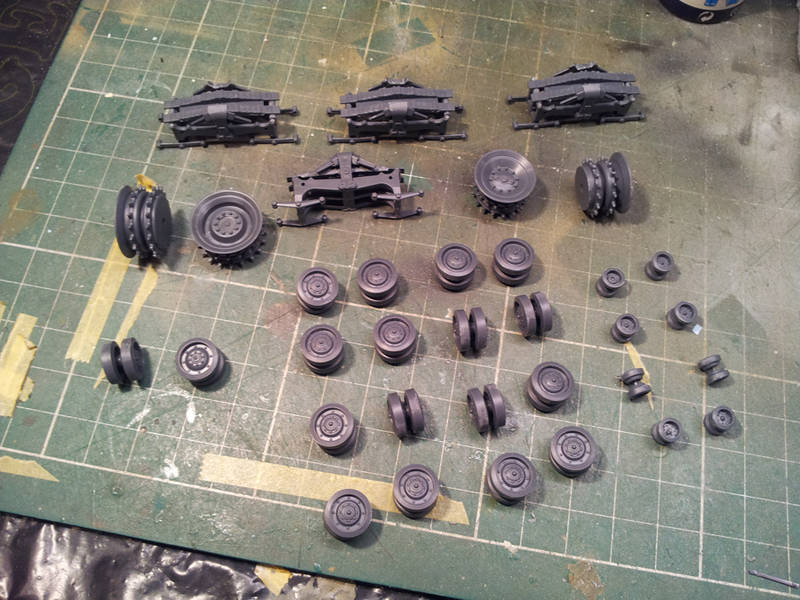
After assembling those it was time to slap together some wheels. And a lot of wheels it has. This will be "fun" painting them all. Below you will see the complete array of rollers this tank has. Sprockets and Idlers. Roadwheels and returnrollers. I like how Academy designed these. Each wheelset has a little nub in the centre that allows you to pop out the wheel from the suspension very easily meaning that after painting you can easily pop them back in again. Glue is needed since it is not the strongest of bonds on it's own. Again really nice boltdetail and well defined edges.


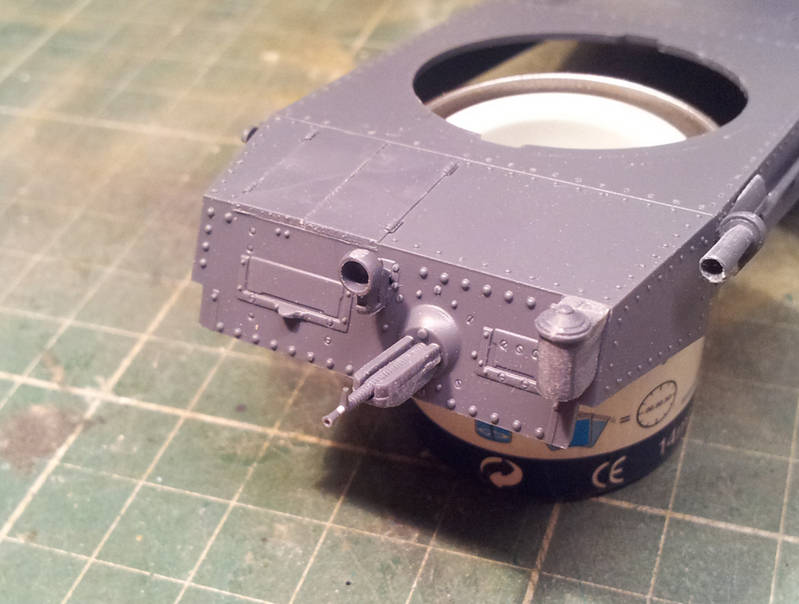
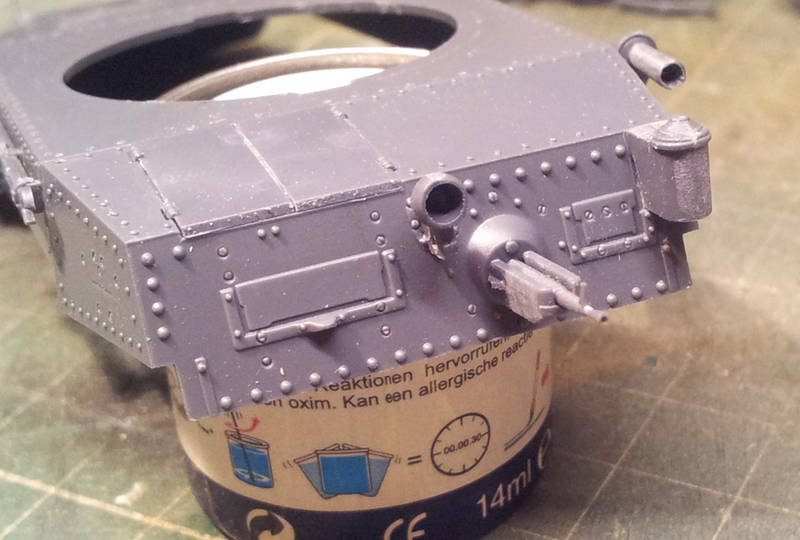
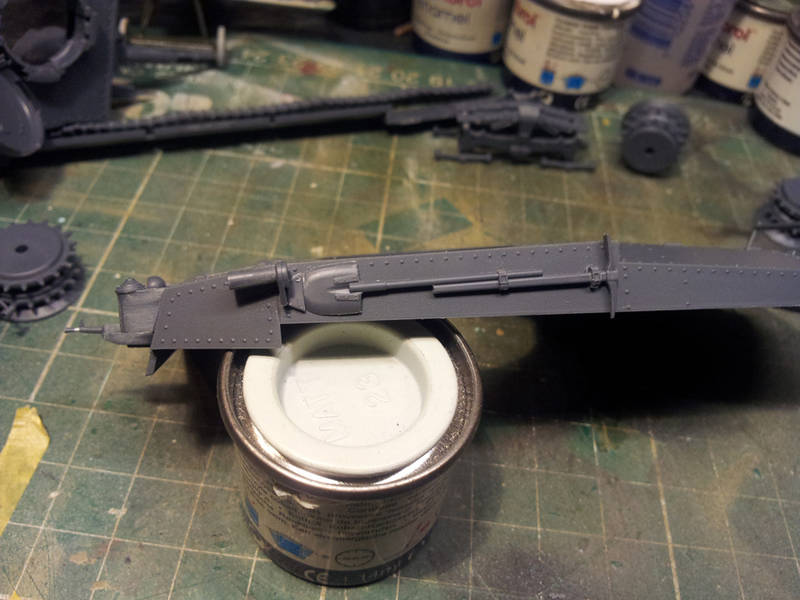
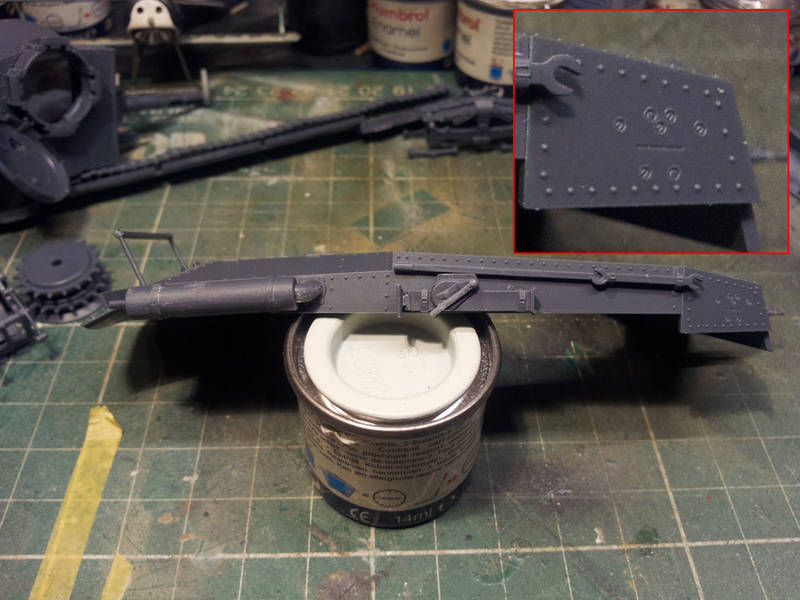
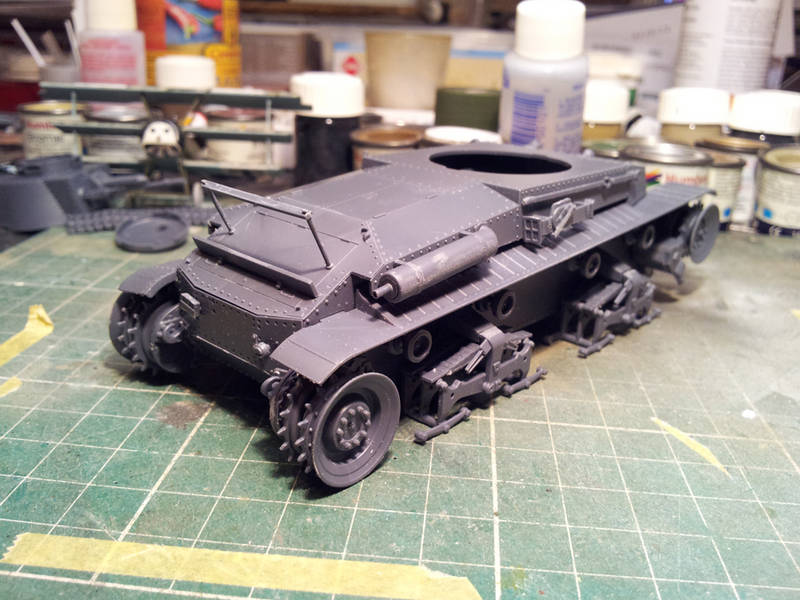
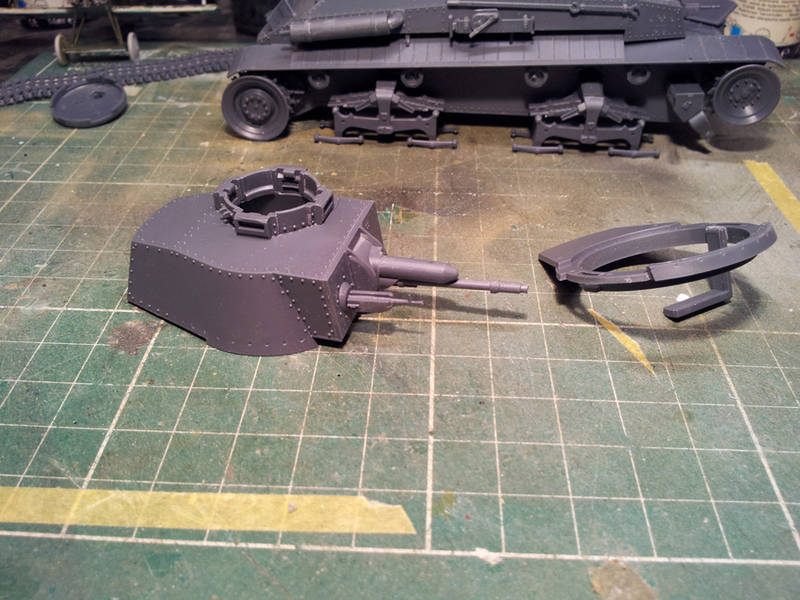
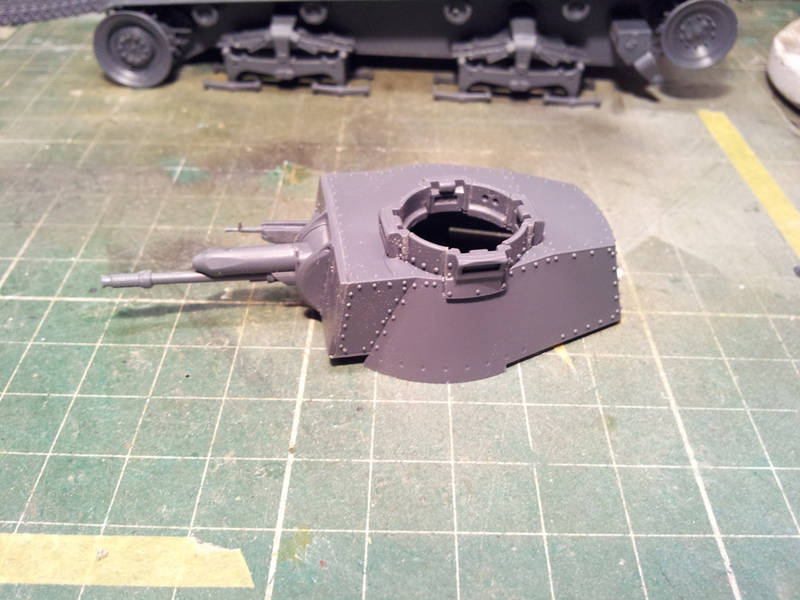
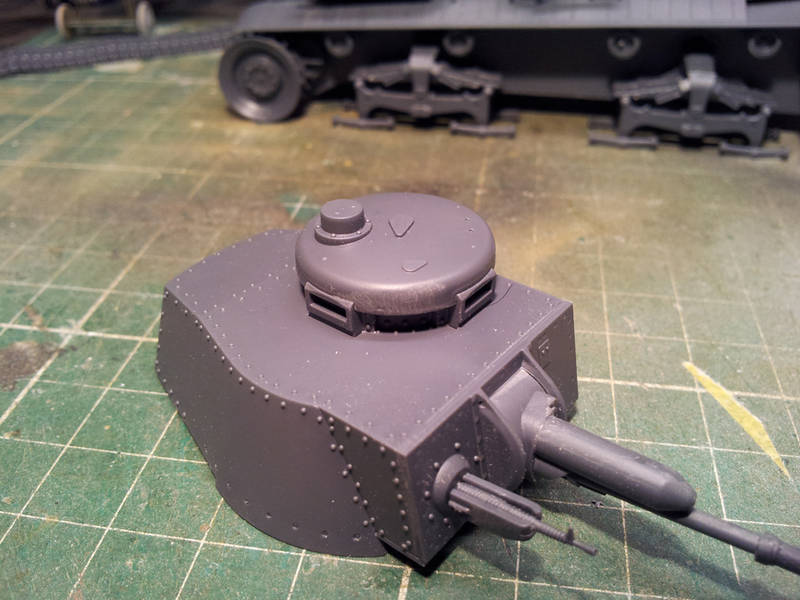
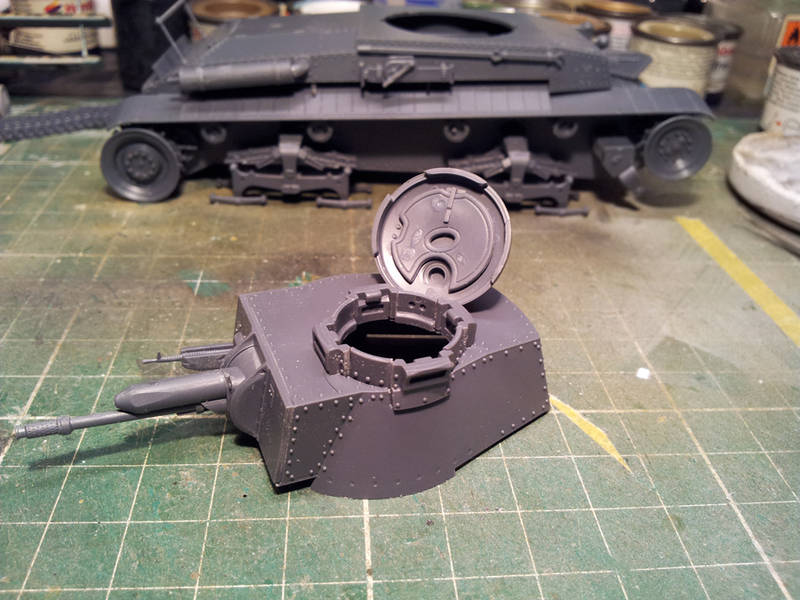
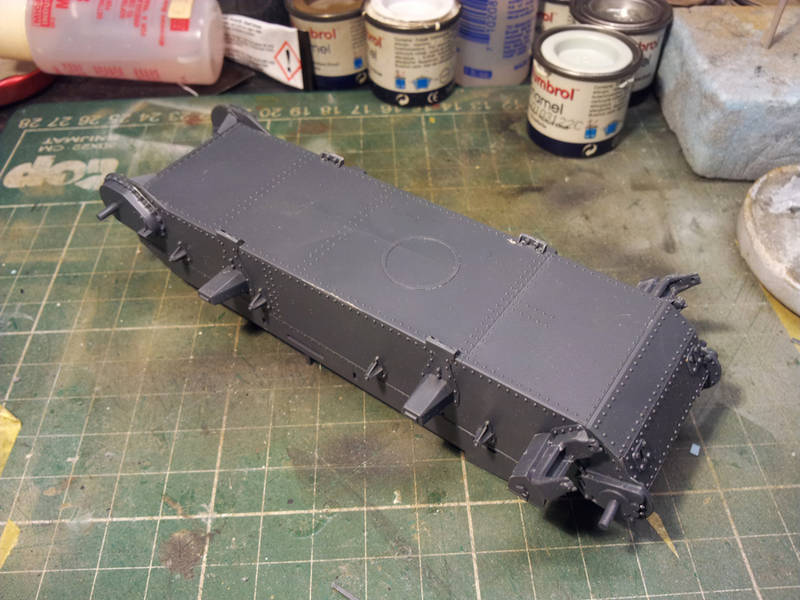
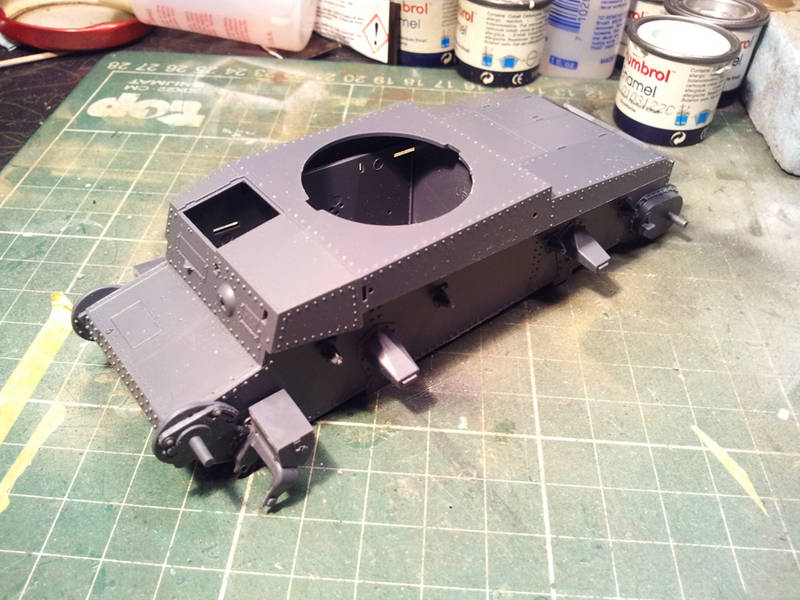
I finish this builtlog off with some pictures of the top deck and it being in position on the hull. Again as you can see the detail is terrific and this will certainly show up once painted and weathered.


I have to say that honestly I'm impressed. If this is the quality I more or less think of as the "new" Academy then this will probably not be my last Academy kit. It has been a joy to built so far. Everything fits perfectly and assembly goes quite fast as well. This so far is the result of one evening.

More to come more to come.

With friendly greetz

Robert Blokker
panzerbob01
Visit this Community
Louisiana, United States
Joined: March 06, 2010
KitMaker: 3,128 posts
Armorama: 2,959 posts
Posted: Thursday, October 31, 2013 - 01:26 PM UTC
Robert;

Good start! Looks like it's a pretty nice kit - got to be better than the very elderly CMK and related and that re-box done by Tamiya.

But, 38(t)? Honestly now, you simply stuttered on your key-board, just like I do, right!? This bad boy looks a whole like a 35(t), to me! You had me all excited for a minute, there, thinking that Academy had quietly pulled a fast one on us and slipped a 38(t) out into the stores without any panzer-kit bloodhound having caught an early whiff of it coming!

But it's on my buy list, whatever you call it!

Bob
retiredyank
Visit this Community
Arkansas, United States
Joined: June 29, 2009
KitMaker: 11,610 posts
Armorama: 7,843 posts
Posted: Thursday, October 31, 2013 - 01:30 PM UTC
35(t) is enough for me. I've been wanting to see a build up of this kit.
FAUST
#130
Visit this Community
Noord-Holland, Netherlands
Joined: June 07, 2002
KitMaker: 8,797 posts
Armorama: 4,190 posts
Posted: Friday, November 01, 2013 - 04:16 AM UTC
@ Bob
Thanks for the compliments. It absolutely is a great kit. Mor ethen what I expected to be honest. It is nice to have a decent kit of the 35T. I have not done any measuring so I don't know if it is accurate but it seems they joined forces with some Czech historical association to make this kit so I guess the info to design this kit should be good.
LOL and you are totally right about the 38T thing. At the time I was posting this I probably already should have been in bed for 2 hours... Instead I decided to watch Pacific Rim and post forum topics. Must have slipped my attention. I asked Darren to change it and he did as I just noticed. Thanks mister Baker.

@ Matt
It is a great kit. And for a decent price as well. And so far I have not really found any flaws.. It fits great. Well designed. Good detail. And it builts up quite fast. I think if I pour in another hour or so the vehicle can be put up for a bit of primer.
panzerbob01
Visit this Community
Louisiana, United States
Joined: March 06, 2010
KitMaker: 3,128 posts
Armorama: 2,959 posts
Posted: Friday, November 01, 2013 - 10:59 AM UTC
Robert;

Hi!

Looking over your pics, the kit continues to impress me and it promises to come up to potential in your gentle hands

I noted your doctoring of those leaf-springs.

See the below pic - looks like there was / is indeed a sort of flat steel plate under the spring pair of each bogie. The leaf springs are attached to the plate with what looks like flattened "u-bolts" or straps, two each side of the mid-point. Looking at your parts, appears that these strap-bolts are pretty clearly represented across the springs. (I can see a compulsive OCD AMS type replacing this molded detail with tiny straps... it would look pretty spiffy, if your eye-sight is good enough to catch it! HaHaHa and LOL!)

I also see in my posted pic that that old mold seam we German panzer modelers love to argue about appears on these ancient rubber tires!

The pic also suggests several small and easy detail bits one can modify or add to tweak bogies and stuff on this beastie right off. Looks so cool I think I'll order one and maybe build it for the coming new Light Tanks campaign!

Build on, Sir! I'm watching.


Image posted for discussion purposes only.

Cheers!

Bob
FAUST
#130
Visit this Community
Noord-Holland, Netherlands
Joined: June 07, 2002
KitMaker: 8,797 posts
Armorama: 4,190 posts
Posted: Friday, November 01, 2013 - 12:37 PM UTC
Ola Bob

Thanks for posting that picture. There indeed appears to be a plate under those leafsprings but as you can see in pic 7 of my first post this plate in the kit is way too wide. So all I did was cut off the excess left and right of the springs and left the springs attached to each other with the plate in between them and you should be good to go.
Sure there is probably enough to improve on this kit allthough I have to say that I haven't had this much fun in building for a long time without doing that. This kit simply falls together.

Tomorrow I will post some more pics of the latest progress.
SSGToms
Visit this Community
Connecticut, United States
Joined: April 02, 2005
KitMaker: 3,608 posts
Armorama: 3,092 posts
Posted: Saturday, November 02, 2013 - 04:17 AM UTC
I have the CMK kit and the aftermarket to make it better and seeing this new Academy release I was very leery of it, being not impressed of Academy lately. However, at a club meeting this past Saturday I got to go through the box and I'm VERY impressed. I am buying one as it is a beautiful kit and so much less work than the CMK kit. This may be the best release I've ever seen from Academy. By the way, I have a 39 photo walk around of Aberdeen's restored 35T at my club's website:http://www.nemilmod.org/gallery.htm. One excellent closeup of the bogie too. They're my photos so go ahead and use them however you want.
FAUST
#130
Visit this Community
Noord-Holland, Netherlands
Joined: June 07, 2002
KitMaker: 8,797 posts
Armorama: 4,190 posts
Posted: Saturday, November 02, 2013 - 05:53 AM UTC
Ola Matthew

That will be a purchase you won't regret. And the joy will be even greater once you start building it. Just as you I was not impressed by the Academy releases I built in the past. But the 35T is seriously good. Speaking of the CMK offering... I was Lucky to have won the 35T from Revell through their Facebook page and when I got it I compared it with sprueshots online of the CMK kit and they appear to be exactly the same kit.
Thanks for that walkaround... In fact thanks for that page of walkarounds... One I did not know yet and aside from the 35T there are walkarounds from another bunch of gems that I happen to have in the stash. For this 35T I am not going to use it since I decided to built it ootb but I love this kit so I bet there will be more in the near future.
Robbd01
#323
Visit this Community
Arizona, United States
Joined: February 13, 2013
KitMaker: 791 posts
Armorama: 344 posts
Posted: Saturday, November 02, 2013 - 06:53 AM UTC
Hey Faust,
I am also in the middle of building a 35t. I am doing the old CMK kit. I figure watching your build you might give me some ideas on doing mine. One issue I am trying to figure out is how the extra jerry cans were attached/secured to the tank. Hopefully when you get to that stage I can figure it out. The CMK kit does not come with jerry cans so I will have to scratch build whatever mounting hardware was used to tie them down. Keep up the work.

Cheers

russamotto
Visit this Community
Utah, United States
Joined: December 14, 2007
KitMaker: 3,389 posts
Armorama: 2,054 posts
Posted: Saturday, November 02, 2013 - 07:35 AM UTC
The extra jerry cans on this kit go into a frame on the rear of the tank. I was really very impressed with the detail on this kit, and the clear instructions are a plus. J's work offers a masking set if you wish to do the early Czech camo scheme.
FAUST
#130
Visit this Community
Noord-Holland, Netherlands
Joined: June 07, 2002
KitMaker: 8,797 posts
Armorama: 4,190 posts
Posted: Saturday, November 02, 2013 - 09:00 AM UTC
Ola Guys thanks for the replies

@ Robbie
Good luck with that CMK kit as I understood it it is a kit with age but still I am convinced you can make something out of it. Russ is right. The extra Jerrycans are kept in special made mounts. Easy construction of a plank and some metal rod and strip. You can see the big rack on the back of my 35T the other sits on the left side of the backdeck and is pretty much of the same construction for a row of 3 lying jerycans.

@ Russ
The detail is what I noticed as well. This is a true hit for Academy. Thanks for the tip on J's work paintmasks. Might keep that in mind for a future built. This one will be in grey. Early soviet front.

Ok Update time. The first series of pics pretty much followed the instruction booklet but since I built subassemblies for ease of painting all the steps are mixed through each other. But I will try to keep as much a chronological order as I can.


Time to add some detail to the top deck of the hull. Antenna pod, Frontlight and the MG. Academy actually did a really neat piece of slidemolding. So no need for drilling it out. Also nice touch are the recessed bolts with mostly different angles. I decided to have the hatches for the driver to be closed. They can be positioned open but that means you have to deal with 4 pushout marks. 2 on each hatch.


One part I don't really like from this kit is part E-19 which is the sighting device for the driver. Academy has made this as a little disk on a stick. While the Original thing looked like this


Totally not like a disk on a stick and I plan to replace this with a scratchbuilt example.

The next page from the instruction booklet is interesting for Robbie since it shows the location and parts for the jerrycanracks on the top deck. Plus it shows where all the tools are located and the adding of the exhaust.


Time for an overview with the suspension parts and fenders added.


And with the hull assembly pretty much finished.


The fenders have some big pushout marks at the bottomside. These will not be very visible. I Still filled them with CA glue and sanded them down.


STOP!!!... Turrettime


With commandershatch closed


And opened


Nice slidemolding for gun and MG barrel


And an overview of the work so far. Nearly ready for primer.


There is another thing I really like from this kit and that is in the link and length tracks. The whole top section over the returnrollers has tracksag added to it. Check it out. By the way after taking the photo's I noticed they had shifted a bit but the tracksag matches up perfectly with the returnrollers.


I might sound too enthousiastic but I think this kit deserves it. After 2 days of working on it it is pretty much 90% assembled and I have not found a single thing I did not like. As I said earlier there will probably be room for improvement but if you decide to build it OOTB you will have lots of fun and a really nice tank as endresult.

Next up. Finishing touches, primer and eventually paint.

With friendly greetz

Robert Blokker
retiredyank
Visit this Community
Arkansas, United States
Joined: June 29, 2009
KitMaker: 11,610 posts
Armorama: 7,843 posts
Posted: Saturday, November 02, 2013 - 09:24 AM UTC
I'm really enjoying following along and you're doing a wonderfull job. I'm not one for link and length tracks, but I'll take your word on it. Does the interior look like it would be possible to detail? This is something I like about the Dragon and Tristar kits.
panzerbob01
Visit this Community
Louisiana, United States
Joined: March 06, 2010
KitMaker: 3,128 posts
Armorama: 2,959 posts
Posted: Saturday, November 02, 2013 - 09:27 AM UTC
Robert;

Looking GOOD! I, too, am pretty convinced that this is a kit to buy and build.

Good point on that driver's aiming device. IF the kit provides it as a disk on a stick... wrong! But looks like it could be fairly easy to scratch up a good-looking replacement. (And maybe someone is working up a PE kit for this thing - this would be a good candidate for PE replacement, I think.)

OK. The turret hatch. May I suggest that you take a sharp knife or other implement and do some thinning around the inside of the rim? IIRC, these hatches were made of some pretty thin metal (at least so it looks in pics of the real deal) and that kit hatch cover looks pretty robust - like it is maybe a couple of inches thick! I'm not sure, but I don't believe that there was any sort of big assist device to help the commander raise it - and it was a pretty wide piece. Scaling the hatch wall / edge could pop this up another notch for maybe little effort.

So, as the jerry-can question has come up... how do the cans in this kit look? Are there PE inserts provided or reasonably well-molded welded seam lines present on cans?

Bob
FAUST
#130
Visit this Community
Noord-Holland, Netherlands
Joined: June 07, 2002
KitMaker: 8,797 posts
Armorama: 4,190 posts
Posted: Saturday, November 02, 2013 - 10:01 AM UTC
Thanks guys for the replies.

@ Matt.
The kit gives you a lot of space to add your own interior. Since it is completely empty. If you want an interior in this tank you either have to try to fit CMK's 35t interior set which can be hard to get or scratchbuilt everything.

@ Bob
Yeah the aiming device is probably a good thing for the AM companies. This one I will scratch but I think I will buy a second 35t in the future and try to get all the new AM stuff released specifically for the academy kit if any surfaces.
Thinning down the sides of that dome is a good idea and can still be done since it is still separate from the rest of the build.
The jerrycans are of the 1937 type and probably of Czech origin. They look really nice. Very crisp molding with the 1937 crisply embossed. All in all quite nice. They do miss the rib that holds the 2 halves together but I think If you are planning to built it as a vehicle in German use you better replace them with later style German Jerrycans from whatever brand you can get them.
panzerbob01
Visit this Community
Louisiana, United States
Joined: March 06, 2010
KitMaker: 3,128 posts
Armorama: 2,959 posts
Posted: Saturday, November 02, 2013 - 02:36 PM UTC
Robert;

Gas cans... I am a little set back, maybe even confused just a bit, that this kit, clearly aimed at depicting a Pz.35(t) in German service (and decked out in the box-art as one probably part of Operation Barbarossa in 1941) would come with jerry-cans labeled as being "1937" production! I didn't know that there were any such cans being made in 1937, by the Czechs or by anyone else!

I am, on the other hand, pretty sure that the can rack and arrangement in the box-art are representative of 35(t) in German service after the Blitz of 1940, and are far from what the original Czech LT vz.35 was configured as! Far as I have been able to find, the Czechs did not put gas-cans and such on vehicles before being taken over by Germany in 1938. So why cans marked "1937", I cannot say! One would reasonably expect that a German 35(t) in 1941 would be carrying the available cans - maybe model 1939, 1940, 1941?

IF the kit's cans don't come with the mid-line seam, guess this calls for proper cans from other sources. For folks doing this, keep an eye out for the date stamps and the "cross pattern" - earlier war cans had a simple "X", later cans had the "box w/ legs" type of design. It would be easy to find oneself in the Twilight Zone with a 1941 tank carrying mod 1943 cans!

Model on, Sir!

Bob
Robbd01
#323
Visit this Community
Arizona, United States
Joined: February 13, 2013
KitMaker: 791 posts
Armorama: 344 posts
Posted: Saturday, November 02, 2013 - 04:10 PM UTC
Thanks for the pics. that helped out. So far this is all I had to go on. I am hoping to finish mine during the France '40 time frame.


Cheers
FAUST
#130
Visit this Community
Noord-Holland, Netherlands
Joined: June 07, 2002
KitMaker: 8,797 posts
Armorama: 4,190 posts
Posted: Sunday, November 03, 2013 - 04:21 AM UTC
@ Bob
The jerrycan story becomes even weirder then that. The Germans only got hold of the 35t in 1939. By which time the later style jerrycan with the box with legs production started or has been started. The Jerrycans provided by Academy as mentioned already are stamped 1937 and share the characteristics and design of that of the Muller Firm from Schwerin. Effectively making it a German Jerrycan.
Check out picture of jerrycan here

So yeah the Jerrycans do exist They are of a correct type and design it is just odd that Academy provides them in a kit with 2 decaloptions... Both German. One France 1940 and one Russia 1941. I think around that time the German army pretty much switched over to the new design of jerrycan as introduced in 39. So yeah long story short. You probably want to switch over to a more "modern" type of jerrycan and indeed don't step into the trap of using Jerrycans from the wrong/too late periods.

@ Robbie
No problem and thank you for posting that pic of the CMK instructions. It actually confirms some additions I was thinking of for my own built.
Robbd01
#323
Visit this Community
Arizona, United States
Joined: February 13, 2013
KitMaker: 791 posts
Armorama: 344 posts
Posted: Sunday, November 03, 2013 - 04:44 AM UTC

Quoted Text


IF the kit's cans don't come with the mid-line seam, guess this calls for proper cans from other sources. For folks doing this, keep an eye out for the date stamps and the "cross pattern" - earlier war cans had a simple "X", later cans had the "box w/ legs" type of design. It would be easy to find oneself in the Twilight Zone with a 1941 tank carrying mod 1943 cans!

Model on, Sir!

Bob


Why can't this be easy . I just wanted to mount some spare jerry cans, now I need to make sure I have the correct style. Sometimes I wonder about this hobby...

So I need to use cans that have the 'X' design not the box with legs ? I have an AM set (CMK again) that came with 6 cans 2 with 'X's and 4 with the box design. Maybe I can hide the cans under a tarp or flag or something.
FAUST
#130
Visit this Community
Noord-Holland, Netherlands
Joined: June 07, 2002
KitMaker: 8,797 posts
Armorama: 4,190 posts
Posted: Sunday, November 03, 2013 - 07:59 AM UTC

Quoted Text


Quoted Text


IF the kit's cans don't come with the mid-line seam, guess this calls for proper cans from other sources. For folks doing this, keep an eye out for the date stamps and the "cross pattern" - earlier war cans had a simple "X", later cans had the "box w/ legs" type of design. It would be easy to find oneself in the Twilight Zone with a 1941 tank carrying mod 1943 cans!

Model on, Sir!

Bob


Why can't this be easy . I just wanted to mount some spare jerry cans, now I need to make sure I have the correct style. Sometimes I wonder about this hobby...

So I need to use cans that have the 'X' design not the box with legs ? I have an AM set (CMK again) that came with 6 cans 2 with 'X's and 4 with the box design. Maybe I can hide the cans under a tarp or flag or something.


Hehehehe Yeah sometimes it can get quite far in this hobby. Basically the Jerycans with the simple X pattern on the sides are pre 1939 and the box with legs was introduced in 1939. Even among those you have to watch out as most jerrycans have, aside from the manufacturers logo and the contents (water or Krafftstoff) also the year of production stamped into them. So if you have a Jerrycan that was produced in 1940 it would have had 1940 stamped into the side. Same goes with a Jerrycan produced in 1944. And this is what Bob means with the Twilight zone situation... It is not possible if you built your tank in a 1941 setting while it has 1943 produced Jerrycans. That said... Not all the Jerrycans were stamped as I understood it and certainly not all scale jerrycans are date-stamped. I'm having my eye on the Great Wall Hobby Jerrycan set as I believe it has a few of the early war year cans in it. But I need six for the backdeck. And the date is only visible on the side of the row. The 4 in the middle will be the cheap resin versions of RB model. By the way... Jerrycans are only stamped on one side so if you don't want to show the age of the Jerrycan... simply turn it around. As long as you have the Box with legs type you are safe.
Robbd01
#323
Visit this Community
Arizona, United States
Joined: February 13, 2013
KitMaker: 791 posts
Armorama: 344 posts
Posted: Sunday, November 03, 2013 - 08:32 AM UTC

Quoted Text

Hehehehe Yeah sometimes it can get quite far in this hobby. Basically the Jerycans with the simple X pattern on the sides are pre 1939 and the box with legs was introduced in 1939. Even among those you have to watch out as most jerrycans have, aside from the manufacturers logo and the contents (water or Krafftstoff) also the year of production stamped into them. So if you have a Jerrycan that was produced in 1940 it would have had 1940 stamped into the side. Same goes with a Jerrycan produced in 1944. And this is what Bob means with the Twilight zone situation... It is not possible if you built your tank in a 1941 setting while it has 1943 produced Jerrycans. That said... Not all the Jerrycans were stamped as I understood it and certainly not all scale jerrycans are date-stamped. I'm having my eye on the Great Wall Hobby Jerrycan set as I believe it has a few of the early war year cans in it. But I need six for the backdeck. And the date is only visible on the side of the row. The 4 in the middle will be the cheap resin versions of RB model. By the way... Jerrycans are only stamped on one side so if you don't want to show the age of the Jerrycan... simply turn it around. As long as you have the Box with legs type you are safe.


I broke out the ole magnifying glass and took a look at the cans with box/legs and it looks like there is year stamp of 1943. Not only that it has the 'W (up arrow) D' stamped on it which according to this link http://www.missing-lynx.com/library/german/feuergefahrlichdm_1.html is a British copy of the German can. So CMK's so called German jerry can set is way wrong - ugh
FAUST
#130
Visit this Community
Noord-Holland, Netherlands
Joined: June 07, 2002
KitMaker: 8,797 posts
Armorama: 4,190 posts
Posted: Sunday, November 03, 2013 - 08:40 AM UTC
Ola Robbie

That is correct... WD stands for War Department and indeed that makes your cans not suitable for your model both in date and owner.
Some more info on the English Jerrycans
British Style Jerrycans

And the main site where the link above comes from has pretty much any info you ever would wish to know about Jerrycans
Everything you ever wanted to know about Jerrycans
panzerbob01
Visit this Community
Louisiana, United States
Joined: March 06, 2010
KitMaker: 3,128 posts
Armorama: 2,959 posts
Posted: Sunday, November 03, 2013 - 11:23 AM UTC
Cans cans cans.

Didn't mean to cause consternation!

Just use your magnifier and check the can date (Italeri, Bronco, GreatWall cans in my stash all seem to have dates on them - and from this discussion, HobbyBoss also dates their cans (how kinky, dating a can...)) and avoid some faux-pas and time-warps! And yes, some can-kits have cans of mixed origins... the Italeri kit includes UK, US and German cans, with the UK stuff labeled W-D. Also watch for content-labels and the occasional SS runes... The Germans probably never put gasoline into cans labeled / stamped "Wasser", but the German cans stamped for gasoline/fuel ("Kraftstoff") could be used for water as well as fuel - but would get painted with bold white cross (or even all white in some cases) when being so used.

And yes, it turns out that some "1939" German cans had the simple X, some the box-with-legs (and appear so in kits). As some have noted above, you can always turn the can and hide the date.

Far as I know, you are A-OK to use older cans on a vehicle (1937 on a 1940 tank...).

Cheers!

Bob
Robbd01
#323
Visit this Community
Arizona, United States
Joined: February 13, 2013
KitMaker: 791 posts
Armorama: 344 posts
Posted: Tuesday, November 12, 2013 - 10:44 AM UTC
Hey Faust,
Any chance you can take pics of the mounting brackets that are holding the spare jerry cans in place when you get to that part of the build ? I want to try to scratch build them. I broke down and just picked up Tamiya's Jerry can set early. They have the 'X' and there is the date of 1939 on them.

Thanx &
Cheers
panamadan
Visit this Community
Minnesota, United States
Joined: July 20, 2004
KitMaker: 1,513 posts
Armorama: 1,449 posts
Posted: Friday, November 15, 2013 - 06:49 AM UTC
any chance that you can show a close up of the tracks, Robert?
Dan
FAUST
#130
Visit this Community
Noord-Holland, Netherlands
Joined: June 07, 2002
KitMaker: 8,797 posts
Armorama: 4,190 posts
Posted: Friday, November 15, 2013 - 07:58 AM UTC
Ola Guys

Thanks for the replies and I will follow up your requests tomorrow with some pictures.
 _GOTOTOP