Panda Hobby Object 279 Soviet Heavy Tank
Minnesota, United States
Joined: March 04, 2003
KitMaker: 4,630 posts
Armorama: 4,498 posts
Posted: Saturday, November 02, 2013 - 12:53 PM UTC
I will be blogging my build here. First off:
Link to thread with walk arounds Second, there will be a kit review going up soon.
Looking forward to getting this beast up and built.

Ex-34th ID MNANG - 13F and 63D
"Fire For Effect."
Loire-Atlantique, France
Joined: October 09, 2004
KitMaker: 2,433 posts
Armorama: 2,325 posts
Posted: Saturday, November 02, 2013 - 09:48 PM UTC
You may have picked the wrong kit Jacques, based on comparison builds between the Panda and Amusing Hobby models on a French forum...
Me I'm sitting on the fence waiting for reviews of the Takom release before I make my order.
Cheers,
Christophe
Minnesota, United States
Joined: March 04, 2003
KitMaker: 4,630 posts
Armorama: 4,498 posts
Posted: Monday, November 04, 2013 - 03:03 PM UTC
Christophe, I did it for a kit review. It is not horrible. In fact,
here is my review: Ex-34th ID MNANG - 13F and 63D
"Fire For Effect."
Pennsylvania, United States
Joined: May 09, 2009
KitMaker: 561 posts
Armorama: 553 posts
Posted: Monday, November 04, 2013 - 11:40 PM UTC
Jacques,
what's happening with your BMP-1 and T-80U blogs ?
Sean
Russia
Joined: August 23, 2005
KitMaker: 310 posts
Armorama: 299 posts
Posted: Wednesday, November 06, 2013 - 05:11 AM UTC
Comparsion review of Panda & Takom nuclear objects
http://tieba.baidu.com/p/2689746512
Alabama, United States
Joined: January 26, 2006
KitMaker: 1,381 posts
Armorama: 1,347 posts
Posted: Wednesday, November 06, 2013 - 08:25 AM UTC
At quick glance, that Takom one looks very nice indeed. Turret texture is noticeably better.
Texas, United States
Joined: March 11, 2007
KitMaker: 977 posts
Armorama: 976 posts
Posted: Wednesday, November 06, 2013 - 08:46 AM UTC
What's interesting is the option for the short barrel version. New to me?
Gregovich "I paint all my Models in 4BO Green" Beckman
Holder of the Knight's Cross, Hero of the Soviet Union, Dragon Slayer and Slinger of Massive BS.
England - South East, United Kingdom
Joined: November 19, 2008
KitMaker: 2,249 posts
Armorama: 2,007 posts
Posted: Wednesday, November 06, 2013 - 08:58 AM UTC
That's so strange the way there's a series of sprue detail shots taken
through the polythene bag.

Minnesota, United States
Joined: March 04, 2003
KitMaker: 4,630 posts
Armorama: 4,498 posts
Posted: Wednesday, November 06, 2013 - 11:01 AM UTC
My VERY quick take on the Takom kit:
1. Better texture (from photos, I need to see it in person)
2. It has clear lens parts
3. It offers variety in barrels, figure, and MG barrels.
4. Add on "plating" detail looks very nice.
BUT...
1. It is very similar to the build design of the Panda kit
2. I am not sure about the PE engine deck screens...
3. Same issue with tracks and some periscopes....pin marks.
4. Fuel tanks actually look TOO complicated (from looking at the instructions...again, I need to look at this in person)
5. Integrated hull side panels is, actually, not as nice in my mind.
6. rivet detail on hull side panels seems overdone?
Finally, how do prices compare?
I may have come up with a way to deal with the Panda texture issue...will report on it after I try it.
Takom kit looks good, but I will reserve final judgement until after I have one in hand.
Ex-34th ID MNANG - 13F and 63D
"Fire For Effect."
Florida, United States
Joined: November 24, 2012
KitMaker: 1,896 posts
Armorama: 1,858 posts
Posted: Wednesday, November 06, 2013 - 03:26 PM UTC
Hi;
O.K. JD; this may be a stupid question, why is the Takom Item called Object 269 ! Is it because of the Different Barrels or is it something that I missed in the Transcripts.
CHEERS; MIKE.

Texas, United States
Joined: March 11, 2007
KitMaker: 977 posts
Armorama: 976 posts
Posted: Thursday, November 07, 2013 - 02:30 AM UTC
And is the short barrel legit? First I have seen of it or is it bogus?
Greg
Gregovich "I paint all my Models in 4BO Green" Beckman
Holder of the Knight's Cross, Hero of the Soviet Union, Dragon Slayer and Slinger of Massive BS.
Minnesota, United States
Joined: March 04, 2003
KitMaker: 4,630 posts
Armorama: 4,498 posts
Posted: Thursday, November 07, 2013 - 04:05 AM UTC
Mike, where are you seeing 269? Everything I am seeing is Object 279.
The short barreled version is the Object 279M. I am not certain at this point, but IIRC it was either a proposal to put a 152mm barrel on it ala the ISU-152 series (think Object 704) or a missile shooting system like the US M551 Sheridan tank (to appease Khrushschev?)
I will (hopefully) post pics tonight of my experiment.
Ex-34th ID MNANG - 13F and 63D
"Fire For Effect."
Florida, United States
Joined: November 24, 2012
KitMaker: 1,896 posts
Armorama: 1,858 posts
Posted: Thursday, November 07, 2013 - 10:02 AM UTC
Hi Guys;

Hi JD; from one of the Advertisements on the Top right hand corner of our Main Page there was a Ad, for the Takom kit, and its Title was Object 269. Maybe just a type-o, but that was what they had on the Box art, Maybe I was seeing things, I am a Old Fart

CHEERS; MIKE.

Heves, Hungary
Joined: October 25, 2009
KitMaker: 216 posts
Armorama: 205 posts
Posted: Thursday, November 07, 2013 - 05:18 PM UTC
I saw that too

Minnesota, United States
Joined: March 04, 2003
KitMaker: 4,630 posts
Armorama: 4,498 posts
Posted: Friday, November 08, 2013 - 04:36 AM UTC
I have now seen the Object 269 ad. Yeah, I think Pacific Coast Models muffed that one.

For the BMP-1 and T-80U Blogs, they are now active again!

And for the experiment to remove the texturing on the hull/turret, I had an idea: Future Floor Polish is self-leveling. So...I brushed on some THINNED DOWN Future onto a few select areas of the tank to see what would happen. Because my solution was thinned down, it does not have to be - mine is because I keep some handy in a container for air brushing, I had to apply 2 coats rather than 1. Decide for yourself if it makes a difference.
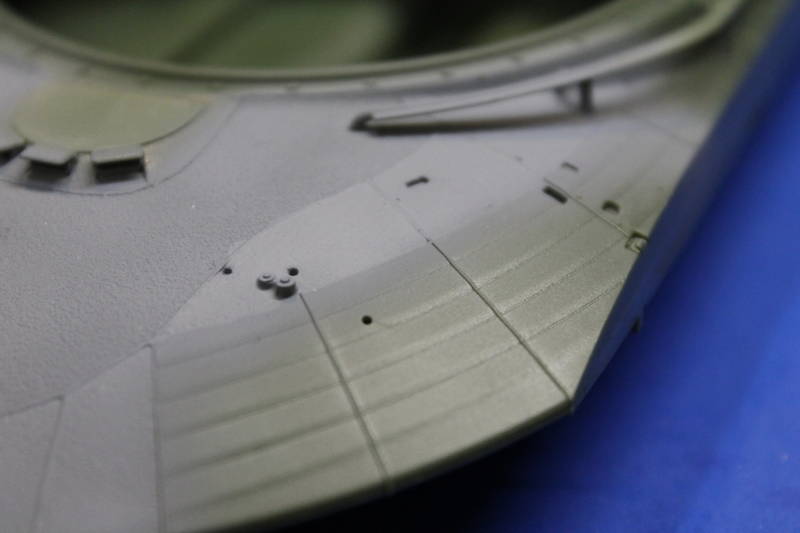
On the hull, can you see a difference?
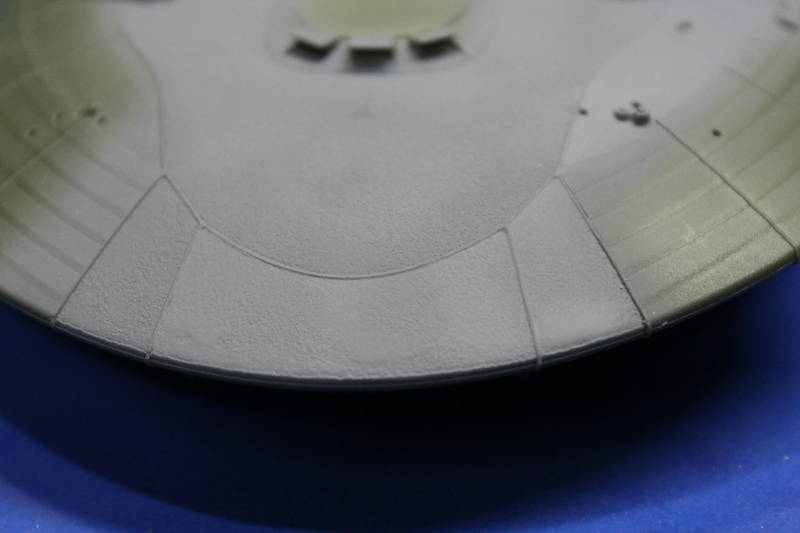
On the front of the hull, I think my thinned future is TOO thin. I have not yet tried it with full strength Future...sorry.
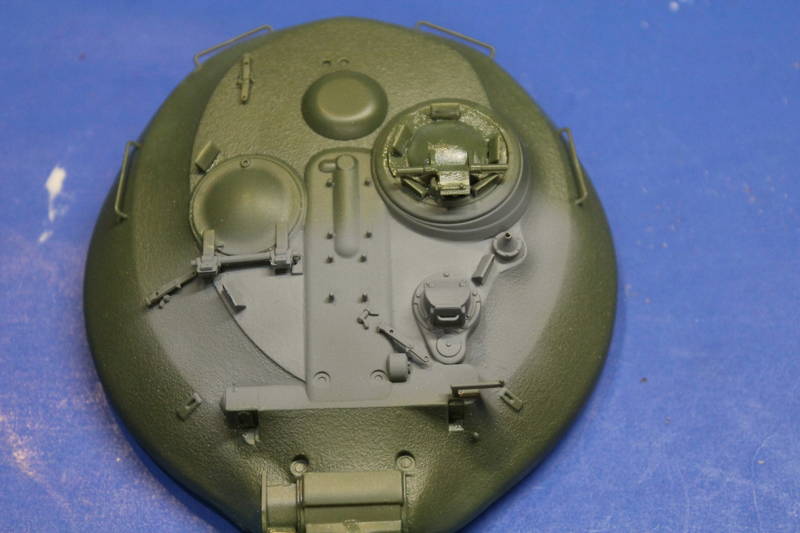
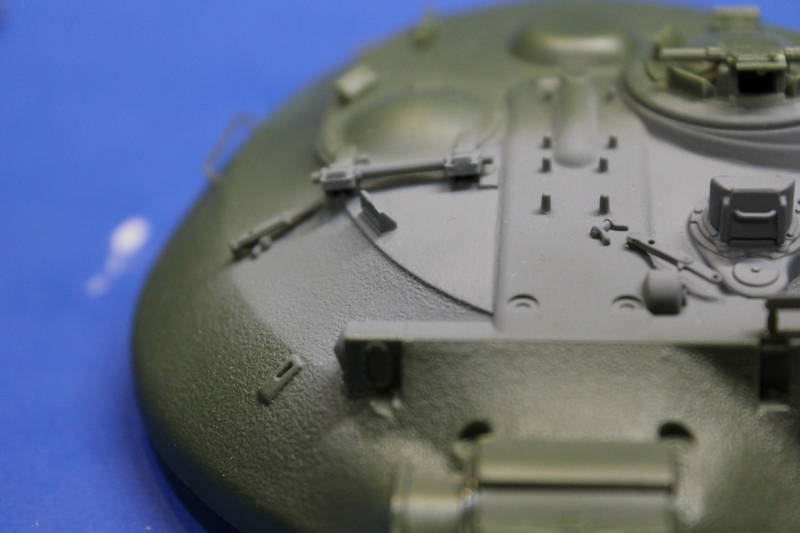
It made a VERY good change on the turret "roof". MUCH smoother.
I did prime the parts quickly to show the effect. With just the future on it did not show well. I did not have time to give it a pin wash to show what texture is left.
Ex-34th ID MNANG - 13F and 63D
"Fire For Effect."
Minnesota, United States
Joined: March 04, 2003
KitMaker: 4,630 posts
Armorama: 4,498 posts
Posted: Friday, November 08, 2013 - 04:44 AM UTC
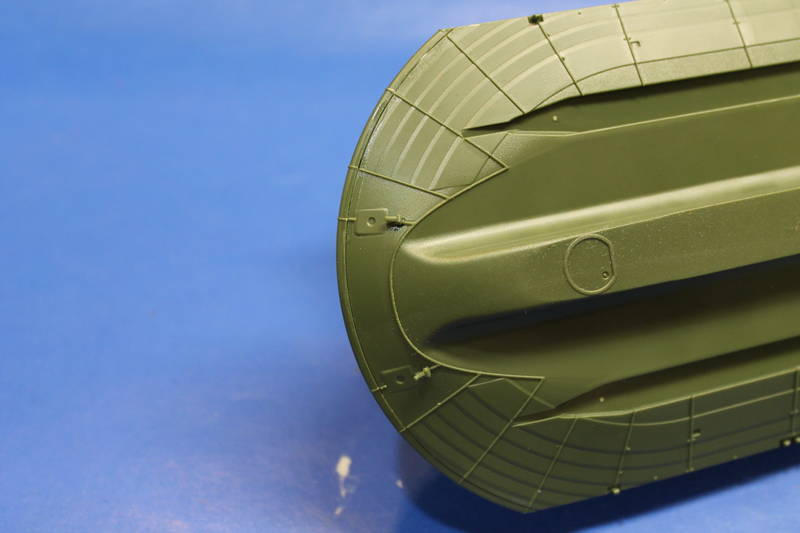
The nasty seam under the front "lip". This was slowly glued together to minimize the seam, but...it should not be there so the putty will be coming out...
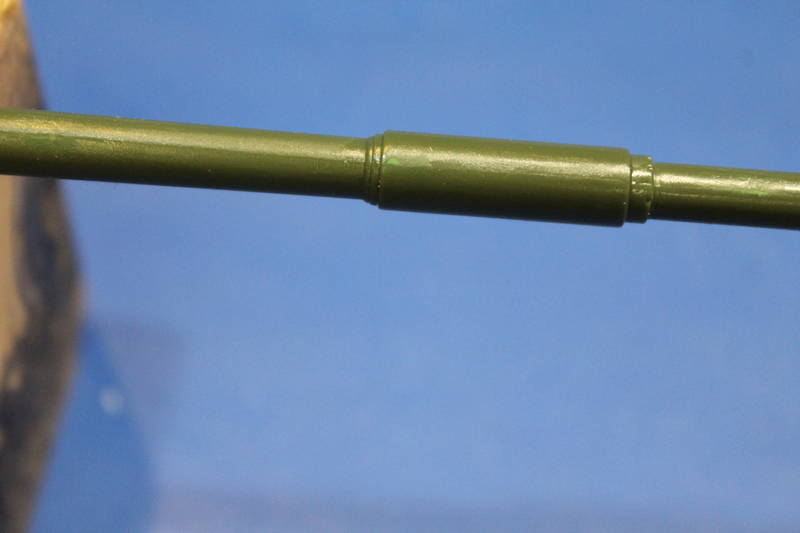
The pinhole on the underside of the barrel...small, but noticable without putty...
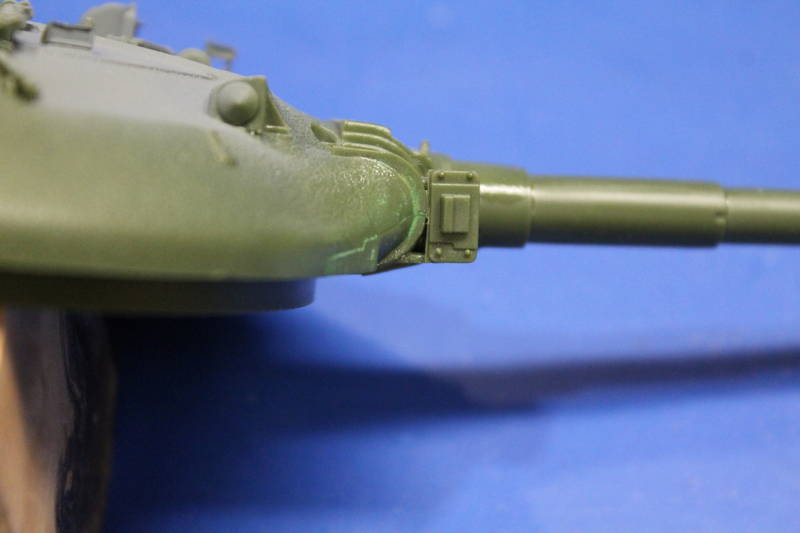
Putty work on the turret join near the searchlight...the only real seam problem on the turret...
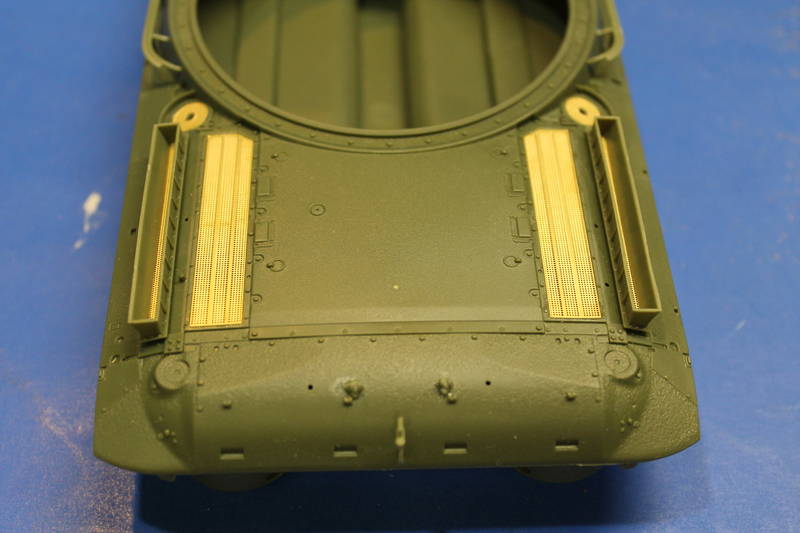
The rear deck with the PE screens on. They fit so nicely that I only used liquid cement to glue them on. Nicely done.
and the "feet". The "foot" on the right has a couple of return roller pins broken off...that is how they came in the kit. Gonna be fun fixing that as the return rollers do not go on all the way over the pin...they are not flush with the hull"protrusion". Fun fun fun. The left "foot" shows the seam in the front, from the 2 halves join, that will have to be puttied.
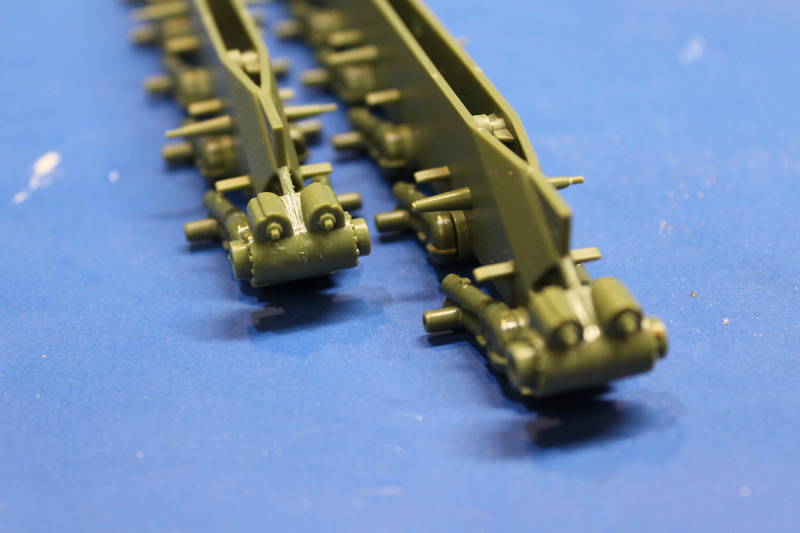
Ex-34th ID MNANG - 13F and 63D
"Fire For Effect."
Russia
Joined: August 23, 2005
KitMaker: 310 posts
Armorama: 299 posts
Posted: Tuesday, November 12, 2013 - 01:04 AM UTC
more comparsion of Object 279's models
http://tieba.baidu.com/p/2700869907 Minnesota, United States
Joined: March 04, 2003
KitMaker: 4,630 posts
Armorama: 4,498 posts
Posted: Tuesday, November 19, 2013 - 10:56 AM UTC
Adding the future to the kit parts. It is working out better than I thought, but slow. Honestly, I dread the tracks.

Ex-34th ID MNANG - 13F and 63D
"Fire For Effect."
Indiana, United States
Joined: June 10, 2005
KitMaker: 6,188 posts
Armorama: 5,960 posts
Posted: Thursday, November 21, 2013 - 05:18 AM UTC
I think I would get the Takom kit JUST for the figure.

But... it is interesting seeing
3 different companies doing the same kit. I do think the differences only stand out when they are side-by-side though. It looks like the Takom is shaped much differently than the other 2.
Great to know and thanks for the links!

Jeff
Virginia, United States
Joined: November 03, 2006
KitMaker: 165 posts
Armorama: 118 posts
Posted: Monday, December 02, 2013 - 11:30 AM UTC
Minnesota, United States
Joined: March 04, 2003
KitMaker: 4,630 posts
Armorama: 4,498 posts
Posted: Monday, December 02, 2013 - 02:28 PM UTC
Yes, the 279 had a complicated hydropneumatic suspension. Not sure they would lay it on the ground for any reason other than maintenance though....
Ex-34th ID MNANG - 13F and 63D
"Fire For Effect."
Virginia, United States
Joined: November 03, 2006
KitMaker: 165 posts
Armorama: 118 posts
Posted: Monday, December 02, 2013 - 03:32 PM UTC
Thanks Jacques.....might build one like that. Working on the Panda now....
Minnesota, United States
Joined: March 04, 2003
KitMaker: 4,630 posts
Armorama: 4,498 posts
Posted: Wednesday, December 04, 2013 - 10:17 AM UTC
Update:
I added Future to the rest of the kit parts I thought needed it to reduce the cast surface texture. Of particular interest were the rear engine deck and the turret top plate. I also sprayed some future on, as a whole, to help reduce some of the texture in other spots that seemed overdone, but should still be visable.
Results:
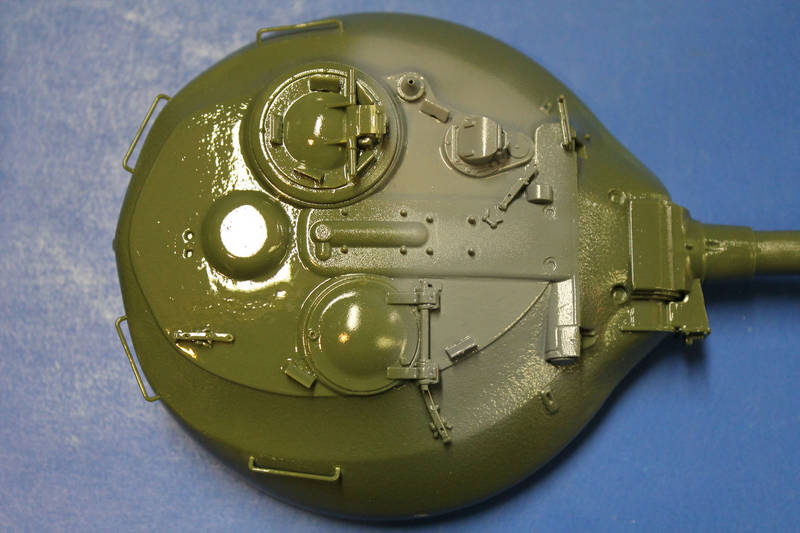
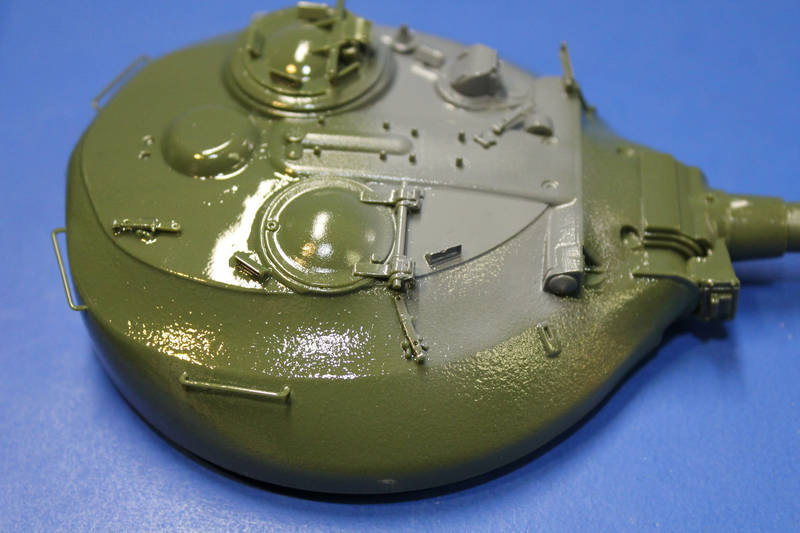
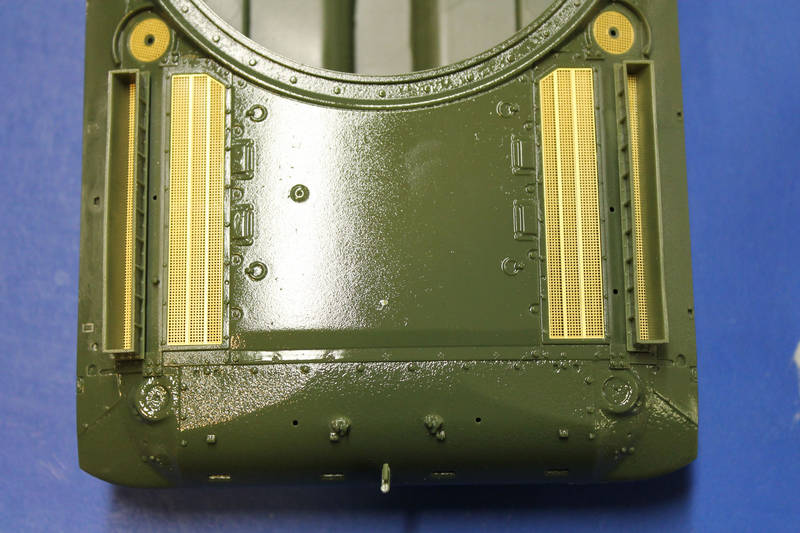
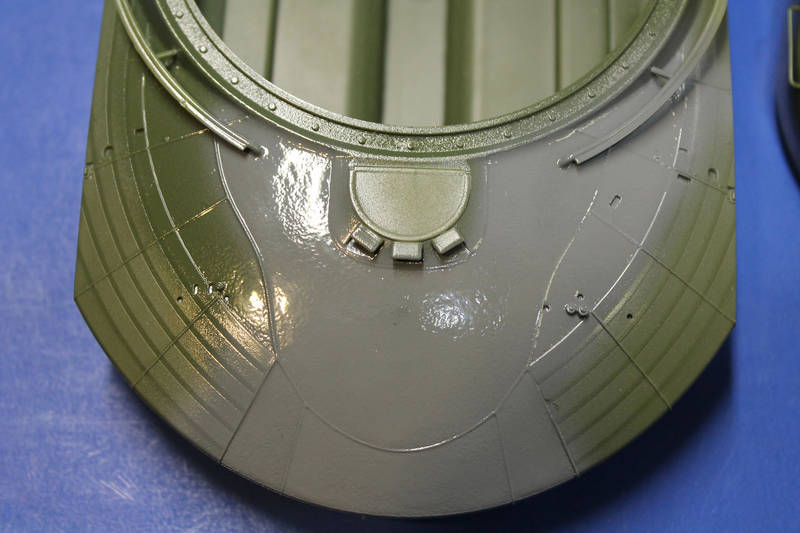
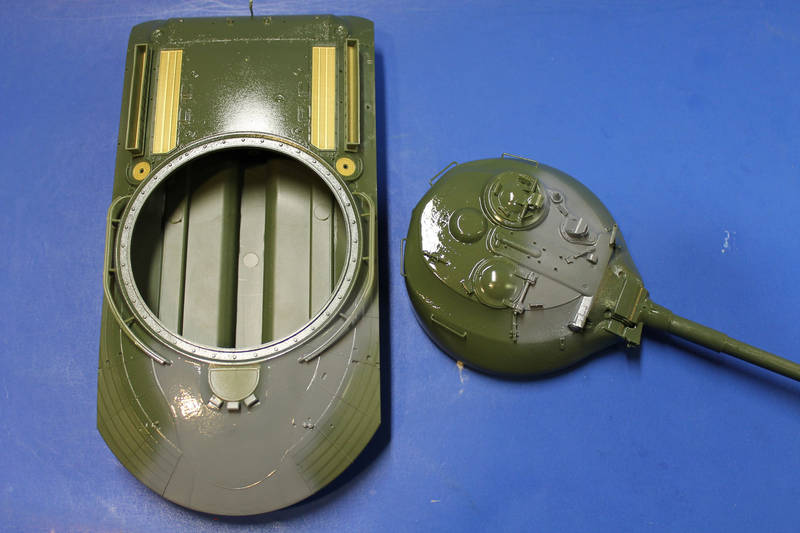
Now for primer...
Ex-34th ID MNANG - 13F and 63D
"Fire For Effect."
Minnesota, United States
Joined: March 04, 2003
KitMaker: 4,630 posts
Armorama: 4,498 posts
Posted: Sunday, December 08, 2013 - 04:36 PM UTC
I decided to move on from my experimentations with the hull texture. I primed and then drybrushed the areas so that you could see the differences. I am satisfied with the change. If you don't really care about the texture, then this does not apply to you at all. If you do care, this is the best way to deal with it.
The turret. The top is now as smooth as I want, it definitely looks smoother than the rest of the turret and looks like rolled steel, as it should.
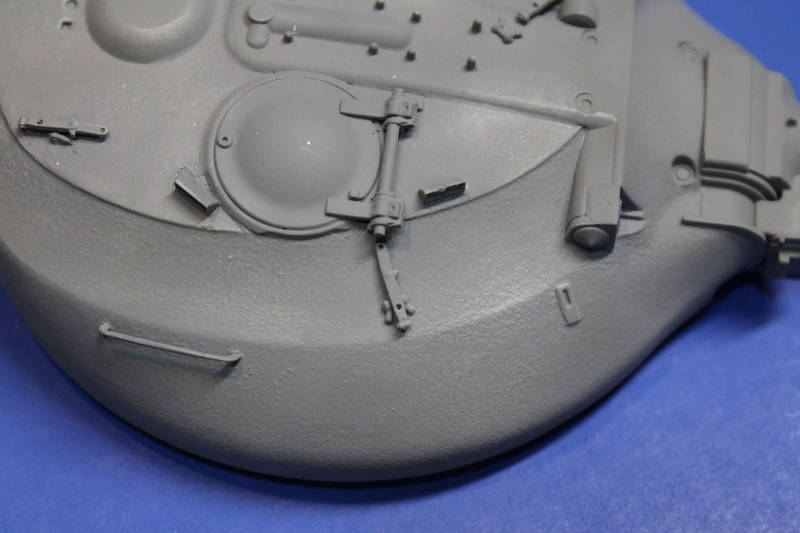
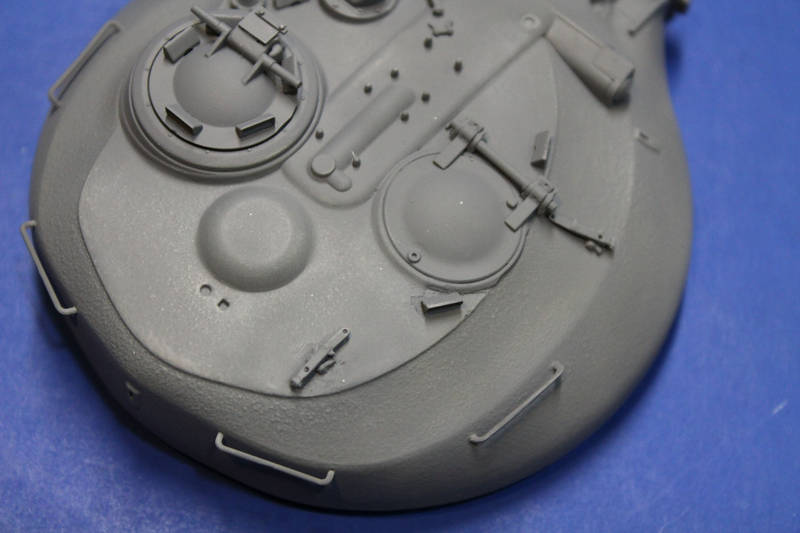
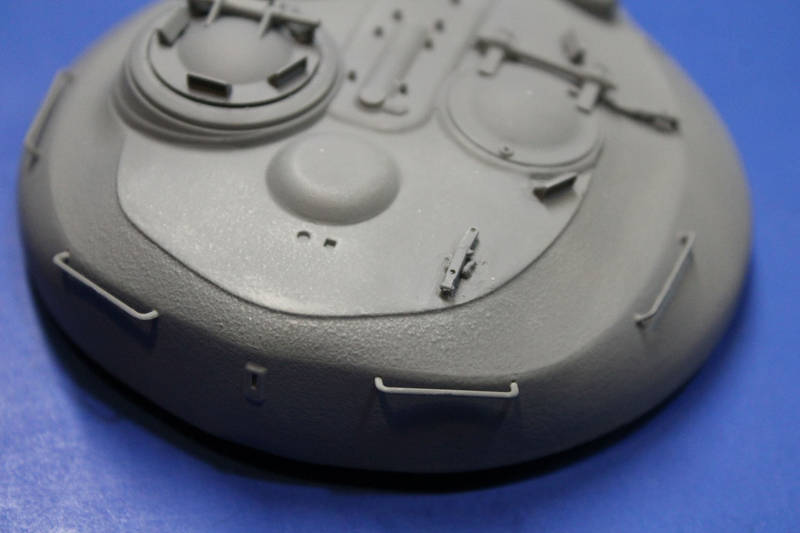
I really had to scrub the drybrushing on the turret top to show any texture at all.
The hull was the same. The engine panel in the middle of the rear deck is also as smooth as I wanted it, and as it should be.
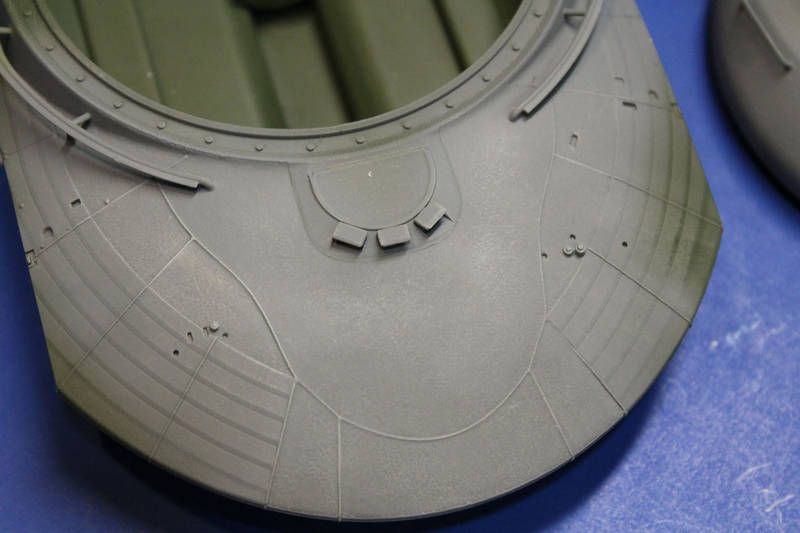
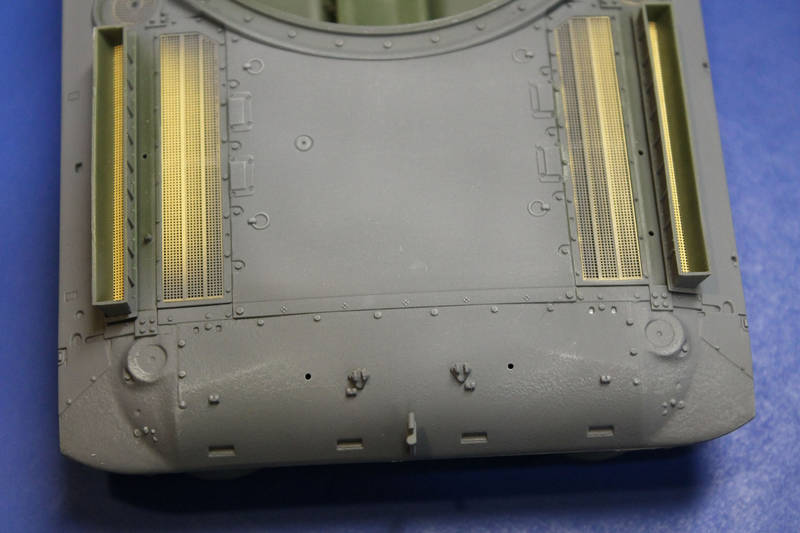
In the process, I have been able to look over the front paneling and I am happier with how it looks than I originally was.
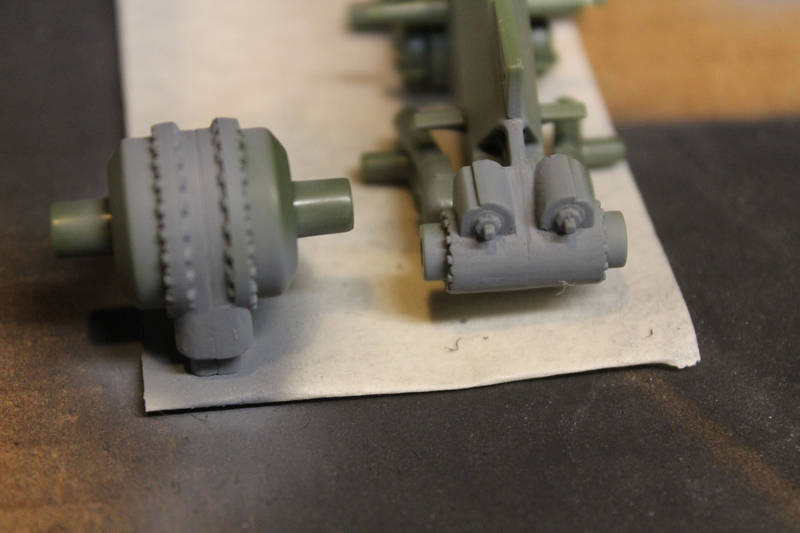
Working with the "legs" to get them ready, I attempted to putty the seams on their faces. I somewhat succeeded. They are now not as noticeable as the photos suggest.
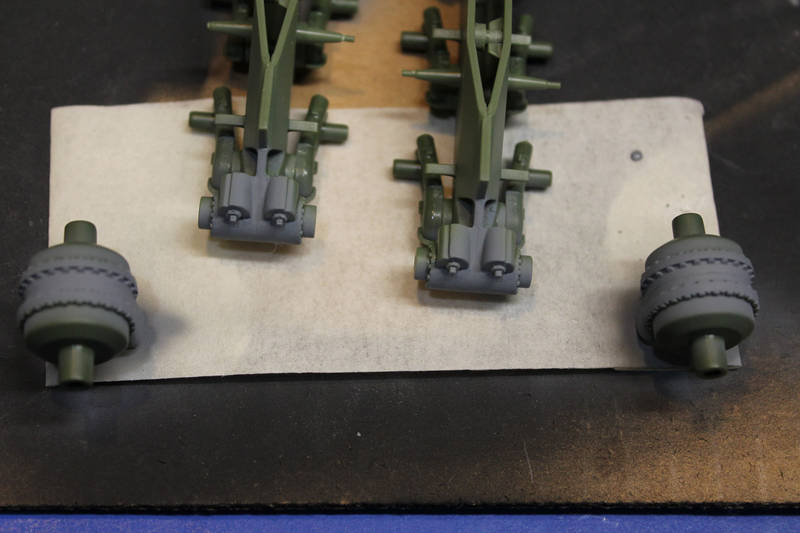
Ex-34th ID MNANG - 13F and 63D
"Fire For Effect."
Buenos Aires, Argentina
Joined: January 26, 2007
KitMaker: 1,024 posts
Armorama: 1,013 posts
Posted: Monday, December 09, 2013 - 12:41 AM UTC
Far better than the kit's original look, with no doubts!!!
It's not too much, but it's all we got...


 But... it is interesting seeing 3 different companies doing the same kit. I do think the differences only stand out when they are side-by-side though. It looks like the Takom is shaped much differently than the other 2.


