Armor/AFV: What If?
For those who like to build hypothetical or alternate history versions of armor/AFVs.
Hosted by Darren Baker
Landkreuzer P-1000 Ratte
TacFireGuru
Visit this Community
Colorado, United States
Joined: December 25, 2004
KitMaker: 3,770 posts
Armorama: 2,263 posts
Posted: Friday, February 07, 2014 - 03:54 PM UTC
FYI, three more sheets of 1/8th came in today. It takes four sheets to do one side of the Ratte's track housing/sides (12" x 24" x 1/8th)...with a bit left over (reinforcing bits the excess parts will be used for).

The recent pictures show two sheets glued together with the angled end pieces (not yet attached). That is the INSIDE section. The OUTER section (seen when done) will be just two sheets glued and then cut down to proper length, height, and angles. Once the outer part is traced and cut out, I'll scribe "panel lines." (no way they could've cold rolled or cast a single "sheet" of armor)


Unfortunate side note to Life:
My wife Karin and I are in a bad way with one of our cats. Prickles is about 11 years old now and dying. She's always been a little thing...with long black hair with a few white and some gray hairs (hence Prickles - like a hedgehog). She's also cross-eyed. The most she's ever weighed was about 8 pounds...she's now less than 4. Karin, myself, and the Vet have done what we can. She's lived a good life with us; loved deeply. Tomorrow we have to say good bye. Hearts are heavy...

Mike ...

Our Girl...yawning

BigfootV
Visit this Community
Colorado, United States
Joined: December 24, 2005
KitMaker: 1,624 posts
Armorama: 994 posts
Posted: Saturday, February 08, 2014 - 05:50 AM UTC
Mike,

Build is coming along nicely. Sorry to hear about Ms. Prickles Mike, she was a sweetie. We've losted many a pet and its never gets easy when they've been a part of the family for so long.

My condolence to you and Karin.

See ya in the funnies...............

TacFireGuru
Visit this Community
Colorado, United States
Joined: December 25, 2004
KitMaker: 3,770 posts
Armorama: 2,263 posts
Posted: Thursday, February 13, 2014 - 01:47 PM UTC
My "helper" while taking pictures (Gizmo):


And the inner side of the hull tub. I'll need one more just like it and two lose a fair bit of the bottom (by the line of holes) to expose the road wheels some:


LOL, my notes while sitting there contemplating things about the hull; note the words "offbeat," "unique," and "smexxy." Oh, it'll be a "Smexxy" beast when done!


And that is where I rest for the night. Figure tomorrow I'll put two sheets together and after drying, cut out the base shape and drill and sand.

Mike

P.S. Oh yeah; reference to the angle of the sides - I think it needs it some. On the OUTSIDE for sure...maybe on the inside too (which would give the front and back some "unique" angling). I'll have to set a jig up and use my trim saw to cut the bend line, but that should work. -M
Nito74
Visit this Community
Lisboa, Portugal
Joined: March 04, 2008
KitMaker: 5,386 posts
Armorama: 4,727 posts
Posted: Thursday, February 13, 2014 - 02:40 PM UTC
Nice work Mike !

I understand how you feel, had a cat for 13 yrs and she left us too, a few years ago.
It's always sad, well I try keep the good memories.
Now we have a big yellow Garfield-look alike.


Anyway, great project you have there, massive work with those tracks & wheels ...
TacFireGuru
Visit this Community
Colorado, United States
Joined: December 25, 2004
KitMaker: 3,770 posts
Armorama: 2,263 posts
Posted: Friday, February 21, 2014 - 07:59 AM UTC
Thanks John. A pet loss is...hard.

Eh, this is a build now dedicated to Prickles. Her name will be on this build somewhere.

I've traced out and cut the outer hull side for the tracks. That which will be seen. I think I have enough scrap to add the front, back, and top plates. WHICH means...!!!...I can lay out the spots for the Kugelblitz's and MAUS turret.

It's quickly coming from a one dimensional bit of plastic to a 3D.

Mike
TacFireGuru
Visit this Community
Colorado, United States
Joined: December 25, 2004
KitMaker: 3,770 posts
Armorama: 2,263 posts
Posted: Saturday, March 01, 2014 - 09:42 AM UTC
Update finally (my internet connection has not allowed for pic uploads It's really "spotty" and they're sending a tech out tomorrow).

The ruler on the left is laid pretty much at the angle of a JagdPanther or JagdPanzer IV. I was hoping that the CMK JP IV set I bought would work, but...too steep of an angle. I "could" angle a portion of the glacis for it...but I don't think the aesthetics would look right. I may mount it in a recess...but I have to see if that would be a really bad "round trap."


Here's the rough placement of the MAUS turret and the two Kugelblitz turrets. Most likely I will "recess" the MAUS about a 1:1 inch lower and raise the Kugel's in a step-fashion to offer some elevation above each other.


This shows the outer side hull on top of the inner side hull with one road wheel:


And an edited version that will show how much of the road wheel will be seen:


And, how the track in relation to the drive sprocket, a road wheel, and the idler will look:


I may get some "spares" and do some crazy tracked "something" based on how this looks!

Mike
BigfootV
Visit this Community
Colorado, United States
Joined: December 24, 2005
KitMaker: 1,624 posts
Armorama: 994 posts
Posted: Saturday, March 01, 2014 - 01:39 PM UTC
Plans for interior Mike. Lol

I hope you've got plans for a display case in the front room for that. Hehehehe.

Anyways, DAMN THAT IS HUGE!!!! The Maus is just that, a mouse compared to that thing.

See ya in the funnies...............
LeftyDan
Visit this Community
Illinois, United States
Joined: November 03, 2013
KitMaker: 77 posts
Armorama: 76 posts
Posted: Saturday, March 01, 2014 - 05:02 PM UTC
You're making some excellent progress there Mike. I'm think you're going to need some other models to put next to this thing as a size comparison. Or probably some figures on this beast.

While it was never built, I'd imagine it would be an SS vehicle. I can't seem the German high command giving something so fancy to the Wehrmacht. Possibly the 503rd or the like.

Thinking down the road, how are you going to paint this thing? It seems like a monotone grey would stand out like a sore thumb. Ambush colors would be a giveaway as well. Maybe they'll be like that Dutch minesweeper and put trees and the like on it to disguise it.
TacFireGuru
Visit this Community
Colorado, United States
Joined: December 25, 2004
KitMaker: 3,770 posts
Armorama: 2,263 posts
Posted: Sunday, March 02, 2014 - 08:32 AM UTC
Brian, I've had the slab sides of this thing on my bench for a bit...and knew it was big. But, yeah, putting that MAUS turret just reinforced the size. And no, Karin will NOT allow me to display this beastie upstairs. And, no....NO interior! Try to find 1/35th Sub engines!!

Dan, I'm not a figgie guy (scares the crap outta me!). But, yes...this MUST have some! I'll figure that out when the time comes. As far as paint goes; no...not gray. I agree about the SS vs. Wehrmacht. Most likely I'll paint it up in a three-tone.

So, I bought a CMK JagdPanzer IV barrel/mantlet (as mentioned above). Didn't figure it would work "recessing" it...but...
I think I've figured out how to do this. I'll have to play with some of the 1/16th inch stock I have and see if I can make a workable mounting. I'm getting a StuG shorty set sent to me...that I can make work for sure...but it's a pop gun so this needs a tad more "oompf."

Mike
TacFireGuru
Visit this Community
Colorado, United States
Joined: December 25, 2004
KitMaker: 3,770 posts
Armorama: 2,263 posts
Posted: Sunday, March 02, 2014 - 08:36 AM UTC
Side note: I need to cut the top of the two side halves straight. Using a jig saw for the short cuts is fine...easy to sand even. But, that top is almost three feet long. I'm going to try my table saw. Wish me luck!!

Mike

P.S. Table saw worked like a charm for smoothing the top edge. Happy.
TacFireGuru
Visit this Community
Colorado, United States
Joined: December 25, 2004
KitMaker: 3,770 posts
Armorama: 2,263 posts
Posted: Sunday, March 02, 2014 - 09:43 AM UTC
Trying to order 72 more HengLong outer King Tiger road wheels. They got in T-34. Supposed to reorder next month. Oh well. Don't need more to build the body.

Mike
TacFireGuru
Visit this Community
Colorado, United States
Joined: December 25, 2004
KitMaker: 3,770 posts
Armorama: 2,263 posts
Posted: Thursday, March 06, 2014 - 01:25 PM UTC
Yesterday I cut the top piece that the MAUS and Kugel's will sit on. This evening I pulled out the measurements for the turret's base (diameter) and the turret's length and width.

I plan to angle in the glacis some between the both track housings; with that...I should have enough room for the MAUS and Kugel's. What I really need to do is cut the turret's round base and the the turret's floor. That'll really get me the idea of room.

I have enough 1/8" sheet stock to finish one side of the track housing completely; top, bottom, front, and back. I'm lacking some brace material (which I ordered last night. Hope maybe this weekend I can post up a taped-up mock up?

Mike
TacFireGuru
Visit this Community
Colorado, United States
Joined: December 25, 2004
KitMaker: 3,770 posts
Armorama: 2,263 posts
Posted: Tuesday, March 11, 2014 - 10:58 PM UTC
Ordered a bunch of styrene strips for supports and small brass rod for the ladders. Hobbylinc chose to not ship for several days (ugh) but it should arrive today or tomorrow.

I've glued the top of the track/body housing on one side. I need those strips to arrive so I can get the other side half set and the inside "floor" (the part directly above the tracks) set up. Basically, I'm kinda stuck until I have those parts.
I need to try and source 2-3 Tiger I or II Commander's hatches; I'd like one on each front side and maybe one on top of the turret. Seems like Artisan Mori is the only route to go (AM wise), but at $20 each? Uh...

Hope to get the camera downstairs tonight to show what's what so far. (pictures are better than words sometimes)

Mike
M4A1Sherman
Visit this Community
New York, United States
Joined: May 02, 2013
KitMaker: 4,403 posts
Armorama: 4,078 posts
Posted: Tuesday, March 11, 2014 - 11:50 PM UTC

Quoted Text

Update finally (my internet connection has not allowed for pic uploads It's really "spotty" and they're sending a tech out tomorrow).

The ruler on the left is laid pretty much at the angle of a JagdPanther or JagdPanzer IV. I was hoping that the CMK JP IV set I bought would work, but...too steep of an angle. I "could" angle a portion of the glacis for it...but I don't think the aesthetics would look right. I may mount it in a recess...but I have to see if that would be a really bad "round trap."


Here's the rough placement of the MAUS turret and the two Kugelblitz turrets. Most likely I will "recess" the MAUS about a 1:1 inch lower and raise the Kugel's in a step-fashion to offer some elevation above each other.


This shows the outer side hull on top of the inner side hull with one road wheel:


And an edited version that will show how much of the road wheel will be seen:


And, how the track in relation to the drive sprocket, a road wheel, and the idler will look:


I may get some "spares" and do some crazy tracked "something" based on how this looks!

Mike


HEY! How about a German tank based on the single sprocket, road wheel and rear idler per side, as shown in the pic? Or, an armored Segway, maybe..?
TacFireGuru
Visit this Community
Colorado, United States
Joined: December 25, 2004
KitMaker: 3,770 posts
Armorama: 2,263 posts
Posted: Wednesday, March 12, 2014 - 12:14 PM UTC

Quoted Text

Or, an armored Segway, maybe..?


I like that idea!

TacFireGuru
Visit this Community
Colorado, United States
Joined: December 25, 2004
KitMaker: 3,770 posts
Armorama: 2,263 posts
Posted: Wednesday, March 12, 2014 - 12:39 PM UTC
Some pictures!

The top of one side that'll hold the Kugelblitz's and Maus glued and ensuring that it'll be "right."


The same side with "reinforcing" glue added to firm it up. There are squares behind it too. Also, I took the inner side and laid down the last of my plastic strip for the "shelf" that will go directly above the tracks (and be the bottom of the "box.") Miscellaneous items are holding the strip down until dry.


And of course there was the request for something to scale this to. My incomplete, but started years ago, 1/35th King Tiger. (you know...this only needs the other side of track done, a wee bit of tuning, and paint? Damn shame Mike! Had some great peeps helping me with this.... )(Hmmm..commitment: once the Ratte is done, I vow to complete the KT...no Campaigns, no other kits. Ratte then this love of mine)


Appears USPS couldn't get my stuff here today...supposedly tomorrow. Pfft.

I'll need to add four pieces of 1/8th stock between the two halves for strengthening purposes. And then... ...I need to figure out just HOW I'm going to ensure that the weight of all this plastic and resin and paint and...doesn't bend the axles.

My upcoming post will attempt to offer a couple of "ideas" for this.

Mike

P.S. I appreciate the comments. They do keep me motivated and thinking.
nng-nng
Visit this Community
Bayern, Germany
Joined: October 22, 2013
KitMaker: 380 posts
Armorama: 376 posts
Posted: Wednesday, March 12, 2014 - 12:49 PM UTC
ouch... it´s geeting clear how big it´s gonna be...
and I thought a Kingtiger was one of the big ones
TacFireGuru
Visit this Community
Colorado, United States
Joined: December 25, 2004
KitMaker: 3,770 posts
Armorama: 2,263 posts
Posted: Wednesday, March 12, 2014 - 02:23 PM UTC
Fabian, it IS quite big. or is it or ??

Here are a couple ideas to support the weight:

Option 1. Basically a second secured shelf with some form of stiff support from the top of the axle to the second shelf (should be hidden by the outer side armor and the road wheels):


Option 2. Kind of like "outriggers," but hidden under the tank. Pretty sure they can be hidden by mud, muck, grass, et cetera (it will go on a base eventually):


I'm leaning towards Option 2 due to ease and greater support.

Thoughts?

Mike
miniflea
Visit this Community
Virginia, United States
Joined: October 17, 2011
KitMaker: 237 posts
Armorama: 235 posts
Posted: Wednesday, March 12, 2014 - 02:32 PM UTC
Just wanted to say that I've been following this build with interest and will continue to do so! I can't help but be amused at the fact that even with a 1/35 scale version of this wildly impractical monstrosity weight and structural strength are real concerns.
medixwerkeshoppe
Visit this Community
United States
Joined: February 15, 2014
KitMaker: 6 posts
Armorama: 6 posts
Posted: Wednesday, March 12, 2014 - 02:41 PM UTC
Brotherman those rounds are out and doing all sorts of majick on your build! I like the placement of the rod on the axle versus making the weight ride on a shim to the wheel depth!

Keep up the awesome work!

Doc SKi
Dragon164
#226
Visit this Community
British Columbia, Canada
Joined: February 20, 2012
KitMaker: 1,909 posts
Armorama: 1,066 posts
Posted: Wednesday, March 12, 2014 - 06:45 PM UTC
Mike,
How about covering the inside of the axels with epoxy.

What Tiger hatches are you looking for?

Cheers Rob.
M4A3E8Easy8
Visit this Community
Washington, United States
Joined: February 04, 2006
KitMaker: 302 posts
Armorama: 300 posts
Posted: Wednesday, March 12, 2014 - 06:57 PM UTC
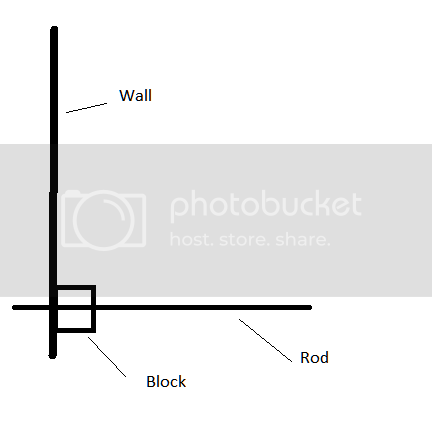
Why not just put a block in between the middle set of tracks and the lower shelf you have shown. This will transfer the weight of the hull directly through the road wheel and will be covered by the skirt armor. Seems alot easier than trying to hide blocks under the tank or putting rods or the like in this beast.
TacFireGuru
Visit this Community
Colorado, United States
Joined: December 25, 2004
KitMaker: 3,770 posts
Armorama: 2,263 posts
Posted: Wednesday, March 12, 2014 - 10:47 PM UTC
Easy8, pretty sure I know what you are suggesting. That may work...

Rob, the weak point is where the axle goes into the hull. Inside there I did plan to put some epoxy to keep the threaded rod, washer, and nut secure. Tiger hatches: Looking for two or three commander's cupolas from a Tiger I or II or even from a MAUS or E100 (or the like). These will go on the front end above the tracks (and maybe one on top of the turret).

Doc Ski, thanks for following along.

Miniflea, what can I say? LOL! Were it not so big, it might not be a concern. Appreciate you following this build.

I'll do up another drawing of what I believe Easy8 is suggesting.

Thanks all.

Mike
hofpig
Visit this Community
England - South East, United Kingdom
Joined: March 04, 2007
KitMaker: 1,330 posts
Armorama: 1,017 posts
Posted: Wednesday, March 12, 2014 - 11:51 PM UTC
Mike,

If you put a thick plastic block inside where the rod goes through the side wall, you can drill through this and it should add some more support to the rod.


Paul
corsair924
Visit this Community
New Hampshire, United States
Joined: August 11, 2008
KitMaker: 403 posts
Armorama: 322 posts
Posted: Thursday, March 13, 2014 - 03:06 AM UTC
Looks really good Mike but to lift a phrase from Roy Scheider I think you're gonna need a bigger bench