_GOTOBOTTOM
AFV Painting & Weathering
Answers to questions about the right paint scheme or tips for the right effect.
Shelving Ideas For Paints And Accessories
gkedwards
Visit this Community
United States
Joined: August 02, 2013
KitMaker: 99 posts
Armorama: 95 posts
Posted: Friday, December 06, 2013 - 05:55 AM UTC
I guess I'm like everybody else in the fact that as my re-interest, and re-entry grows in modeling, so does my inventory of paints, tubes of oils, and all of the rest of the accessories that go along with having what you need, to do what you need to do, to get the results that you want to get.

I have reached a point to where I have things piled up, falling off, and constantly in my way on the edges of my work bench.

I was wondering if any of you guys would share a picture or two, to give me some ideas of how I could build some easily constructed storage shelving, or racks, that would attach down length ways to the outsides of my bench? I don't have a great deal of room to work with, so I built my bench 55 inches wide by 40 inches deep.

I have ordered myself a portable spray booth that I am going to sit in the center of the bench, and move it closer to the front as I need it for airbrushing. So that, will take care of itself and not take up too much space. My compressor sits under the bench, so it's completely out of the way...

I was thinking about cutting some thin strips of wood, and screwing them together, making (2) storage "racks" out of them. Then attaching them, one on either side of the bench so that the bottles of paint etc. would be within arms reach, and neat, and out of the way, on each side of me. I could also install a light on top of each "rack" to allow me good lighting at side angles so as to eliminate shadows.

It's just a thought that I have, .. but I have to do something.! My paints and accessories are reproducing like rabbits in heat I have a couple of those plastic storage tubs with the pull out drawers from Wally World, but I am quickly out growing those.

For those of you who have ran into this issue, and solved the problem, please send a picture or two of your work area. I would LOVE to see how you have your work area arranged.

Thanks,

Greg
retiredyank
Visit this Community
Arkansas, United States
Joined: June 29, 2009
KitMaker: 11,610 posts
Armorama: 7,843 posts
Posted: Friday, December 06, 2013 - 06:15 AM UTC


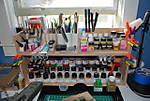
The shelves in this photo are on sliders.


I also keep sets of tools in craft tool boxes.
Petro
Visit this Community
Connecticut, United States
Joined: November 02, 2003
KitMaker: 984 posts
Armorama: 846 posts
Posted: Friday, December 06, 2013 - 06:24 AM UTC
I've got paint storage and tool storage all over in my area. But i never seem to put stuff back as i use it.
Hell, half my paints are over 10 years old. I'm not even sure if they are still good. Most i will probably never use anyways.
gkedwards
Visit this Community
United States
Joined: August 02, 2013
KitMaker: 99 posts
Armorama: 95 posts
Posted: Friday, December 06, 2013 - 06:25 AM UTC
I hear ya Matt. Every time that the wife and I go to the craft and hobby stores I come back with another load. I have seen some of those guys on YouTube, and their work areas look like they punch the clock and work for a professional organization.

I think I can make my idea work, if I see enough of others ways of doing things. Thanks for your help, seeing how other modelers store things, and keep stuff organized helps to create ideas of how to do this.

Thanks again
gkedwards
Visit this Community
United States
Joined: August 02, 2013
KitMaker: 99 posts
Armorama: 95 posts
Posted: Friday, December 06, 2013 - 06:27 AM UTC

Quoted Text

I've got paint storage and tool storage all over in my area. But i never seem to put stuff back as i use it.
Hell, half my paints are over 10 years old. I'm not even sure if they are still good. Most i will probably never use anyways.


MEEE TOOO !!!!! That's what I'm trying to solve I can't see how to get into my hobby room anymore !!!
Chrisk-K
Visit this Community
Maryland, United States
Joined: January 09, 2012
KitMaker: 310 posts
Armorama: 294 posts
Posted: Tuesday, December 10, 2013 - 06:37 PM UTC

Quoted Text

I've got paint storage and tool storage all over in my area. But i never seem to put stuff back as i use it.
Hell, half my paints are over 10 years old. I'm not even sure if they are still good. Most i will probably never use anyways.


Yep. I do have several storage & shelving units in my hobby room. My plan was to organize every paint and every tool. I found that neatly organizing my hobby stuff was stressful.

Nowadays, I store my paints in air-tight containers.
retiredyank
Visit this Community
Arkansas, United States
Joined: June 29, 2009
KitMaker: 11,610 posts
Armorama: 7,843 posts
Posted: Tuesday, December 10, 2013 - 08:27 PM UTC
A clean desk is a sign of an empty mind. Actually, mine is usually very neatly organized.
sltom44
Visit this Community
Canada
Joined: December 11, 2013
KitMaker: 15 posts
Armorama: 14 posts
Posted: Tuesday, December 10, 2013 - 11:08 PM UTC

Quoted Text

I guess I'm like everybody else in the fact that as my re-interest, and re-entry grows in modeling, so does my inventory of paints, tubes of oils, and all of the rest of the accessories that go along with having what you need, to do what you need to do, to get the results that you want to get.

I have reached a point to where I have things piled up, falling off, and constantly in my way on the edges of my work bench.

I was wondering if any of you guys would share a picture or two, to give me some ideas of how I could build some easily constructed storage shelving, or racks, that would attach down length ways to the outsides of my bench? I don't have a great deal of room to work with, so I built my bench 55 inches wide by 40 inches deep.

I have ordered myself a portable spray booth that I am going to sit in the center of the bench, and move it closer to the front as I need it for airbrushing. So that, will take care of itself and not take up too much space. My compressor sits under the bench, so it's completely out of the way...

I was thinking about cutting some thin strips of wood, and screwing them together, making (2) storage "racks" out of them. Then attaching them, one on either side of the bench so that the bottles of paint etc. would be within arms reach, and neat, and out of the way, on each side of me. I could also install a light on top of each "rack" to allow me good lighting at side angles so as to eliminate shadows.

It's just a thought that I have, .. but I have to do something.! My paints and accessories are reproducing like rabbits in heat I have a couple of those plastic storage tubs with the pull out drawers from Wally World, but I am quickly out growing those.

For those of you who have ran into this issue, and solved the problem, please send a picture or two of your work area. I would LOVE to see how you have your work area arranged.

Thanks,

Greg


I purchased the large Stanley FatMax at Home Depot and it is perfect for storing everything I have. The top section is detachable which is a blessing as that has all of my reference books and that is quite heavy on its own.

The FatMax comes with 2 fold-out drawers. One drawer holds all of my modelling tools. I purchased small storage containers to fit in the drawer so that my tools don't go all over the place when moving around.

The second drawer comes with 11 separate little containers and that is where I store my paints. The little containers are the perfect size for storing 12 bottles of Vallejo sized paint jars.

The bottom tub is the largest and that is where my painting tools are stored - air compressor, airbrush, brushes, and of course thinner and solvents. The great thing is it comes with an expandable handle and wheels for easy travel. Check out the toolbox section of Lowe's, Home Depot, etc. You will find great ideas for storage.

Up here in Canada we have a retail outlet called 'Canadian Tire' I recently purchased a few of their Mastercraft toolboxes. One is similar to my STANLEY FatMax, but a little smaller. It is perfect for holding all of my diorama material. I purchased a few of their smaller toolboxes for holding the projects I am currently working on.

Toolboxes are a great storage solution as they keep your work protected and are much nicer to look at when stacked neatly in the corner (I work at the kitchen table so I must put everything away when not working at it because we need that table to eat our meals?.
gkedwards
Visit this Community
United States
Joined: August 02, 2013
KitMaker: 99 posts
Armorama: 95 posts
Posted: Wednesday, December 11, 2013 - 02:04 PM UTC
Thanks for the input and the advice. I have looked around on Google images for "hobby, artist's, modeling, craft" and every other thing I can think of, for some kind of examples of paint storage racks, organizers and things of that nature.

I just can't seem to find the right thing that catches my eye. I'm thinking about just building me some racks to store my paints, thinners, tools, and brushes in. I did see one supplier on a European forum "Brit Modelers" and he does offer some very nice table top paint organizers.

Although they are in Europe, and I am in the U.S.A. and they are pricey as well.....but, as I said they are well made, and they look nice too.

So....I think I'll just sit down after Christmas and sketch out something on paper that I can build myself, for a few bucks.

Thanks guys.
catman31
Visit this Community
Ohio, United States
Joined: September 12, 2005
KitMaker: 166 posts
Armorama: 142 posts
Posted: Wednesday, December 11, 2013 - 04:00 PM UTC
Hey Greg

Have you seen this site (link below) and guy's stuff for hobby paints and glues? Maybe this may help?

-Felix

http://www.tshobbies.com/main.sc
LeoCmdr
Visit this Community
Alberta, Canada
Joined: January 19, 2005
KitMaker: 4,085 posts
Armorama: 3,917 posts
Posted: Wednesday, December 11, 2013 - 04:17 PM UTC
These carrousels are the cat's meow. I highly recommend them as a storage option.

http://paintier.com/
fhvn4d
#159
Visit this Community
Massachusetts, United States
Joined: April 07, 2008
KitMaker: 803 posts
Armorama: 564 posts
Posted: Wednesday, December 11, 2013 - 04:21 PM UTC
I made this myself for under 10 dollars.....
Beauslx
Visit this Community
Nevada, United States
Joined: August 28, 2013
KitMaker: 159 posts
Armorama: 9 posts
Posted: Wednesday, December 11, 2013 - 04:45 PM UTC

Quoted Text

I made this myself for under 10 dollars.....


MDF and PVC? I like it!
j76ljr
Visit this Community
United States
Joined: July 11, 2011
KitMaker: 150 posts
Armorama: 148 posts
Posted: Thursday, December 12, 2013 - 12:01 AM UTC
nice Brian
fhvn4d
#159
Visit this Community
Massachusetts, United States
Joined: April 07, 2008
KitMaker: 803 posts
Armorama: 564 posts
Posted: Thursday, December 12, 2013 - 07:42 AM UTC
It was made out of a 6 foot piece of 3/4 inch Oak Board, a piece of 1/4 inch Oak Plywood, and PVC pipe stock that I had from a bathroom project. A table saw and a cut off saw were all I used, but a skill saw would probably work too. Its customizable to the extent that you find the right size PVC for the paints you use ( MM as you can see), and the things are just epoxied onto the wood wherever it suits you.
AlanL
Visit this Community
England - East Anglia, United Kingdom
Joined: August 12, 2005
KitMaker: 14,499 posts
Armorama: 11,675 posts
Posted: Thursday, December 12, 2013 - 08:33 AM UTC
Have a look here:

http://www.progeng.co.uk/sphere

I got a couple of their racks, very useful.

Al
MadModeler
Visit this Community
Nova Scotia, Canada
Joined: July 26, 2012
KitMaker: 454 posts
Armorama: 281 posts
Posted: Thursday, December 12, 2013 - 11:49 PM UTC
Hey...
for my storage issues, I use a Wal Mart plastic dresser.. the mid size ones on the plastic wheels. Works like a charm. Three drawers for different paints and putties I own.
Can't complain.

Cheers,
Tom
j76lr
Visit this Community
New Jersey, United States
Joined: September 22, 2006
KitMaker: 1,081 posts
Armorama: 1,066 posts
Posted: Friday, December 13, 2013 - 12:20 AM UTC
nice Brian.
I imagine you could cement the largest diameter pvc and then cut ,in sequence, smaller diameters ,not cemented, for smaller bottles ? as you need a space for a large jar you remove the uncemented pvc. replace them for smaller bottles. hope that makes sense !
fhvn4d
#159
Visit this Community
Massachusetts, United States
Joined: April 07, 2008
KitMaker: 803 posts
Armorama: 564 posts
Posted: Friday, December 13, 2013 - 08:33 AM UTC
yea it does... and I think you could... it would depend on the diameters I guess.. but that was the cool thing about the thing I made.. I made it work for ME... other people might like things in different places... and by making it this way... its not hard to put things in other places
GALILEO1
Visit this Community
Maryland, United States
Joined: April 18, 2006
KitMaker: 1,794 posts
Armorama: 1,431 posts
Posted: Saturday, December 14, 2013 - 06:26 AM UTC
I built this in a weekend:


Nothing to it. Wood, some nails, and that's it. I was going to paint it but I seem to like the natural wood color. I'm building another one (bigger one) in a couple of weeks (to put all those extra stuff you see on top).

Rob
210cav
Visit this Community
Virginia, United States
Joined: February 05, 2002
KitMaker: 6,149 posts
Armorama: 4,573 posts
Posted: Saturday, December 14, 2013 - 06:59 AM UTC
Rob-- details on material used, etc would be most appreciated.
Great looking case
DJ
dogstar
Visit this Community
Canada
Joined: November 17, 2007
KitMaker: 109 posts
Armorama: 103 posts
Posted: Saturday, December 14, 2013 - 08:04 AM UTC
I'm working on a desk top rack, laser cut stainless steel and assembled using Chicago screws (or sex bolts) if you prefer their other name.
It'll have a solid bottom plate and a plate with holes for the bottles, raised about an inch. Pretty easy to duplicate in wood if you dont happen to have a laser cutter sitting around.
GALILEO1
Visit this Community
Maryland, United States
Joined: April 18, 2006
KitMaker: 1,794 posts
Armorama: 1,431 posts
Posted: Saturday, December 14, 2013 - 12:35 PM UTC

Quoted Text

Rob-- details on material used, etc would be most appreciated.
Great looking case
DJ


Thanks DJ. Nothing special went into this, really. The backing is a piece of plywood I had in the garage. Size, I think, is 48(L)X22.5(W) inches. I didn't even bother to cut it so I know it was that size straight from Home Depot. I then went back to HD and purchased two types of wood strips. These are the kind you use in frames and the such (good quality and smooth). If you look at the pics, you can see both the thinner type and thicker type of strips. To be honest though, when I do this again in a couple of weeks, I'll be using only the thicker type as it holds much better. Size of this thicker strip of wood (as it comes from HD) is 1/2x2x4. Product # for this seems to be 317914. First thing I did was to completely frame the plywood. After that, it was a matter of cutting and installing the individual strips in place. I used the paints as reference for spacing. Pretty simple all in all.

Rob
210cav
Visit this Community
Virginia, United States
Joined: February 05, 2002
KitMaker: 6,149 posts
Armorama: 4,573 posts
Posted: Saturday, December 14, 2013 - 03:12 PM UTC

Quoted Text


Quoted Text

Rob-- details on material used, etc would be most appreciated.
Great looking case
DJ


Thanks DJ. Nothing special went into this, really. The backing is a piece of plywood I had in the garage. Size, I think, is 48(L)X22.5(W) inches. I didn't even bother to cut it so I know it was that size straight from Home Depot. I then went back to HD and purchased two types of wood strips. These are the kind you use in frames and the such (good quality and smooth). If you look at the pics, you can see both the thinner type and thicker type of strips. To be honest though, when I do this again in a couple of weeks, I'll be using only the thicker type as it holds much better. Size of this thicker strip of wood (as it comes from HD) is 1/2x2x4. Product # for this seems to be 317914. First thing I did was to completely frame the plywood. After that, it was a matter of cutting and installing the individual strips in place. I used the paints as reference for spacing. Pretty simple all in all.

Rob


Rob-- fine work and I thank you for your response
DJ
GALILEO1
Visit this Community
Maryland, United States
Joined: April 18, 2006
KitMaker: 1,794 posts
Armorama: 1,431 posts
Posted: Sunday, December 15, 2013 - 04:18 AM UTC

Quoted Text


Rob-- fine work and I thank you for your response
DJ


No problem at all. Coming to think of it, I may post a step-by-step guide on this when I build my second unit.

Rob
 _GOTOTOP