

interesting project
meanwhile - at least for domestic use - Australian army purchased 6x6 Mercedes G-Wagons as replacement for the old landrovers
Hosted by Darren Baker
SOCOMD double build

rotxxyyzz

Joined: September 05, 2006
KitMaker: 43 posts
Armorama: 37 posts
Posted: Friday, January 10, 2014 - 08:59 PM UTC
2805662

Joined: March 27, 2008
KitMaker: 546 posts
Armorama: 541 posts
Posted: Friday, January 10, 2014 - 09:39 PM UTC
Quoted Text
interesting project
meanwhile - at least for domestic use - Australian army purchased 6x6 Mercedes G-Wagons as replacement for the old landrovers
Thanks for your interest.
Dead right - currently for domestic (& probably not SOCOMD) use. I saw a 6x6 G wagon for the first time last week. Not that impressed. I guess the bugs will be wrung out as they are brought into service. Still yet to see the surveillance variant.

barny

Joined: August 03, 2005
KitMaker: 273 posts
Armorama: 272 posts
Posted: Friday, January 10, 2014 - 09:44 PM UTC
Really like this ,need to build me a 1/35 scale one I think.
Terry
Terry
grimmo
Joined: January 17, 2006
KitMaker: 752 posts
Armorama: 569 posts
Posted: Friday, January 10, 2014 - 10:45 PM UTC
Quoted Text
Quoted Textinteresting project
meanwhile - at least for domestic use - Australian army purchased 6x6 Mercedes G-Wagons as replacement for the old landrovers
Thanks for your interest.
Dead right - currently for domestic (& probably not SOCOMD) use. I saw a 6x6 G wagon for the first time last week. Not that impressed. I guess the bugs will be wrung out as they are brought into service. Still yet to see the surveillance variant.
I've crawled all over the 4x4 version, and i'd hate to drive one. for me, I could just fit behind the wheel, (6'2" tall, and big build), with not much room to move.
Great work greg. do you have detailed pics of the lrpv's?
2805662
Joined: March 27, 2008
KitMaker: 546 posts
Armorama: 541 posts
Posted: Friday, January 10, 2014 - 10:56 PM UTC
Quoted Text
Quoted Text
Thanks for your interest.
Dead right - currently for domestic (& probably not SOCOMD) use. I saw a 6x6 G wagon for the first time last week. Not that impressed. I guess the bugs will be wrung out as they are brought into service. Still yet to see the surveillance variant.
I've crawled all over the 4x4 version, and i'd hate to drive one. for me, I could just fit behind the wheel, (6'2" tall, and big build), with not much room to move.
Great work greg. do you have detailed pics of the lrpv's?
That does sound tight. One of the mods that both SOCOMD trucks received was a new, non-LR steering wheel of a smaller diameter (350mm). That helped larger guys fit & reduced the chances of injuries to the upper leg if there was a mine-strike.
I've squirrelled away some pics of the late-mod trucks. Pretty hard to come by.
I'd like to finish that build of mine in 1/35, but I don't have it anymore.
2805662
Joined: March 27, 2008
KitMaker: 546 posts
Armorama: 541 posts
Posted: Friday, January 10, 2014 - 11:00 PM UTC
Quoted Text
Really like this ,need to build me a 1/35 scale one I think.
Terry
Thanks Terry. It's a pretty simple subject, lots of straight sides. The roll cage & gun mount are a little tricky. One thing some people miss is that the truck was both lengthened & widened.
barny
Joined: August 03, 2005
KitMaker: 273 posts
Armorama: 272 posts
Posted: Friday, January 10, 2014 - 11:38 PM UTC
Yes buddy I picked up on the width bit ,do you know by how much.
Terry
Terry
2805662
Joined: March 27, 2008
KitMaker: 546 posts
Armorama: 541 posts
Posted: Saturday, January 11, 2014 - 08:54 AM UTC
Cheers Terry - ever since I saw a drawing being sold as reference without the additional width I've become a little 'evangelist' about the width thing. 
I'll do the maths and get back to you.
Greg
I'll do the maths and get back to you.
Greg
barny
Joined: August 03, 2005
KitMaker: 273 posts
Armorama: 272 posts
Posted: Saturday, January 11, 2014 - 10:33 PM UTC
Greg you are a star thank you .
Terry
Terry
2805662
Joined: March 27, 2008
KitMaker: 546 posts
Armorama: 541 posts
Posted: Sunday, January 12, 2014 - 01:14 AM UTC
Too easy Terry.
I've got an overall width of 2140mm in 1/1. That figure includes the brush guards & sideboards though. I'll dig a little more - I'm sure I've got the firewall dimension somewhere too.
I've got an overall width of 2140mm in 1/1. That figure includes the brush guards & sideboards though. I'll dig a little more - I'm sure I've got the firewall dimension somewhere too.
2805662
Joined: March 27, 2008
KitMaker: 546 posts
Armorama: 541 posts
Posted: Sunday, January 12, 2014 - 01:20 AM UTC
Got it - 'Panel, dash, inner, 1812mm LG'. Hope that helps.
2805662
Joined: March 27, 2008
KitMaker: 546 posts
Armorama: 541 posts
Posted: Sunday, January 12, 2014 - 09:50 PM UTC
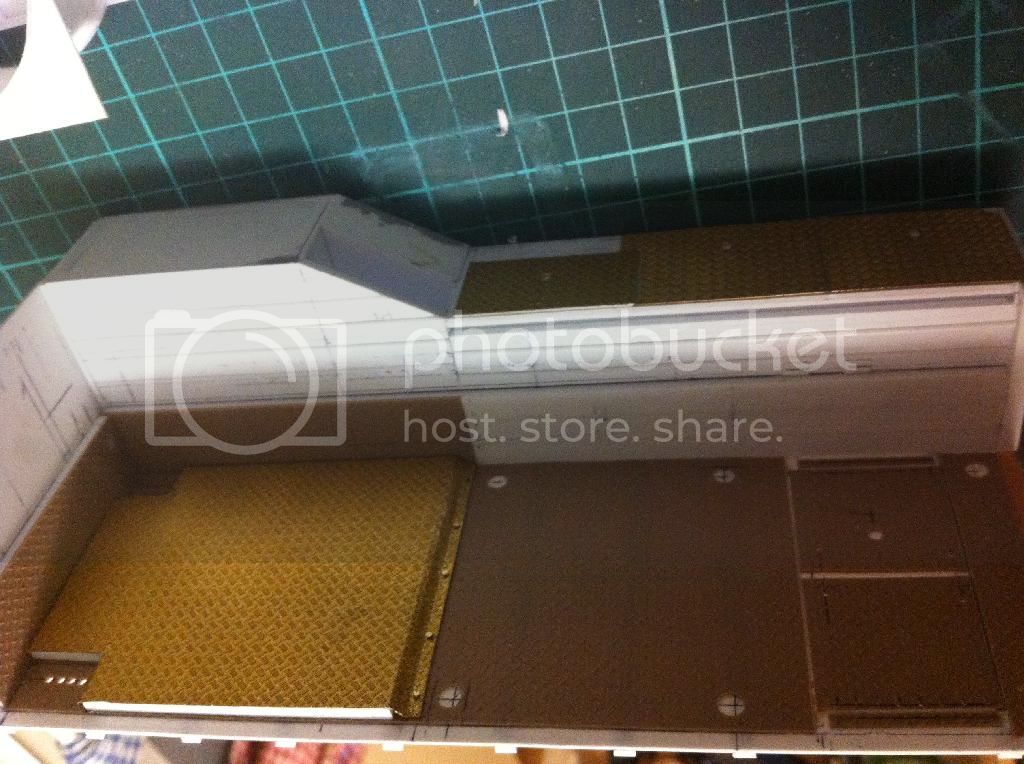
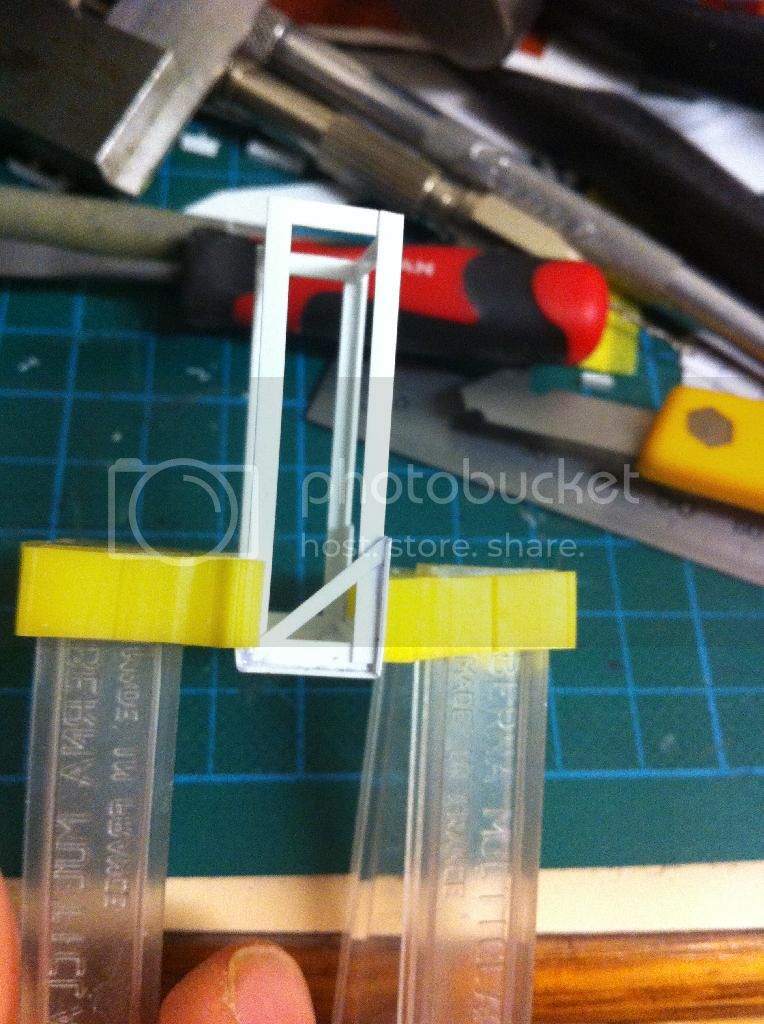
Time to move on to the sponson stowage bin lids. The 5-bar chequer-plate is from Kit Form Services in the United Kingdom. Very nice, btw.
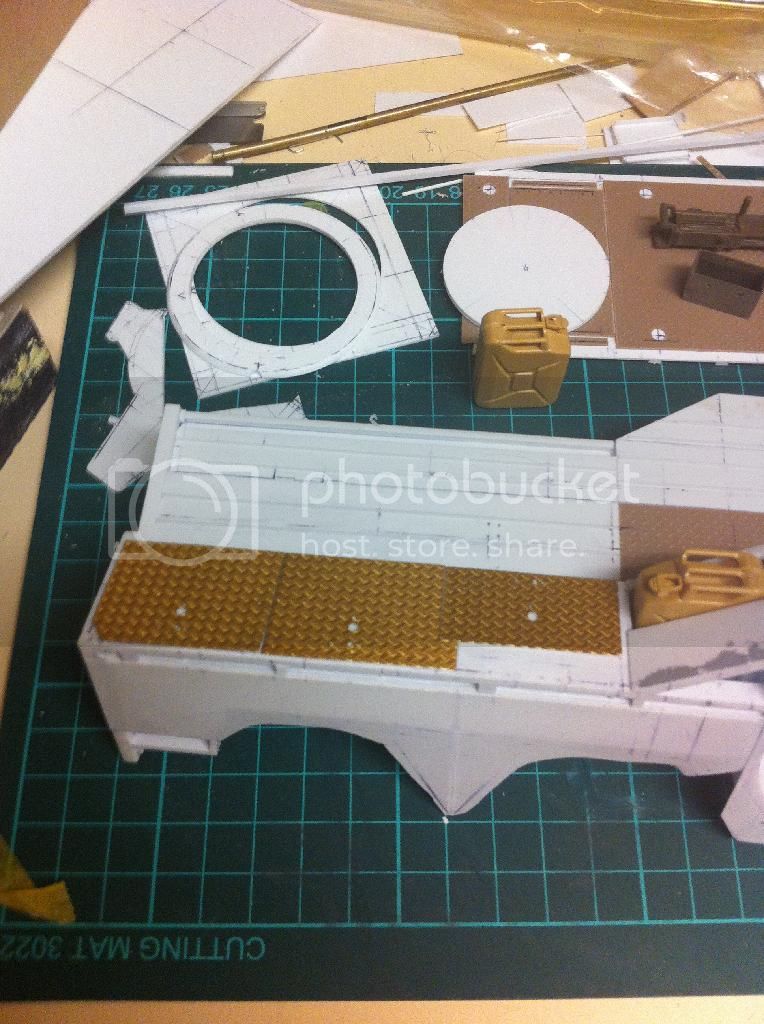
Close-up of the bins: holes were punched using a punch & die set:
Still need to add the hinges & rivet details.

Close-up of the bins: holes were punched using a punch & die set:

Still need to add the hinges & rivet details.
barny
Joined: August 03, 2005
KitMaker: 273 posts
Armorama: 272 posts
Posted: Sunday, January 12, 2014 - 10:22 PM UTC
Very nice ,thank you for the measurements ,
Terry
Terry
grimmo
Joined: January 17, 2006
KitMaker: 752 posts
Armorama: 569 posts
Posted: Sunday, January 12, 2014 - 11:30 PM UTC
nice work.
the kfs stuff is great. I have around $1000 worth of truck stuff from KFS, and it's worth it.
the kfs stuff is great. I have around $1000 worth of truck stuff from KFS, and it's worth it.
2805662
Joined: March 27, 2008
KitMaker: 546 posts
Armorama: 541 posts
Posted: Sunday, January 12, 2014 - 11:55 PM UTC
Quoted Text
Very nice ,thank you for the measurements ,
Terry
Too easy Terry, glad to be of assistance.
Matt, I agree, the KFS stuff is magic. Just about run out of the chequer-plate though. The tray, pack trays (side racks) of the LRPV & the SRV-SF consume 5-bar like crazy. Doesn't help when the modeller screws up, either.
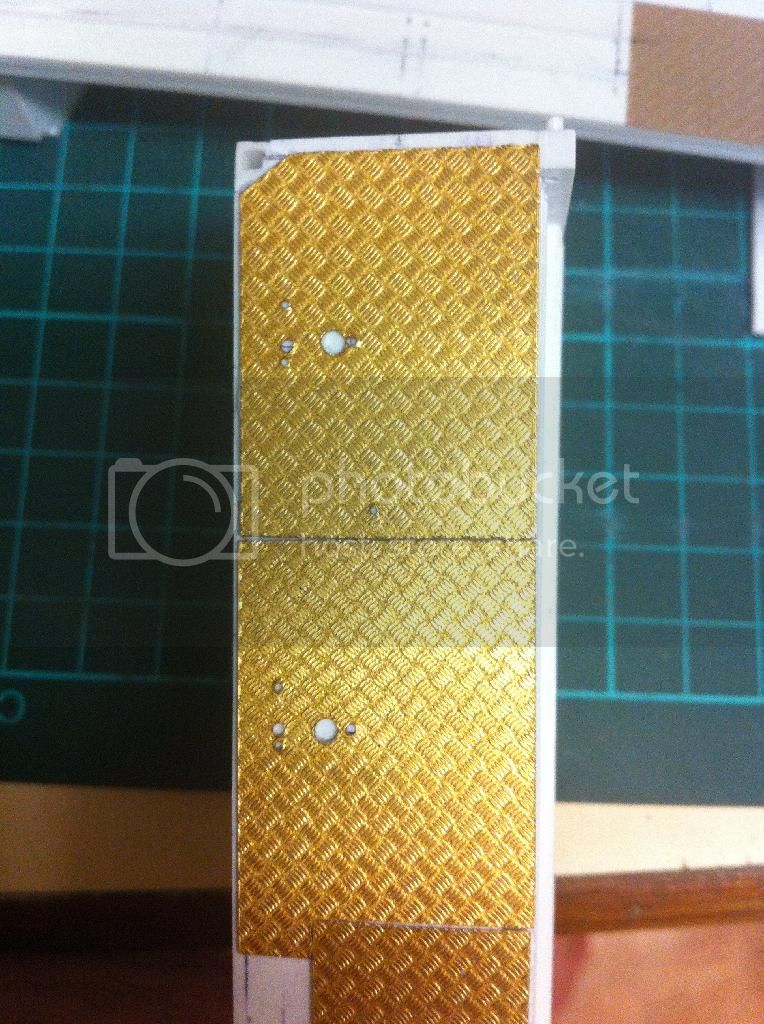
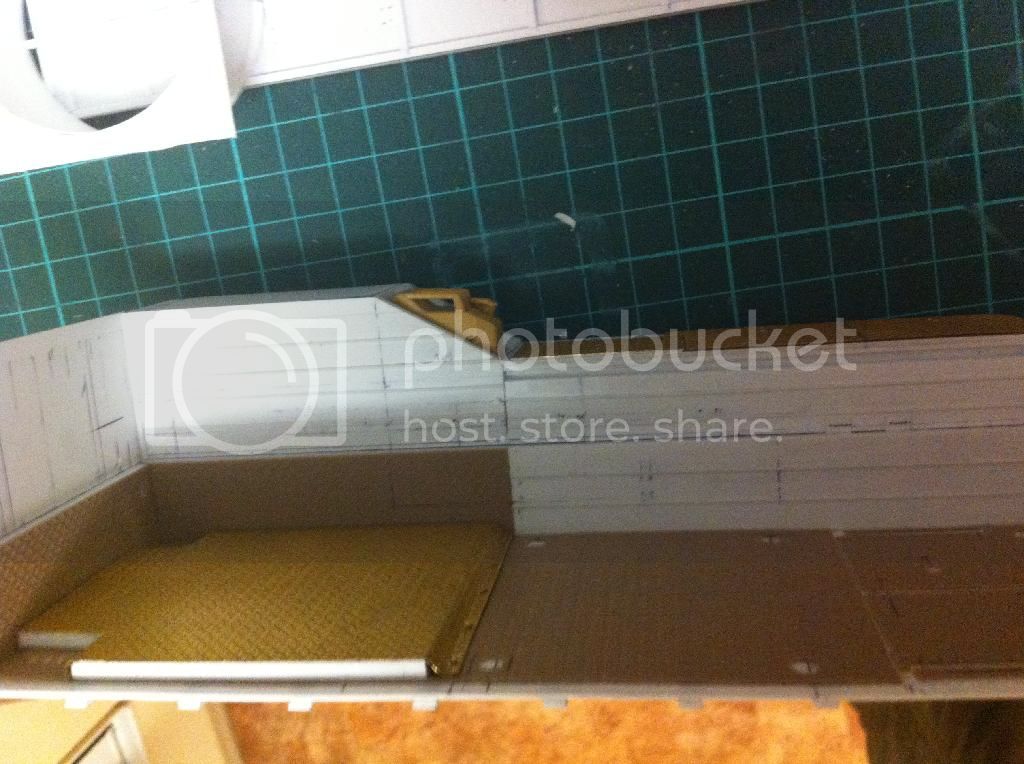
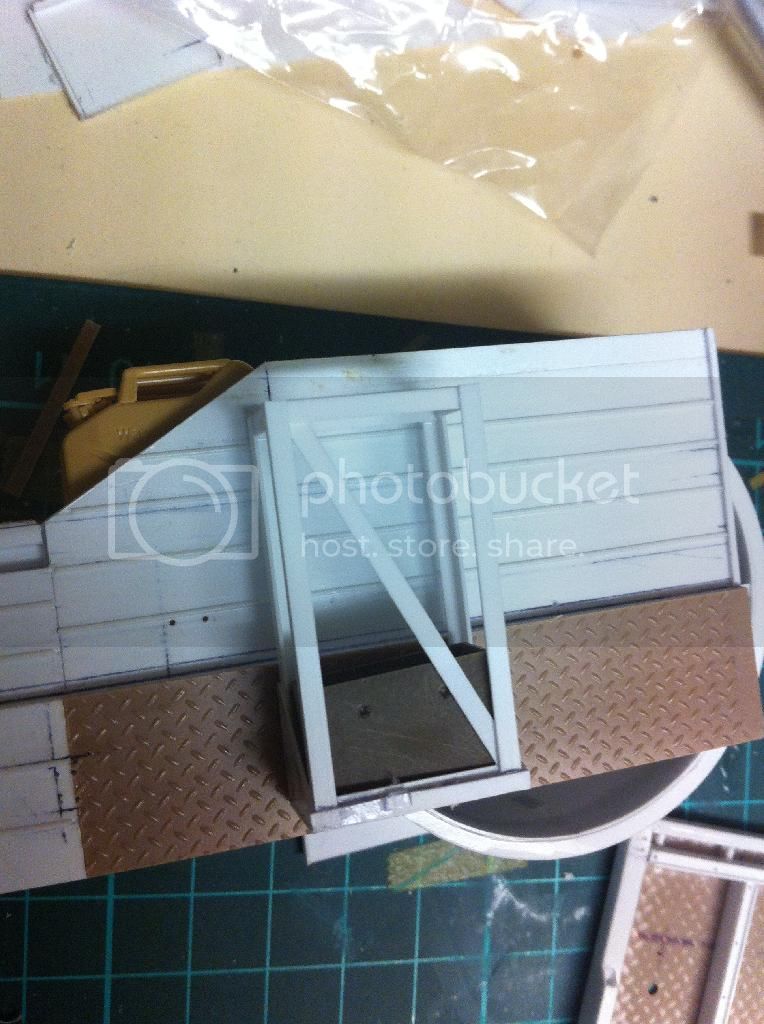
Finished the LHS bin lids too:

These are 6mm thick IRL, so I had to fabricate the lids to match 0.375mm in-scale. Mine are somewhat thin: I cut & punched the lids in PE & 0.25mm styrene sheet, laminated them with CA before gluing them to the sponsons. This ensured a more forgiving styrene-styrene mating surface.
More in a couple of days.
grimmo
Joined: January 17, 2006
KitMaker: 752 posts
Armorama: 569 posts
Posted: Monday, January 13, 2014 - 02:25 AM UTC
nice work. can we have picks of the wheels please?
2805662
Joined: March 27, 2008
KitMaker: 546 posts
Armorama: 541 posts
Posted: Monday, January 13, 2014 - 08:36 AM UTC
Quoted Text
nice work. can we have picks of the wheels please?
Too easy Matt - I'm away from the bench for a day or so, so this is what I have with me:

Better pics when I get back.
2805662
Joined: March 27, 2008
KitMaker: 546 posts
Armorama: 541 posts
Posted: Wednesday, January 15, 2014 - 08:53 AM UTC
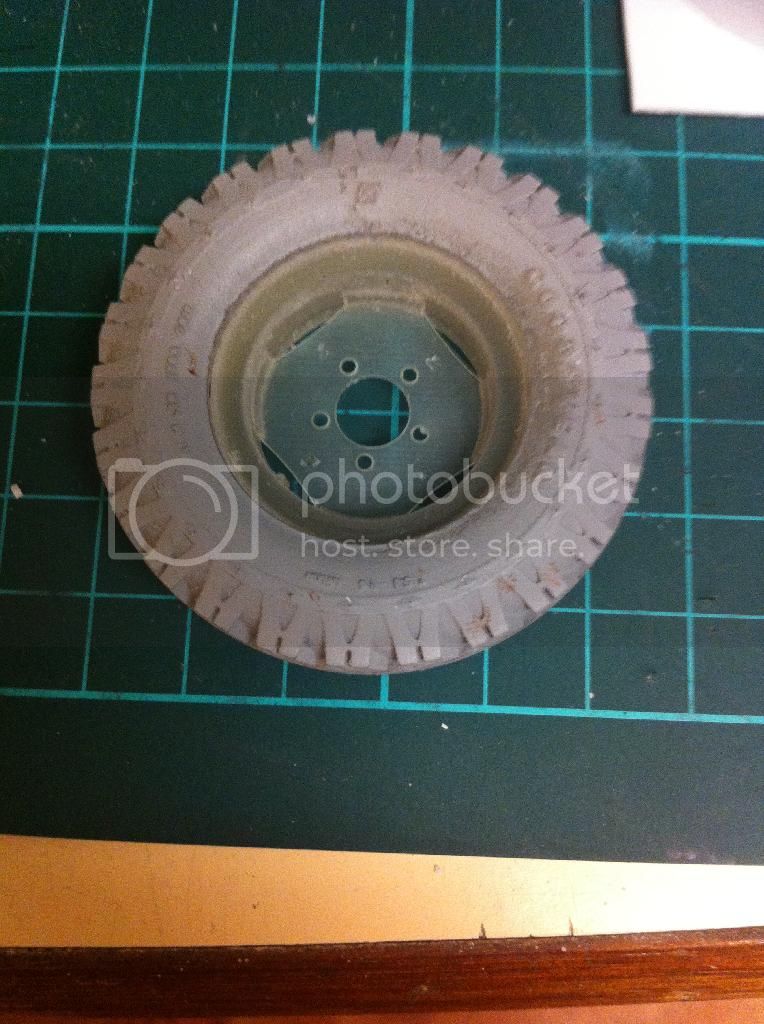
The 3D printed wheels turned up from shapeways - I rushed the clean up of the tyres before I primed them, so I'll have to revisit them. This is a wheel with the spare hub:
And this is the tyre tread pattern:
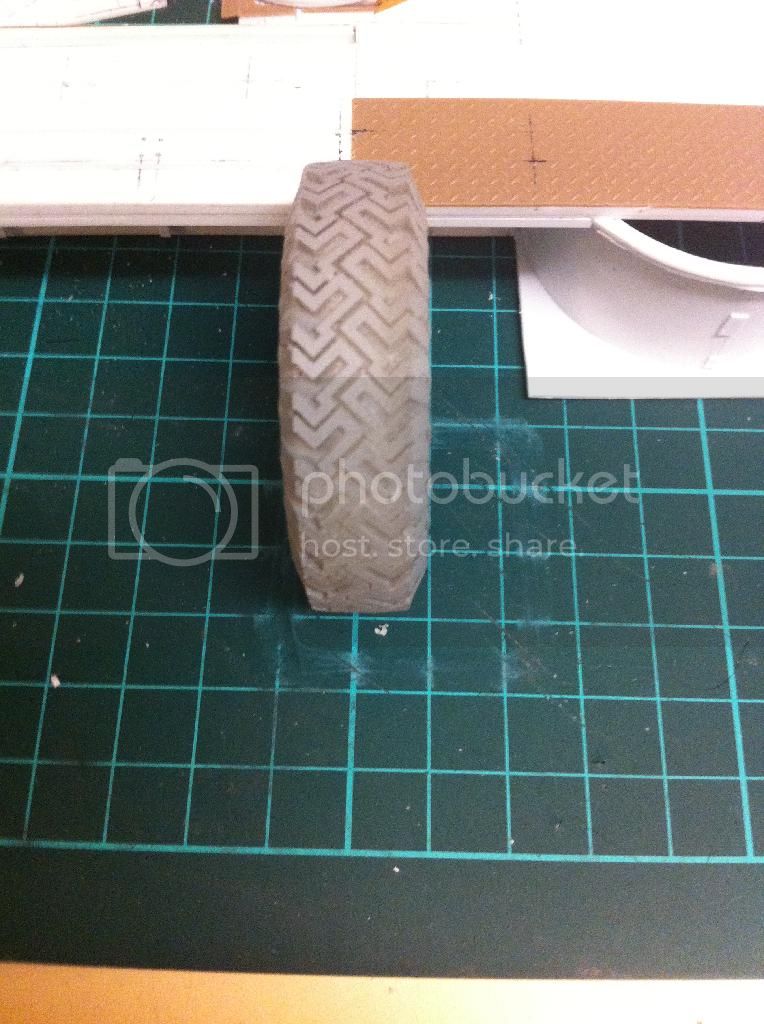
Once again, the CAD work done by Denis Loep is amazing!

And this is the tyre tread pattern:

Once again, the CAD work done by Denis Loep is amazing!
2805662
Joined: March 27, 2008
KitMaker: 546 posts
Armorama: 541 posts
Posted: Saturday, January 18, 2014 - 02:38 PM UTC
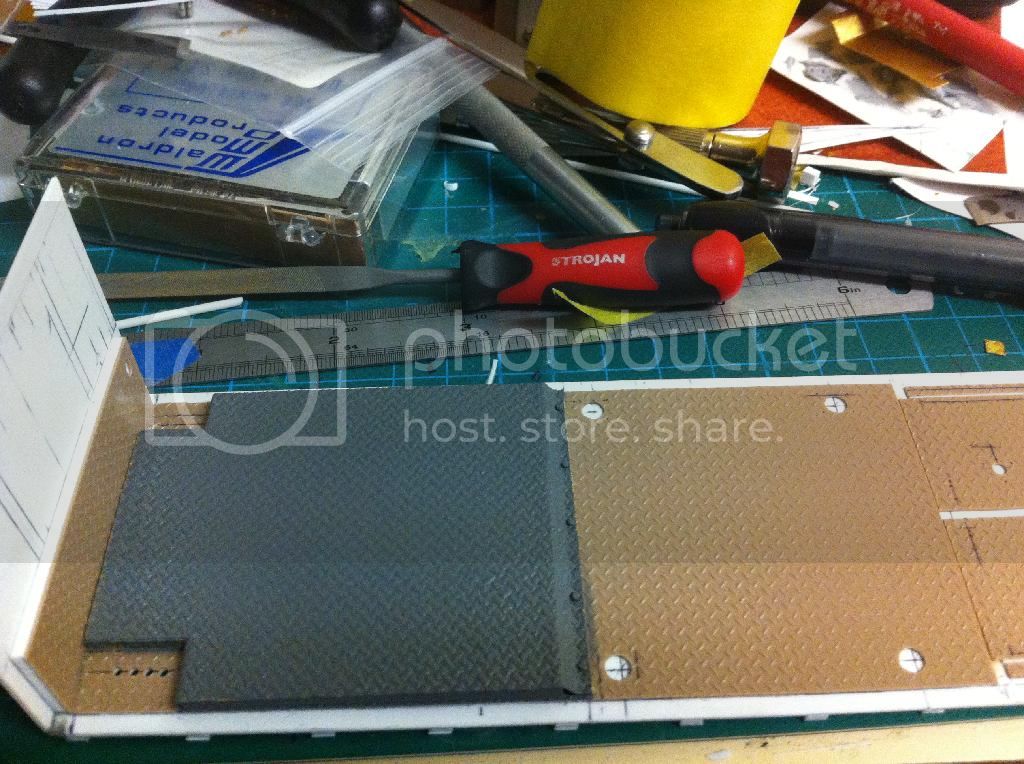
Time to revisit the tray floor. There's a raised floor covering the front third of the tray, with odd rectangular cut-outs on the RHS (individual weapon stowage) and on the LHS (wiring loom). This was added with 2mm styrene sheet and covered with 5-bar chequer plate (compared to 1-bar for the tray floor). The chequer plate was bolted down using scale hardware 0.8mm nuts and bolts.

This still needs to be covered with anti-slip.
Here's a couple of shots of the tray floor and RHS wall:

This still needs to be covered with anti-slip.
Here's a couple of shots of the tray floor and RHS wall:


grimmo
Joined: January 17, 2006
KitMaker: 752 posts
Armorama: 569 posts
Posted: Sunday, January 19, 2014 - 12:00 AM UTC
looking good greg! I like the tyres, they have come up good.
2805662
Joined: March 27, 2008
KitMaker: 546 posts
Armorama: 541 posts
Posted: Sunday, January 19, 2014 - 08:03 AM UTC
Thanks Matt. The wheels do look good. Pretty thankless work at the moment. Lots of hours, not much visible in terms of results.
After masking off the tray, I added some Games Workshops 'roughcoat' textured spray as antislip on the Kit Form Services 5-bar chequer plate PE. It was a little sad to see that beautiful etched brass disappear under the textured paint!
Just have to add the rivets, tie down rings and rifle-butt holder and the tray floor interior is done!
After masking off the tray, I added some Games Workshops 'roughcoat' textured spray as antislip on the Kit Form Services 5-bar chequer plate PE. It was a little sad to see that beautiful etched brass disappear under the textured paint!

Just have to add the rivets, tie down rings and rifle-butt holder and the tray floor interior is done!
grimmo
Joined: January 17, 2006
KitMaker: 752 posts
Armorama: 569 posts
Posted: Sunday, January 19, 2014 - 01:21 PM UTC
I have a can of that games workshop spray too, what great stuff that is!
2805662
Joined: March 27, 2008
KitMaker: 546 posts
Armorama: 541 posts
Posted: Monday, January 20, 2014 - 08:16 AM UTC
Matt - I agree; the Roughcoat works a treat!
Next up is the front tray wall. To make things difficult, the two vertical stiffeners aren't evenly spaced. Using the evenly spaced tie-downs along the top of the tray wall as reference points, the upright positions were plotted. These were fabricated using 1.5 x 2 mm rectangular rod. The tamiya tape is plotting the location of the MT-F301 mounting tray.
Once the verticals were done, the horizontal stiffener that runs across the top of the tray wall was added, again using 1.5 x 2 mm styrene.
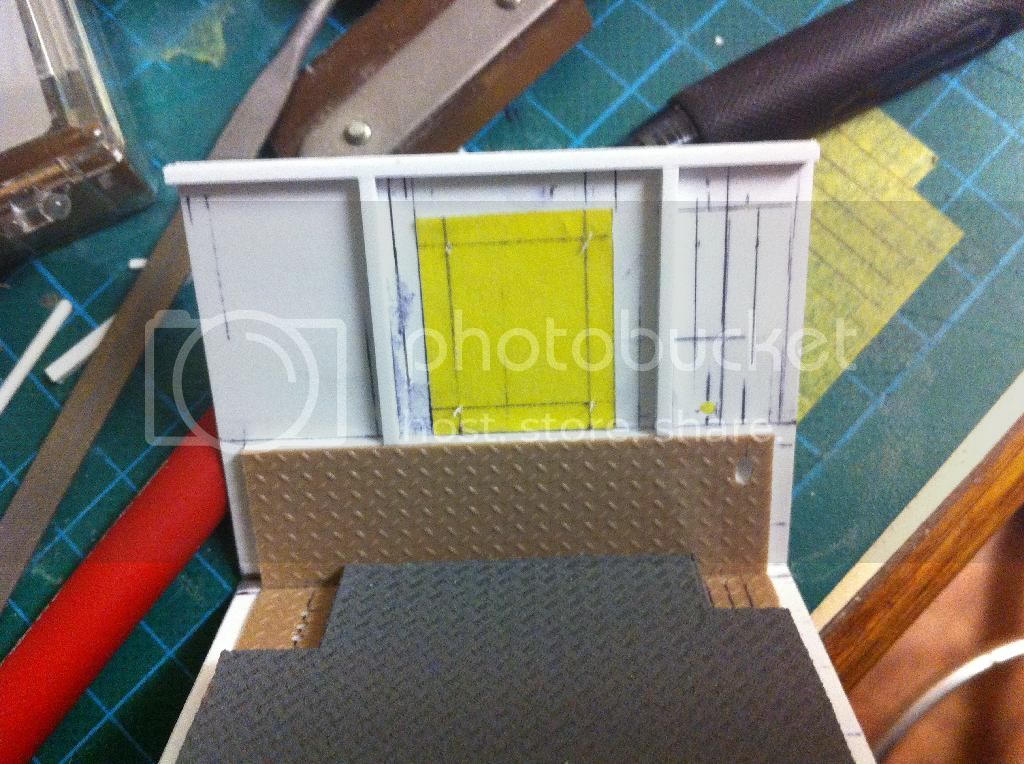
The hieroglyphics on the right are plotting the individual weapon upper mount and the conduit routing for the power distribution unit.
2805662
Joined: March 27, 2008
KitMaker: 546 posts
Armorama: 541 posts
Posted: Tuesday, January 21, 2014 - 08:45 AM UTC
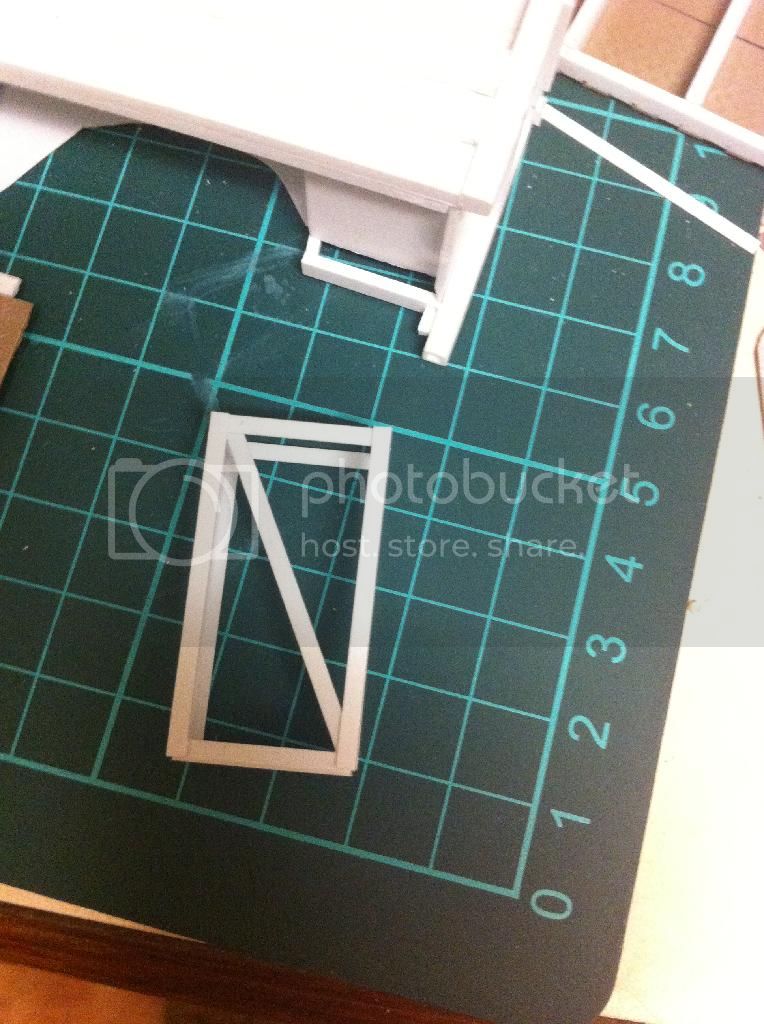
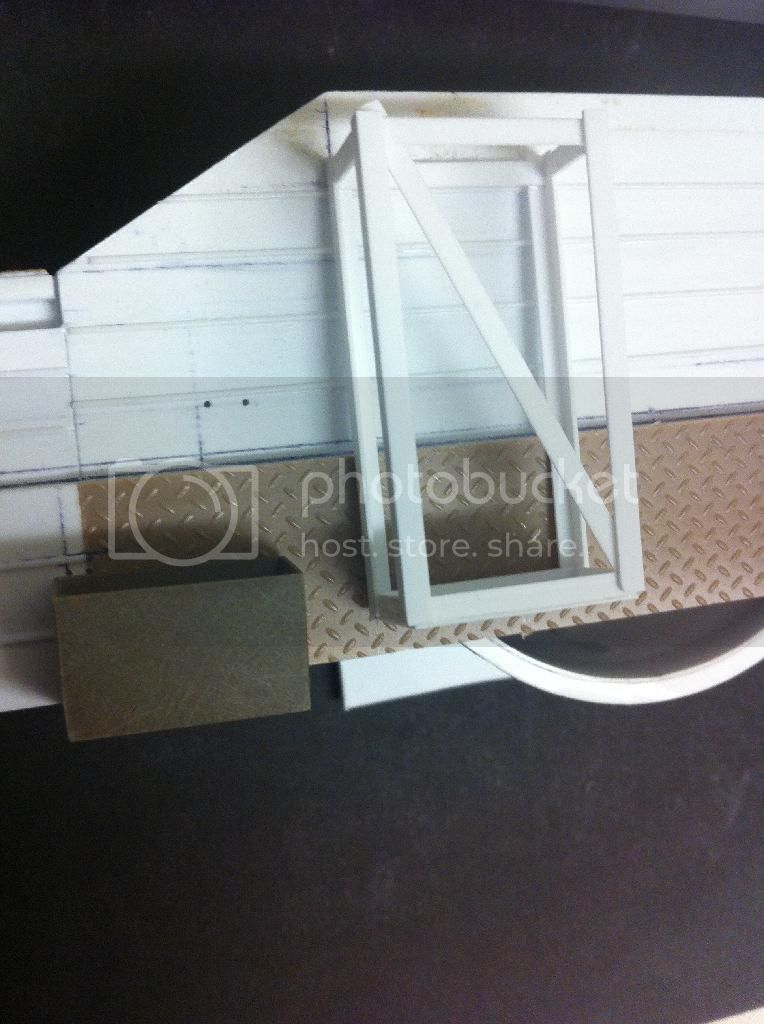
The ammunition stowage rack for the LHS tray wall was next. This rack holds 3 x 100-round liners of 50 calibre ammunition & is bolted to the LHS tray wall. The basic structure was fabricated using Evergreen 2 mm angle stock, building the floor first, then extending upward. The diagonal & the frame around the top was made from doubled up 0.25 x 2 mm stock. Quick for check with a 50 cal liner and it was set aside for drying. Still need to make the lower support frame.


2805662
Joined: March 27, 2008
KitMaker: 546 posts
Armorama: 541 posts
Posted: Wednesday, January 22, 2014 - 08:26 AM UTC
By way of background for this next step, there's been an evolution of the LRPV over the almost 25 years of service. Some of those modifications have their catalyst in operationally sustained fatalities. One of these, was SGT Andrew Russell, who was killed in action on 16 Feb 02 (http://www.defence.gov.au/vale/sgt_russell/sgt_russell.htm - RIP). As a side note to the build itself, but part of the impetus for if, is to - in some way - remember those who crewed these vehicles, lived their lives, served their country and were killed in the course of their duties.
Back to the model - specifically of the tray. Originally, the tray floor was stepped, a rearward-facing seat was installed and there was a pintle mounted machine gun mounted (5.56mm or 7.62mm).
Anecdotally, this configuration was 'found wanting' post the 1998 deployment to Saudi Arabia as part of the Australian response (Operation Pollard) to Iraqi shenanigans (to use technical term). Apparently the need for a heavier (ie 12.7mm) calibre was identified. At the time, the Mk19 Mod 3 40mm hadn't been purchased by the Australian Defence Force (ADF): this came in 2001 as part of a procurement to support the Australian commitment to Afghanistan (Operation Slipper).
To facilitate the firepower upgrade from 12.7mm, the seat & associated step was removed from the tray, the floor levelled, the original roll-over protection system (ROPS) & machine gun pintle were also removed & a new ROPS, incorporating a ring mount was developed & installed. This was the configuration used in Afghanistan in 2001 & Iraq in 2003. Part of that mod was the fitment of a 50 calibre ammunition stowage rack to the LHS tray wall, bolted directly to the wall and floor (as per the last update).
That ROPS/ring mount configuration was found to be too high for certain operational tasks, so it a new, lower profile ROPS/ring mount was developed & fitted.
At around the same time, as a part of the analysis of the circumstances of SGT Russell's aforementioned death in action, there was an additional mod to the tray floor (the one with the 5-bar chequer plate seen in previous steps) fitted.
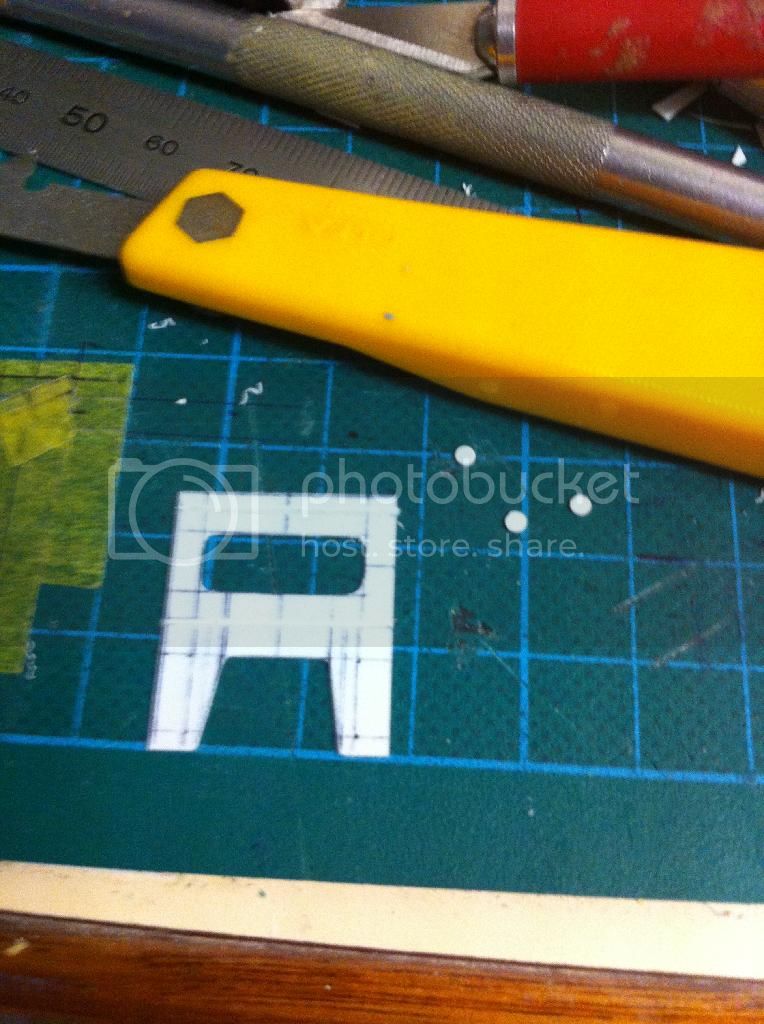
As part of that mod, the ammunition storage on the LHS tray wall was relocated to be fitted suspended from the LHS tray wall. This suspension required an additional bracket to be fitted to the underside of the ammunition stowage rack (the that I fabricated in the last update).
Firstly, the front, bottom & back of the support bracket was made:
Then it was bent to shape & fit checked:
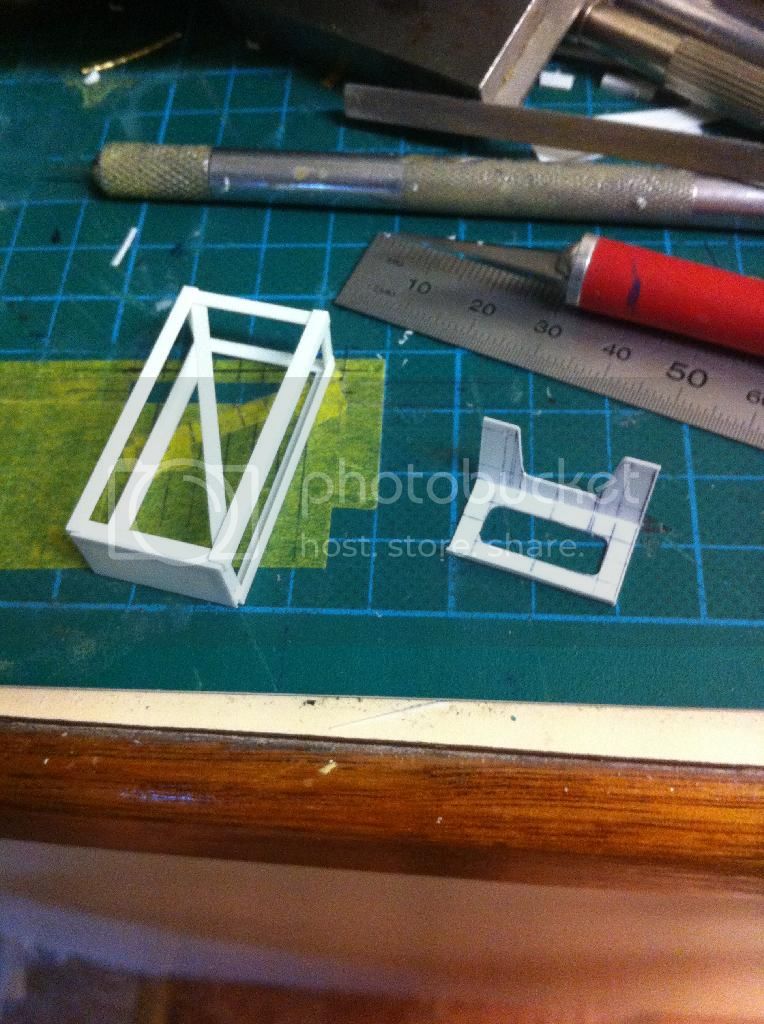
Then it was glued to the ammunition stowage rack & the side braces added:
This was then fit checked with a scale 50 cal liner:
The floor of the rack will be opened up to match the rack support bracket once dry. Phew!
Back to the model - specifically of the tray. Originally, the tray floor was stepped, a rearward-facing seat was installed and there was a pintle mounted machine gun mounted (5.56mm or 7.62mm).
Anecdotally, this configuration was 'found wanting' post the 1998 deployment to Saudi Arabia as part of the Australian response (Operation Pollard) to Iraqi shenanigans (to use technical term). Apparently the need for a heavier (ie 12.7mm) calibre was identified. At the time, the Mk19 Mod 3 40mm hadn't been purchased by the Australian Defence Force (ADF): this came in 2001 as part of a procurement to support the Australian commitment to Afghanistan (Operation Slipper).
To facilitate the firepower upgrade from 12.7mm, the seat & associated step was removed from the tray, the floor levelled, the original roll-over protection system (ROPS) & machine gun pintle were also removed & a new ROPS, incorporating a ring mount was developed & installed. This was the configuration used in Afghanistan in 2001 & Iraq in 2003. Part of that mod was the fitment of a 50 calibre ammunition stowage rack to the LHS tray wall, bolted directly to the wall and floor (as per the last update).
That ROPS/ring mount configuration was found to be too high for certain operational tasks, so it a new, lower profile ROPS/ring mount was developed & fitted.
At around the same time, as a part of the analysis of the circumstances of SGT Russell's aforementioned death in action, there was an additional mod to the tray floor (the one with the 5-bar chequer plate seen in previous steps) fitted.
As part of that mod, the ammunition storage on the LHS tray wall was relocated to be fitted suspended from the LHS tray wall. This suspension required an additional bracket to be fitted to the underside of the ammunition stowage rack (the that I fabricated in the last update).
Firstly, the front, bottom & back of the support bracket was made:

Then it was bent to shape & fit checked:

Then it was glued to the ammunition stowage rack & the side braces added:

This was then fit checked with a scale 50 cal liner:

The floor of the rack will be opened up to match the rack support bracket once dry. Phew!
 |

WEB HOSTING BY


Copyright ©2021 Armorama and Kitmaker Network, a subsidiary of Silver Star Enterprises
All Rights Reserved. Please read our Conditions of Use and Privacy Policy.
All Rights Reserved. Please read our Conditions of Use and Privacy Policy.