Яusso-Soviэt Forum: Cold War Soviet Armor
For discussions related to cold war era Russo-Soviet armor.
Syrian Rebel T-55 Build-Log
Jamesite
Visit this Community
United Kingdom
Joined: December 05, 2006
KitMaker: 2,208 posts
Armorama: 2,152 posts
Posted: Saturday, February 08, 2014 - 01:28 AM UTC

Quoted Text

Hi James,

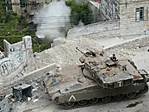
Looking really nice, can't wait to see more paint on her!!
I agree with you thoughts about the shell casing's, at least from the photo's it does look a tad grainy.

Like you thoughts on the tank crew, especially the "deserter", as you would know with 'rebels,freedom fighter's & deserter's" being in short supply, I too have to use at least one of them...or maybe one & a half

Cheers Mike


Thanks mate, have been making some serious progress on the paint front, lagging behind a little on the posts I'm afraid, but let's just say I'm pleased with how she's looking so far.

Since posting I put a wash of ak's engine gimme over the shells and they look better but still not metallic enough. I have had some good results with ak's dark steel pigment so that may be the saving grace.

Yes these type of figures are extremely rare, particularly in styrene, the masterbox stuff is great though so have fun with whichever you choose.

Cheers,

James
Jamesite
Visit this Community
United Kingdom
Joined: December 05, 2006
KitMaker: 2,208 posts
Armorama: 2,152 posts
Posted: Sunday, February 09, 2014 - 03:47 PM UTC
Ok,

Some long awaited photos of the painting of my rebel!

As it's going to be all beaten up and abandonned looking the first thing to do was to apply a rust coat to serve as a basis for all other coats to revert back to as I chip them away.

This was done using James' patented random colour mixes of Tamiya paints:


Starting from the left with a dark brown I moved through progrssively lighter shades (and lighter and more random coats) through to a yellowy-orange rust tone. This left me with one old rust bucket:


The same approach was applied to the wheels and running gear, masking them to protect the previously painted rubber:


Before I got too carried away with adding some colour I decided to add a little variance to some of the parts with some diluted humbrol enamel paints. Matt 32 was used on the barrel and additional radiation armour parts and Matt 106 on the rangerfinder.


The idea being that the chips in these areas will have a subtle difference to the rest of the tank.

Almost had a disaster before I got anywhere when I was cleaning my airbrush and accidentally blocked the intake hole causing thinner to spray out of the breather hole on the pot, all over the hull! ARRRRGGGHHHH:


You can see the wet circles of thinner when you get your eye in. They were everywhere!

Fortunately I was able to fix it with no real problems by adding some more of the lighter rust colour over the top:


Phew! Good job it wasn't the final coat!

With that fixed I did a litte bit more work on the various undercoats by using some of AK interactive's dark steel pigment to add a more metallic finish to the LRF and adding a primer colour to the missing fume extractor area from a mix of suitable humbrol enamels. This looks a bit bright at this stage but will be toned down in subsequent stages.


Very happy with how it looks so far, been a bit of work considering it's all going to get covered up, but hopefully worth it!

Cheers,

James
Tanksami
Visit this Community
Victoria, Australia
Joined: August 06, 2011
KitMaker: 1,314 posts
Armorama: 1,217 posts
Posted: Sunday, February 09, 2014 - 08:25 PM UTC
Hi James,

Looking really cool sir!! Can wait to see how she come's up in her war paint!!

Like all the different rust shade's in use

Mike
Jamesite
Visit this Community
United Kingdom
Joined: December 05, 2006
KitMaker: 2,208 posts
Armorama: 2,152 posts
Posted: Monday, February 10, 2014 - 11:49 AM UTC
Thanks mate, much appreciated, will have some more updated pics of the paintjob up soon!

James
spitfire303
Visit this Community
Vendee, France
Joined: December 22, 2006
KitMaker: 1,437 posts
Armorama: 1,406 posts
Posted: Tuesday, February 11, 2014 - 07:32 AM UTC
HI,

Looks very rusty but it's nice. If you plan to use the HS technique it will surely be a nice under cote. It looks like a very challenging task. I look forward to see more!

spit
Jamesite
Visit this Community
United Kingdom
Joined: December 05, 2006
KitMaker: 2,208 posts
Armorama: 2,152 posts
Posted: Tuesday, February 11, 2014 - 12:34 PM UTC

Quoted Text

HI,

Looks very rusty but it's nice. If you plan to use the HS technique it will surely be a nice under cote. It looks like a very challenging task. I look forward to see more!

spit


Thanks very much mate, it is designed as a base coat only to 'weather back to' so should look better the more coats of paint added. Challenging is right!

Ask and you shall receive........

James
Jamesite
Visit this Community
United Kingdom
Joined: December 05, 2006
KitMaker: 2,208 posts
Armorama: 2,152 posts
Posted: Tuesday, February 11, 2014 - 01:20 PM UTC
And here we are!

First up a bit of work on the tracks. Been trying to follow the technique outlined in one of AK's westhering magazines (dust edition I think) for these (Thanks to Pawel for his help here).

First up just a coat of a sandy brown mix, it looks a lot more orange in this photo and despite trying to correct the light it hasn't really worked for me:


Once dried these were given a wash with AK's track wash (strange choice I know ) which certainly did darken them up a bit:


But now to the moment you've all been waiting for, the application of the first coat and the subsequest hairspray technique chipping!
I used a green mix of paint I had that looked ok for a Rusian 4BO style of colour. A bit darker than I'd usually go for but the idea was to serve as yet another undercoat for subsequent layers so that's ok. Once given a short time to dry I went pretty hard with the brush and warm water to remove large portions of the paint in the areas likely to see the most wear. It probably looks a bit overkill but given that multiple additional layers will be applied I wanted to have a lot of the rust base available to show through. In hindsight not sure if this was for the best or not but time will tell!


Some of the detail shots show the underlying variation in tone of the LRF, barrel and radiation armour quite well. Happy with how these look. Once dried I sprayed some clear gloss over the neccesarry areas and applied some of the Tamiya decals to indicate a generic russian vehicle. I then coated the entire model in a matt varnish of Alclad II. Had to thin it slightly from the bottle but was pleased with its effectiveness; I've always stuggled with a decent matt varnish. Only issue is it's enamel.

That's all for now, hope you like what you see!

Cheers,

James
1721Lancers
Visit this Community
England - East Anglia, United Kingdom
Joined: March 21, 2012
KitMaker: 1,673 posts
Armorama: 1,640 posts
Posted: Wednesday, February 12, 2014 - 03:50 AM UTC
Hi James, what about the exhaust holes in the barrel I am to remind you about

Looking cool, and the track wash is something else, you changed those pinkish girly armbands into good looking tracks.


Paul
dogstar
Visit this Community
Canada
Joined: November 17, 2007
KitMaker: 109 posts
Armorama: 103 posts
Posted: Wednesday, February 12, 2014 - 07:17 AM UTC
Hi James,
This is really starting to look like a rough aAnd tumble junkyard refugee.
spitfire303
Visit this Community
Vendee, France
Joined: December 22, 2006
KitMaker: 1,437 posts
Armorama: 1,406 posts
Posted: Wednesday, February 12, 2014 - 10:27 AM UTC
It looks interesting however I must say that I haven't expected such big but alone chipped areas. Also the shape of some of them looks a bit odd for a tank (ex: the rear of the turret). What I thought of was rather small or medium size but more of them. I wait to see other chips / layers of paint however before saying anything more. Maybe I just miss the big picture here or I just can't imagine the painting steps to come.
BTW here's a site with many pics of the model you told inspire you http://www.puttyandpaint.com/projects/2904

Wait to see more my friend.

spit
LeQuoix
Visit this Community
Missouri, United States
Joined: February 11, 2014
KitMaker: 18 posts
Armorama: 14 posts
Posted: Wednesday, February 12, 2014 - 10:56 AM UTC
Well with some first hand experience with middle eastern T-55's, I think you are hitting the mark pretty good. I have crawled over a lot of them, after the fire had burned out, a I think you have a good line on a rebel rebuild. We captured a few in Lebanon that were tore to hell, look like they were held together with duck tape and bubble gum, but were still combat capable.
The Tali's tanks were abortions too, but again they could make you dead too. The Iraqi 55s were generally in better shape, in 03, but in Fallujah in 05 we smoked a couple that our little insurgent buddies had pieced together.
So, like I said, I think I can vouch for your abilities to this point. Great Job
Jamesite
Visit this Community
United Kingdom
Joined: December 05, 2006
KitMaker: 2,208 posts
Armorama: 2,152 posts
Posted: Wednesday, February 12, 2014 - 12:15 PM UTC
Hi gents,

Thanks for the feedback!


Quoted Text

Hi James, what about the exhaust holes in the barrel I am to remind you about

Looking cool, and the track wash is something else, you changed those pinkish girly armbands into good looking tracks.


Paul


Paul,

lol, as you'll see the barrels masked off, need you to remind me when that's removed!

Yes the rack wash is pretty good, not sure how much will be visible by the time pigments etc. have been applied but we'll see....


Quoted Text

Hi James,
This is really starting to look like a rough aAnd tumble junkyard refugee.


Thanks Barry, that's certainly what I'm aiming for!


Quoted Text

It looks interesting however I must say that I haven't expected such big but alone chipped areas. Also the shape of some of them looks a bit odd for a tank (ex: the rear of the turret). What I thought of was rather small or medium size but more of them. I wait to see other chips / layers of paint however before saying anything more. Maybe I just miss the big picture here or I just can't imagine the painting steps to come.
BTW here's a site with many pics of the model you told inspire you http://www.puttyandpaint.com/projects/2904

Wait to see more my friend.

spit


Thanks for the link Pawel, a great set of pics of that build; makes me realise just how slim my chances are of reaching anything like M.R.'s perfection!

Incidentally I should note I'm not trying to emulate the exact same scheme or anything, simply have used the techniques he used for his build on my own.

You're right, the current chips aren't that realistic but then again the idea is the elements have been at work, not neccesarilly just the wear of use and combat. It boils down to the technique of removing the paint after the HS, it can be very difficult to keep chips small and precise and what seems to happen is that once a small area starts to loosen, large peices begin to flake off. This may be the hairspray I'm using (I'll blame the wife there!) but I think I can improve subsequent layers by using an alternate brush.

As you say lets see how it goes with more layers of paint, the idea is again that I'm effectively building up a series of base coats here.

Appreciate your comments mate!


Quoted Text

Well with some first hand experience with middle eastern T-55's, I think you are hitting the mark pretty good. I have crawled over a lot of them, after the fire had burned out, a I think you have a good line on a rebel rebuild. We captured a few in Lebanon that were tore to hell, look like they were held together with duck tape and bubble gum, but were still combat capable.
The Tali's tanks were abortions too, but again they could make you dead too. The Iraqi 55s were generally in better shape, in 03, but in Fallujah in 05 we smoked a couple that our little insurgent buddies had pieced together.
So, like I said, I think I can vouch for your abilities to this point. Great Job


LeQuoix,

Thanks very much, that means a lot coming from someone who's got up close and personal with the real thing. I'm sure there are a lot of similarities with those conflicts here and so knowing I'm on the right line is certainly a great comfort, much appreciated.

Thanks a lot guys, hope to post some more progress soon!

James
Jamesite
Visit this Community
United Kingdom
Joined: December 05, 2006
KitMaker: 2,208 posts
Armorama: 2,152 posts
Posted: Thursday, February 13, 2014 - 05:53 PM UTC
Ok, lets show you another coat of paint to see what you think....

Same procedure as before, matt coat of alclad II to protect previous layers, then hairspray, then a coat of 'James' special' light russian green and then some vigorous work with a brush and some water gets me to here:


Definately looking better I think. Some detail of the track guards now shows how I've tried to show wear corresponding to the areas of missing fittings. Perhaps a 'reverse reality' but alludes to their missing presence all the same:


Similar work has been ongoing with the wheels, but here I've been mixing up the green tones a little more. (Apologies for the poor quality pics by the way)


Hopefully you can see the affect I'm going for, the idea to build this up in layers until it starts looking very haggard!

Cheers,

James
Tanksami
Visit this Community
Victoria, Australia
Joined: August 06, 2011
KitMaker: 1,314 posts
Armorama: 1,217 posts
Posted: Saturday, February 15, 2014 - 01:38 PM UTC
Hi James,

Looking very cool, nicely haggard too, the 2nd coat really helped pull back the first hairspray rub down!!
Love the extra darker bits that would have been under the fuel cells etc.

Cheers Mike
spitfire303
Visit this Community
Vendee, France
Joined: December 22, 2006
KitMaker: 1,437 posts
Armorama: 1,406 posts
Posted: Sunday, February 16, 2014 - 09:20 AM UTC
Looking good James! Definitely better. More layers to come?

spit
Jamesite
Visit this Community
United Kingdom
Joined: December 05, 2006
KitMaker: 2,208 posts
Armorama: 2,152 posts
Posted: Sunday, February 16, 2014 - 12:32 PM UTC

Quoted Text

Hi James,

Looking very cool, nicely haggard too, the 2nd coat really helped pull back the first hairspray rub down!!
Love the extra darker bits that would have been under the fuel cells etc.

Cheers Mike


Hey Mike,

Thanks a lot, yes the second coat certainly has been an improvement, and pleased that the wear under missing details has had the neccesarry effect. Definately looking more as I'd envisoned now!


Quoted Text

Looking good James! Definitely better. More layers to come?

spit


Thanks mate, certainly about the long game this one, with every coat just a base coat for the next! Yes, more layers to come indeed!

James
Tanksami
Visit this Community
Victoria, Australia
Joined: August 06, 2011
KitMaker: 1,314 posts
Armorama: 1,217 posts
Posted: Sunday, February 16, 2014 - 12:45 PM UTC
Hi James,

I noticed you mentioned the 6 nations, I know the feeling, thought it sucked that Foxtel didn't show the All Blacks v England game end of last year...least we won tho!!

What part of Oz u live in?

Cheers Mike
Jamesite
Visit this Community
United Kingdom
Joined: December 05, 2006
KitMaker: 2,208 posts
Armorama: 2,152 posts
Posted: Sunday, February 16, 2014 - 01:06 PM UTC

Quoted Text

Hi James,

I noticed you mentioned the 6 nations, I know the feeling, thought it sucked that Foxtel didn't show the All Blacks v England game end of last year...least we won tho!!

What part of Oz u live in?

Cheers Mike


Yeah, think you've got to be in Queensland to be able to watch Rugby really, I'm in W.A. (Kalgoorlie) and it's all AFL over here.

Guessing you're a Kiwi then mate, so you don't need to watch the games as you know who's going to win! (Pretty sure the All Blacks were unbeaten last year - impressive!)

James
Tanksami
Visit this Community
Victoria, Australia
Joined: August 06, 2011
KitMaker: 1,314 posts
Armorama: 1,217 posts
Posted: Sunday, February 16, 2014 - 01:18 PM UTC
James,
Yeah born & bred kiwi boy, ohh I feel your pain about the AFL thing, I won't share my thoughts on "that game" lol

Not sure if you know there is the Australian Model Expo event run annually on Queens Birthday Weekend here in Melbourne at Sandown Raceway & I know we are getting a contingent from your part of the island rocking up this year.

It is the biggest show held in Oz, be nice to meet & greet if you came down?

Mike
Jamesite
Visit this Community
United Kingdom
Joined: December 05, 2006
KitMaker: 2,208 posts
Armorama: 2,152 posts
Posted: Sunday, February 16, 2014 - 03:31 PM UTC

Quoted Text

James,
Yeah born & bred kiwi boy, ohh I feel your pain about the AFL thing, I won't share my thoughts on "that game" lol

Not sure if you know there is the Australian Model Expo event run annually on Queens Birthday Weekend here in Melbourne at Sandown Raceway & I know we are getting a contingent from your part of the island rocking up this year.

It is the biggest show held in Oz, be nice to meet & greet if you came down?

Mike


Haha,

I'd love to attend mate but not much of a chance given the cost of flights to get over there, costs $1,000 just to get to Perth from Kal, it's ridiculous (aparently the most expensive Qantas flight route there is) so don't get out too much and unfortunately not much of a 'scene' here to get into, hence the big A! Appreciate the offer though mate.

James
Tanksami
Visit this Community
Victoria, Australia
Joined: August 06, 2011
KitMaker: 1,314 posts
Armorama: 1,217 posts
Posted: Sunday, February 16, 2014 - 04:03 PM UTC
Man that price is , u would be wanting some in flight service & then some at that cost!!
I am guessing your working the mines then?? I would bet the modelling fraternity would be real small up that way

Mike
Jamesite
Visit this Community
United Kingdom
Joined: December 05, 2006
KitMaker: 2,208 posts
Armorama: 2,152 posts
Posted: Sunday, February 16, 2014 - 04:31 PM UTC

Quoted Text

Man that price is , u would be wanting some in flight service & then some at that cost!!
I am guessing your working the mines then?? I would bet the modelling fraternity would be real small up that way

Mike


You betcha, but have a local shop with enough essentials and then between Perth and the internet I'm still able to waste a lot of money! Yep, chasing the gold is my game!

James
Jamesite
Visit this Community
United Kingdom
Joined: December 05, 2006
KitMaker: 2,208 posts
Armorama: 2,152 posts
Posted: Tuesday, February 18, 2014 - 04:35 PM UTC
Apologies, I've been a bit slow on posting updates, but wasn't well this week which slowed me down.

Major advance has been the application of a second set of 'Russian era' turret numbers and then have masked some key areas using Humbrol's Maskol. I've had some good results with this stuff before masking some complex Italian paint schemes although it had got a little 'lumpy' over time and required some water to thin it out.


The aim of the masking is to make sure that subsquent 'post soviet' paint schemes do not affect those areas of missing equipment etc. as this would have been removed much later in the AFV's life.


Same goes for the inside of the hatches.


I also opted to cover the LRF for some general contrast.

That's all for now, but lets just say the next part of the paint will be based around its new owners in 1973......

Cheers,

James
Jamesite
Visit this Community
United Kingdom
Joined: December 05, 2006
KitMaker: 2,208 posts
Armorama: 2,152 posts
Posted: Tuesday, February 25, 2014 - 07:40 PM UTC
Ok, it's been a while and I know my last post wasn't anything too interesting, but hopefully this is a bit more what you're after!

Have applied yet another coat of hairspray and then some 1973 era Syrian camouflage as a Yom Kippur war veteran.
This was fairly basic with some dark yellow and grey bands, both from pre-made mixes I already had in my paint box.
Once I'd scratched a bit of this off I masked an area on each turret flank and sprayed a black rectangle which was then complemented with some white arabic numerals from the spare decals folder.
At the time of photographing the kit had a flat coat applied but I'd sprayed gloss over the decals so there's a bit of a wierd contrast going on in that respect sorry!


I really think it's starting to come together now.

Cheers,

James

Pedro
Visit this Community
Wojewodztwo Pomorskie, Poland
Joined: May 26, 2003
KitMaker: 1,208 posts
Armorama: 1,023 posts
Posted: Wednesday, February 26, 2014 - 04:51 AM UTC
James, you're doing stellar job with paintjob on this model! I dont think I've ever saw such meticulous building up of background layers on a tank model and I'm sure the effect will be worth it!

I also noticed this trend of posts or threads with very little answers which should not happen, especially with quality of work presented. I have no idea what have caused this, maybe people just got lazy. It looks much different than what the forum felt like some 3-4 years ago before I went on hiatus with finishing models and posting my work.

Loking forward to seeing this old lady finished!

Cheers,
Greg