_GOTOBOTTOM
Constructive Feedback
For in-progress or completed build photos. Give and get contructive feedback!
15cm SIG 33 auf Pz III - Done
AFVFan
Visit this Community
North Carolina, United States
Joined: May 17, 2012
KitMaker: 1,980 posts
Armorama: 1,571 posts
Posted: Saturday, January 18, 2014 - 05:47 PM UTC
Here's the latest project to roll off the bench. It's Dragon's 15cm SIG 33. The base kit was modified to show some damage and some stowage was added. An RB metal barrel was used.
All Comments, especially constructive critiques, are more than welcome.


More pics can be seen here:
http://s1254.photobucket.com/user/AFVFan/library/SIG33_15cm?sort=3&page=1
AFVFan
Visit this Community
North Carolina, United States
Joined: May 17, 2012
KitMaker: 1,980 posts
Armorama: 1,571 posts
Posted: Saturday, January 25, 2014 - 04:07 AM UTC
200+ page views, and not a comment among them. You got to love it. The only reason I post builds on here is to get other eyes on them in the hopes that someone will pick up on problems and errors that I missed. Don't get me wrong, the positive comments are welcome too, but I really live for the critiques. If I can't get the feedback, then I really don't see much point in wasting the time and effort posting anything else here. While I'll still be around and may comment on threads, this will probably be the last model pics I post.
johhar
Visit this Community
Alabama, United States
Joined: September 22, 2008
KitMaker: 476 posts
Armorama: 447 posts
Posted: Saturday, January 25, 2014 - 05:01 AM UTC
It looks like the green in the camo is hand-painted and not airbrushed. If so, that's encouraging since the pattern looks effective and balanced - neither too much nor too little, and I like hand-brushing more than airbrushing.
Everything looks good; vehicle, storage, tracks, and the gun barrel stands out. I can't think of anything I could actually improve and I wouldn't be surprised if many people felt that way. I think the number of modelers who feel they can offer specific suggestions that can actually improve the posted project shrinks as the quality of the project improves. You may simply be a victim of your success at developing your modeling skills.
cassshay
Visit this Community
West Virginia, United States
Joined: September 17, 2013
KitMaker: 55 posts
Armorama: 52 posts
Posted: Saturday, January 25, 2014 - 05:46 AM UTC
Bob, I just caught this post so I am looking at a well constructed model that is well represented of avehicule of that time. Great work, I hope to see more of your work.

Mark
LikesTanks
Visit this Community
Wales, United Kingdom
Joined: May 07, 2013
KitMaker: 242 posts
Armorama: 234 posts
Posted: Saturday, January 25, 2014 - 06:39 AM UTC
If I must be a critic then possibly the contact-worn track surfaces could be a little shinier (could just not be showing up in the photo). Otherwise it's a nicely restrained bit of weathering, a vehicle that has been in use for a few months, not one stood untended for years in a museum park. Keep it up, wish mine were as good.
spoons
Visit this Community
England - East Anglia, United Kingdom
Joined: January 09, 2008
KitMaker: 527 posts
Armorama: 500 posts
Posted: Saturday, January 25, 2014 - 07:14 AM UTC
Bob don't worry too much about views versus comments,most people will only post comment if there's a blinding error or problem so no comments must mean theres not much wrong with the build.
Now my turn, had a quick look over and noticed while its a good effort with the weathering you may want to try a pin wash around the details,i can see you have used a dark brown wash around the bolts etc but this can sometimes just darken the base colour next time try just a pin wash on panel lines etc.
Anyway nice model!
AFVFan
Visit this Community
North Carolina, United States
Joined: May 17, 2012
KitMaker: 1,980 posts
Armorama: 1,571 posts
Posted: Saturday, January 25, 2014 - 11:29 AM UTC
I guess there's nothing like a little rant to get things going. Not only have some people commented, but the view count doubled in a matter of hours (now over 400)!

Jonathan - Yes, the green is hand painted. Glad you like it, and thanks for the insight about the comments.

Mark - Appreciate the thoughts.

Richard - You bring up a valid point. I originally had more bare metal showing on the tracks, but lost a lot of it when I did the pigments. I hadn't realised that, until you mentioned it. I'll have to keep an eye on that in the future ....and this is exactly the type of thing I like to hear.

Stephen - Thanks for pointing that out. It's funny, because I did do a pin wash of the panel lines when I did the bolts. For some reason most of the panel line washes seem to have have faded out. After taking another look at the model, I may go back in and redo some of them (along with the tracks that Richard mentioned).

At one time, not too long ago, a thread posted here could reasonably expect a 5% to 8% ratio of comments to views. Now, it seems, it's down to 2% or less. I'd love to figure out what caused the drop.
Petro
Visit this Community
Connecticut, United States
Joined: November 02, 2003
KitMaker: 984 posts
Armorama: 846 posts
Posted: Sunday, January 26, 2014 - 02:21 AM UTC
Very nice . I like the chain up front.
I find the vehicle interesting. How was the kit to build itself/
casualmodeler
Visit this Community
Hame, Finland
Joined: February 04, 2009
KitMaker: 702 posts
Armorama: 665 posts
Posted: Sunday, January 26, 2014 - 02:44 AM UTC
My LHS has a major discount on some DML kits and one of these were in that stash. But I have a hesitation for this kit because I don't know how it is to build or the quality of it. But anyway, your's came up nicely.
ivanhoe6
Visit this Community
Wisconsin, United States
Joined: April 05, 2007
KitMaker: 2,023 posts
Armorama: 1,234 posts
Posted: Sunday, January 26, 2014 - 04:11 AM UTC
Nice looking SIG Bob ! I like the hand painted green camo. I'm willing to buy a round of for everyone betting that most field camouflage was applied with a brush. Nice attention to the rubber on the road wheels too. I also see flame cutting on the edges of the glacis an oft over looked detail on armor plate.
I like it a lot !
Tom
AFVFan
Visit this Community
North Carolina, United States
Joined: May 17, 2012
KitMaker: 1,980 posts
Armorama: 1,571 posts
Posted: Sunday, January 26, 2014 - 04:29 AM UTC
Marc - Thanks! The chain was done using BlackenIt first, followed by rust tones from LifeColor.

Marc and Kimmo - It's actually a pretty nice kit to work with. I found no major problems with it. In fact, I didn't even find very many minor ones.

The things I added that weren't part of the kit were the metal cannon barrel, the chain, the stowage, the jack block, and the spare track holder (there're plenty of extra links to play with). If you wanted to, you could spiff it up a bit with a few more PE bits, like tool clamps (the screens came with the kit), a metal MG barrel, and a set of aftermarket tracks (though I found the Dragon links to be adequate).
panzerbob01
Visit this Community
Louisiana, United States
Joined: March 06, 2010
KitMaker: 3,128 posts
Armorama: 2,959 posts
Posted: Sunday, January 26, 2014 - 10:02 AM UTC
Bob;

VERY nice job indeed!

I sympathize with you on the oft-times meager responses of stuff posted here. "Tell me all about it"! I fully agree with the idea and desirability of getting good "/review and comment and critique and suggestions".

That aside, here I go! :

1) I love the camo - hand-brushing was very effective for this scheme, and yes, it could well have been originally done just that way (begs the question, maybe, but as this was a sort of refurb conversion vehicle using what I believe to have been recovered Pz. III, it seems probable that these may not have had the air-compressor and spray-gun included as OEM equipment, as seen on later Pz. IV and Panthers and Tigers I and II. So the crew may well not have had the easy option to spray their camo!)

Anyway, the camo is GREAT.

2) I like the weathering a lot - looks properly dirty but excessively so. While pics do show tanks covered in mud, these were not the majority. So, IMO, this is GOOD!

3) Others have noted some details - flame-cut edges, etc. By me... OK, but perhaps a little too sharp. My impression from photos is that this effect is not all that apparent, but of course just my opinion. It IS certainly more interesting and perhaps "accurate" than a smooth, clean edge on plates that did not have such edges (I'm accepting here that these plates were indeed somewhat roughly-finished, as compared to factory-built production tanks).

3) The tracks (runs and links in spare-mounts) are all fine, IMHO. I am a fan of Magics and think that they do really look pretty nice in almost every case. Looks like you drilled out some pin-holes in the spares - always a neat touch and something I routinely do, as well.

4) Running gear looks pretty good. I, too, am a fan of chipping and cracking the rubber tires. I do think you may have been a bit aggressive in this and could have had some more gradation in the wear - some of those divits look pretty substantial, to me! But it's only an opinion - wear is good. What could make that pop a bit is to "wear" most or all-but-one wheels, and have one which looks new and "shiny" as the replacement. This could, for interest (and another question begged, I suspect!) be reciprocated in the spares mount - having one be a routine spare, even "included" in the crew-applied camo (as often appears the case in photos), and the other maybe the old wheel re-stored after being swapped (the begged question here being whether crew were instructed to return used wheels for rebuilding...). The swap-over used condition may include some lingering mud on the old wheel... Just an idea for a future build

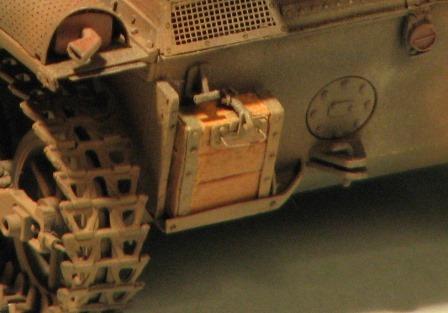
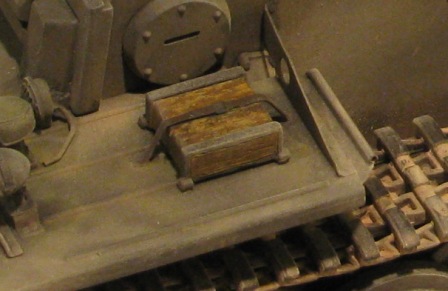
5) Where the ball dropped, IMHO...: a) that bucket. Looks unused and rather out-of-scale a bit (maybe it's an extra from a Tamiya kit?) - buckets were used for painting and for washing vehicles and maybe even for changing oil. Most appear dented and very mottled with stuff, far as I see. Your bucket also has a very evident and prominent punch-out pad inside. And it's bottom rim needs real thinning to get the tinny bucket look. b) you jack-block. Blah, IMHO. Blocks were made of wood pieces wrapped with metal bands. Yours looks like it has metal caps. Not likely, I think. I know that these bits seldom have end-detail molded on - a common failing even in the best kits. EASY to score in some detailing. Also, I cannot see how it is being held or mounted there. Options include a tray mount, strapping, one or more bolts through with wing-nuts. Looks out of keeping with your otherwise great job. Again, JUST my opinions!

All up, it's very cool and I wouldn't mind having such a build on my shelf!

Thanks for posting this, and yes, very good to see someone actually punt out here some feeling and statement for how we are largely not using our site as well as we can be! "Hear, hear, Sir!"

Bob
AFVFan
Visit this Community
North Carolina, United States
Joined: May 17, 2012
KitMaker: 1,980 posts
Armorama: 1,571 posts
Posted: Sunday, January 26, 2014 - 11:26 AM UTC
Tom - Thanks for the comments. You're right about the paint done in the field. It was pretty much "do it with whatever is on hand". I've seen pics of paint and whitewash being applied by spray, brush, rags, and even hands.

The road wheels are often overlooked by modelers. I've seen it time and again that a model will be presented that's beat to the edge of it's life, and still have perfect wheels. It takes a little time (and skin if you're not careful) to chunk them up, but it goes a long way in selling the idea that the vehicle's well used.

Bob - Thanks for stopping in. To run down a few of the things you mentioned....
1) I, too, like the magic tracks. I only wish they'd figure out a way to do them with open guides where applicable (as in this vehicle).
2) I'm right with you on the wheel damage. It doesn't show in the pics, but there are actually four sets of wheels on the vehicle that are undamaged. On a side note, I don't think it would take very long for a tank's wheels to show damage if they were operating in an urban area with a lot of rubble to clamber over. These were actually designed for that very environment with the majority of them initially being sent to Stalingrad.
3) Ball dropping.. you hit the nail on the head in both cases.
--The bucket is the lesser offender (yes, it ex-Tamiya). Comparing it to the water cans, it would be about a 5 gal. size. I rationalized the condition as a new "find" the crew recently picked up. The raised bottom I thought was just the way it was stamped. Good point about the lower lip, though. I'll keep that in mind if I have chance to use another one. --Now, the worst offender, the jack block. This one came off an Italeri Hetzer, and no, I'm not real happy with it. I was curious to see if anyone else was bothered by it. I guess I'll need to find a replacement, even if I have to make one. By the way, the center strap was supposed to be it's mount. Guess that failed, too.

tankglasgow
Visit this Community
Scotland, United Kingdom
Joined: October 04, 2010
KitMaker: 275 posts
Armorama: 260 posts
Posted: Sunday, January 26, 2014 - 01:51 PM UTC
Good to see a bit of passion going on here, I too have sometimes felt as if I'm in an echo chamber on this section of the site and it's great when someone takes the time to scribble something back good or bad. So here is my tiny wee quibble.....the rifling in the gun barrel looks a bit dusty could do with a bit of steely shine, maybe run over with a pencil otherwise it's really good. It's always good to see a well done model so keep posting.
Paul
Petro
Visit this Community
Connecticut, United States
Joined: November 02, 2003
KitMaker: 984 posts
Armorama: 846 posts
Posted: Sunday, January 26, 2014 - 02:35 PM UTC
Jack blocks in general confuse me. The one on my Dragon STUPA has what looks like solid metal sides. I just painted it brown.
AFVFan
Visit this Community
North Carolina, United States
Joined: May 17, 2012
KitMaker: 1,980 posts
Armorama: 1,571 posts
Posted: Monday, January 27, 2014 - 04:19 AM UTC
Paul - It is frustrating, to be sure. With the number of people on this site, you'd expect to get more feedback on postings. After all, it not only helps the builder of the model in question, but also most anyone else reading the thread. Since people have started commenting here I've learned a few things about my SIG that I hadn't thought of, or just plain overlooked. At the same time, a lot of the comments can be food for thought on any build.

Thanks for the comment on the barrel. I was going for a heavily fouled look of a barrel after heavy use, needing a good cleaning. If it's coming across as "dusty", then I missed my mark and will need to revamp it a bit.

Marc - As Bob pointed out, most, if not all, jack blocks were just banded wood. While some companies mold theirs with the end caps, I honestly don't know if any actually existed. In this case, I just got lazy and used what I had on hand. Thanks for joining in.
panzerbob01
Visit this Community
Louisiana, United States
Joined: March 06, 2010
KitMaker: 3,128 posts
Armorama: 2,959 posts
Posted: Monday, January 27, 2014 - 04:48 AM UTC
Molded styrene jack-blocks all pretty much suffer the limitations of molding - you can get detail on top and opposing sides (say, the long side of the wood sections on either side of the block) but then cannot also get the end-cuts of that block. And most go further in simplification...

There were quite a variety of these blocks in use - best I know, ALL were constructed of multiple wood block sections bolted together and strapped (with bolts passing thru straps to fasten all the bits in place). Remember - this was a large wooden block needing to support a portion of a many-ton vehicle and prevent the jack-foot from simply burrowing down into the ground - increasing foot surface-area as it were - so it was robustly-built.

Blocks of course attached to the vehicle - straps, clamps, thru-bolts, etc.

It turns out that it is pretty easy (and I think fun) to make a very cool real wood block and it looks mighty nice on almost any build.

I build mine "almost like the real thing" by cutting appropriate-sized bits of square wood match-sticks or other small square wood stock and gluing the bits into a "raft". I then trim and sand the ends of the bits so that all align together. I then "wrap" 2 or 3 (depending on the block being made - ) thin strips of surplus tin-can aluminum or sheet brass or wine-bottle tin or even styrene sheet around my raft to become the straps. I add a few tiny bits of styrene sprue as the rivets, and... voila! a real wood jack block ready for painting or staining as you desire!

Here's one I did for a Panzer IA a few years back - note that this block had a wire grip-handle (blocks often did - check your specific vehicle in photos for guidance!) and these little blocks sat into small box frames on the back panel of the tank - and were held into that frame by a spring-clamp. I actually made a wire spring for this one. A bit OCD and AMS, perhaps.


IF you think doing PE tool clamps and adding metal shovel-blades is called for, doing the jack-block brings that visible item up to the same snuff.

Cheers!

Bob
AFVFan
Visit this Community
North Carolina, United States
Joined: May 17, 2012
KitMaker: 1,980 posts
Armorama: 1,571 posts
Posted: Monday, January 27, 2014 - 01:30 PM UTC
Nice job on the block there, Bob. Thanks for posting it.
panzerbob01
Visit this Community
Louisiana, United States
Joined: March 06, 2010
KitMaker: 3,128 posts
Armorama: 2,959 posts
Posted: Monday, January 27, 2014 - 04:58 PM UTC
Thanks, Bob!

Just sort of FYI; I often do a much more basic "improvement" of the styrene block - here's the one on my recent HobbyBoss Pz II-J build for the Armorama Panzers Return campaign - an example of the lesser treatment route:


This was one of those typical kit styrene blocks with very basic surfaces and a couple of molded straps with featureless, smooth sides. As the "long side" faces out on the fender, I scored in a inner "box" on the smooth sides to show the edge of the putative metal strapping, and scratched the surface inside that "box" to create some wood texture. This simple treatment works well to step up most of those simple-looking molded blocks. I lazed out and did not add any "rivets" on the strap, but that is another easy step-up for these.

Bob
RLlockie
Visit this Community
United Kingdom
Joined: September 06, 2013
KitMaker: 1,112 posts
Armorama: 938 posts
Posted: Monday, January 27, 2014 - 08:46 PM UTC
I'd be wary of assuming tbat very much vehicle camouflage was applied by crews, beyond the hasty winter whitewash coverage. Armoured units had a Werkstatt Kompanie equipped for repairs and maintenanace and when orders refer to units painting kit, they mean the appropriate detachment within it, not "everyone grab a paintbrush or spray gun and set to it".

As feedback on the model was requested, here are my thoughts (sorry I failed to post before but I don't have enough time to spend all day trawling internet modelling forums).

There is a fair bit of mud up the nose but the lower hull sides are pretty clean.
The surface of the idler is polished where it runs on the track but the adjacent track surface is not. While it doesn't look like bare metal, it does tend to be shiny in my experience, unless covered in mud.
What is the chain for on the front? Tanks don't have much use for chains, as they are heavy and unwieldy compared to a wire tow rope.
It looks a bit odd that the gun barrel was left unpainted when the rest of the vehicle was camouflaged, particularly as the forward attachment to the recoil slide, which I think is part of the barrel assembly, was painted Dunkelgelb. If the attachment is just a sleeve in which the barrel slides, then would there be some wear where it recoils into it?
I think I see a join line in the strip at the bottom right of the superstructure, on the side.
I'm not sure why the jack would be unpainted, as it will rust like any other ferrous metal if left unprotected.
Finally, and this is serious nitpicking and it's very tedious to do but the loops on the ends of the tracklinks can be opened up with a small drill bit and a power drill. Having said that, I only do it on visible link ends where I can hide the rest of the link behind Schuerzen and use Modelkasten for the rest of the run where it is more visible. Or you can opt for mud....

Does that help?
AFVFan
Visit this Community
North Carolina, United States
Joined: May 17, 2012
KitMaker: 1,980 posts
Armorama: 1,571 posts
Posted: Tuesday, January 28, 2014 - 02:51 AM UTC
Bob - Thanks for the 2nd example.

Robert - Thanks for stopping in and taking the time to comment. That's quite a laundry list , but yes, every bit helps. I'll try to give my view for each item.

I'd be wary of assuming tbat very much vehicle camouflage was applied by crews,... - While, as you pointed out, it may not have been common, it can't be said that it never happened, so I'm comfortable with the idea.

There is a fair bit of mud up the nose but the lower hull sides are pretty clean. - There are some light mud areas on the lower sides. They just don't show up well in the pics.

The surface of the idler is polished where it runs on the track but the adjacent track surface is not. While it doesn't look like bare metal, it does tend to be shiny in my experience, unless covered in mud. - This, again, is the problem of poor quality pics. While I didn't depict the section as bare metal, there is a color change where the wheels track. It kind of shows in the last pic, though I may have to emphasize it a bit more in the future. Actually, where I really dropped the ball is that I forgot to show the wear on the inner idler surfaces from the guide teeth

What is the chain for on the front? - A chain beats having nothing if the tow cable has been lost

It looks a bit odd that the gun barrel was left unpainted when the rest of the vehicle was camouflaged, particularly as the forward attachment to the recoil slide, which I think is part of the barrel assembly, was painted Dunkelgelb. If the attachment is just a sleeve in which the barrel slides, then would there be some wear where it recoils into it? - For the first point, replacement gun barrels came from the factory in a dark grey primer. They were only painted after installation, though there is pictorial evidence that this didn't always happen. As to the second part, I may be mistaken in thinking that was a band around the barrel. Many pics I've seen show versions of the howitzer without it.

I think I see a join line in the strip at the bottom right of the superstructure, on the side. - Not for sure where you're referring to. If you mean along the lower edge, that gap is intentional, as the superstructure wasn't attached to the fenders.

I'm not sure why the jack would be unpainted, as it will rust like any other ferrous metal if left unprotected. - Something I guess I need to work on. It was supposed to look coated with a very dark grey, not bare metal. I'll have to rethink that in the future.

Finally, and this is serious nitpicking and it's very tedious to do but the loops on the ends of the tracklinks can be opened up with a small drill bit.... - Here, again, I'm not sure what you're referring to. It sounds like you're talking about the pin holes. If so, these would not be open if the pin is in place. Now, as discussed in an earlier post, the guide teeth do need to be opened, but I didn't want to fool with them.
easyco69
Visit this Community
Ontario, Canada
Joined: November 03, 2012
KitMaker: 2,275 posts
Armorama: 2,233 posts
Posted: Tuesday, January 28, 2014 - 03:00 AM UTC
awesome work Bob!
AFVFan
Visit this Community
North Carolina, United States
Joined: May 17, 2012
KitMaker: 1,980 posts
Armorama: 1,571 posts
Posted: Tuesday, January 28, 2014 - 09:47 AM UTC

Quoted Text

awesome work Bob!


Thanks David, but as can be attested to by all the comments, it's still got a little ways to go. I can't fix everything that's been discussed, however, I do plan on going back in and taking care of some of them.
 _GOTOTOP