

Hosted by Darren Baker
Leopard C2 MEXAS Build

LeoCmdr

Joined: January 19, 2005
KitMaker: 4,085 posts
Armorama: 3,917 posts

Posted: Wednesday, March 05, 2014 - 03:12 PM UTC
You've attached the tank phone (round object on the hull rear) upside down. The hinges should be on the bottom. Hopefully you can flip it 180 degrees.

SgtRam

#197
Joined: March 06, 2011
KitMaker: 3,971 posts
Armorama: 2,859 posts

Posted: Sunday, March 09, 2014 - 02:17 AM UTC
Just a little update, thanks to Jason for pointing out my incorrect installation of the phone box, a little surgery with a mirco saw and the issue is rectified.


A little more work on the turret and the application of anti-skid. The anti-skid was applied using Mr. Surfacer 500 and dabbing it on using a cut-off brush.

A little more work on the turret and the application of anti-skid. The anti-skid was applied using Mr. Surfacer 500 and dabbing it on using a cut-off brush.
recceboy
Joined: July 20, 2006
KitMaker: 706 posts
Armorama: 665 posts

Posted: Sunday, March 09, 2014 - 04:47 AM UTC
Kevin
The turret armour should be flush and aligned with the top of the turret, there should be no gap between armour and turret.
Anthony
The turret armour should be flush and aligned with the top of the turret, there should be no gap between armour and turret.
Anthony
bulivyf
Vendor

Joined: April 03, 2006
KitMaker: 2,450 posts
Armorama: 2,409 posts
Posted: Sunday, March 09, 2014 - 05:26 AM UTC
Quoted Text
Kevin
The turret armour should be flush and aligned with the top of the turret, there should be no gap between armour and turret.
Anthony
here is photo


LeoCmdr
Joined: January 19, 2005
KitMaker: 4,085 posts
Armorama: 3,917 posts
Posted: Sunday, March 09, 2014 - 06:45 AM UTC
Take a look at this pic of the Legend conversion...see how the edges of the MEXAS sit pretty much flush up against the turret...

SgtRam
#197
Joined: March 06, 2011
KitMaker: 3,971 posts
Armorama: 2,859 posts
Posted: Sunday, March 09, 2014 - 07:57 AM UTC
Thanks, I have not mounted them on yet, I just posed them for the picture, the next step is to mount the turret armour and those pictures will help in lining it up. Thanks
LeoCmdr
Joined: January 19, 2005
KitMaker: 4,085 posts
Armorama: 3,917 posts
Posted: Sunday, March 09, 2014 - 01:51 PM UTC
Your anti-slip surface looks good.
SgtRam
#197
Joined: March 06, 2011
KitMaker: 3,971 posts
Armorama: 2,859 posts
Posted: Friday, March 14, 2014 - 01:37 AM UTC
The turret is starting to come together, and I must say between the Legend Conversion Set and the Legend Update Set, there is plenty of turret detail
While the set suggest using brass rod for the stowage shelves, I found it a lot easier to use plastic rod as it was easier to cut and use.


The brackets for the jerry cans is part of the Update Set, and look great.

The ECM unit included in the update set also looks great. And from images I have seen of the PSM and Real Model releases, it is the best looking ECM unit available.

I have started working on the smoke launchers, and hopefully got the angles close, as there are no markings to help line these up.

Work continues on completing the turret next.
While the set suggest using brass rod for the stowage shelves, I found it a lot easier to use plastic rod as it was easier to cut and use.
The brackets for the jerry cans is part of the Update Set, and look great.
The ECM unit included in the update set also looks great. And from images I have seen of the PSM and Real Model releases, it is the best looking ECM unit available.
I have started working on the smoke launchers, and hopefully got the angles close, as there are no markings to help line these up.
Work continues on completing the turret next.
LeoCmdr
Joined: January 19, 2005
KitMaker: 4,085 posts
Armorama: 3,917 posts
Posted: Friday, March 14, 2014 - 02:35 AM UTC
The angles of the grenade dischargers look off. The front most grenade discharger should launch pretty much straight ahead and the remainder are at varied angles increasing to the rear.
You can refer to the MENG Leopard 1A3 instructions for diagrams of the angles of the grenade dischargers.
http://www.1999.co.jp/eng/10247492
You can refer to the MENG Leopard 1A3 instructions for diagrams of the angles of the grenade dischargers.
http://www.1999.co.jp/eng/10247492
SgtRam
#197
Joined: March 06, 2011
KitMaker: 3,971 posts
Armorama: 2,859 posts
Posted: Friday, March 14, 2014 - 03:07 AM UTC
Jason
I think once mounted, they be fine as there is an angle to the turret.
Thanks
Kevin
I think once mounted, they be fine as there is an angle to the turret.
Thanks
Kevin
LeoCmdr
Joined: January 19, 2005
KitMaker: 4,085 posts
Armorama: 3,917 posts
Posted: Friday, March 14, 2014 - 06:01 AM UTC
As long as the forward most grenade launcher points forward when you attach it the rest can adjust angles accordingly.
The angles of the dischargers with the MEXAS are a bit different from the standard layout due to the rounded MEXAS modules.
You might want to attach the mounting rail to the turret for the other side first and then position the grenade dischargers so you can adjust the angles.
The angles of the dischargers with the MEXAS are a bit different from the standard layout due to the rounded MEXAS modules.
You might want to attach the mounting rail to the turret for the other side first and then position the grenade dischargers so you can adjust the angles.
SgtRam
#197
Joined: March 06, 2011
KitMaker: 3,971 posts
Armorama: 2,859 posts
Posted: Friday, March 14, 2014 - 12:56 PM UTC
Just a little update, smoke dischargers added. It is a little tough in there are no marking to assist lining everything up nor is there any templates for bending the wire guards.


SgtRam
#197
Joined: March 06, 2011
KitMaker: 3,971 posts
Armorama: 2,859 posts
Posted: Saturday, March 29, 2014 - 01:01 PM UTC
Well added the rest of the turret detail and I can call the build but done.
For the jerry cans, I used Tamiya tape cut in strips, and fed the photo-etched buckles onto it.

The MG builds up real nice, I softened the resin is some hot water to form.


I have to say I am very impressed with the conversion set from Legend Productions, it builds into a nice looking Leopard C2 MEXAS. While it takes a little work, it is work you will be proud of once built. I have seen a few photos of the plastic kit now available, but I am glad I went the conversion route.


Now to apply some primer, paint, and weathering. I will attach the MG and ECM unit after paint, as well as some Black Dog stowage, including a nice Coleman cooler from another Legend set.
I would highly recommend the Legend Production conversion set for building a Leopard C2 MEXAS.
For the jerry cans, I used Tamiya tape cut in strips, and fed the photo-etched buckles onto it.
The MG builds up real nice, I softened the resin is some hot water to form.
I have to say I am very impressed with the conversion set from Legend Productions, it builds into a nice looking Leopard C2 MEXAS. While it takes a little work, it is work you will be proud of once built. I have seen a few photos of the plastic kit now available, but I am glad I went the conversion route.
Now to apply some primer, paint, and weathering. I will attach the MG and ECM unit after paint, as well as some Black Dog stowage, including a nice Coleman cooler from another Legend set.
I would highly recommend the Legend Production conversion set for building a Leopard C2 MEXAS.
LeoCmdr
Joined: January 19, 2005
KitMaker: 4,085 posts
Armorama: 3,917 posts
Posted: Saturday, March 29, 2014 - 01:18 PM UTC
It looks like you missing the Muzzle Reference System included in the update set for the end of the barrel.
What were your Highs and Lows with respect this to the conversion set and update set?
What were your Highs and Lows with respect this to the conversion set and update set?
SgtRam
#197
Joined: March 06, 2011
KitMaker: 3,971 posts
Armorama: 2,859 posts
Posted: Saturday, March 29, 2014 - 01:25 PM UTC
Jason
While there are some fit issues with the resin, dry fitting and sanding takes care of that. I also found the the instructions a little vague at times. As for the highs, the Legend set is well detailed, and in my untrained Leopard eyes, does a good job of resembling the C2 MEXAS. I did use the DVD from Anthony Seward as reference during the build, and found most of the parts from Legend did a great job of matching the tank.
As for the barrel, I did use the PSM Leopard barrel, and did not realize I needed the other part, I will take a look, as it is in the update set.
Thanks
Kevin
Removed by original poster on 05/14/19 - 00:34:44 (GMT).
LeoCmdr
Joined: January 19, 2005
KitMaker: 4,085 posts
Armorama: 3,917 posts
Posted: Monday, March 31, 2014 - 07:40 AM UTC
Quoted Text
The Leopard looks so good with this MEXAS kit on it, and this is a very nice build, did they ever get painted in overall sand at any point?, or did they stay all green?

They were never painted CARC tan. The only tan parts were the thermal covers added in 2007.
SgtRam
#197
Joined: March 06, 2011
KitMaker: 3,971 posts
Armorama: 2,859 posts
Posted: Saturday, April 05, 2014 - 07:45 AM UTC
Now that the build is completed, on with the paint. After masking the wheels and track, I applied two light coats of Tamiya NATO Green, then followed up with a few selective sprays of True Earth Paint Fading 1, Acid, and some smoke around the exhausts. Now to let it dry before a coat of Future and then decal.


gcdavidson
Joined: August 05, 2003
KitMaker: 1,698 posts
Armorama: 1,563 posts
Posted: Saturday, April 05, 2014 - 09:31 AM UTC
turned out great!
LeoCmdr
Joined: January 19, 2005
KitMaker: 4,085 posts
Armorama: 3,917 posts
Posted: Sunday, April 06, 2014 - 12:06 AM UTC
I'd recommend spraying over the sooty overspray on the back deck along the top of the exhaust grills and the engine air intake grill (square grill in the middle of the back deck).
Those areas did not have exhaust blackening.
Those areas did not have exhaust blackening.
SgtRam
#197
Joined: March 06, 2011
KitMaker: 3,971 posts
Armorama: 2,859 posts
Posted: Thursday, April 10, 2014 - 02:44 AM UTC
Decals are applied, and a wash of AK Interactive Brown for Green. Now to apply the first flat coat, and start making it look like it was in the desert.


I know the "I love Alberta Beef" bumper sticker does not belong on this tank, but I liked it so much, I had to put it on....sorry Anthony
I know the "I love Alberta Beef" bumper sticker does not belong on this tank, but I liked it so much, I had to put it on....sorry Anthony
Crox77
#354

Joined: January 06, 2013
KitMaker: 184 posts
Armorama: 178 posts

Posted: Sunday, April 13, 2014 - 04:18 AM UTC
Nice looking Mexas Kevin, I'm currently building the Tacom version, but I wonder if you can help me? Any chance you could tell me the number of links needed for one side using the orochi tracks please?
Thanks Paul
Thanks Paul
SgtRam
#197
Joined: March 06, 2011
KitMaker: 3,971 posts
Armorama: 2,859 posts
Posted: Monday, April 14, 2014 - 07:04 AM UTC
@Paul - sorry I don't have the actual number, I will look in my spares box, and see how many were left on the sprue. It is difficult to count on the model with the skirt armor.
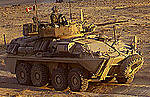
So with the C2 MEXAS build complete, it did find a little sand, and the weathering is under way.


I need to smooth out the sand dust look, add the antennas (with water bottles), and add some stowage.
So with the C2 MEXAS build complete, it did find a little sand, and the weathering is under way.
I need to smooth out the sand dust look, add the antennas (with water bottles), and add some stowage.
Crox77
#354
Joined: January 06, 2013
KitMaker: 184 posts
Armorama: 178 posts
Posted: Monday, April 14, 2014 - 08:04 AM UTC
Ok Kevin thanks a lot, loving your work though very nice

gigi63

Joined: February 09, 2014
KitMaker: 241 posts
Armorama: 241 posts
Posted: Wednesday, April 16, 2014 - 08:30 AM UTC
Hi Kevin compliments for your work on this model.You have described very well each assembly stage exhaustively and with a large number of photos.Thanks for sharing.
Cheers Luigi
Cheers Luigi
 |

WEB HOSTING BY


Copyright ©2021 Armorama and Kitmaker Network, a subsidiary of Silver Star Enterprises
All Rights Reserved. Please read our Conditions of Use and Privacy Policy.
All Rights Reserved. Please read our Conditions of Use and Privacy Policy.