Hosted by Darren Baker
A Dragon Wagon odyssey
JLModels
Manitoba, Canada
Joined: February 15, 2014
KitMaker: 117 posts
Armorama: 117 posts
Joined: February 15, 2014
KitMaker: 117 posts
Armorama: 117 posts
Posted: Friday, February 14, 2014 - 01:55 PM UTC
About ten years ago I purchased and completed a 1/35 Tamiya Dragon Wagon and built it pretty much stock out of the box. It was only the second model I had built since I was a kid and was purchased because it was new, had good reviews and looked cool.
It turned out okay, but not realizing I needed to protect the basecoat color, I added a dark wash and turned my nice Dragon Wagon a VERY dark shade of green by accident (I was applying filters before they were a recognized thing, Ha! If only I had added them properly!) To add insult to injury, I didn’t properly glosscoat it and a few of the larger decals silvered rather badly. I was still proud of it at the time, but as time passed and my skills grew I began to look at the old beast with more and more regret.
Finally one day I got irritated enough that I decided to try to strip and repaint it. While stripping the trailer went well, trying to do the cab did not…
I could probably have salvaged it, but it would have been even more work than building a new one (or so I thought at the time!)
Then I discovered via my local AMPS chapter that a new model competition, AMPS Great White North, was going to occur a few hours away and decided to combine my goal to build a Dragon Wagon I could be proud of with my desire to enter something decent into that competition.
If only I knew what I was getting myself into…
This is the stuff I purchased to begin my quest. In addition to the Tamiya kit itself, I picked up the Royal Models upgrade kit part 1 and 2, their Dragon Wagon chains set, the Eduard Interior and Exterior photoetch sets and the eduard stowage bin sets.
Finally I picked up every reference I could find, including Tankograd’s Dragon Wagon in detail book and their technical reference book. Not pictured here are Allied-Axis #3 and #5, The Military Machine’s TR-1 Dragon Wagon M25 and Ampersand’s Dragon Wagon – a visual history books. The M25 Dragon Wagon technical manual TM9-767 also came in very handy. I also bookmarked pretty much every site I could find containing Dragon Wagon images, some of which came in surprisingly handy in ways I didn’t expect as I’ll explain as we go along.
The purpose of this blog is not only to chronicle my construction of the Tamiya Dragon Wagon, but also to note any problem or pitfall areas others looking to build the same kit should know about. Hopefully this will be a helpful and exciting adventure!
JLModels
Manitoba, Canada
Joined: February 15, 2014
KitMaker: 117 posts
Armorama: 117 posts
Joined: February 15, 2014
KitMaker: 117 posts
Armorama: 117 posts
Posted: Friday, February 14, 2014 - 01:59 PM UTC
Here I’ve assembled sets 1 and 2 from the Tamiya instructions, and begun detailing. While the kit falls together really easily, the undercarriage is simplified and required a lot of additions to bring it up to todays standards.
As you can see I’ve replaced almost all of the details on the leaf springs, which were VERY crude. The leaf spring shackles were molded solid, as they often are in kits, so I carved away and replaced them, as I did with the leaf spring straps. The worst though was the shock absorber arm, which you can see in the middle of the wheel well. It was molded as just this large, ugly, rectangular block thing and I don’t understand why. There’s no reason Tamiya couldn’t have molded it as a separate part, which would have allowed them to make it properly thin and round with the proper stepped rod connector, but they decided not to. I have no idea why. This part is clearly visible in the finished model above the wheel due to the large size of the wheel wells, and isn’t particularly tiny or hard to mold…
You can also see the hundreds of bolts, as well as the lead wire air hoses I added in after checking through the Tankograd books. I also added the fender support crossbars that go across the chassis underneath the leaf springs.
Finally, I added the control system for the front winch power take-off. It took me a while studying all of the references to figure out where this goes and how it works. Just below the drivers seat there is a mechanism which feeds a rod down through the floor, and connects to a pivot in front of the steering column. This connects to a rod that crosses just behind the front winch, forms another pivot, and that connects to a long rod that travels down the right side of the frame to the gearbox in the middle of the frame. All of this was scratchbuilt from evergreen styene rod and strip.
Will any of this be seen once the model is finished? I have no idea, but I think so. And I’ll know its there, so that counts for something right?
Tiger_213
California, United States
Joined: August 10, 2012
KitMaker: 1,510 posts
Armorama: 1,443 posts
Joined: August 10, 2012
KitMaker: 1,510 posts
Armorama: 1,443 posts
Posted: Friday, February 14, 2014 - 02:20 PM UTC
Looking forward to watching this. Always have time for a coopeRation Wagon build.
LTMike4208
Maryland, United States
Joined: May 23, 2011
KitMaker: 39 posts
Armorama: 28 posts
Joined: May 23, 2011
KitMaker: 39 posts
Armorama: 28 posts
Posted: Friday, February 14, 2014 - 02:23 PM UTC
Great work so far. I'll be following along. Thanks
JLModels
Manitoba, Canada
Joined: February 15, 2014
KitMaker: 117 posts
Armorama: 117 posts
Joined: February 15, 2014
KitMaker: 117 posts
Armorama: 117 posts
Posted: Friday, February 14, 2014 - 03:38 PM UTC
I aim to please!
cassshay
West Virginia, United States
Joined: September 17, 2013
KitMaker: 55 posts
Armorama: 52 posts
Joined: September 17, 2013
KitMaker: 55 posts
Armorama: 52 posts
Posted: Friday, February 14, 2014 - 04:29 PM UTC
Hey Jason, great start. I've built the tractor for the Dragon Wagon several years ago also, it is a great kit to start with. Look forward to your progress.
Mark
Mark
panamadan
Minnesota, United States
Joined: July 20, 2004
KitMaker: 1,513 posts
Armorama: 1,449 posts
Joined: July 20, 2004
KitMaker: 1,513 posts
Armorama: 1,449 posts
Posted: Friday, February 14, 2014 - 05:17 PM UTC
I'll be watching. How do you rate the Tankograd book?
Dan
Dan
JLModels
Manitoba, Canada
Joined: February 15, 2014
KitMaker: 117 posts
Armorama: 117 posts
Joined: February 15, 2014
KitMaker: 117 posts
Armorama: 117 posts
Posted: Friday, February 14, 2014 - 06:37 PM UTC
Dan,
Tankograd publishes two books on the Dragon Wagon; their walk around 'in detail' book and the technical manual book. The 'in detail' walk around book is worth its weight in gold if you really want to go all out on a Dragon Wagon. The images are huge, detailed, and VERY useful (in particular the shots inside the cab, and the underside, as well as the trailer. I don't think I could wire the trailer properly without having seen it.
The technical manual book though is not worth it. You can find the actual US military technical manual for the Dragon Wagon online, in its 400+ page glory. It also contains a lot of detail Tankograd decided not to include, some of which I found critical to figuring out how a lot of it goes together. I wouldn't bother with the Tankograd Technical manual book unless for some reason you can't find the original Army technical manual online.
mat
Limburg, Netherlands
Joined: November 18, 2003
KitMaker: 894 posts
Armorama: 643 posts
Joined: November 18, 2003
KitMaker: 894 posts
Armorama: 643 posts
Posted: Friday, February 14, 2014 - 07:46 PM UTC
Hi Jason,
I might have a tip, I see you bought the chain set. I used this one myself and the method shown by RM is a pain. I used some plastic rod instead of the resin parts to make the links. The rod was small enough to fit through the holes. I fit about 5 pieces spread over the whole chain to get a good distance bewteen both PE halves. Once the glue had dried, I filled the other chainlink holes.
a small mistake in the kit, if you are going to fit the lifting frame: the locking pins that lock both tubes of the lifting frame together go through the larger pipe, not the small one.
HTH, Matthijs
airborne1
Queensland, Australia
Joined: April 15, 2006
KitMaker: 915 posts
Armorama: 797 posts
Joined: April 15, 2006
KitMaker: 915 posts
Armorama: 797 posts
Posted: Friday, February 14, 2014 - 08:08 PM UTC
look forward to seeing this build Jason,
It's a big job and a lot of work .
Congrats on taking on a big challenge .
Michael
It's a big job and a lot of work .
Congrats on taking on a big challenge .
Michael
ironhull
Venezia, Italy
Joined: November 23, 2013
KitMaker: 134 posts
Armorama: 134 posts
Joined: November 23, 2013
KitMaker: 134 posts
Armorama: 134 posts
Posted: Friday, February 14, 2014 - 08:30 PM UTC
Hi Jason
nice start!
Looking forward to watching this.
Mikek92888 add some M26 3D printed parts at click2detail.
They are very expensive, most of them the Gar Wood winch covers, but I think the new chain drive is worth its price and better then RM PE parts.
Winch cover
chain drive
Some years ago I upload some pictures on my website. I wish they may help modellers
DRAGON WAGON TM9
DRAGON WAGON THE REAL BEAST
Bye
Pierantonio
JLModels
Manitoba, Canada
Joined: February 15, 2014
KitMaker: 117 posts
Armorama: 117 posts
Joined: February 15, 2014
KitMaker: 117 posts
Armorama: 117 posts
Posted: Friday, February 14, 2014 - 08:47 PM UTC
Pierantonio,
Want to have a bit of a laugh at my expense? I'm actually a little further ahead then what I already posted, and completed the Royal models chain two days before Click2Detail announced the 3D printed ones a little while back!
Trust me, if I could go back in time I'd have just waited and bought those ones, given how much of a pain the Royal models ones were. They look good, but took hours, if not days!
Funny enough, I have your website bookmarked and have used those images for reference, as well as Toadman's online M26 Walkaround.
panamadan
Minnesota, United States
Joined: July 20, 2004
KitMaker: 1,513 posts
Armorama: 1,449 posts
Joined: July 20, 2004
KitMaker: 1,513 posts
Armorama: 1,449 posts
Posted: Saturday, February 15, 2014 - 02:51 AM UTC
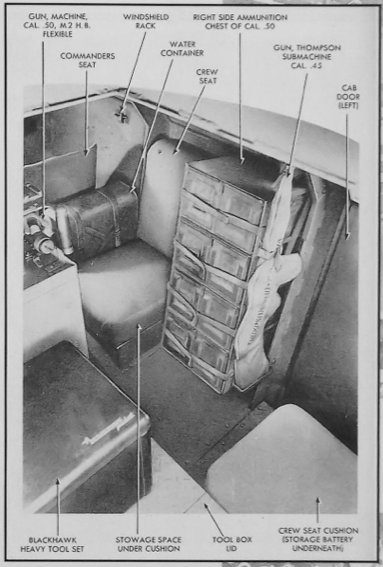
Jason, have you found pics of the missing Blackhawk heavy tool box?
Dan
Dan
Posted: Saturday, February 15, 2014 - 03:52 AM UTC
Quoted Text
Will any of this be seen once the model is finished? I have no idea, but I think so. And I’ll know its there, so that counts for something right?
Absolutely Right! I'm with you on this one. Excellent work!
Posted: Saturday, February 15, 2014 - 03:59 AM UTC
JLModels
Manitoba, Canada
Joined: February 15, 2014
KitMaker: 117 posts
Armorama: 117 posts
Joined: February 15, 2014
KitMaker: 117 posts
Armorama: 117 posts
Posted: Saturday, February 15, 2014 - 05:51 AM UTC
Dan,
the only image I've ever seen found is the one below, which shows only a third of the box. As far as I can tell it's just a black box, presumably with hinges on the back and a rounded edge along the flush-fitting top. Closeup images of the floor mount suggest it has handles on the side which can be tied down to the floor but that's all that's known. Not even the official army technical manual includes an image of it!
JLModels
Manitoba, Canada
Joined: February 15, 2014
KitMaker: 117 posts
Armorama: 117 posts
Joined: February 15, 2014
KitMaker: 117 posts
Armorama: 117 posts
Posted: Saturday, February 15, 2014 - 06:08 AM UTC
Michael,
I actually consider that one of the more minor errors compared to the incorrect machine gun mount, its wrong-style ammo box, a few missing floor plates in front of the A-frame and some messed up tool mounts.
But don't worry, i'll be correcting and explaining those as we go along!
I actually consider that one of the more minor errors compared to the incorrect machine gun mount, its wrong-style ammo box, a few missing floor plates in front of the A-frame and some messed up tool mounts.
But don't worry, i'll be correcting and explaining those as we go along!
panamadan
Minnesota, United States
Joined: July 20, 2004
KitMaker: 1,513 posts
Armorama: 1,449 posts
Joined: July 20, 2004
KitMaker: 1,513 posts
Armorama: 1,449 posts
Posted: Saturday, February 15, 2014 - 06:56 AM UTC
Jason, I've been looking for better views of it than that, but have had poor luck so far.
There are some pics, but at a distance of the soft top DW in Ampersand's DW book.
Dan
There are some pics, but at a distance of the soft top DW in Ampersand's DW book.
Dan
JLModels
Manitoba, Canada
Joined: February 15, 2014
KitMaker: 117 posts
Armorama: 117 posts
Joined: February 15, 2014
KitMaker: 117 posts
Armorama: 117 posts
Posted: Saturday, February 15, 2014 - 08:30 AM UTC
Dan,
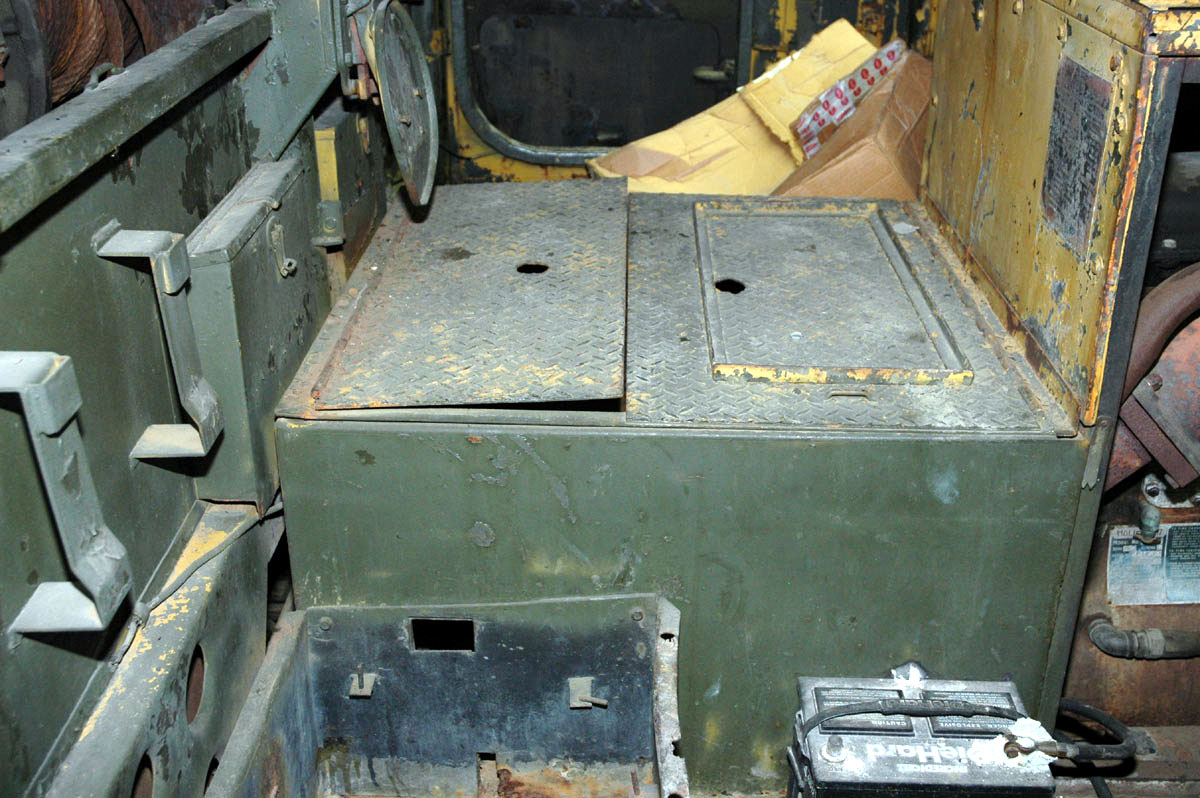
I have that book and yeah, it does have a few good images although they aren't that clear. On pages 81 and 83 it shows a strap going over the top of the tool box in addition to the ones on the sides, but I don't know if that was actually used in production and what its for. In the image below you can see the side tiedowns welded to the floor that would probably be for the side straps but nothing to tie down the strap over the top.
Was that strap used in the field? did it just wrap around the entire toolbox to keep the lid closed like a latch? I have no idea.
Also, the armoured Dragon Wagon doesn't even have those side tie-downs welded to the floor in any image I've seen, only notches in the angled plate that holds the toolbox, which I think the side straps were looped through. So yet more questions!
panamadan
Minnesota, United States
Joined: July 20, 2004
KitMaker: 1,513 posts
Armorama: 1,449 posts
Joined: July 20, 2004
KitMaker: 1,513 posts
Armorama: 1,449 posts
Posted: Saturday, February 15, 2014 - 11:02 AM UTC
Jason, I do have photos of the side of the box taken from a museum in the Netherlands and I believe it is correct. The box is held down with latches similar like the jeep's hood latches. I'd like to share the pics, but don't know how to upload them here.
Dan
Dan
panamadan
Minnesota, United States
Joined: July 20, 2004
KitMaker: 1,513 posts
Armorama: 1,449 posts
Joined: July 20, 2004
KitMaker: 1,513 posts
Armorama: 1,449 posts
Posted: Saturday, February 15, 2014 - 11:13 AM UTC
panamadan
Minnesota, United States
Joined: July 20, 2004
KitMaker: 1,513 posts
Armorama: 1,449 posts
Joined: July 20, 2004
KitMaker: 1,513 posts
Armorama: 1,449 posts
Posted: Saturday, February 15, 2014 - 11:27 AM UTC
panamadan
Minnesota, United States
Joined: July 20, 2004
KitMaker: 1,513 posts
Armorama: 1,449 posts
Joined: July 20, 2004
KitMaker: 1,513 posts
Armorama: 1,449 posts
Posted: Saturday, February 15, 2014 - 11:27 AM UTC
Small, but it worked!
JLModels
Manitoba, Canada
Joined: February 15, 2014
KitMaker: 117 posts
Armorama: 117 posts
Joined: February 15, 2014
KitMaker: 117 posts
Armorama: 117 posts
Posted: Sunday, February 16, 2014 - 05:54 AM UTC
Here we can see some of the detail added to the front of the cab. The visible wiring has been added traveling from the steering column and engine bay to where the back of the instrument panel would be, as well as adding the ribbing, straps and wingnuts to the aircleaners (I just noticed one has fallen off of the left hand side air filter!).
The Eduard kit includes replacement photoetch screen for the main engine grill, but honestly I haven’t a clue why you would want to use it. The plastic molded grill looks great, and in all the images I saw never once could you see past the grill. Why Eduard bothered with it I don’t know, but maybe it’ll be useful for someone who plans to scratchbuild an engine (although why you would bother when its housed in an armored cab and you’d see almost none of it I don’t know).
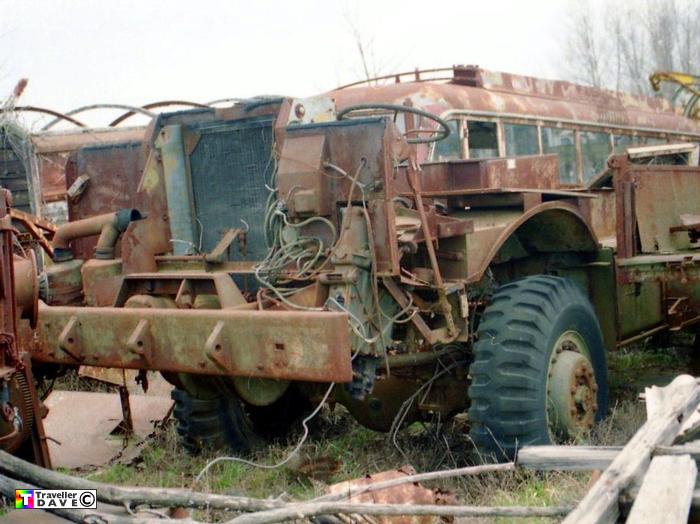
The most interesting, and irritating thing about this image is the plastic details added in front of the grill. I found those details in the most unlikely of places: someone’s travel images from a wrecking yard they went to in France.
http://www.travellerdave.co.uk/?s=27
This is the best image I have ever found of what’s underneath the dragon wagon armored cab. You can see the cross reinforcement bar going across and above the winch, as well as a VERY strange bar going across in front of the air horns and stopping in the center. I have never seen a single Dragon Wagon model depict this, and it was only hinted at in some of the better images in the Tankograd books. Only the war department’s TM9-767 technical manual shows it in detail, but not where its connected to.
It took me ages to figure out what it was and what it does. It’s the control arm for opening the armored front shutters for the radiator! The two rods you can see dangling off the end of it and down toward the winch are actually normally attached to the front armored shutters (which have been removed along with the cab in this image) and are thus just dangling free. The way it works is that the commander actuates the lever on the right side of the cab, which passes through the firewall just behind the air cleaners, there is a pivot there connected to the bar, which rotates and pushes the arms out to open the shutters.
Suffice it to say, once I realized that, I scratchbuilt that in there.
JLModels
Manitoba, Canada
Joined: February 15, 2014
KitMaker: 117 posts
Armorama: 117 posts
Joined: February 15, 2014
KitMaker: 117 posts
Armorama: 117 posts
Posted: Sunday, February 16, 2014 - 09:14 AM UTC
Dan,
interesting pics. I'm not sure if that toolbox is original given that I've never seen the front projection in any other images, but the latch mechanism certainly makes sense.
Thanks!
interesting pics. I'm not sure if that toolbox is original given that I've never seen the front projection in any other images, but the latch mechanism certainly makes sense.
Thanks!