_GOTOBOTTOM
Constructive Feedback
For in-progress or completed build photos. Give and get contructive feedback!
Meng Char 2C completed build
AFVFan
Visit this Community
North Carolina, United States
Joined: May 17, 2012
KitMaker: 1,980 posts
Armorama: 1,571 posts
Posted: Friday, March 07, 2014 - 11:42 AM UTC
Here's my latest finished work. It's Meng's 1/35 French Char 2C. Comments are appreciated and critiques are encouraged. This one has been done straight out of the box.


There are some more pictures here: http://s1254.photobucket.com/user/AFVFan/library/Char2C?sort=3&page=1

Thanks for looking.
TAFFY3
Visit this Community
New York, United States
Joined: January 21, 2008
KitMaker: 2,531 posts
Armorama: 859 posts
Posted: Friday, March 07, 2014 - 11:46 AM UTC
Sweet! Can't wait for mine to get here. Al
AFVFan
Visit this Community
North Carolina, United States
Joined: May 17, 2012
KitMaker: 1,980 posts
Armorama: 1,571 posts
Posted: Friday, March 07, 2014 - 12:06 PM UTC
Thanks Al. I will say that you should order in one of the new Lionmarc barrels. It's an inexpensive addition that not only looks better, since it's rifled, but will save you the time of deseaming the kit parts.
retiredyank
Visit this Community
Arkansas, United States
Joined: June 29, 2009
KitMaker: 11,610 posts
Armorama: 7,843 posts
Posted: Friday, March 07, 2014 - 12:36 PM UTC
Exceptional work. A rather odd tank that should have a special place in the collection. The tracks are very convincing. Not that the rest of the build is lacking. How bad is the seam on the barrel? Since I started using plastic cement, a quick swipe with my razor knife takes care of what little seam there is.
TAFFY3
Visit this Community
New York, United States
Joined: January 21, 2008
KitMaker: 2,531 posts
Armorama: 859 posts
Posted: Friday, March 07, 2014 - 04:08 PM UTC

Quoted Text

Thanks Al. I will say that you should order in one of the new Lionmarc barrels. It's an inexpensive addition that not only looks better, since it's rifled, but will save you the time of deseaming the kit parts.


Already have one, Luckymodel shipped the barrel before the tank, which is still on back-order! Al
AFVFan
Visit this Community
North Carolina, United States
Joined: May 17, 2012
KitMaker: 1,980 posts
Armorama: 1,571 posts
Posted: Friday, March 07, 2014 - 04:34 PM UTC

Quoted Text

Exceptional work. ... How bad is the seam on the barrel? ...


Thanks Matt. Appreciate the comments.

As you can see in my pictures, the kit barrel can be used. You have to contend with the side seams of the mating surfaces, and there's also a good sized gap at the front that needs to be filled and smoothed out. I had my LHS order a metal barrel in for the 2nd one of these I'm doing. It was only $6.95 and came very nicely rifled. It's a direct replacement with no extra work needed to mount it (unlike some metal barrels I've seen)
Grauwolf
#084
Visit this Community
Quebec, Canada
Joined: September 14, 2005
KitMaker: 2,485 posts
Armorama: 743 posts
Posted: Friday, March 07, 2014 - 04:42 PM UTC
PERFECT!!!

Well painted and weathered!

Not too much...not too little...extremely well balanced.

The tracks look so real...WOW.

Cheers,
Joe
AFVFan
Visit this Community
North Carolina, United States
Joined: May 17, 2012
KitMaker: 1,980 posts
Armorama: 1,571 posts
Posted: Friday, March 07, 2014 - 05:04 PM UTC
Thanks Joe. Since these things were never in combat I wanted to keep the weathering in check.

The tracks did turn out well, at least paint wise. You can really see on the front and back views the links almost separating due to the tension on them. They really needed to be designed about a quarter link longer to keep a snug fit, but not be stretched as tight as they are. With absolutely no adjustment in them, there's not much to be done, though.
ColinEdm
Staff MemberAssociate Editor
ARMORAMA
Visit this Community
Alberta, Canada
Joined: October 15, 2013
KitMaker: 1,355 posts
Armorama: 1,229 posts
Posted: Friday, March 07, 2014 - 05:33 PM UTC
Very impressive! This is a very unique subject and it turned out beautifully. I love the weathering and how the dirt is applied to the hull, tracks and under the tracks around the return guides where it would actually collect. How do you achieve such a realistic effect? My attempts at built up dirt never seem to turn out very well.
panzerbob01
Visit this Community
Louisiana, United States
Joined: March 06, 2010
KitMaker: 3,128 posts
Armorama: 2,959 posts
Posted: Friday, March 07, 2014 - 07:13 PM UTC
Very NICE job on this very cool subject, Bob!

Yes, the tracks are really quite the bee's knees - not to say that the rest of it is anything less than way nice and realistic.

The paint scheme looks good, and the weathering does indeed come across as one of those unhappy chars left mostly by the road in 1940.

While these did not actually contribute to any fight (at least not that I know of), they did make it onto the road in a few cases, where they were abandoned and sometimes blown-up by their crews.

I confess that the tracks grab my attention. I wish I could get tracks to come out "gently mudded" and looking like that!

Thanks for sharing this!
Bob
SdAufKla
Visit this Community
South Carolina, United States
Joined: May 07, 2010
KitMaker: 2,238 posts
Armorama: 2,158 posts
Posted: Saturday, March 08, 2014 - 03:51 AM UTC
Well done, Bob!

I hope to see this one in person sometime.

The weathering and finish have indeed turned out very nice.
Rockfall
#202
Visit this Community
Ontario, Canada
Joined: December 19, 2004
KitMaker: 884 posts
Armorama: 602 posts
Posted: Saturday, March 08, 2014 - 05:36 AM UTC
Ugly and awesome all at the same time. Thanks for sharing this unique piece of armour(armor) history.

The weathering looks spot on.
tankglasgow
Visit this Community
Scotland, United Kingdom
Joined: October 04, 2010
KitMaker: 275 posts
Armorama: 260 posts
Posted: Saturday, March 08, 2014 - 05:43 AM UTC
This looks good, dried on mud is convincing and the tracks are superb, would like to see a figure along side to give an idea of the size of the beast.
well done.
Paul
thebear
Visit this Community
Quebec, Canada
Joined: November 15, 2002
KitMaker: 3,960 posts
Armorama: 3,579 posts
Posted: Saturday, March 08, 2014 - 06:12 AM UTC
Very nice .. Congrats ..Love the mudded up suspension .. Trying to creat that effect on my St Chamond .. (work in progress )

Great job sir

Rick
JoLuke
Visit this Community
Oregon, United States
Joined: July 30, 2013
KitMaker: 61 posts
Armorama: 54 posts
Posted: Saturday, March 08, 2014 - 07:35 AM UTC
Great looking tank, the camo looks great with all the streaking you did on it, also alot ofthe mud is pretty subtle, theres not too much and not too little, great job finding a good balance
AFVFan
Visit this Community
North Carolina, United States
Joined: May 17, 2012
KitMaker: 1,980 posts
Armorama: 1,571 posts
Posted: Saturday, March 08, 2014 - 08:07 AM UTC
Colin and Bob - I'll post a quick SBS for both, the mud and tracks, here later tonight or tomorrow. It'll be easier to explain with pictures.

Mike - I'd love for you to see it in person since the pictures really don't do it justice. Unfortunately, it'll be on it's way to it's new home next week.

Jeff - Thanks for the kind words.

Paul - I agree about the figure, but I rarely do them unless I plan on doing a vignette or diorama with the vehicle.

Richard and Jonas - Appreciate the comments. Mud is always fun to do. I normally work it in stages, building it up and removing excesses as needed. In most cases, it'll take 2 or 3 applications for me to get it looking right.
Blackstoat
Visit this Community
England - East Anglia, United Kingdom
Joined: October 15, 2012
KitMaker: 568 posts
Armorama: 561 posts
Posted: Saturday, March 08, 2014 - 10:58 AM UTC
That's the dogs. Well done mate.
AFVFan
Visit this Community
North Carolina, United States
Joined: May 17, 2012
KitMaker: 1,980 posts
Armorama: 1,571 posts
Posted: Saturday, March 08, 2014 - 09:56 PM UTC
Andy - Thanks! Don't know if I ever had it put that way, but thanks!

Now, the promised mud pics.... Before we begin I need to explain that I rushed doing these and the end result kind of suffered.

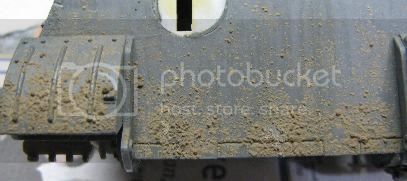
For mud build up, step 1 would be to get a soft bristled brush, load it with pigment powder, and gently tap it over the area you want covered. I vary the height of the brush over the work dependent on if I'm going for heavy saturation or coverage.


Next, I take a small 5/0 soft bristle brush and dip it in the fixer. This is just touched to the edges of the pigments, letting the osmosis action draw the fixer in. As much as possible, I try to keep from touching the actual pigment. It's best if you try to have the area you're working on near level to avoid runs in the pigment. Apologies for the blurred pic.


Here's a pic of the completion of this stage


The 3rd step is to let it dry. In this case, I used a hair dryer to speed things up a bit (be careful not to blow things around or melt the plastic if you do this).


From here, it's just a matter of deciding if you need to add more pigments (to build up areas or add a different color), or remove any areas that are too heavy.

--------------------------------------------------

The tracks... as with the mud, I messed up trying to hurry through this. I'll explain on the way.

First is a coat of LifeColors UA905 (or whatever your preferred track base is). I like working off a black primer coat. In this case, the track links came molded in black, so I skipped the primer


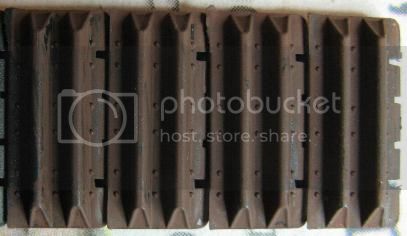
Step 2 is to add the worn silver highlights. I use a mix of silver and engine gray and use a semi dry brush technique. The gray tones the silver down, but still allows a nice shine. This is the step I messed up on. In my rush, I actually applied the mix a bit too heavily. I prefer to do this lighter, adding any additional highlights after the pigments are added.


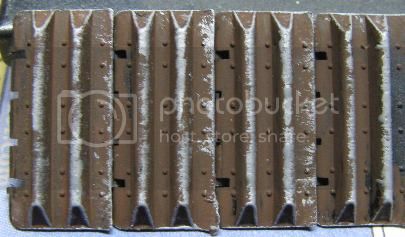
Next, the pigments are applied to the tracks using a soft bristle brush (same as the above mud)


The last stage is again done the same as the mud, applying fixer without touching the powder. Again, a hairdryer was used to the following result. And again, I messed up trying to add too much at one time.


It's actually a pretty simple process. Practice and patience are the keys (as shown here, it's easy to get away from the desired effect by rushing it). Hope this helps.
ColinEdm
Staff MemberAssociate Editor
ARMORAMA
Visit this Community
Alberta, Canada
Joined: October 15, 2013
KitMaker: 1,355 posts
Armorama: 1,229 posts
Posted: Sunday, March 09, 2014 - 02:58 AM UTC
Awesome Bob! that should be stickied.
AFVFan
Visit this Community
North Carolina, United States
Joined: May 17, 2012
KitMaker: 1,980 posts
Armorama: 1,571 posts
Posted: Monday, March 10, 2014 - 03:34 PM UTC

Quoted Text

Awesome Bob! that should be stickied.


Thanks Colin. Like I said, this technique really is basic, but the pics make it easier to understand.
Calahan
Visit this Community
Kansas, United States
Joined: October 09, 2005
KitMaker: 89 posts
Armorama: 85 posts
Posted: Tuesday, March 11, 2014 - 10:09 AM UTC
Flipping solid Bob, thanks for posting your mud techniques. Probably a good chance I'll experiment with this technique while weathering my T-26. I'd say you did this kit justice!

Paul
AFVFan
Visit this Community
North Carolina, United States
Joined: May 17, 2012
KitMaker: 1,980 posts
Armorama: 1,571 posts
Posted: Tuesday, March 11, 2014 - 11:50 AM UTC
Thanks Paul. You can do a lot of variations with the mud. To name a few: use two different pigment powders at the same time, use a wash (either complete or spot) after it dries, or seal it and add a different layer, to name a few.
 _GOTOTOP