_GOTOBOTTOM
Constructive Feedback
For in-progress or completed build photos. Give and get contructive feedback!
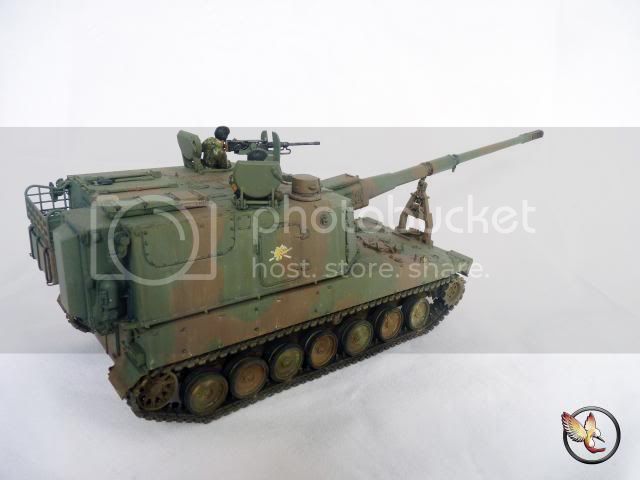
Trumpeter 1/35 JGSDF Type99 HSP
hummingbird
Visit this Community
England - East Anglia, United Kingdom
Joined: March 06, 2012
KitMaker: 120 posts
Armorama: 118 posts
Posted: Tuesday, April 08, 2014 - 06:46 AM UTC
Hello awesome people.

Right... so I have here another finished kit for you following after the little gem DANA. This here is one of Trumpeter's best. Retailing at £29.99, this beautiful gal comes in a large box with no fewer then 200 parts and a fret of PE and ( surprise, surprise !! ) with separate rubber tires for the wheels.

I painted this beautiful gal in Tamiya. A friend who is also building this and me spent alot of time trying to narrow down the best brand for the colour but I ended up settling for the Tamiya JGSDF Brown and Dark Green. As I have painted the Type90 and Type10 with the Tamiya colours, I am more comfortable with those colours.

For weathering, I kept it rather clean apart from the various shades of mud and many streakings. I am very very weak in making streakings and since this baby offer a lot of nicely angled surfaces, I though I'd give streakings another try. I used a grey colour streaking wash which I applied following a friend's suggestion; that is to streak them from bottom to up. I let it dry and apply another gloss and put on streakings that go top to bottom using oil; a total of 5 different oil colours were used. I am really happy with how all the streakings came out. Doing the streakings on the DANA really helped me improved and did a proper job on this.

I debated for a long time on the mud and I decided to go for the dried mud and slightly more wet muds to depict the vehicle going on a field that is slightly damp. I saw a lot of pictures showing this moving around damp fields so I decided to go for that.




Well, that's about as much I can sum up about the build. More informations and more photos ( many more) can be found on my blog -
http://modeller-innovation.blogspot.co.uk/2014/04/trumpeter-135-jgsdf-type99-hsp.html
Please do have a look and thank you so much in advance for any feedback you guys may have. C&C are welcomed. Just be gentle... LOL.

Until the next launch .
AFVFan
Visit this Community
North Carolina, United States
Joined: May 17, 2012
KitMaker: 1,980 posts
Armorama: 1,571 posts
Posted: Tuesday, April 08, 2014 - 10:00 AM UTC
Hey Gary, overall, a pretty nice job. I like the camo, and the streaking came out well. There are a few areas that need to be looked at, though.

It's hard to tell in the pics, but it almost looks like you didn't weather the insides of the tracks at all. There's also a broken link on the left rear that should be repaired. The road wheel rubber's running surface shouldn't be the same color as the sides. Even running on a clean shop floor those will get discolored from the contact with the tracks.

The second area to look at are your lenses (both light and periscope). You should go back and touch them up where you "colored outside the box". Pics # 12 & 13 on your blog page are good examples.

And lastly, you need to watch the seams and mold lines on your figures (mainly on the commander). Also both are suffering from the skin tone bleeding over their helmets and clothing.

As they say, the devil is in the details.
hummingbird
Visit this Community
England - East Anglia, United Kingdom
Joined: March 06, 2012
KitMaker: 120 posts
Armorama: 118 posts
Posted: Tuesday, April 08, 2014 - 08:11 PM UTC

Quoted Text

Hey Gary, overall, a pretty nice job. I like the camo, and the streaking came out well. There are a few areas that need to be looked at, though.

It's hard to tell in the pics, but it almost looks like you didn't weather the insides of the tracks at all. There's also a broken link on the left rear that should be repaired. The road wheel rubber's running surface shouldn't be the same color as the sides. Even running on a clean shop floor those will get discolored from the contact with the tracks.

The second area to look at are your lenses (both light and periscope). You should go back and touch them up where you "colored outside the box". Pics # 12 & 13 on your blog page are good examples.

And lastly, you need to watch the seams and mold lines on your figures (mainly on the commander). Also both are suffering from the skin tone bleeding over their helmets and clothing.

As they say, the devil is in the details.


Aww man ... so many boo-boos ... dang it ...

thanks for letting me know Bob ... Really appreciate it ... Painting figure is still my weakest stuff ... and many other of those boo-boos, well, it's due to my impatience ... ..

The inside of the tracks were just given a bit of wash and very lightly dusted with pigment... I thought it was enough but boy was I wrong
AFVFan
Visit this Community
North Carolina, United States
Joined: May 17, 2012
KitMaker: 1,980 posts
Armorama: 1,571 posts
Posted: Wednesday, April 09, 2014 - 12:58 AM UTC
Gary, that's the great thing about being able to get and give feedback on here. It helps us all to improve our skills. Most of what I pointed out are easy fixes that you should be able to take care of in short order.

I feel your pain about doing figures. I'm not that good at them myself. It's all about practice, and I hate using the time I can spend building vehicles doing that!

Like I said, you've got a good overall build going on here. Taking the time to refine the details can only make it better.
IrishGreek
Visit this Community
Michigan, United States
Joined: October 17, 2010
KitMaker: 627 posts
Armorama: 571 posts
Posted: Wednesday, April 09, 2014 - 02:44 AM UTC
Gary,

Overall, I would like to say I really like the job, but I also would second fixing the track link on the rear. That does draw away from the overall effect of the kit.

I have this one in the stash and have been mulling it over, but it just lost to my Type87 AW. Love the look of the beast and that GUN. Wow.

Nice and if you decide to update anything on this, please post new pics.

John
 _GOTOTOP