_GOTOBOTTOM
Armor/AFV: Axis - WWII
Armor and ground forces of the Axis forces during World War II.
Hosted by Darren Baker
Tiger I Late and Mid Co-Build Log
AlexStefan
Visit this Community
Equatorial Guinea
Joined: May 09, 2014
KitMaker: 54 posts
Armorama: 53 posts
Posted: Saturday, May 10, 2014 - 06:15 AM UTC
Hy guys,
inspired by Steven's work, I have begun building my Tigers, a project which has been waiting for a long time - as I am fairly new in the modelling business.
I now felt inspired enough to tackle this monstrum.

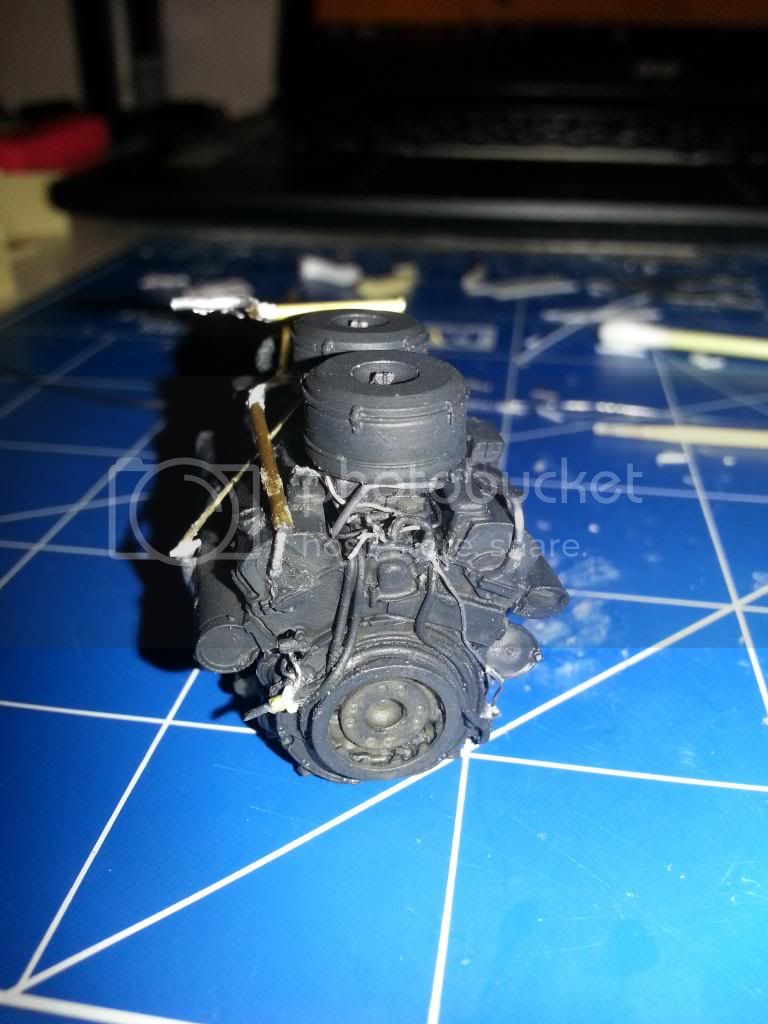
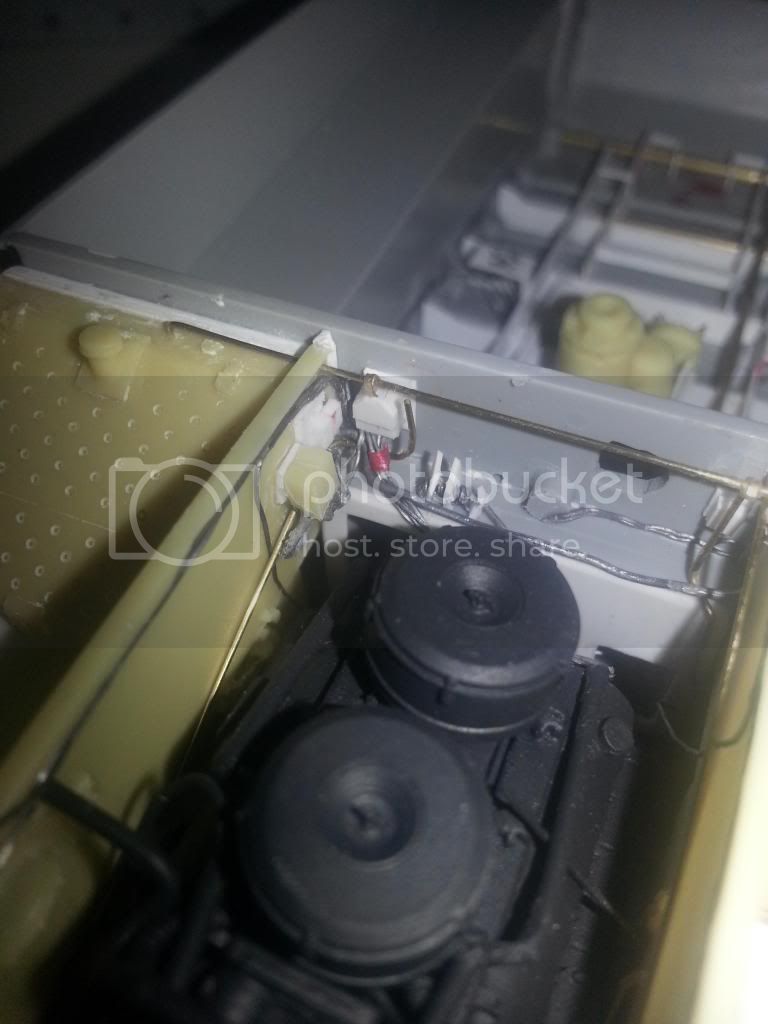
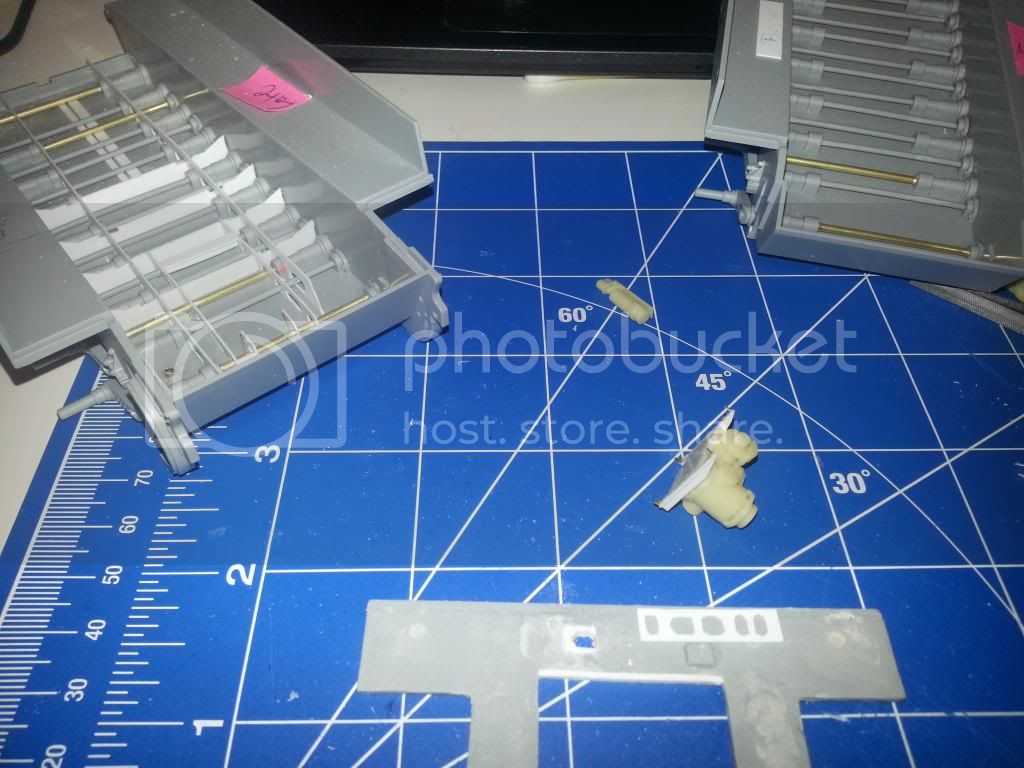
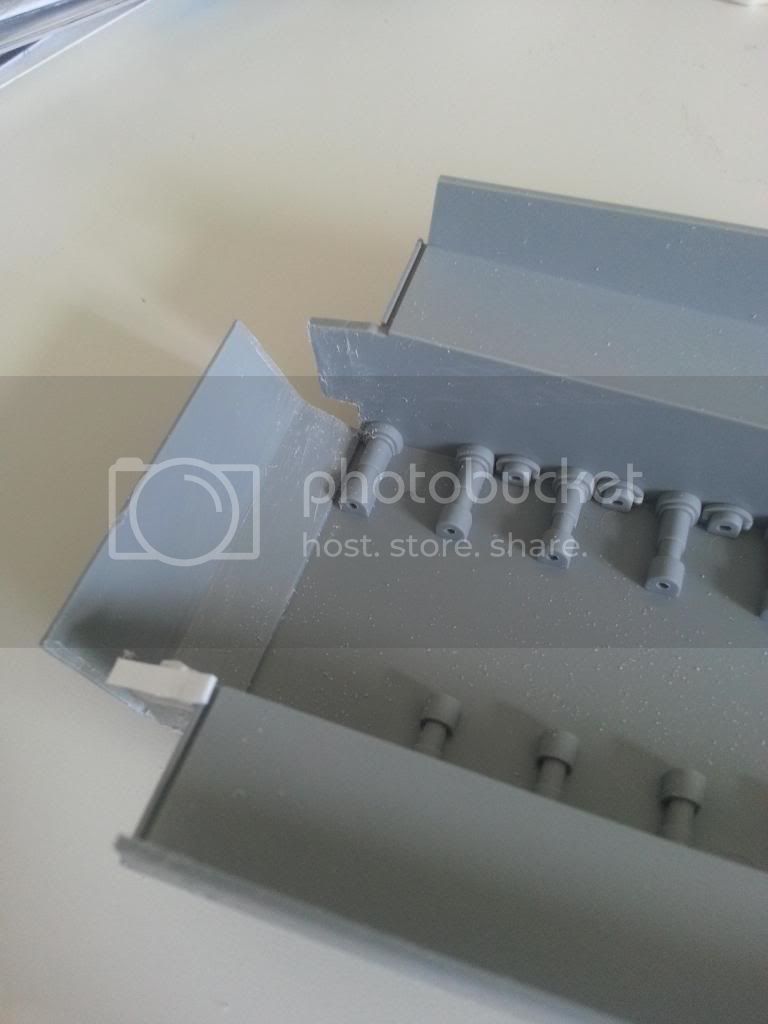
Early photos will follow soon, workin on suspension and fire wall atm.
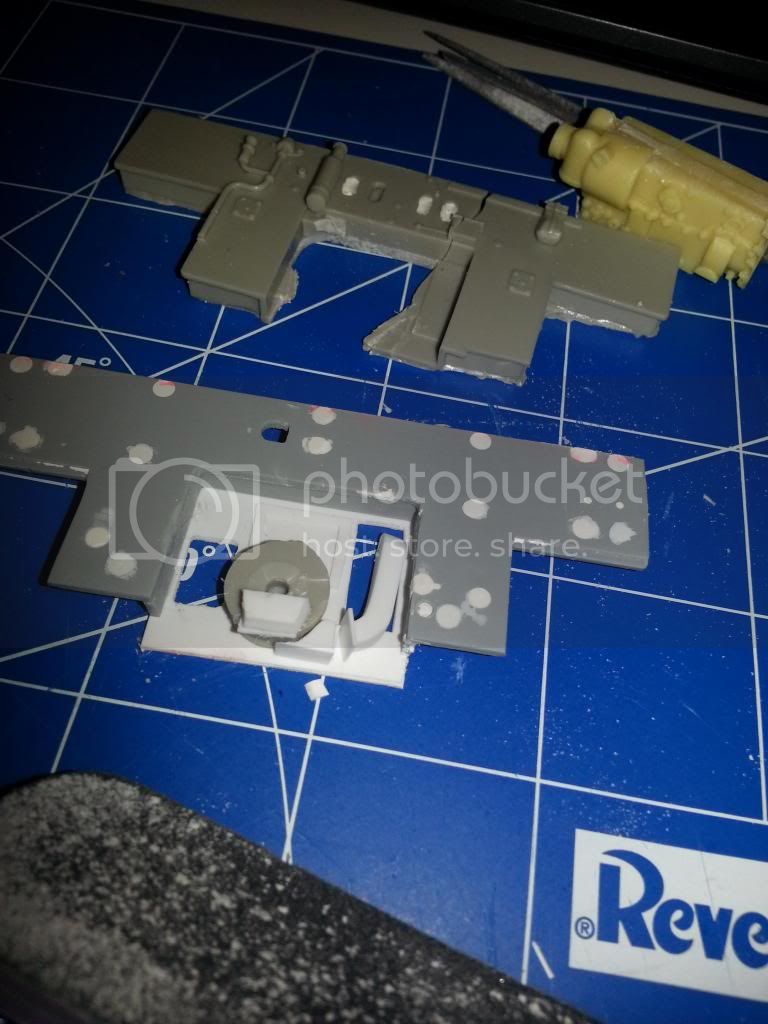
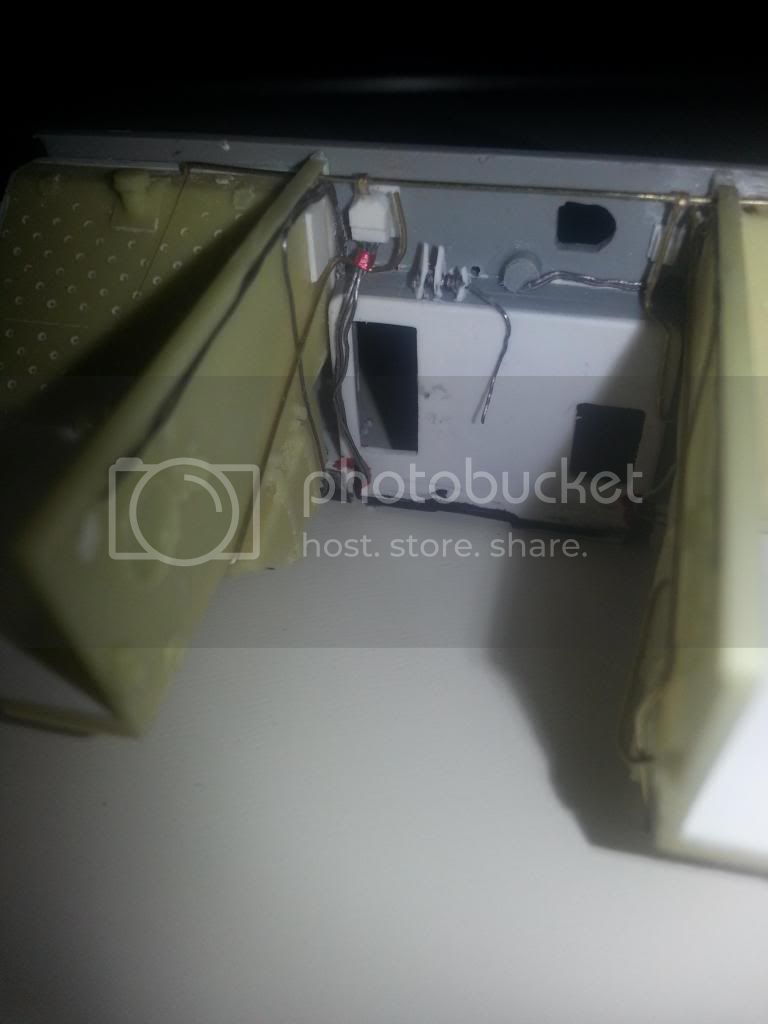
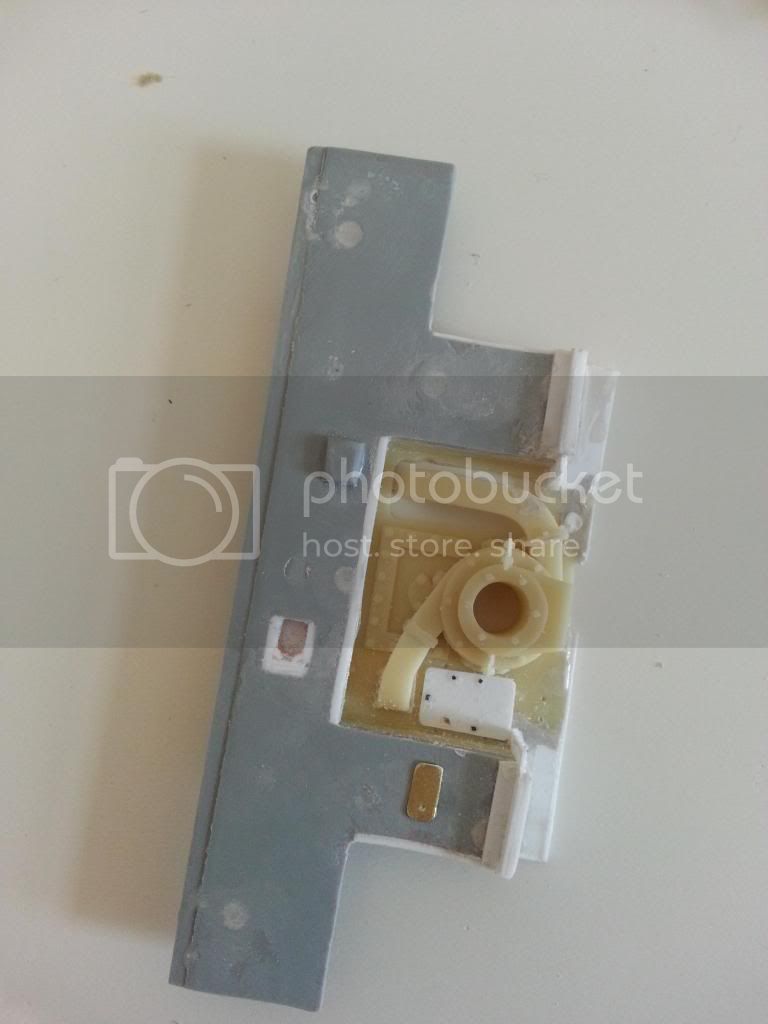
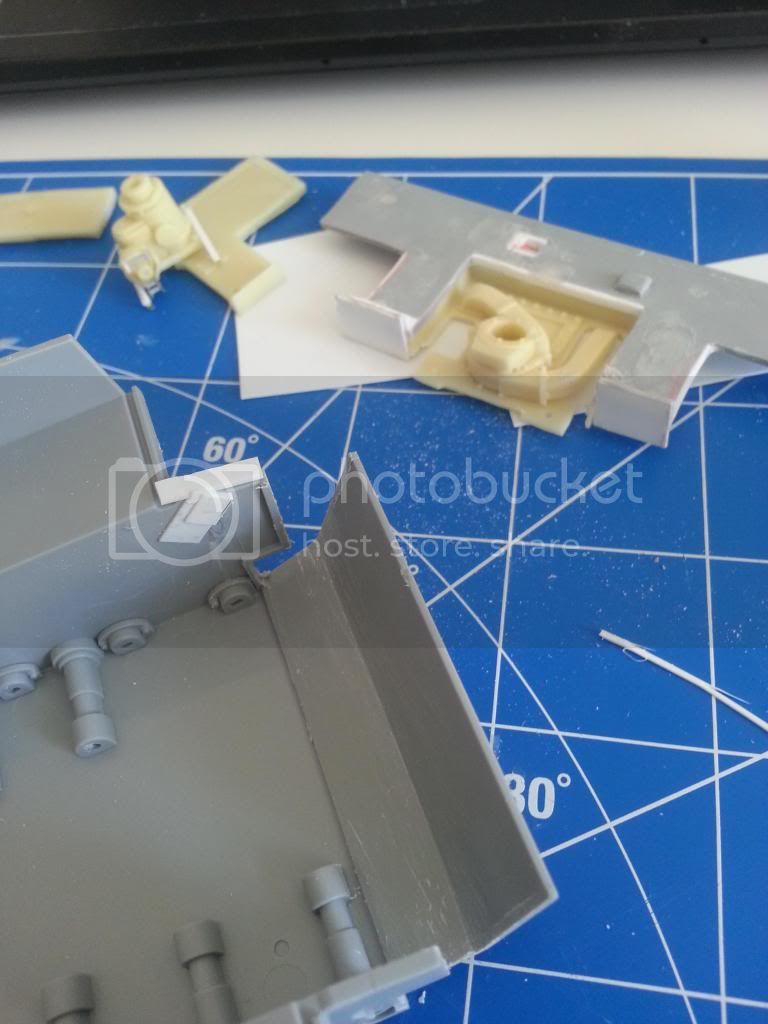
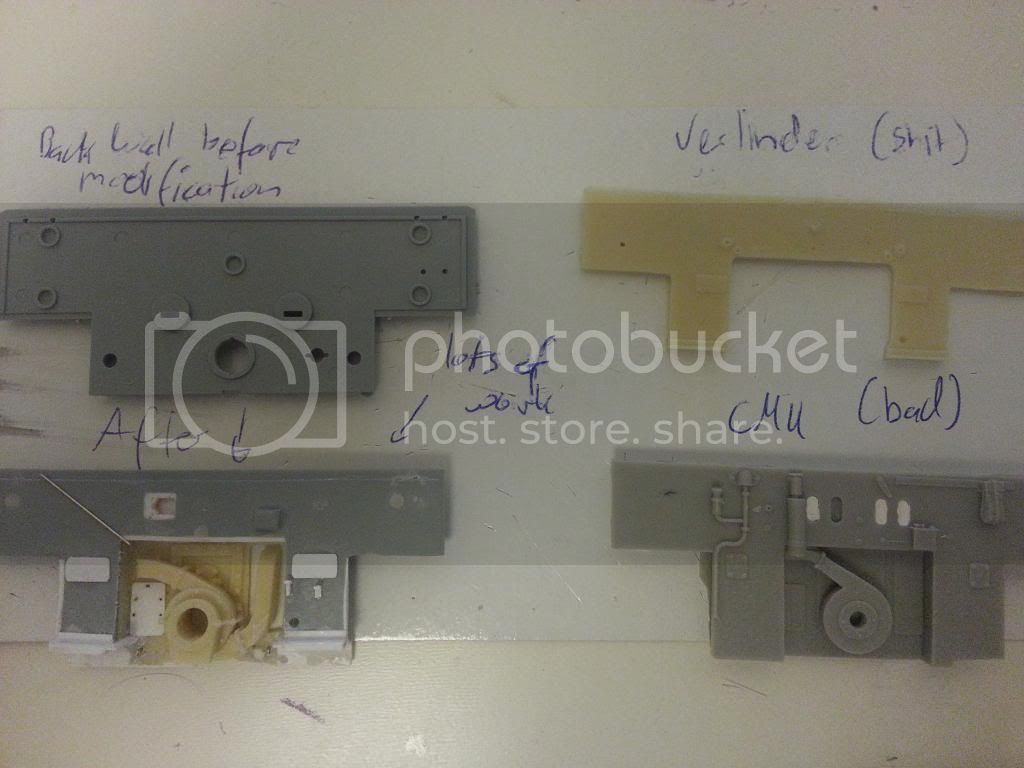
Trying to get this second generation firewall built from scratch, as neither Verlinden, nor CMK provide anything reasonably useful.
Anyways, one starting pic is attached. More news tomorrow, when I have some time for a more detailed Info panel.

Cheers,
Alex
PS: Can't add photos yet, need to subscribe first. Will do so tmrw as well.


A list of items to be used:


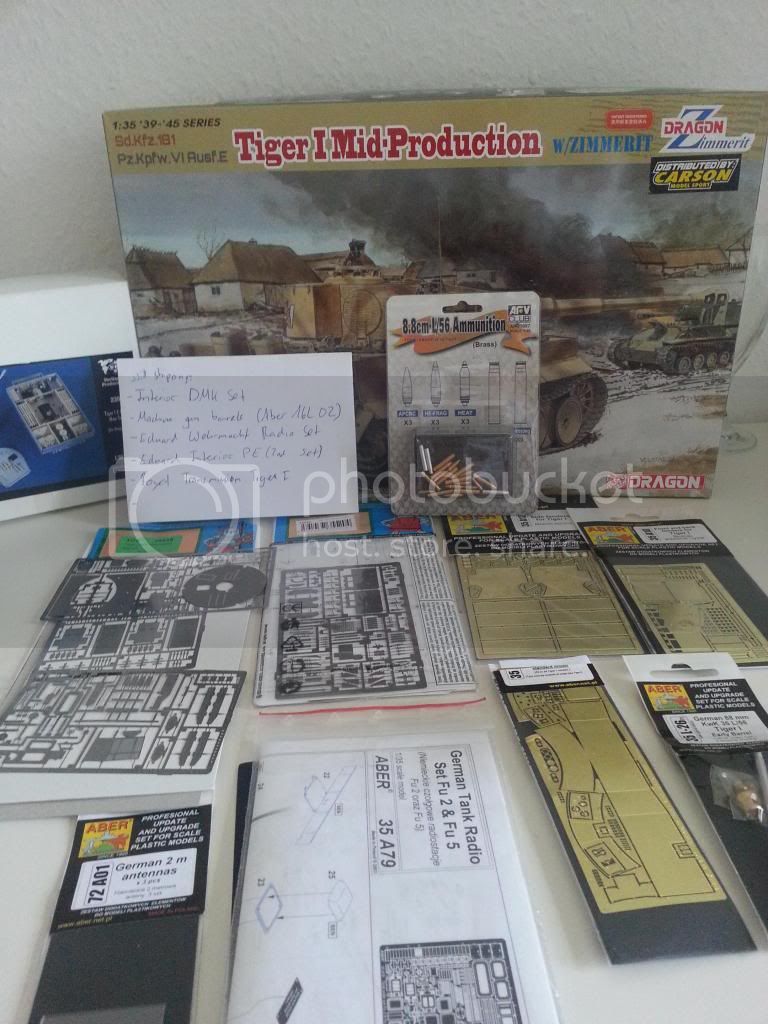
Pz.Kpfw.VI Tiger I LATE w/Zimmerit Dragon 6383
Pz.Kpfw.VI Tiger I MID w/Zimmerit Dragon 6700
2*Tiger I Mid. Production interior for (Academy)- EDUARD (3551icon_cool.gif
Tiger I Mid. Production exterior for(Academy) - EDUARD (35520)
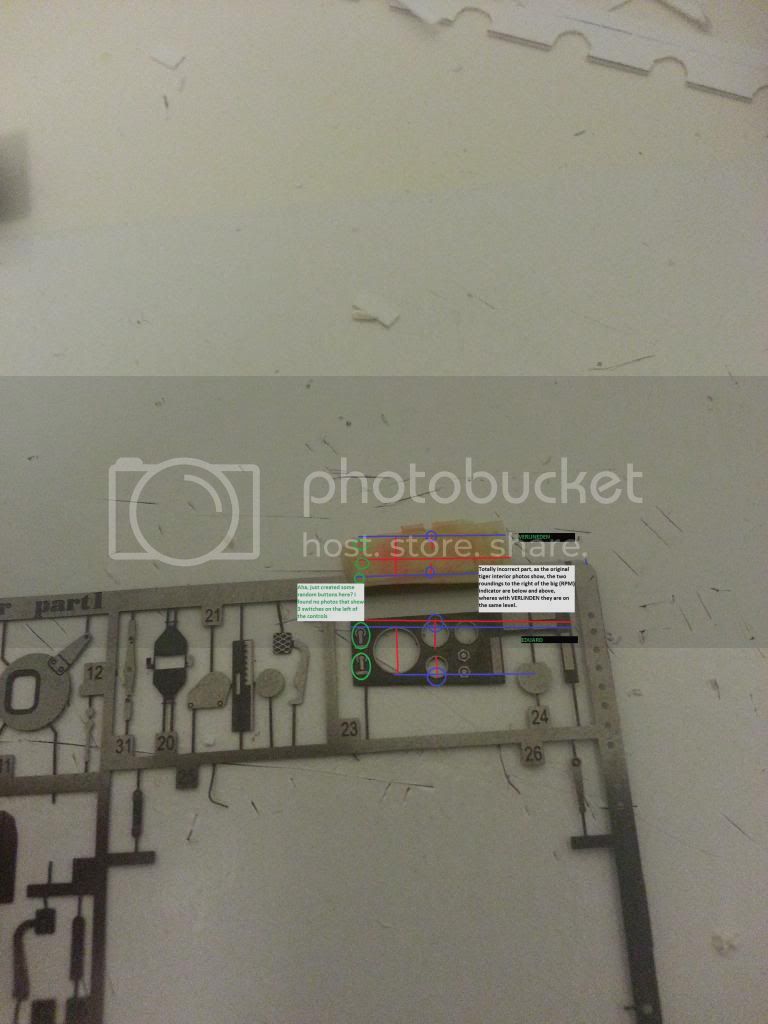
Tiger I E Interior (Dragon) VERLINEN --> tonnes of modifications needed, for the second tiger i ordered the DMK version, let's see
AB 16L-02 Turned barrel for German machine gun MG3
AB 35A10 Front and back fenders for Tiger
AB 35A102 Turret stowage bin for TigerI
AB 35A12 Side fenders for Tiger I E
AB 35A79 German Tank Radio Set Fu 2 & Fu 5
AB 35L-26NG German 88 mm KwK 36 L/56 Tiger I
AB 72A01 German 2 m antennas x3 pcs
AF 35087 8,8 cm Kwk 43 TIGER II (BRASS) ammunition
ED 36162 German Wehrmacht Radio
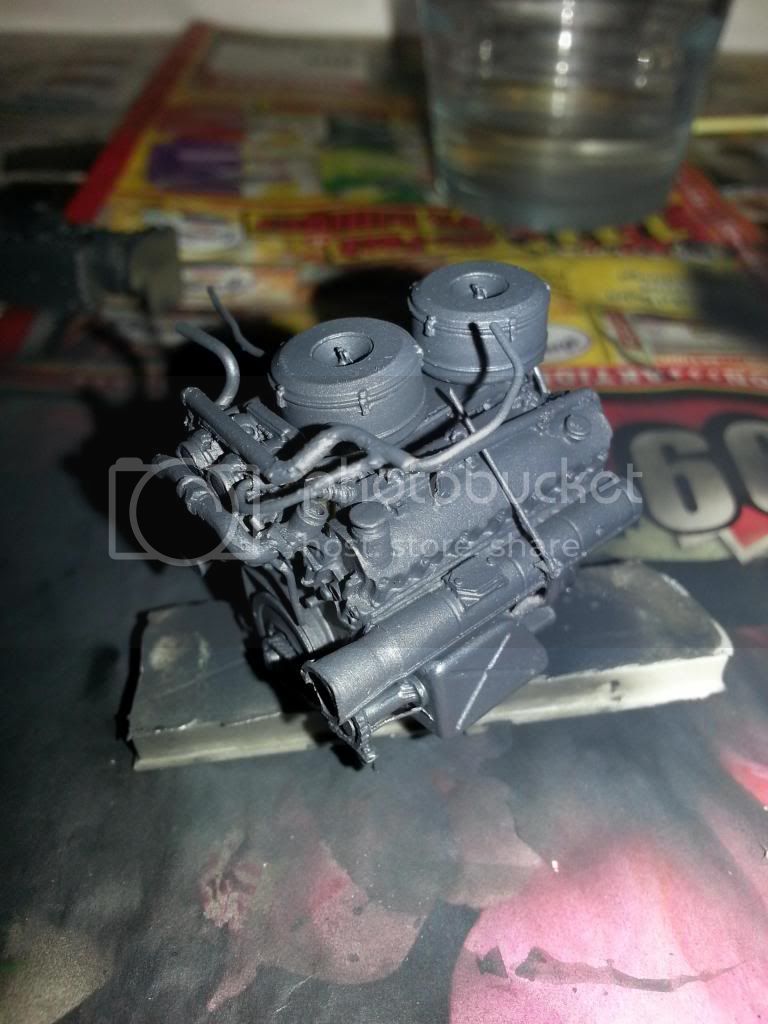
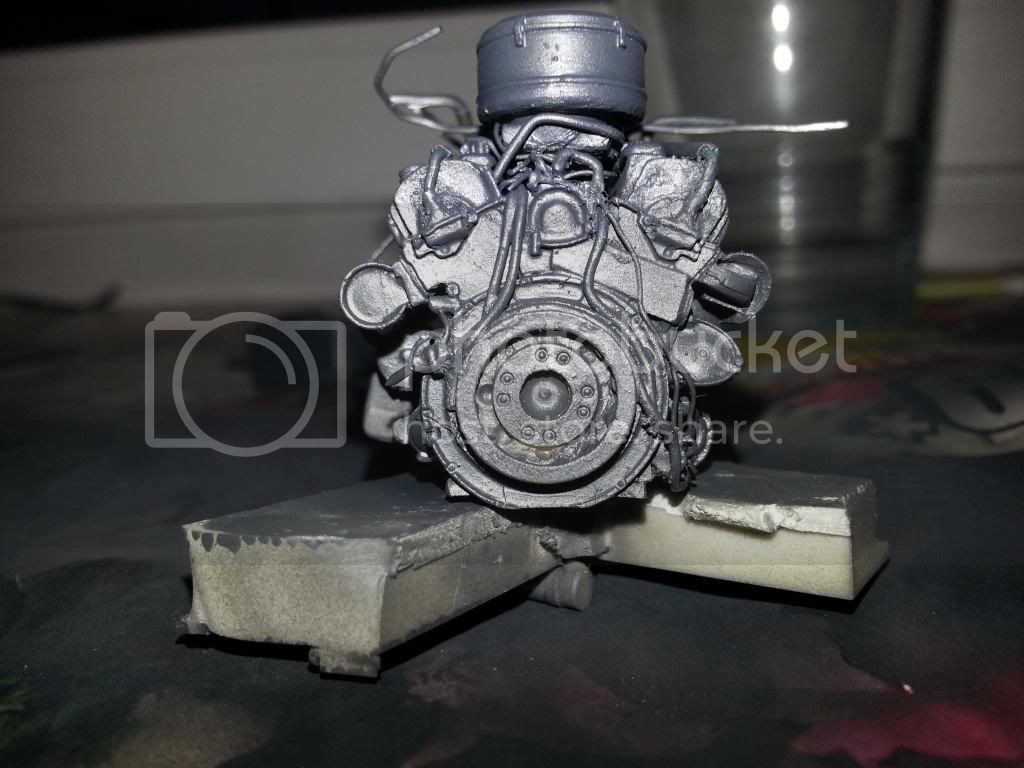
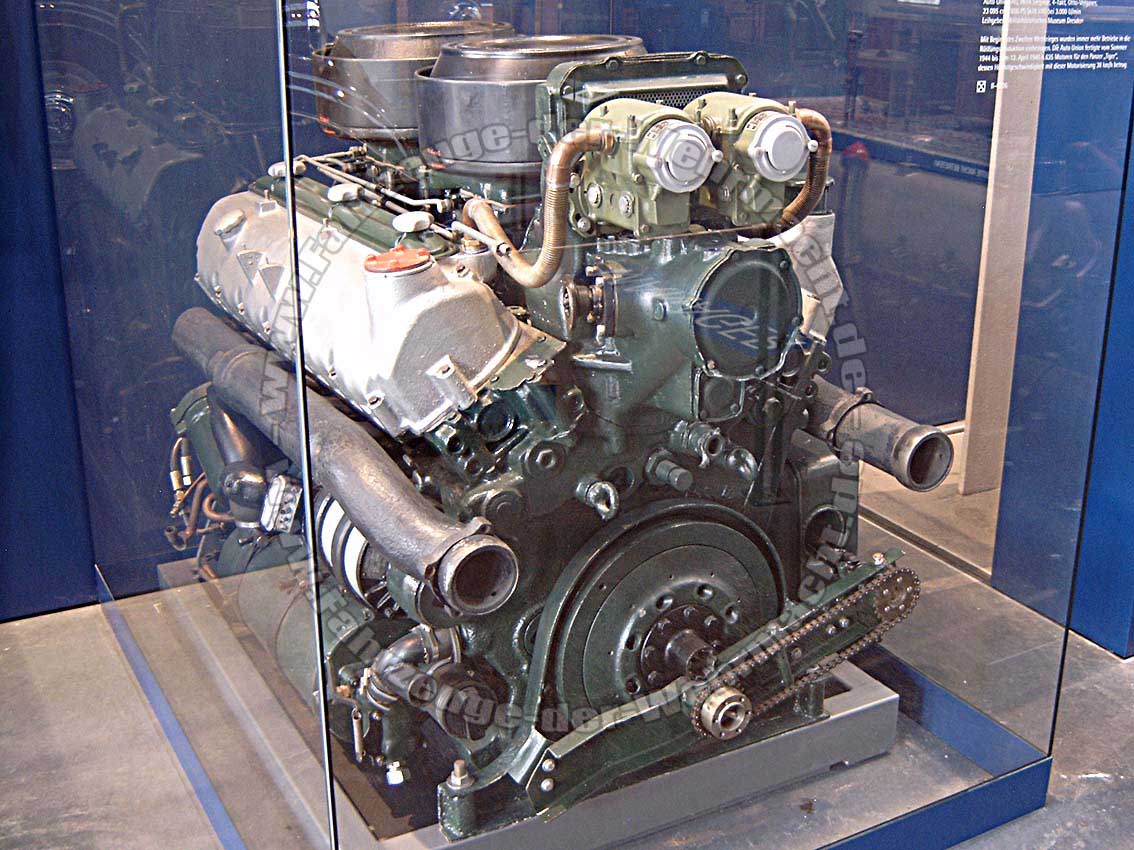
ROY 094 Transmission


Please check out Steven's page of his blog:

https://armorama.kitmaker.net/forums/196822&ord=&page=1
www.tiger1.info is already known by every modeller I guess, still a special thanks to you, too.
AlexStefan
Visit this Community
Equatorial Guinea
Joined: May 09, 2014
KitMaker: 54 posts
Armorama: 53 posts
Posted: Saturday, May 10, 2014 - 06:18 AM UTC


https://www.youtube.com/watch?v=Vmgd3KBIE0U
Minute 0:25 and 1:57 adn 3:25... It seems that there is a welded plate covering the torsion bar in the drivers place... In a documentary (in German though - https://www.youtube.com/watch?v=hP-94GfbBLI) they were also talking about this cover. From what can be seen in these photos, this plate is flat, does anyone have specific information on this? This would help when assempling the drivers compartment.
Waiting for some parts... Missing wire and plastic blocks...

Currently still trying to make this fire wall be ok...
My drawing of the shift in the position of the firewall, as it is approaching the torsion bars. Looks [auto-censored]ty, is quite usefull though. (Based on David Byrdens dimension input)


Not sanded yet, and still many moulding parts to be added, so it is still looking fairly crude...


I cut away excess material, but the mould ripped. I used putty to fix it, the white plastic was needed to cover a crack and reinforce it for the time being.
If you are also getting rid of this extra material in your model, use the file and smothing sponge more often, i tried to cut too large pieces and boom, [auto-censored] happened.


AlexStefan
Visit this Community
Equatorial Guinea
Joined: May 09, 2014
KitMaker: 54 posts
Armorama: 53 posts
Posted: Tuesday, May 13, 2014 - 10:10 AM UTC
Well, work on the firewall is going on at a slow pace.
Anyways, I have a comparison of the VERLINDEN, the CMK and my own creation (mine is not done yet though).
[


Verlinden's part was bent and CMK has so much excess material, that you can file down Mt Everest to the size of Mt Blanc and you would be quicker!
Sad, but in order to not do everything on your own, you will need both kits to combine the best parts of each one, to reduce the needed workload, as some parts like then engine, are very well made by VERLINDEN.

A close up of the transition from the scratch thing (needed cutting, sanding and burning) to get the base part, to whicht I then added vvarious layers of putty and styrene parts...
]


And last, but not least, the drivers compartment. VERLINDEN seems to have done garbage here as well. See further explanations within the photo. It was so bad that I had to do a little paint analysis of this.


Not sure if anyone else came across these problems...
AlexStefan
Visit this Community
Equatorial Guinea
Joined: May 09, 2014
KitMaker: 54 posts
Armorama: 53 posts
Posted: Tuesday, May 13, 2014 - 10:14 AM UTC
To prove my pont:
Tiger Interior form the Bovington Tank museum and of an old imiage during WW2, from a german documentary.


Documentary
https://www.youtube.com/watch?v=hP-94GfbBLI
Inside the tiger tank, youtube series
https://www.youtube.com/watch?v=k_9_HYqC8kA
Byrden
Visit this Community
Wien, Austria
Joined: July 12, 2005
KitMaker: 2,233 posts
Armorama: 2,221 posts
Posted: Tuesday, May 13, 2014 - 10:49 AM UTC
This is the step in the Tiger's firewall;


As for the details on the firewall, I must ask the build date of the Tiger you are representing.

David
AlexStefan
Visit this Community
Equatorial Guinea
Joined: May 09, 2014
KitMaker: 54 posts
Armorama: 53 posts
Posted: Tuesday, May 13, 2014 - 07:19 PM UTC
Thx for the reply David,

I used your firewall info for the construction of the step. I will upload a side view photo later (I have already implemented this).

As for the firewall vent openings, 1 Tiger E mid, and 1 Tiger E late production, building simultaneously.
At first I thought the Tiger E mid had the 2nd generation firewall, but I guess this is wrong and it already had the 3rd generation???
If this is correct, then the back of my wall would be wrong...And all that work was for nothing...

Hence the though --> if I keep the back of the 2nd generation wall (maybe they still had soem on stock and used it for the first few or so new 3rd generation wall vent system) just because materials were running low and they wanted to use what they already had produced?
Let me know what you think of this.
Byrden
Visit this Community
Wien, Austria
Joined: July 12, 2005
KitMaker: 2,233 posts
Armorama: 2,221 posts
Posted: Tuesday, May 13, 2014 - 08:46 PM UTC
I can't be very helpful with the firewall details, as we have so little information and photos, as compared to the outside of the tank.
But it would help if you could be more specific than just calling it a "mid". That's a 6 month period with a lot of changes in it. What will the outside of the tank have? Feifels? S-mines? A travel lock?

David
AlexStefan
Visit this Community
Equatorial Guinea
Joined: May 09, 2014
KitMaker: 54 posts
Armorama: 53 posts
Posted: Tuesday, May 13, 2014 - 10:05 PM UTC
Well, the 101st SS Heavy Panzer Battalion
Around June(Mid) 1944 in Normandy - summer camouflage and ???(Late) in ???.
As for the MID:
Number 334, captured on Junde 27 '44. I will be using this one I think.

I am yet trying to work out the numbers assigned to the designated vehicles, and which would be a LATE production type.
I am using this as a basis for the chassis number and then verifying production time. Any useful help, ideas/suggestions?
Compared with your knowledge, I am quite non-knowledgeable about the tiger^^
http://www.panzerace.net/the-tiger-i/order-of-battle/101st-hv-ss-pz-btn.html

----
Travel lock was introduced in November 1943 as of chassis no. 250635 and deleated by Feb 1944. The rubber saving wheels were introduced in Feb 1944 from chassis no. 250822.
----

I know that there are quite a few in the 101 which had travel lock, I met a Tiger driver in Calgary in 2008 (captured in France in 1944 and later mvoed to Canada), sucks that I have lost his e-mail address, he could have been of great help now... As a matter of fact, his name was David^^.
SDavies
Visit this Community
England - South East, United Kingdom
Joined: January 09, 2010
KitMaker: 979 posts
Armorama: 959 posts
Posted: Wednesday, May 14, 2014 - 12:40 AM UTC
Hello Alex,

You build seems to be moving on quickly. Apologies for not sending you those references yet, they are huge files and I am having trouble E-mailing them. I will have to think about creating a drop box account.

Anyway you are building things out of sequence and this will cause you problems.

I would advise you do do the following, you are obviously free to ignore it

1) Set up a photobucket account. Your pics are being hosted by a site that I would not normally visit and are full of pop up adds and malware. (Your PC has a virus please click here sort of thing) The size of the images that you post are also very small and require you to click on the pics which I will not do after the first experience. The PB account is free.

2)Don't build two tanks at once, at least not concurrently. There are many minor differences between the Tigers that you want to build and you will need careful study to work out what parts go where.

3) Build in a logical sequence. I guarantee you that lots of the parts that you have made will require modification and if you build out of sequence they will probably not fit. There as a reason why I left working on the hull floor till last.

You have started work on one of the most complex tanks ever made. I made the Panzer 1, Panzer 2, Panzerjager 1, SDKFZ 222 and a Marder 3M to provide me with the right amount of experience to complete the build. It has taken me two years to get my Tiger to where it us now, so dont rush the build because I guarantee you will loose interest and burn out.

Anyway looking good so far

S
AlexStefan
Visit this Community
Equatorial Guinea
Joined: May 09, 2014
KitMaker: 54 posts
Armorama: 53 posts
Posted: Wednesday, May 14, 2014 - 02:31 AM UTC
Thx Steven,

1) As for your advice for Photobucket, CHECK, tthx for the tip!
2)

As I will be depicting the late production type as a blown up tank, i am always "front running" it's modelling and learning while assembling it.
Doing both at once, as this Uni year is fairly low, volume wise, so I do have some time atm. I am keeping all seperate though, and never building two parts of the same tank simultaneously (as you said, this would result in mistakes).
3)
Ye I will create a general stepwise construction plan.
Just wanted to get some things done to get help and attention .

I have built a Jagdtiger, Elefant and a King Tiger previously, the Elefant is not done yet, still tonnes of work needed, however I tried a different approach to coloring this time.
Coloring shades and rust and all this first, then applying a cover layer and thereafter itching/chippping away the top layer. Not sure if this is a good way, I am using the Elefant for trial and error and practicing. So model bashing and hefty criticism is allowed


PS: waiting for the material, no worries, I am downloading all kind of files and stuff what i can find. Not sure about literature and which to get/not to get though.
Thx again to both of you for helping!
SDavies
Visit this Community
England - South East, United Kingdom
Joined: January 09, 2010
KitMaker: 979 posts
Armorama: 959 posts
Posted: Wednesday, May 14, 2014 - 04:02 AM UTC
Creating a realistic blown up tank with full internals is one of the most challenging tasks in modeling. You have to create an interior and then shape the plastic to look like it was metal that has suffered thermal damage from an explosion and then burned.

You have to make a realistic impact penetration in the tanks armour (something difficult to achieve)and then you can proceed to the hardest part, painting. You need a vast amount of experience and ability to create a realistic looking burnt out tank. The colour modulations created when a tank is burnt out then rusted are very difficult to achieve.
quetch
Visit this Community
Australia
Joined: January 30, 2014
KitMaker: 18 posts
Armorama: 10 posts
Posted: Wednesday, May 14, 2014 - 02:12 PM UTC
I just got the verlinden interior fot the tiger 1 late. I think im missing the stuf for the turret and the dam drive shaft. Unless that grey plastic tube is replacement for the drive shaft. I never thort it would be so much work to remove the extra stuf that comes with the parts.not happy.
AlexStefan
Visit this Community
Equatorial Guinea
Joined: May 09, 2014
KitMaker: 54 posts
Armorama: 53 posts
Posted: Wednesday, May 14, 2014 - 07:23 PM UTC
Yep matthew xD. You will be busy with sanding for hours, I can feel your pain xD. Imo totally annoying as well. As Steven has not complained about this, however it seems to be normal.

Steven, see pm.
But yes, as difficult as it might be by the time I reach the exterior I will have played around lots with the Elefant and we'll see what happens. And a project without massive challanges is boring
holmerz
Visit this Community
Aarhus, Denmark
Joined: January 02, 2006
KitMaker: 258 posts
Armorama: 121 posts
Posted: Wednesday, May 14, 2014 - 09:44 PM UTC
Wauw, what a project, it would take the best out of most men, I'll be following this for sure.

Erik
AlexStefan
Visit this Community
Equatorial Guinea
Joined: May 09, 2014
KitMaker: 54 posts
Armorama: 53 posts
Posted: Wednesday, May 14, 2014 - 11:21 PM UTC
Erik, check out the real pro:
But thx for following, i am working on the model now. Uni is over for the day and no papers due this week yehaa.
https://armorama.kitmaker.net/forums/196822&ord=&page=1

Btw, your Nashorn is cool.
http://armorama.com/forums/221324#1862186
AlexStefan
Visit this Community
Equatorial Guinea
Joined: May 09, 2014
KitMaker: 54 posts
Armorama: 53 posts
Posted: Tuesday, May 20, 2014 - 07:43 AM UTC
Okay,
trying a 100% scratch firewall, nothing glued yet, all parts still need filing and lots of love, but it is slowly getting there. (Waiting for some parts, so other progress is stopped atm)
Just tore out the center of the bad CMK part, it seemed to be ok to use for the central round part.
Not sure how I will be modeling the super fine details, will see.


Thx,
Alex
AlexStefan
Visit this Community
Equatorial Guinea
Joined: May 09, 2014
KitMaker: 54 posts
Armorama: 53 posts
Posted: Friday, May 23, 2014 - 09:19 AM UTC
I have been working on the engine details and have actually tested an airbrush for the first time... quite cool and interesting, I will never go back again^^.

Too much of a headache now, so more text tmrw, weather is supposed to be bad ---> building time.


The tubes on top will run to the radiators/vents on either side and will change in form, i simply added them already so that I can begin attaching all the pipes that are running to and from the engine. Pretty sure that there are professionals who would have done a better and even more detailed job on it, however I feel fairly confident that most ppl would approve of this work.


Thx for looking,
have a great day,
Alex
AlexStefan
Visit this Community
Equatorial Guinea
Joined: May 09, 2014
KitMaker: 54 posts
Armorama: 53 posts
Posted: Monday, May 26, 2014 - 07:26 AM UTC
Hey guys,
I have done tonnes of work, I just messed up with the flywheel... As the sth sth is mounted below the flywheel rather than straight ontop it, so I will redo that part.
I am pretty happy with the rest of the engine setup based on all the photo material and design charts that i have.
Mostly from the Bovington Tiger 131.


Pages credited below.
http://www.tiger-tank.com/secure/journal25.htm
AlexStefan
Visit this Community
Equatorial Guinea
Joined: May 09, 2014
KitMaker: 54 posts
Armorama: 53 posts
Posted: Wednesday, June 04, 2014 - 10:36 AM UTC
I have continued work on the engine bay and the engine.
I did not change the flywheel, however I have added a new pipe and a spring lever to the water cooling system of the engine.
This can be seen in the first picture. The lever handle need yet to be added (still thinking about how to do this).


Then I started adding wiring and pipe systems to the engine bay. After some failures, I have decided to do this before adding gimmicks to the front of the firewall, as stuff keeps breaking off, so I took all parts off from the front, and put them in a bin and they will be added later on again.


This is how it looks like with the engine in place.
Wiring on roof inside and on the back wall is still missing...


So far I am quite happy with the results.

Thanks,
Alex
tigertanktoo
Visit this Community
Florida, United States
Joined: June 10, 2007
KitMaker: 20 posts
Armorama: 18 posts
Posted: Wednesday, June 04, 2014 - 01:53 PM UTC
Alex, your engine compartment is coming along very nicely. Keep up the great work.
AlexStefan
Visit this Community
Equatorial Guinea
Joined: May 09, 2014
KitMaker: 54 posts
Armorama: 53 posts
Posted: Thursday, June 05, 2014 - 01:59 AM UTC
Thanks Chris .

Now I have run into serious troubles though.
If I mount the engine into the hull first and then the firewall, I cannot attach all pipes and wires asf, as there will be no "room for navigation" in the model.

However, if I mount the engine into the engine compartment and assemble all first and then put it into the tank, there is some margin of error with respect to the positioning of the engine...
I think I will assemble it first and then put it inside, not sure what Steven would say to this, he is much more experienced than I am .
(I have actually discontinued with the late tiger for the moment, and am working solely on the mid production one).
No Feifels,
Rubber wheels
External travel lock
--> production anywhere btw Dec 1943 and Jan 1944.
It will house a 3rd gen firewall for sure,if I got David right, this was introduced no later than Sept 1943, so I have changed this and am still working on the "window" in the wall, I have to make it square and reshape it.

First world problems, I know, nonetheless I want to get this engine bay to be nice and good.
tigertanktoo
Visit this Community
Florida, United States
Joined: June 10, 2007
KitMaker: 20 posts
Armorama: 18 posts
Posted: Thursday, June 05, 2014 - 11:17 AM UTC
Just take your time. Do a lot of test fitting and retest fitting before you do the final install. Like all carpenters will tell you "measure twice and cut once". Good luck.
ahandykindaguy
Visit this Community
Alberta, Canada
Joined: August 20, 2008
KitMaker: 1,295 posts
Armorama: 1,191 posts
Posted: Thursday, June 05, 2014 - 11:48 AM UTC

Quoted Text

Just take your time. Do a lot of test fitting and retest fitting before you do the final install. Like all carpenters will tell you "measure twice and cut once". Good luck.


The really good carpenters will say to measure as many times as is needed, which is usually a lot more than twice. Or they will maybe say they only measured twice, but we know the truth. It's Murphy's Law that always rears it's ugly head just about the time the CA is set completely. Believe me. I know!!!
SDavies
Visit this Community
England - South East, United Kingdom
Joined: January 09, 2010
KitMaker: 979 posts
Armorama: 959 posts
Posted: Thursday, June 05, 2014 - 08:03 PM UTC

Quoted Text


Now I have run into serious troubles though.
If I mount the engine into the hull first and then the firewall, I cannot attach all pipes and wires asf, as there will be no "room for navigation" in the model.

However, if I mount the engine into the engine compartment and assemble all first and then put it into the tank, there is some margin of error with respect to the positioning of the engine...
I think I will assemble it first and then put it inside, not sure what Steven would say to this, he is much more experienced than I am .
.


There is no right answer on what to do and fitting in the engine represents a real challenge.

This is what I have done and still plan to do

1) Fit firewall into hull without the rear armour attached.
2) Seal the inevitable gaps in the firewall and hull with miliput. Fit the radiator and the cooling fans. Dont bother to paint them before installation.
3) Complete the engine and drill a hole in it approximating where the drive shaft would be and install a metal rod into it. Drill a hole into the drive shaft leading from the transmission so that the metal rod can slide into it. This will always correctly orientate your engine.
4) Slide the engine in from the rear, rather than from above and take it in and out as needed.
5) Complete the engine bay as much as you can, prime and paint. (only do this when the rest of the hull is ready)
6) Paint the engine and make the final install and then seal the hull with the rear armour.
7) Add the remaining metal work to the hull and paint on a case by case basis
AlexStefan
Visit this Community
Equatorial Guinea
Joined: May 09, 2014
KitMaker: 54 posts
Armorama: 53 posts
Posted: Thursday, June 05, 2014 - 08:35 PM UTC
Murphy's Law aside - I hope not all that may go wrong, will go wrong , thanks for the input.

Yep Steven, as I am following your talent and tips, I will wait with the engine till the rest is done/finished. I have just been preoccupied with the engine as I was fascinated by this HL230 P45? as it would it's correct specification?!


Kind of a nooby question:
Before assembling, all parts will have dust on them. May I put them in the bath tub and give them a little shower before I paint them for real? The engine primed in black is covered with this "debris", as will be all the rest of the parts i guess.
Thx,
Alex
 _GOTOTOP