

Looks magnificent,
J
Figures
Military figures of all shapes and sizes.
Military figures of all shapes and sizes.
Hosted by Darren Baker, Mario Matijasic
Vietnam - Head for the Huey

jrutman

Joined: April 10, 2011
KitMaker: 7,941 posts
Armorama: 7,934 posts
Posted: Sunday, August 24, 2014 - 01:28 AM UTC

Biggles2

Joined: January 01, 2004
KitMaker: 7,600 posts
Armorama: 6,110 posts

Posted: Sunday, August 24, 2014 - 02:25 AM UTC
What do you use for your replacement buttons - punch and die? - or PE rivet heads? 

Karl187

#284

Joined: October 04, 2006
KitMaker: 3,094 posts
Armorama: 2,942 posts

Posted: Sunday, August 24, 2014 - 02:30 AM UTC
Looking brilliant Andy- looking forward to seeing it with some paint on.

andyevans

Joined: October 04, 2008
KitMaker: 369 posts
Armorama: 249 posts

Posted: Sunday, August 24, 2014 - 02:59 AM UTC
Thanks Jerry !
Biggles - I started off doing the buttons with sliced plastic rod, this has the advantage of being glueable and you can sand it back if it is too pronounced. I usually add a little dimple in the middle with a sharp point, this is what you see on the trouser pockets.
The rest of the buttons and press-studs were made with my new toy, the Small Shop Nutter. This is basically a punch and die but for lead foil and comes with hexagonal punches too. Not cheap, but I got one at a discount earlier this year. I "glue" these on with either Kleer/Future or just plain old Vallejo matt varnish. Once primed they are pretty much fixed in place and have a pleasing rounded dome shape.
Hi Karl, thanks mate. This was the easy bit, I fear !

1stjaeger

Joined: May 20, 2011
KitMaker: 1,744 posts
Armorama: 1,727 posts

Posted: Sunday, August 24, 2014 - 03:00 AM UTC
Hi Andy,
if your painting turns out as superb as your superdetailing, we are in for a real treat!!
Thanks for keeping us posted!
Cheers
Romain
andyevans
Joined: October 04, 2008
KitMaker: 369 posts
Armorama: 249 posts
Posted: Sunday, August 24, 2014 - 03:05 AM UTC
No pressure then Romain !

SdAufKla
Joined: May 07, 2010
KitMaker: 2,238 posts
Armorama: 2,158 posts

Posted: Sunday, August 24, 2014 - 12:34 PM UTC
Beautiful work, as always, Andy!
I'm looking forward to seeing how you tackle the Tiger Stripe cammo. I'm sure it'll be just as impressive as your LW Splinter cammo (and just as inspiring!).
Happy modeling!
I'm looking forward to seeing how you tackle the Tiger Stripe cammo. I'm sure it'll be just as impressive as your LW Splinter cammo (and just as inspiring!).
Happy modeling!
andyevans
Joined: October 04, 2008
KitMaker: 369 posts
Armorama: 249 posts
Posted: Saturday, August 30, 2014 - 07:29 PM UTC
Thanks Mike, I hope it turns out ok.
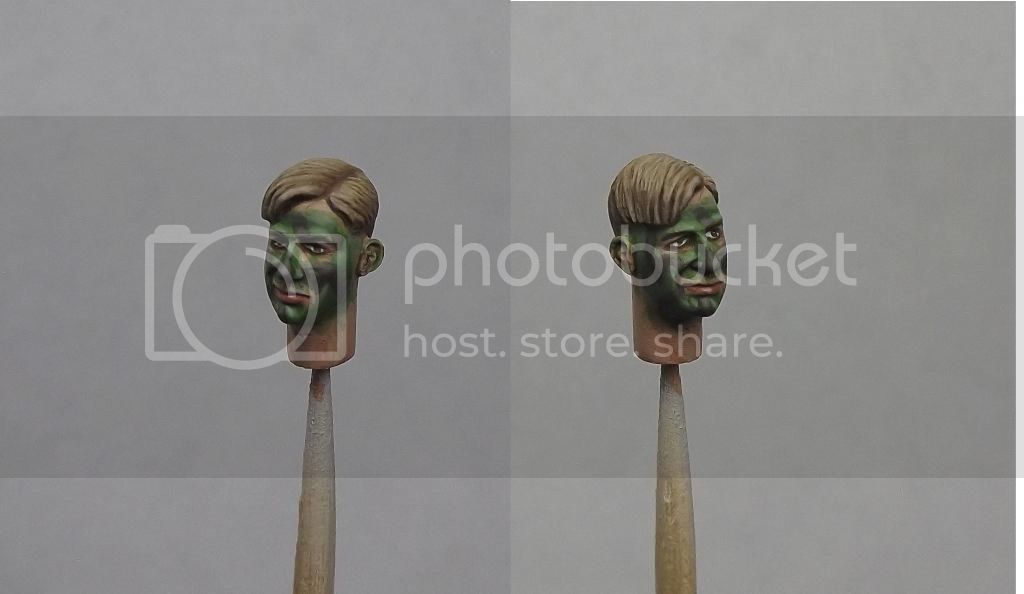
Whilst I have been gathering reference on the tiger pattern I thought I would have a go at replicating the camo face make-up on a spare Hornet head. I'm not sure I like it to be honest, perhaps it is just that I am not used to seeing a face like this and it looks a bit messy. Not sure if I will do this on the final figure yet but it was definitely a good exercise.
Whilst I have been gathering reference on the tiger pattern I thought I would have a go at replicating the camo face make-up on a spare Hornet head. I'm not sure I like it to be honest, perhaps it is just that I am not used to seeing a face like this and it looks a bit messy. Not sure if I will do this on the final figure yet but it was definitely a good exercise.
Karl187
#284
Joined: October 04, 2006
KitMaker: 3,094 posts
Armorama: 2,942 posts
Posted: Saturday, August 30, 2014 - 10:35 PM UTC
I've seen this camo face paint done on a 1/10 bust and it was good but this is actually better and given the space you had to work with compared to a bust...I'm left a bit speechless to be honest!
spoons

Joined: January 09, 2008
KitMaker: 527 posts
Armorama: 500 posts

Posted: Saturday, August 30, 2014 - 11:50 PM UTC
Hi Andy
This has got to be one of the best camo heads I've seen.
Well done.
This has got to be one of the best camo heads I've seen.
Well done.


justsendit
Joined: February 24, 2014
KitMaker: 3,033 posts
Armorama: 2,492 posts
Posted: Sunday, August 31, 2014 - 01:17 AM UTC
I agree with the others the face camo looks great!
I couldn't paint that well on my own 1:1 face!
I couldn't paint that well on my own 1:1 face!
andyevans
Joined: October 04, 2008
KitMaker: 369 posts
Armorama: 249 posts
Posted: Sunday, August 31, 2014 - 02:04 AM UTC
Thanks Karl, I know the bust you mean and it is a cracker. I actually used that example for some of the reference but, as you say, a lot less room for manoeuvre in 35th scale !
Spoons, Mike - many thanks guys, bit of a scary moment for me painting this head but from the feedback it seems to have worked out !
Well, I think I've nailed the colours for the tiger pattern. The schiffer book "Tiger Patterns" by Sgt Richard Johnson is an absolutely fantastic reference for this but unfortunately opens up a whole can of worms with regards to choice. There are literally dozens of patterns to choose from and this is the one I settled on, the late war heavyweight dense pattern, or LHD.
All of the patterns seem to follow the same-ish formula, a light base background colour, thick dark stripes and two colours filling in the gaps. In this particular pattern the two fill-in colours are close enough to each other tonally that I used just one colour.
Anyway, here we are so far on a spare torso (I practice like this a lot when I am experimenting, explains my dismal completion rate !!)
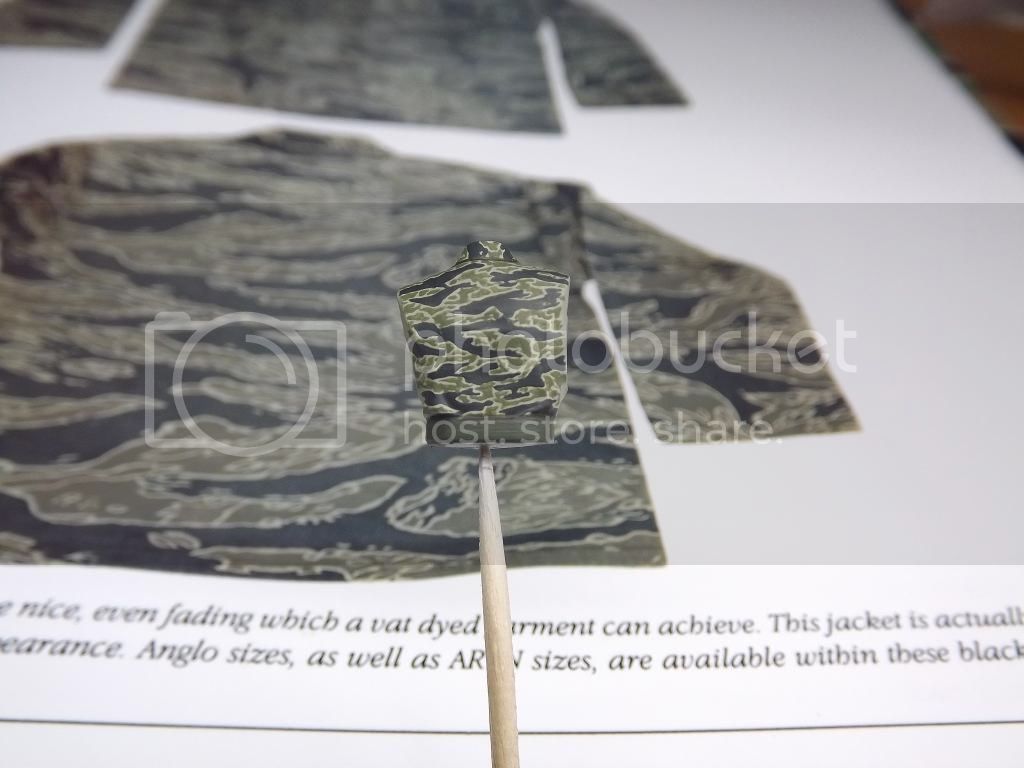
The base coat for this is 884 Stone Grey, black stripes were done with 862 Black Grey and the intermediate green was 924 Russian Uniform WW2.
There is no shading or highlighting on this yet, it is just the base colours blocked in, but very happy with it so far.
Thanks for checking in and more soon, hopefully
Spoons, Mike - many thanks guys, bit of a scary moment for me painting this head but from the feedback it seems to have worked out !
Well, I think I've nailed the colours for the tiger pattern. The schiffer book "Tiger Patterns" by Sgt Richard Johnson is an absolutely fantastic reference for this but unfortunately opens up a whole can of worms with regards to choice. There are literally dozens of patterns to choose from and this is the one I settled on, the late war heavyweight dense pattern, or LHD.
All of the patterns seem to follow the same-ish formula, a light base background colour, thick dark stripes and two colours filling in the gaps. In this particular pattern the two fill-in colours are close enough to each other tonally that I used just one colour.
Anyway, here we are so far on a spare torso (I practice like this a lot when I am experimenting, explains my dismal completion rate !!)
The base coat for this is 884 Stone Grey, black stripes were done with 862 Black Grey and the intermediate green was 924 Russian Uniform WW2.
There is no shading or highlighting on this yet, it is just the base colours blocked in, but very happy with it so far.
Thanks for checking in and more soon, hopefully
jrutman
Joined: April 10, 2011
KitMaker: 7,941 posts
Armorama: 7,934 posts
Posted: Sunday, August 31, 2014 - 02:11 AM UTC
In my head I am bowing down,on my knees with straighten arms in front giving homage to some fantastic painting and use of color,both on the tiger stripe and face paint.
J
J
1stjaeger
Joined: May 20, 2011
KitMaker: 1,744 posts
Armorama: 1,727 posts
Posted: Sunday, August 31, 2014 - 02:14 AM UTC
.............(I'm speechless, see!).......
Fantastic job on both head and tiger stripe camo. You've managed to nail the colours 100%.
Kudos to you Sir!! Thanks for sharing and making our day!!
Cheers
Romain
andyevans
Joined: October 04, 2008
KitMaker: 369 posts
Armorama: 249 posts
Posted: Sunday, August 31, 2014 - 02:16 AM UTC
Nearly choked on my celebratory glass of wine there Jerry, steady on !
Romain - always a pleasure, glad you like it so far.

Romain - always a pleasure, glad you like it so far.

amoz02t
#192
Joined: November 25, 2009
KitMaker: 1,383 posts
Armorama: 1,281 posts

Posted: Sunday, August 31, 2014 - 03:50 AM UTC
Wow! Most impressive work! Really appreciate you taking the time to detail the technique to add the crisp detail to the figure with the blades. I see now how I was pressing too hard when I tried such. One question for you please...does your figure have his finger OFF the trigger as he runs with the M79? Small point, but folks need to think safety right? Congratulations on your excellent figure! Please send more photos 
SdAufKla
Joined: May 07, 2010
KitMaker: 2,238 posts
Armorama: 2,158 posts
Posted: Monday, September 01, 2014 - 01:32 AM UTC
I totally agree with the other comments, and I'm really looking forward to seeing more.

pstansell
Joined: November 10, 2005
KitMaker: 167 posts
Armorama: 163 posts
Posted: Monday, September 01, 2014 - 02:44 AM UTC
Gotta add my kudos to the pile!
There are so many excellent plastic sets out there that deserve this level of TLC.
Pat
MMiR
There are so many excellent plastic sets out there that deserve this level of TLC.
Pat
MMiR

CMOT


Joined: May 14, 2006
KitMaker: 10,954 posts
Armorama: 8,571 posts

Posted: Monday, September 01, 2014 - 08:20 AM UTC
Andy that is some of the best painting I have seen, I initially thought it was a decal and then you mentioned the colours. you have a good eye and a very steady hand.
ReconTL3-1
Joined: June 07, 2006
KitMaker: 726 posts
Armorama: 687 posts
Posted: Monday, September 01, 2014 - 01:10 PM UTC
Wow! Excellent job on the face camo as well as the tiger stripe uniform. I am very impressed. I cannot wait to see the completed figure.
Cheers,
James
Cheers,
James

Maki

Joined: February 13, 2002
KitMaker: 5,579 posts
Armorama: 2,988 posts
Posted: Monday, September 01, 2014 - 07:05 PM UTC
Great stuff Andy! You always had a good eye for camo patterns and the tiger stripe is one of the really hard ones to recreate realistically in scale. You did an amazing job.
Perhaps you would be interested in setting up another article on painting camo for Armorama?
Mario
Perhaps you would be interested in setting up another article on painting camo for Armorama?
Mario

andyevans
Joined: October 04, 2008
KitMaker: 369 posts
Armorama: 249 posts
Posted: Wednesday, September 03, 2014 - 07:52 PM UTC
Amoz - It is very easy to press too hard when scribing and you end up with that blade chatter which causes nasty marks, you need to be quite gentle and let the blade do the work. With regards to gun safety, let us assume he has either just fired a round or the M79 has the safety on, either way he is 2" tall and made of plastic so we should be alright. 
Mike- many thanks, should proceed at a pace now I have worked out the palette.
Pat - Thanks for the comment. I agree you can really do a lot with these plastic figures if you invest a little time, sadly I have many boxes of them awaiting my attention
Cheers Darren, but decals ! How very dare you sir !
James, knowing your interest in Vietnam I appreciate the comment, thanks.
Hi Mario, thanks buddy. I was quite hesitant trying out this pattern, it does look easy but took quite a bit of concentration. It doesn't hold the record though, I spent six hours painting an SS Palm Pattern smock once ! Madness.
I'll see what I can do on a SBS article, leave it with me and I'll do some photos as I go along.
Many thanks everyone for commenting, I really appreciate that people are interested in my figures.
Update soon...
Fenbeiduo

Joined: April 05, 2014
KitMaker: 103 posts
Armorama: 90 posts
Posted: Thursday, September 04, 2014 - 12:34 AM UTC
What! on my kneeds!
amoz02t
#192
Joined: November 25, 2009
KitMaker: 1,383 posts
Armorama: 1,281 posts
Posted: Friday, September 05, 2014 - 05:03 AM UTC
Quoted Text
Amoz - It is very easy to press too hard when scribing and you end up with that blade chatter which causes nasty marks, you need to be quite gentle and let the blade do the work. With regards to gun safety, let us assume he has either just fired a round or the M79 has the safety on, either way he is 2" tall and made of plastic so we should be alright.
Update soon...
LOL! My comment on the trigger finger was only to make the figure more accurate as with any training this guy would not do that in real life. Always a give away as it is the first think discussed on the firing range ...always assume it is loaded...do not point it at anything you do not want to destroy...and finger off the trigger until you mean it. Touch, tap, release..my finger is my safety. I am sure others could comment here as well? I am inspired by your work and will try some more figures now. Thank you for sharing your art! Looking forward to more photos
andyevans
Joined: October 04, 2008
KitMaker: 369 posts
Armorama: 249 posts
Posted: Sunday, September 07, 2014 - 02:09 AM UTC
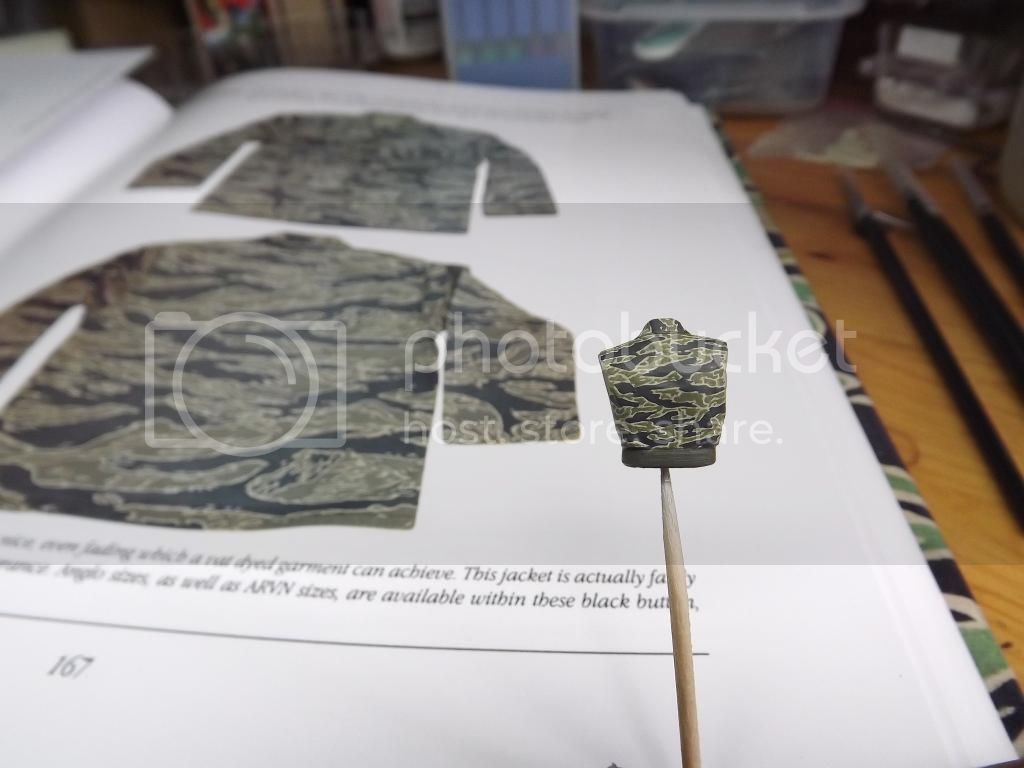
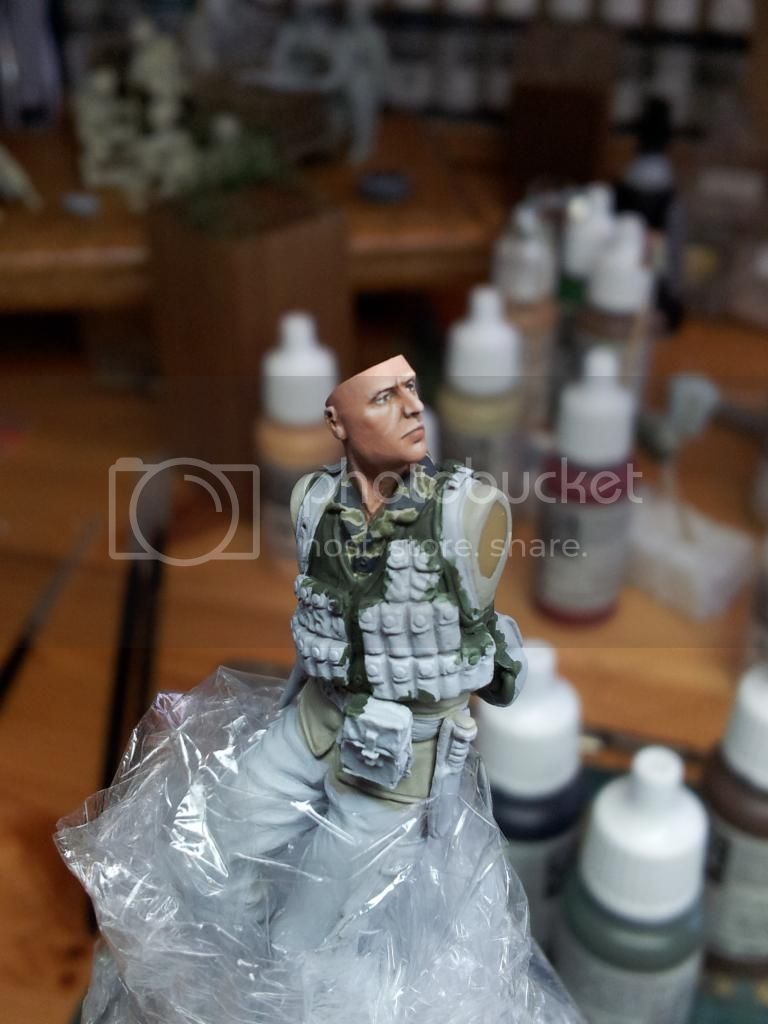
Well, a little bit more done this morning. I've started working up the face, not sure whether to do the camo face paint yet as I think it may get a little much with the Tiger Stripes too. The sleeves on the arms are also rolled up so I would have to camo up the forearms.
I have also started blocking in the uniform and equipment colours just to get an idea of how the colour tones will work together. Still very much early days yet but at least it is progress, right. :-)
Scary big picture below !
 |

WEB HOSTING BY


Copyright ©2021 Armorama and Kitmaker Network, a subsidiary of Silver Star Enterprises
All Rights Reserved. Please read our Conditions of Use and Privacy Policy.
All Rights Reserved. Please read our Conditions of Use and Privacy Policy.