

No, Nigel, I had not realized that you were still updating your earlier posts. (Did not know that was possible!)
Thank you for pointing that out, very helpful. The depth of detailing this kit is impressive.
Mike, the Chassis Man
Яusso-Soviэt Forum: Cold War Soviet Armor
For discussions related to cold war era Russo-Soviet armor.
For discussions related to cold war era Russo-Soviet armor.
Hosted by Jacques Duquette
1/35 Trumpeter Scud Missile Launcher

165thspc

#521

Joined: April 13, 2011
KitMaker: 9,465 posts
Armorama: 8,695 posts
Posted: Friday, December 05, 2014 - 05:45 PM UTC

Removed by original poster on 12/07/14 - 11:23:37 (GMT).

gloucesternige

Joined: January 13, 2012
KitMaker: 307 posts
Armorama: 283 posts
Posted: Saturday, December 06, 2014 - 04:24 PM UTC
Michael, you can do what ever you like to your own posts, just hit the edit tab at the bottom of the window.
We have now come to stage 3 of the instructions which basically entails joining the main frame rails together.

I painted all the transmission parts before joining the two halves simply because there's so much detail in there!! I think this will be the case going forward, everything in there will need a splash of matt black base before going in?
To give you an idea of the level of detail in this kit, take a look at the next two shots... and this is only stage 3 out of 36!!


Here's the instruction sheet..

With stage 3 behind us, we move swiftly on to stage 4.. no hang on.. we've got ejector pin holes to fill and the backs of the bash plates to paint first..
While that dries we can get on with the engine assembly and also start on the transmission cases.. they're for step 5.

Here's the instruction sheet for stage 4.

Thanks for looking...
Nige
gloucesternige
Joined: January 13, 2012
KitMaker: 307 posts
Armorama: 283 posts
Posted: Saturday, December 06, 2014 - 11:58 PM UTC
Stages 4 and 5 are now complete and can be seen in the following pics...

Engine detail..

Stage 5 instructions


Engine detail..

Stage 5 instructions

165thspc
#521
Joined: April 13, 2011
KitMaker: 9,465 posts
Armorama: 8,695 posts
Posted: Monday, December 08, 2014 - 08:12 PM UTC
I know this is being REALLY picky on such a well detailed model but . . .
It looks like Trumpeter omitted the oil drain plugs for the differentials that are normally accessed from below thru those oval cutouts in the bash plates.
Problem easily fixed with the addition of a small round disc and a bolt head casting!
It looks like Trumpeter omitted the oil drain plugs for the differentials that are normally accessed from below thru those oval cutouts in the bash plates.
Problem easily fixed with the addition of a small round disc and a bolt head casting!
165thspc
#521
Joined: April 13, 2011
KitMaker: 9,465 posts
Armorama: 8,695 posts
Posted: Monday, December 08, 2014 - 08:59 PM UTC
Nigel, I am watching your build with great interest eagerly awaiting each new post.
I think we have finally been offered a kit that does justice, mechanically, to these monster MAZ 8x8's. Clearly the earlier Scud offering didn't do it and even the more recent offering of the MAZ 537 (early and late) by the same manufacturer falls way short in the chassis and mechanical areas.
This kit however seems to be a tour d'force in all departments, kudos to Trumpeter.
x3oinx

Joined: March 08, 2014
KitMaker: 7 posts
Armorama: 7 posts
Posted: Monday, December 08, 2014 - 10:37 PM UTC
Thanks for the review (made me pull the trigger on this one) looking forward to the build too 
mvaiano

Joined: January 24, 2012
KitMaker: 1,054 posts
Armorama: 1,050 posts

Posted: Monday, December 08, 2014 - 10:57 PM UTC
Hi Nige!
Fantastic model, fantastic build. I'll follow.
Cheers!
Marco
Fantastic model, fantastic build. I'll follow.
Cheers!
Marco

retiredyank
Joined: June 29, 2009
KitMaker: 11,610 posts
Armorama: 7,843 posts
Posted: Tuesday, December 09, 2014 - 10:57 PM UTC
I think I have Scud envy. I will try to keep up with this comprehensive build.

165thspc
#521
Joined: April 13, 2011
KitMaker: 9,465 posts
Armorama: 8,695 posts
Posted: Wednesday, December 10, 2014 - 03:37 AM UTC
Nigel, a question: Do you think much of this beautiful mechanism will be visible after the model is completed? I know the engine will be somewhat visible under the raised cab but will any of the rest?
gloucesternige
Joined: January 13, 2012
KitMaker: 307 posts
Armorama: 283 posts
Posted: Wednesday, December 10, 2014 - 04:23 AM UTC
Mike,
None of the actual suspension components will be visible, except the extreme front and rear, or if you get down and really study between the wheels.
The chassis detail and transmission detail will be visible under the rear of the missile, whether raised or lowered. It doesn't matter to me what I can see at the end, it just satisfies me building it and knowing it's there...
Now we move on to stage 6 of the build, which is a comparatively simple step..

It entails fitting the suspension pivot points and the rear chassis stiffeners. here are the parts as fitted..

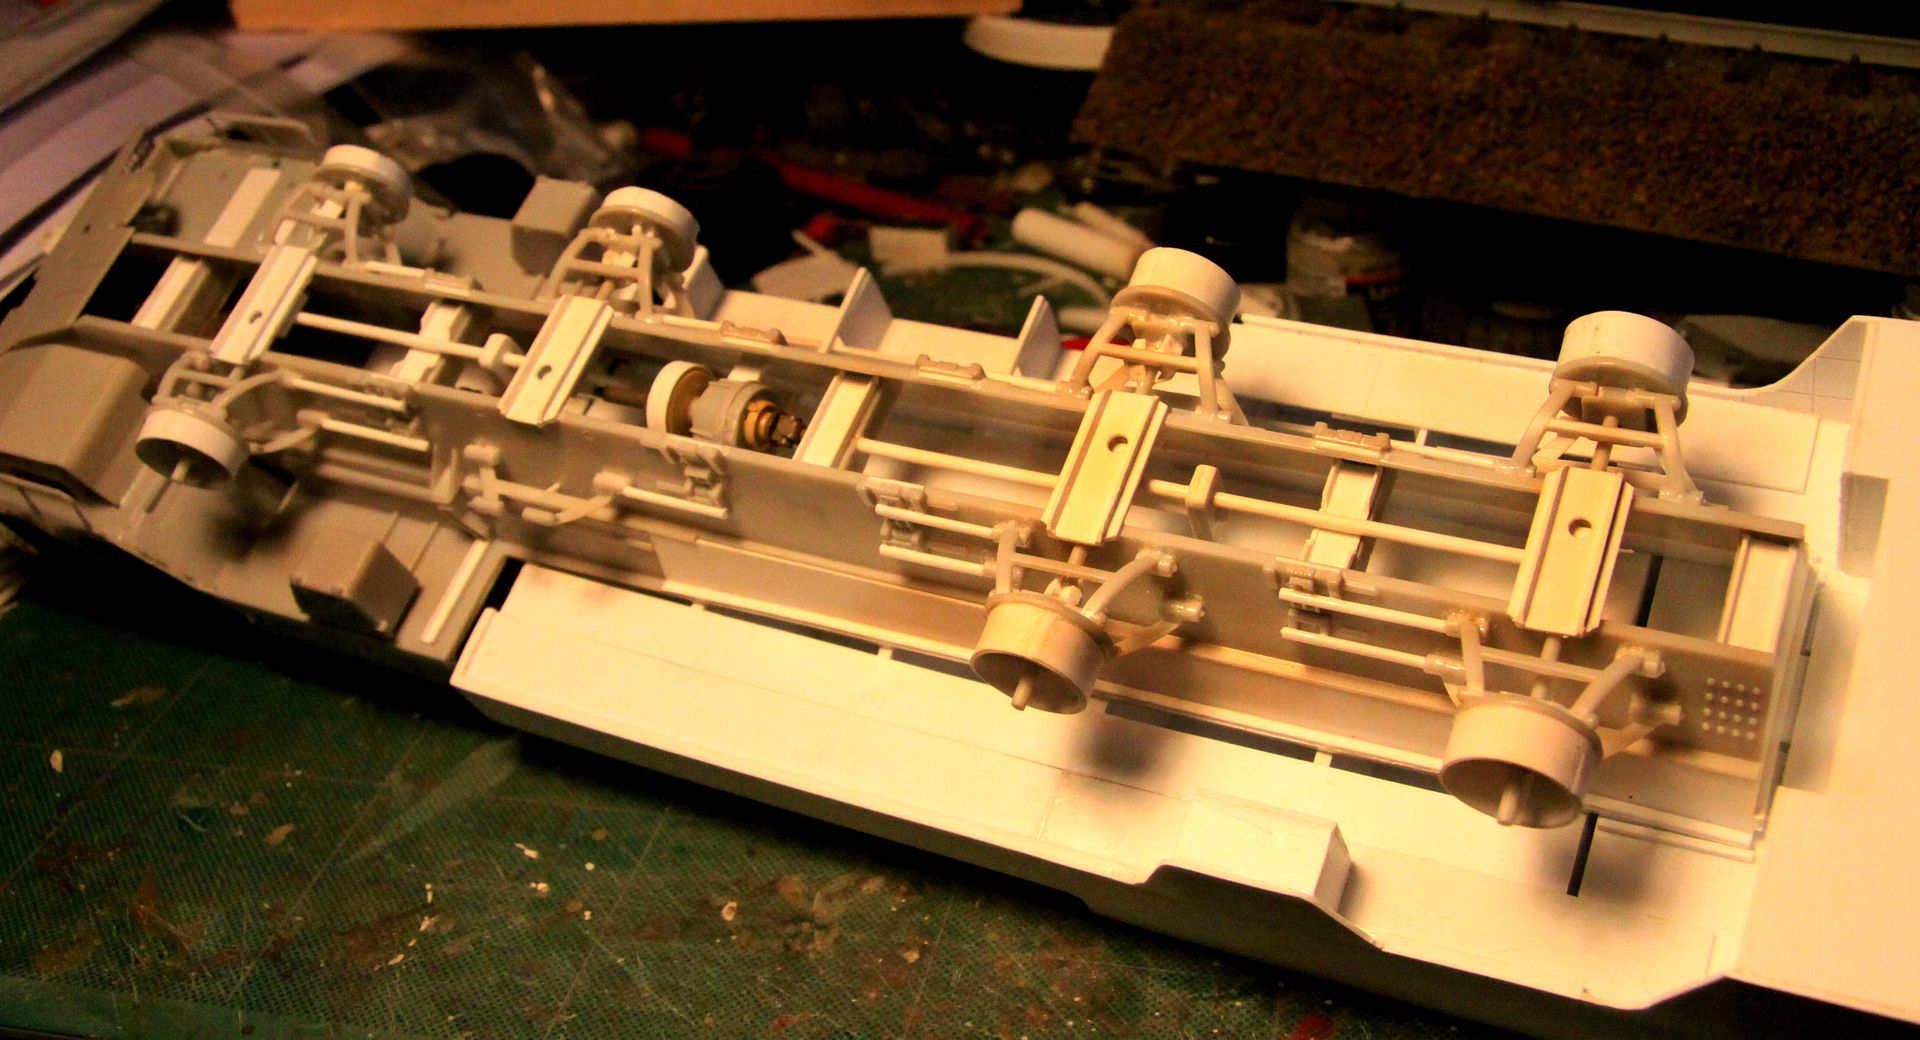
Step 7 is way more complex and involves assembling and fitting double wishbone and torsion bar suspension.

As can clearly be seen, there is a lot of work to be done in this step, and much care is required as there is a lot of clean up to be done on the multiple sprue gates, (No ejector pin marks), and the left/right/front/rear parts must not be mixed up. Thankfully all the instruction part call outs are correct in relation to their sprue numbers..

These are the eight suspension assemblies. believe it or not there are 76 parts here alone!! None of the steering or up/down pivots are glued at this stage. I am beginning to wonder how the ride height will be set? I guess the shocks will come into play.. I am really looking forward to having all eight wheels touching the ground, square.
Thanks for looking..
Nige
None of the actual suspension components will be visible, except the extreme front and rear, or if you get down and really study between the wheels.
The chassis detail and transmission detail will be visible under the rear of the missile, whether raised or lowered. It doesn't matter to me what I can see at the end, it just satisfies me building it and knowing it's there...
Now we move on to stage 6 of the build, which is a comparatively simple step..

It entails fitting the suspension pivot points and the rear chassis stiffeners. here are the parts as fitted..

Step 7 is way more complex and involves assembling and fitting double wishbone and torsion bar suspension.

As can clearly be seen, there is a lot of work to be done in this step, and much care is required as there is a lot of clean up to be done on the multiple sprue gates, (No ejector pin marks), and the left/right/front/rear parts must not be mixed up. Thankfully all the instruction part call outs are correct in relation to their sprue numbers..

These are the eight suspension assemblies. believe it or not there are 76 parts here alone!! None of the steering or up/down pivots are glued at this stage. I am beginning to wonder how the ride height will be set? I guess the shocks will come into play.. I am really looking forward to having all eight wheels touching the ground, square.
Thanks for looking..
Nige
165thspc
#521
Joined: April 13, 2011
KitMaker: 9,465 posts
Armorama: 8,695 posts
Posted: Wednesday, December 10, 2014 - 09:25 AM UTC
Quoted Text
Mike,
None of the actual suspension components will be visible, except the extreme front and rear, or if you get down and really study between the wheels.
The chassis detail and transmission detail will be visible under the rear of the missile, whether raised or lowered. It doesn't matter to me what I can see at the end, it just satisfies me building it and knowing it's there...
Now we move on to stage 6 of the build, which is a comparatively simple step..
Nigel, please don't get me wrong. I am a huge proponent of installing internal detail regardless if in the end it can be seen or not.
I just wondered if this was the case and so I asked the question.
gloucesternige
Joined: January 13, 2012
KitMaker: 307 posts
Armorama: 283 posts
Posted: Friday, December 12, 2014 - 04:01 PM UTC
Hey Mike,
I didn't get you wrong buddy, I know exactly what you meant. I love to build the detail, even if it can't be seen, I get the satisfaction of doing the work and knowing it's there at the end of the day..
So, We've now completed step 6 of the instructions with all the wishbones, hubs and shafts fitted.

Everything is clipped together at the moment. The shock absorbers will support the weight of the vehicle.

I intend to weight the hubs down between two lengths of steel bar and glue all the pivots whilst restrained. This should ensure all eight wheels sit square and touch the ground.

On the subject of detail and what can be seen, here's a shot of an old Maz kit compared to this new Trumpeter kit...

Just a small difference eh?? Look at the underside difference..

As modellers, we are all being spoilt these days with the quality of the new kits on our shelves!!
Thanks for looking in...
165thspc
#521
Joined: April 13, 2011
KitMaker: 9,465 posts
Armorama: 8,695 posts
Posted: Friday, December 12, 2014 - 06:47 PM UTC
Quoted Text
As modellers, we are all being spoilt these days with the quality of the new kits on our shelves!!
Nigel, I totally agree. As modelers we live in the "best of times"!
p.s. The new 3-D printing services will make this even BETTER - it already has!
165thspc
#521
Joined: April 13, 2011
KitMaker: 9,465 posts
Armorama: 8,695 posts
Posted: Friday, December 12, 2014 - 07:00 PM UTC
If one REALLY wants to show off all that beautiful chassis detail there are alternate uses for the MAZ-534 chassis!
(Trumpeter and MENG - PLEASE take note.)
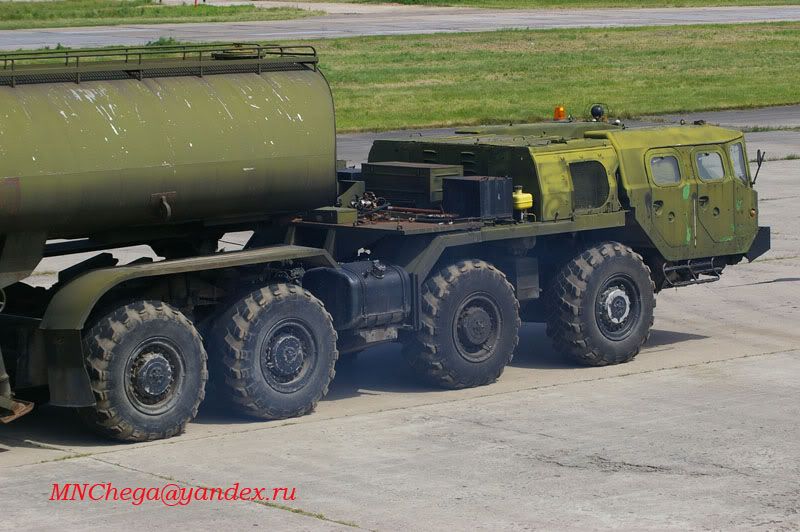


(Photos are for purposes of discussion ONLY - images come for various online sources.)
(Trumpeter and MENG - PLEASE take note.)


(Photos are for purposes of discussion ONLY - images come for various online sources.)
165thspc
#521
Joined: April 13, 2011
KitMaker: 9,465 posts
Armorama: 8,695 posts
Posted: Friday, December 12, 2014 - 07:08 PM UTC
I apologize for the intrusion into this thread, however alternate uses of a super detailed MAZ-543 chassis has been a pet modeling project of mine for quite some time.
Cheers
Cheers
Removed by original poster on 12/13/14 - 14:41:19 (GMT).
165thspc
#521
Joined: April 13, 2011
KitMaker: 9,465 posts
Armorama: 8,695 posts
Posted: Friday, December 12, 2014 - 07:47 PM UTC
I have now spun the topic of MAZ-543 variants off onto it's own thread located at:
http://armorama.kitmaker.net/forums/229433&page=1#1932621
http://armorama.kitmaker.net/forums/229433&page=1#1932621
gloucesternige
Joined: January 13, 2012
KitMaker: 307 posts
Armorama: 283 posts
Posted: Saturday, December 13, 2014 - 12:59 AM UTC
Thanks for your valued input here Mike.
I do not consider your posts an intrusion whatsoever, keep those pics coming!! I love the top picture, if for nothing more than to show some weathering ideas.
Nige
I do not consider your posts an intrusion whatsoever, keep those pics coming!! I love the top picture, if for nothing more than to show some weathering ideas.
Nige
165thspc
#521
Joined: April 13, 2011
KitMaker: 9,465 posts
Armorama: 8,695 posts
Posted: Saturday, December 13, 2014 - 03:50 AM UTC
Earlier Nigel compared the old Dragon Scud kit having no mechanical detail at all to the new Trumpeter kit with almost every part modeled.
It brought to mind an old conversion I did a few years back that used the Dragon Scud kit as a starting point wherein I just couldn't stand the total lack of detail. I had to build what I call a simplified "profile" mechanism even though it would probably never be seen again.
Here is the result:
It brought to mind an old conversion I did a few years back that used the Dragon Scud kit as a starting point wherein I just couldn't stand the total lack of detail. I had to build what I call a simplified "profile" mechanism even though it would probably never be seen again.
Here is the result:

slobuilder
Joined: September 06, 2013
KitMaker: 70 posts
Armorama: 6 posts
Posted: Wednesday, December 17, 2014 - 12:56 AM UTC
Hi Nigel,
My Scud arrived today! Looks great. What are you using as a reference, i.e. interior colors, hydraulic lines? The only internet images are from a distance.
The Military Technology Vehicle Museum, which is now closed had one! I'm kicking myself that I only took two photos from the front and no detail shots.
Russ

andymacrae

Joined: September 01, 2005
KitMaker: 409 posts
Armorama: 402 posts
Posted: Wednesday, December 17, 2014 - 03:40 AM UTC
Quoted Text
Hi Nigel,
My Scud arrived today! Looks great. What are you using as a reference, i.e. interior colors, hydraulic lines? The only internet images are from a distance.
The Military Technology Vehicle Museum, which is now closed had one! I'm kicking myself that I only took two photos from the front and no detail shots.
Russ
The one I looked over at Duxford a good few years ago had the hydraulic lines the same colour as the adjoining bodywork, black on the chassis and green on the rest. The interior of the front two cabs was a lurid green colour and the two rear cabins were a orange-brown colour with lots of aluminium coloured radios and electrical boxes etc. Pety much the same a this one:
http://svsm.org/gallery/SS-1C
HTH
Andy
slobuilder
Joined: September 06, 2013
KitMaker: 70 posts
Armorama: 6 posts
Posted: Wednesday, December 17, 2014 - 05:38 AM UTC
Andy,
Thanks, very helpful. Those images are of the same one I saw and did not take enough photos of.
Russ
Thanks, very helpful. Those images are of the same one I saw and did not take enough photos of.
Russ
andymacrae
Joined: September 01, 2005
KitMaker: 409 posts
Armorama: 402 posts
Posted: Wednesday, December 17, 2014 - 02:34 PM UTC
Quoted Text
Andy,
Thanks, very helpful. Those images are of the same one I saw and did not take enough photos of.
Russ
Hi Russ,
No probs. I took a few pics of the one that used to be at Duxford (wonder where it went?) but it was in the days before I had a digital camera so they are not all that good. One thing I know is that the drivers panel was Russian style dark green rather than the blue on the SVSM website one. I'll be interested to see how the area at the rear under the missile launcher looks on the trumpeter kit as the Dragon one was wrong in this area. Check this walkaround for what it should look like(this is the same one I saw):
http://www.primeportal.net/artillery/tim_roberts/maz-543_scud_b_tel/
Regards,
Andy
slobuilder
Joined: September 06, 2013
KitMaker: 70 posts
Armorama: 6 posts
Posted: Thursday, December 18, 2014 - 02:42 AM UTC
Hi Andy,
Thanks for the link, the photos were just what I was looking for. I checked out my kit and no fittings for the hoses. Meng's Facebook shows the hoses but is not enough of a closeup to see what the fittings look like. I'm not sure if I can come up with 1-to-3 fittings. Maybe somebody will make resin fittings.
Regards
Russ
 |

WEB HOSTING BY


Copyright ©2021 Armorama and Kitmaker Network, a subsidiary of Silver Star Enterprises
All Rights Reserved. Please read our Conditions of Use and Privacy Policy.
All Rights Reserved. Please read our Conditions of Use and Privacy Policy.