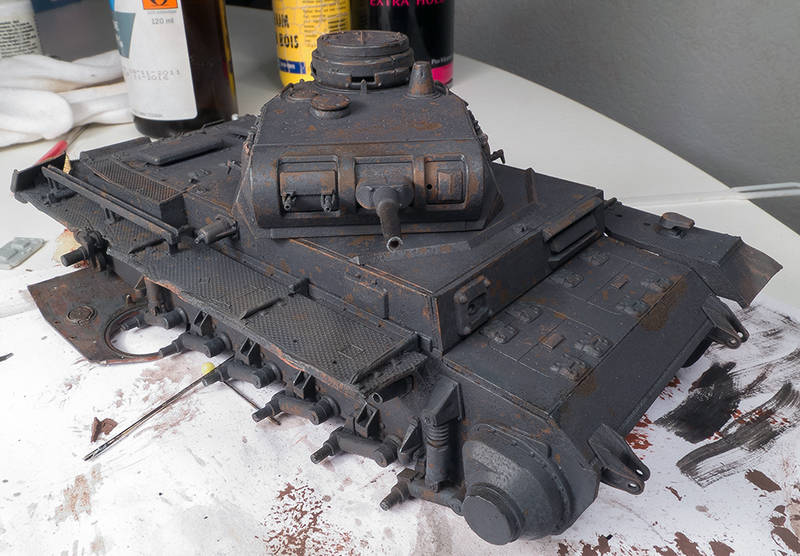
I'm building a Panzer III in German Grey, but to me the chipping isn't like it should be. In the photo I used salt technique with an rusty underlayer. Or am I to impatient and should I apply washes, pigment, dry-brushing to improve the appearance?
Hairspray technique didn't work for me. The paint (Ammo MIG jimenez acrylic paint) was very difficult to scrub off. Any suggestions and tips are welcome. Thanks.
AFV Painting & Weathering
Answers to questions about the right paint scheme or tips for the right effect.
Hosted by Darren Baker, Matthew Toms
Chipping help
Schwarzadler
Joined: May 12, 2014
KitMaker: 68 posts
Armorama: 58 posts
KitMaker: 68 posts
Armorama: 58 posts
Posted: Wednesday, December 03, 2014 - 03:30 AM UTC
Rforand
Florida, United States
Joined: July 14, 2013
KitMaker: 108 posts
Armorama: 89 posts
Joined: July 14, 2013
KitMaker: 108 posts
Armorama: 89 posts
Posted: Wednesday, December 03, 2014 - 04:03 AM UTC
Looking good keep going with the weathering it should bring it all together. I use the chipping solution with ammo paint ,it comes off very easy. Migs chipping solution comes in heavy and light solution,
Schwarzadler
Joined: May 12, 2014
KitMaker: 68 posts
Armorama: 58 posts
KitMaker: 68 posts
Armorama: 58 posts
Posted: Wednesday, December 03, 2014 - 04:10 AM UTC
Quoted Text
Looking good keep going with the weathering it should bring it all together.
What should be the next steps, decals and a dark Vandyke Brown oilpaint washing? Is it wise to put a semi gloss varnish first, or can I apply a wash without a varnish layer?
Rforand
Florida, United States
Joined: July 14, 2013
KitMaker: 108 posts
Armorama: 89 posts
Joined: July 14, 2013
KitMaker: 108 posts
Armorama: 89 posts
Posted: Wednesday, December 03, 2014 - 05:31 AM UTC
You need to seal the paint with future or a varnish.Next the decals then seal them then you re weathering
clayocker
New South Wales, Australia
Joined: February 01, 2005
KitMaker: 69 posts
Armorama: 59 posts
Joined: February 01, 2005
KitMaker: 69 posts
Armorama: 59 posts
Posted: Wednesday, December 03, 2014 - 06:16 AM UTC
Looks alright to me. It might be a question of contrast ? If you lightened your grey up and made the chipping colour darker the contrast would be greater and look more like the chipping you wanted ? (obviously too late for that now).
MIGS stuff is good, so not sure why that not working.Most hairsprays should do the trick too. You are using water based paints when you are trying to do it aren't you ? If you are using enamels it wont work.
Schwarzadler
Joined: May 12, 2014
KitMaker: 68 posts
Armorama: 58 posts
KitMaker: 68 posts
Armorama: 58 posts
Posted: Wednesday, December 03, 2014 - 02:30 PM UTC
Quoted Text
Looks alright to me. It might be a question of contrast ? If you lightened your grey up and made the chipping colour darker the contrast would be greater and look more like the chipping you wanted ? (obviously too late for that now).
MIGS stuff is good, so not sure why that not working.Most hairsprays should do the trick too. You are using water based paints when you are trying to do it aren't you ? If you are using enamels it wont work.
Yes, I used Vallejo and MIG acrylic paints and the hairspray does work as I used it before on another model.
How many layers of hairspray should I have applied and how long should the drying time have been for the top paint layer when using the hairspray technique?
Armored76
Bayern, Germany
Joined: September 30, 2013
KitMaker: 1,615 posts
Armorama: 1,500 posts
Joined: September 30, 2013
KitMaker: 1,615 posts
Armorama: 1,500 posts
Posted: Wednesday, December 03, 2014 - 05:16 PM UTC
I think the look is fine at this stage...
I'd use the sponge technique with some lighter rust and a lightened version (~30% white) of your base panzer grey to simulate lighter scratches plus maybe some metallic grey or even a graphite pencil on the weary edges to simulate that slightly shiny look of often touched steel.
Some light pigments for simulating dust, at the later weathering steps could also help break this up a bit.
PS: I REALLY like the weathered look of that turret bottom under the model! Maybe you can use that for inspiration?
alewar
Canelones, Uruguay
Joined: December 27, 2006
KitMaker: 773 posts
Armorama: 765 posts
Joined: December 27, 2006
KitMaker: 773 posts
Armorama: 765 posts
Posted: Wednesday, December 03, 2014 - 05:34 PM UTC
Maybe a bit overdone, but depends of our taste. Anyway looks well done.
You can reload the airbrush with the same paint, or with a light version of the paint and apply it where you don't like.
After the washes and filters and dust, and the flat coat all must be look right
Regards
Alvaro
You can reload the airbrush with the same paint, or with a light version of the paint and apply it where you don't like.
After the washes and filters and dust, and the flat coat all must be look right
Regards
Alvaro
easyco69
Ontario, Canada
Joined: November 03, 2012
KitMaker: 2,275 posts
Armorama: 2,233 posts
Joined: November 03, 2012
KitMaker: 2,275 posts
Armorama: 2,233 posts
Posted: Wednesday, December 03, 2014 - 05:58 PM UTC
lighten your German grey & do the edges of your chips. On the very inside of your chips use a pencil or a Vallejo Gun Metal metallic or Tamiya Dark Iron...lightly...very small areas..don't over due it. You can also apply some rust effects...but...not a lot..ie - rusty streaks
After that do your dry brushing, dark & light washes.