Hey everyone...,
Have stared working on this year’s new project, inspired by a book I read over Christmas. “Rising ’44 – The Battle for Warsaw” details the peoples resistance for 2 months between August & October 1944 against the German forces, believing the Russians were only days away from crossing the river & helping them liberate their city. Unfortunately, the Russians had their own plans for Warsaw & never came, leaving the Polish to fight it out for themselves with initial victories turning into devastating losses.
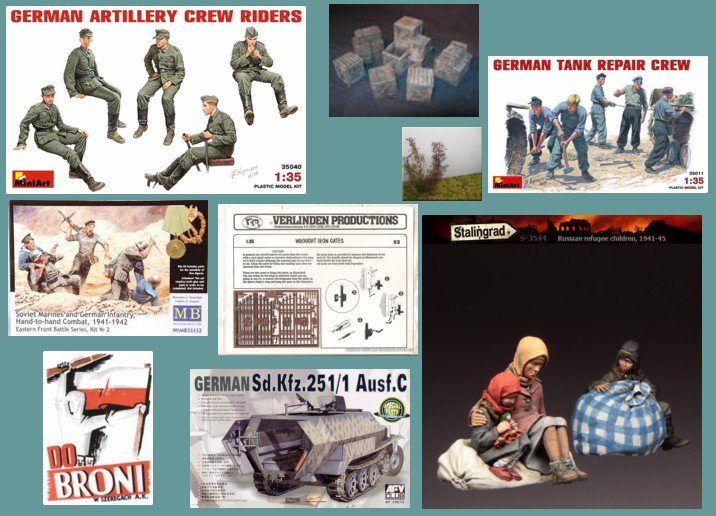
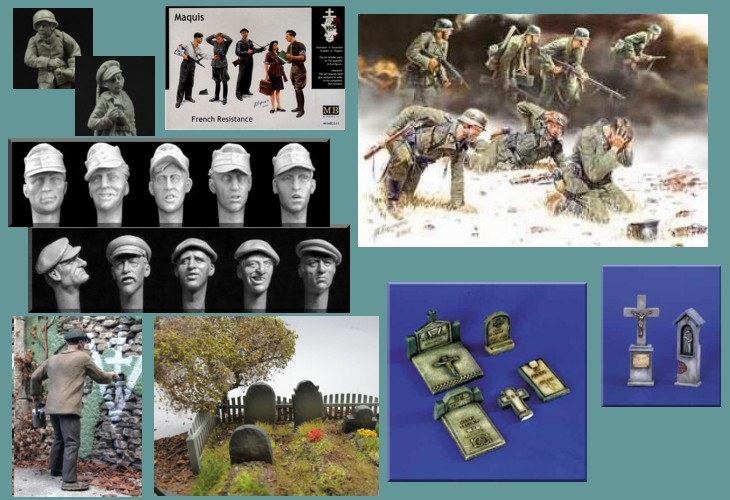
Anyway, so that’s the history part. One idea that appealed for doing this was the fact that during the early part of the Uprising the Polish captured a German store containing, amongst other things, Wehrmacht uniform which they duly used for themselves, often infiltrating German forces to launch surprise attacks. So the idea of apparently ‘German fighting German’seemed too good to ignore, giving some confusion to the initial viewer. So with a little ‘tweaking’ I used MB’S Soviet Marines & German Infantry set. As well as them, here are the other kits I’m planning on including in the dio........
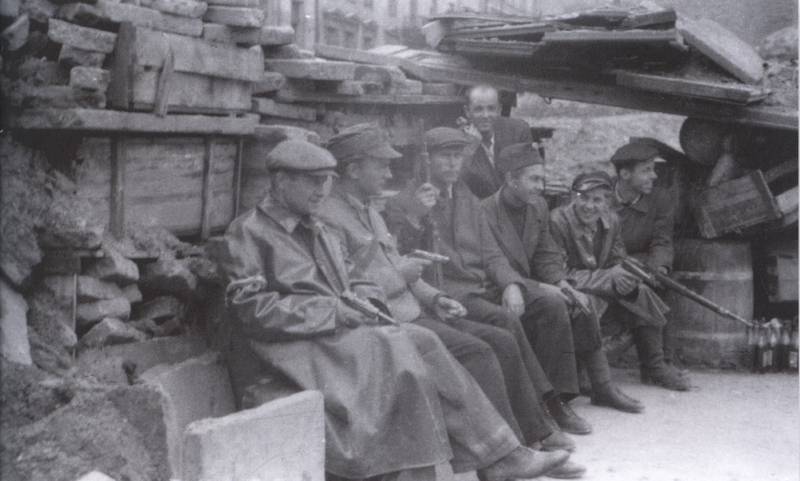
Whilst researching through photos, 2 stood out to base the ‘story’ on. A barricade in the street with home army men seeming quite informal & relaxed. Then, insurgents reading dropped ‘Ultimatum’ German leaflets urging them to surrender & to give up their resistance.
Evident on the 2nd photo is the red & white armbands & bands around the captured German helmets identifying them as resistance fighters.
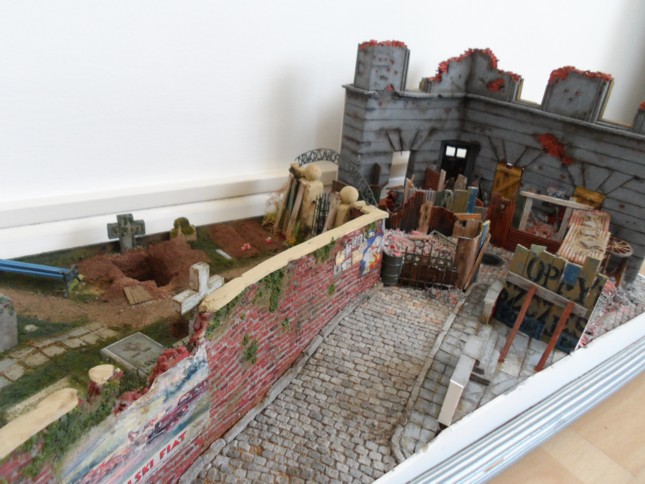
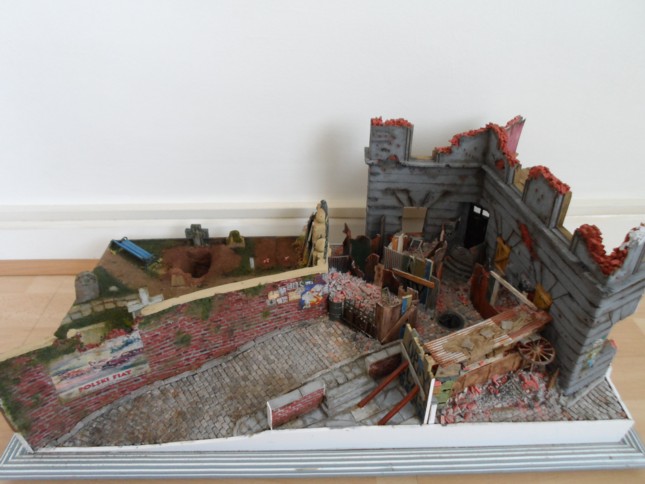
So, the dio itself will be comprised of a Polish building in the top right, with small streets leading to it from below & to the left. In the opposite corner will be a city graveyard. The barricade will be across the bottom, front right, with a captured Sd.Kfz. 251-1 delivering ammunition & supplies to the scene. Altogether I’m expecting to have around 27 figures, which does sound abit nuts, but they all have their place. Some are children, including a couple of very young fighters which look pretty good kits.
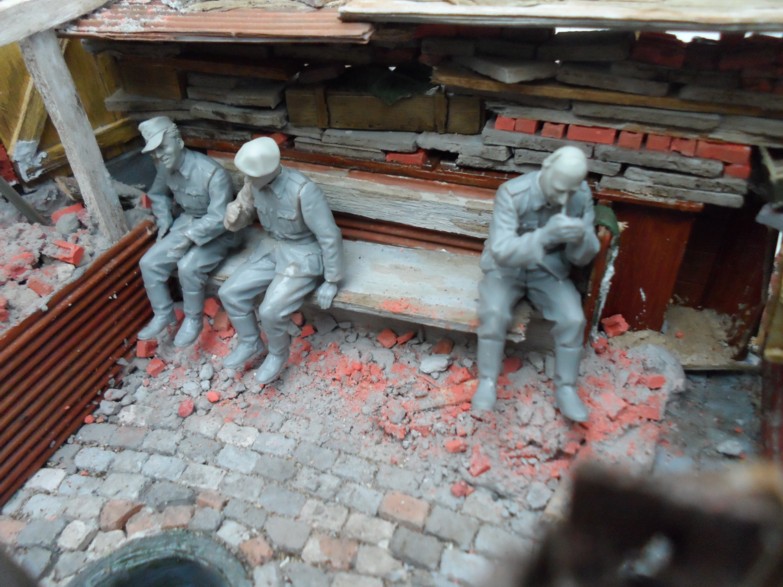
A unit of German troops will have infiltrated the building through a window, lower right, & have begun hand to hand combat with the defenders, unbeknown to the rest of the Home Army. The ground floor windows will have been bricked & boarded up.
The guys behind the barricade will be similar to the ones in the photo, although wearing captured uniform & joking casually about the airdropped ultimatums. The area in front of the building will be built up with rubble & debris, forming small corridors. The half track will be backed up onto this.
In the graveyard will be recently captured German soldiers, being interrogated by Polish fighters.
Invested in a couple of rolls of cork for this one, great stuff! The brick walls took ‘forever’ to cut & stick, nothing short of around 8 hours......, & then went & stuffed it up when filling the gaps.....
The building has been a long project, to measuring & cutting out the initial plastic walls, covering in 4 layers of cork, wallpaper, flooring, room dividing & more brick cutting. But really pleased how it eventually turned out.
The cobblestones are a mould from ‘Diorama Debris’ from the UK. 80 cobbles x 15+ mouldings = losing the will to live..... But the final effect is good, they just need filling between the gaps & weathering. A lot of them will be then covered with vehicles, debris & rubble...., Oh what’s the point!!!! The end window on the right is where the German will infiltrate, hidden by the barricade which will be almost twice the height of the cart, or at least head height +.
The inside of the building is the only part almost complete, less for the rubble, debris, dust abit of furniture of some sort, & the 5 figures. The graves in the graveyard are only a rough set up, & that’ll be only half of them. Looking at photo’s of similar places, the graves were so close to each other, plus it will look slightly overgrown with bushes, shrubs, maybe a tree? Wasn’t too too happy with the way the brick wall turned out, I wet plastered the ‘cement’ on, but with hindsight should’ve sprinkled dry plaster over, brushed it into the gaps, then misted water over to set. It still needs weathering, repainting some bricks, slogans, advertising, posters & the graveyard side will be quite covered up[ anyway, so may get away with it....it should’ve been better...
Thanks for reading (if you made it), look forward to comments & responses, always looking for ideas on how to improve it. Will post progress pics over the comming weeks, months......years....
Cheers,
SIMON.
Hosted by Darren Baker
'Ultimatum' - Warsaw 1944
Barbarossa
United Kingdom
Joined: August 25, 2005
KitMaker: 216 posts
Armorama: 215 posts
Joined: August 25, 2005
KitMaker: 216 posts
Armorama: 215 posts
Posted: Tuesday, February 17, 2015 - 04:51 PM UTC
yeahwiggie
Dalarnas, Sweden
Joined: March 24, 2006
KitMaker: 2,093 posts
Armorama: 1,359 posts
Joined: March 24, 2006
KitMaker: 2,093 posts
Armorama: 1,359 posts
Posted: Tuesday, February 17, 2015 - 06:51 PM UTC
I have been looking into a Warsaw-dio myself for sometime now, trying to depict the 251 with Polish flag and some cheering civilians, but it somehow ground to a halt. especially the civilians give some headaches, due to the low quality figures. Another factor was reading Norman Davies' Rising'44. A hefty book and one that angered me. Not for the sheer amount of info and detail, but for the very dirty politics that coloured the whole episode...
Looking at your dio it will be hard to squeeze a 251 in there, but I like the rest of the ideas.
jrutman
Pennsylvania, United States
Joined: April 10, 2011
KitMaker: 7,941 posts
Armorama: 7,934 posts
Joined: April 10, 2011
KitMaker: 7,941 posts
Armorama: 7,934 posts
Posted: Tuesday, February 17, 2015 - 07:57 PM UTC
Simon Simon Simon!!!!
Excellent push-off for this epic build. I really really love how you set up the base to have it compartmentalized into different scenes. Inspired. It is like having 4 or 5 separate vignettes on the same base,all contributing to the overall story.
Nice!!!
Nice work on the multi layered walls of the brick building. It lets you see the layers of brick quite well. I am stoked about this build.
J
Barbarossa
United Kingdom
Joined: August 25, 2005
KitMaker: 216 posts
Armorama: 215 posts
Joined: August 25, 2005
KitMaker: 216 posts
Armorama: 215 posts
Posted: Tuesday, February 17, 2015 - 08:18 PM UTC
Hi Guys, thanks for the replies....
Ron - Hope you get to eventually get your Warsaw dio up & running, there's so many stories, so many ideas you can get from research, particularly the book you mentioned, isn't it good? The stories of what went on 'behind the scenes' as the normal civilians were just trying to stand for what they believed in, only to be cruelly let down by hierarchy & politics is unbelievable... Haven't yet got the 251 model kit, but a panzer 2 fits onto the hill, so should be ok...???
Jerry - thanks for your kind comments. You're right about all the little vignettes, that's why although they'll be 26-27 figures approx, they'll all be part of their own story. The building idea came from someones else's build on Armorama. Took an age to figure out 'exactly' how he'd put it together, but that cork mat is excellent material to replicate walls.
Thanks again,
SIMON
Posted: Tuesday, February 17, 2015 - 08:36 PM UTC
Hi Simon,
Wow - this is looking very good! Nice! The definition of destinctive spaces, and variations on wall and floor planes is great! - maybe to Jerry's point, your 27 figs will be set in numerous places - maybe four or five or six groups - not all 27 standing about - the walls are cool. One of these days I'll need to give the cork a try - I'll need to study your pics to figure out how to do it! - sorry to ramble a bit, morning coffee hasn't kicked in yet - nice build
Cheers
Nick
americanpanzer
Iowa, United States
Joined: May 12, 2014
KitMaker: 542 posts
Armorama: 539 posts
Joined: May 12, 2014
KitMaker: 542 posts
Armorama: 539 posts
Posted: Tuesday, February 17, 2015 - 10:19 PM UTC
wow! very ambitious! looking forward to seeing the finished project; I've also read that book; a truly sobering but inspiring story
justsendit
Colorado, United States
Joined: February 24, 2014
KitMaker: 3,033 posts
Armorama: 2,492 posts
Joined: February 24, 2014
KitMaker: 3,033 posts
Armorama: 2,492 posts
Posted: Wednesday, February 18, 2015 - 12:00 AM UTC
Hi Simon,
WOW! Your large scale, very figure intensive concept sounds fantastic! A great storyline with individual events emerging around every corner turned. I'm really looking forward to seeing your project evolve.
—mike
WOW! Your large scale, very figure intensive concept sounds fantastic! A great storyline with individual events emerging around every corner turned. I'm really looking forward to seeing your project evolve.
—mike
1stjaeger
Wien, Austria
Joined: May 20, 2011
KitMaker: 1,744 posts
Armorama: 1,727 posts
Joined: May 20, 2011
KitMaker: 1,744 posts
Armorama: 1,727 posts
Posted: Wednesday, February 18, 2015 - 02:05 AM UTC
Hi Simon,
There is nothing like a thorough preparation for such an ambitious project! You truly have done your homework on this!!!!
There are a couple of figures showing kids in the uprising. Can't presently remember who makes them, but they are superb and I'm sure other members will know!
Given your thorough prep, I guess you have them already zeroed in!
Well done so far and good thinking about the future!!
Congratulations Sir!!
Cheers
Romain
1stjaeger
Wien, Austria
Joined: May 20, 2011
KitMaker: 1,744 posts
Armorama: 1,727 posts
Joined: May 20, 2011
KitMaker: 1,744 posts
Armorama: 1,727 posts
Posted: Wednesday, February 18, 2015 - 02:14 AM UTC
They are from scibor miniatures, but you have them anyway!!!! Great figures, poignant really!
Good luck!
Cheers
Romain
Barbarossa
United Kingdom
Joined: August 25, 2005
KitMaker: 216 posts
Armorama: 215 posts
Joined: August 25, 2005
KitMaker: 216 posts
Armorama: 215 posts
Posted: Wednesday, February 18, 2015 - 04:20 PM UTC
Hi guys, thanks for all the positive comments & feedback.....
Nick - Your right about the 'groups' of figures, they'll be 5 in the building, plus 2 by the window. Approx 9 in the graveyard, 7 in & around the barricade & 4 or 5 around the half track in the street.
Mike - 'Figure Intensive', your not wrong. Figure painting by far isn't my specialty (like I have one anyway...), but hoping that won't be too evident once the final dio is complete?
Romain - As always appreciate your feedback... Those 2 months in Warsaw (& the aftermath) is so interesting, especially from the common civilians point of view. Came across those scibor miniatures scout figures by chance on this site late last year, only 5 euros each, have yet to order them, but they're on the radar...
Currently working on the brick walls in the road, with homemade transfers, brick painting & weathering. Hope to add a couple of pics in the next few days, if all goes to plan....
Thanks again,
SIMON.
Barbarossa
United Kingdom
Joined: August 25, 2005
KitMaker: 216 posts
Armorama: 215 posts
Joined: August 25, 2005
KitMaker: 216 posts
Armorama: 215 posts
Posted: Thursday, February 26, 2015 - 02:43 PM UTC
Hey everyone.....
Some updates on the dio I'm working on based on the Uprising in Warsaw 1944.
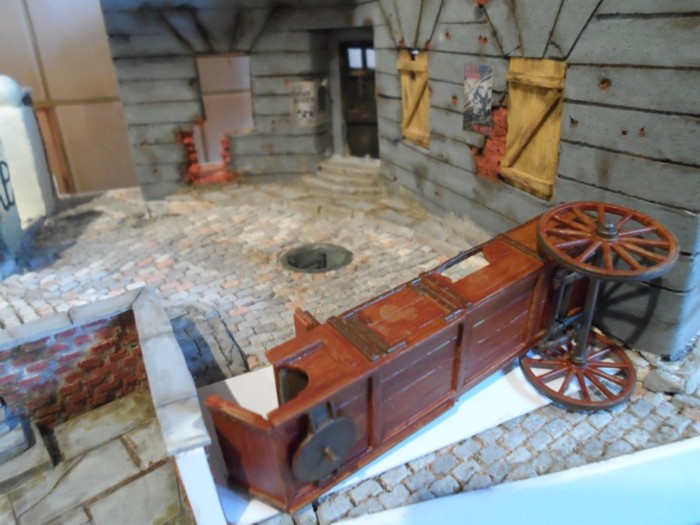
Have attached the building to the base now, & neatened up the edges. Built the steps for the door out of clay, & the front has been 'paved' with plaster & plastic. Unfortunately more than half of that will now be covered with debris, but it's there.... Have gone over the cobble stones, brick wall & outside of the building with oils, painting the bricks on the building too. The brown tape on the cobbles is to define where the rubble will be built up, held in place by wooden planks & corrugated iron. The cart forming the barricade is to be properly painted & attached next.
The downstairs windows have been boarded up from the outside, bricked up from the inside. The posters, advertisements & notices have been added around, some still look too 'fresh' & so need to be dirtied up some more. Some are homemade transfers, others are just printed paper from images on the net.
The sign painted on the wall is a Home Army slogan "PW", standing for 'Polska Walczy', meaning 'Poland is Fighting'.The hole in the street is leading to the sewers, which alot of the insurgents used to get from one part of the city to another.
Thanks as always for looking, any comments always appreciated. Will get working on the cart & barricade soon, & the area beside it. Then the German part of the story, the figures which are built, & awaiting their uniforms painting....
Thanks again,
SIMON.
1stjaeger
Wien, Austria
Joined: May 20, 2011
KitMaker: 1,744 posts
Armorama: 1,727 posts
Joined: May 20, 2011
KitMaker: 1,744 posts
Armorama: 1,727 posts
Posted: Thursday, February 26, 2015 - 03:28 PM UTC
Hi Simon,
great job on those cobbles and the brickwork!!!
Well done Sir!!! Really impressive!!
Can't wait to see the figures..!!
Keep up the good work!!!
Cheers
Romain
jrutman
Pennsylvania, United States
Joined: April 10, 2011
KitMaker: 7,941 posts
Armorama: 7,934 posts
Joined: April 10, 2011
KitMaker: 7,941 posts
Armorama: 7,934 posts
Posted: Thursday, February 26, 2015 - 08:07 PM UTC
I agree with the Romain-meister. Really is looking great. Will the spaces between the cobbles be filled in at all? Seems like it would rattle your teeth if you drove over it.
The posters are a nice touch and very well done as far as placement goes,etc.
Nice touch also on the bricked up windows. Classic!
J
The posters are a nice touch and very well done as far as placement goes,etc.
Nice touch also on the bricked up windows. Classic!
J
justsendit
Colorado, United States
Joined: February 24, 2014
KitMaker: 3,033 posts
Armorama: 2,492 posts
Joined: February 24, 2014
KitMaker: 3,033 posts
Armorama: 2,492 posts
Posted: Friday, February 27, 2015 - 01:20 AM UTC
Simon, Your dio is gaining some great momentum!
Bricked-up windows, narrow cobblestone streets, debris, an overturned cart ... and a ladder leading down to the sewers! I can almost hear faint whispers echoing off alley walls — revolutionaries scurrying in their preparation. Tensions are mounting!
—mike
Bricked-up windows, narrow cobblestone streets, debris, an overturned cart ... and a ladder leading down to the sewers! I can almost hear faint whispers echoing off alley walls — revolutionaries scurrying in their preparation. Tensions are mounting!
—mike
parrot
Ontario, Canada
Joined: March 01, 2002
KitMaker: 1,607 posts
Armorama: 1,581 posts
Joined: March 01, 2002
KitMaker: 1,607 posts
Armorama: 1,581 posts
Posted: Saturday, February 28, 2015 - 12:56 AM UTC
Ambitious project Simon.
Coming together great.
Looking forward to your progress.
About the cork.I bought ,by mistake a roll that was shelf liner.Turned out to be a blessing.It has double sided tape on one side.Saves a ton of time gluing.
Tom
Coming together great.
Looking forward to your progress.
About the cork.I bought ,by mistake a roll that was shelf liner.Turned out to be a blessing.It has double sided tape on one side.Saves a ton of time gluing.
Tom
Barbarossa
United Kingdom
Joined: August 25, 2005
KitMaker: 216 posts
Armorama: 215 posts
Joined: August 25, 2005
KitMaker: 216 posts
Armorama: 215 posts
Posted: Saturday, February 28, 2015 - 02:14 AM UTC
Thanks guys for the feedback, & the positive comments.
Jerry - I did fill the gaps between the cobbles, but it didn't work out 100%. Think I'll need to go over them again. Alot of them will be covered anyway, especially on the slope where the halftrack will be. Having second thoughts on the row of stones down the side of the wall, need to make them abit neater, so may redo with clay which creates a nice effect once dry, & will 'flow' better with the bumps in the slope.
Mike - Very 'poetic', building the atmosphere....., just hoping the visuals can do your words justice...
Thanks again, more photos soon..
SIMON.
Paulinsibculo
Overijssel, Netherlands
Joined: July 01, 2010
KitMaker: 1,322 posts
Armorama: 1,239 posts
Joined: July 01, 2010
KitMaker: 1,322 posts
Armorama: 1,239 posts
Posted: Saturday, February 28, 2015 - 02:28 AM UTC
Hi Simon,
Quite a job you started!
Looks great.
Though one thing to me seems rather unlikely: the paper commercial advertisements, like those from Polski Fiat, on the wall!?
I guess that, even if they would have been there at the beginning of the war in 1939, they certainly would have vanished in 1944.
Just a small remark,
Looking forward to see the figures coming.
Posted: Sunday, March 01, 2015 - 02:03 AM UTC
Hi Simon,
Looking good! I really like the asymmetry, horizontal and vertical. It's really coming together well. I don't know about the authenticity (sounds like more of a time question, than content) of the use of wall signs etc, but it does result in a great look! Maybe to address the question of time, some wear and tear could help? Maybe the signs went up earlier, and this is what's left of them? Whatever - looking forward to your next post!
Cheers
Nick
Barbarossa
United Kingdom
Joined: August 25, 2005
KitMaker: 216 posts
Armorama: 215 posts
Joined: August 25, 2005
KitMaker: 216 posts
Armorama: 215 posts
Posted: Friday, March 27, 2015 - 08:44 PM UTC
Hello everyone...
Thanks Paul & Nick for the comments.... You could be right Paul about the signs, but I wanted to add colour & interest to the scene. I researched 1940's advertisements, so they are of the period.... & that leads into other 'time & place' dilemma I've had.
As this scene isn't copied from an exact photo & location, the cemetery at the back would probably be the Jewish one which was on the front line the early stages of the Uprising, & not the cemetery "Powązki" which was behind the Jewish one. The graves I have, mostly from Verlinden, are more suited to "Powązki", although they do have RIP on them with Western European names. So to reply to your query Paul, unless I'm wanting to make this 100% accurate, then I'll just have to get as close as I can......., as long as there's no Panzer 1's rolling up the main street, or the US Airbourne aren't parachuting into the scene then I'm happy enough....
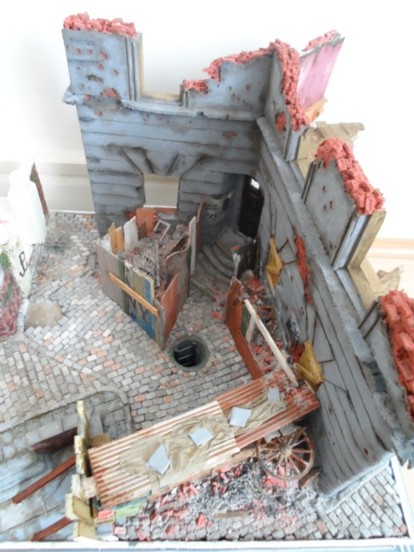
So to progress, I changed the paving stones along side the brick wall & added some greenery to that. The cart for the barricade was initially painted nicely with oil colours, all to be completely covered over in the later process. To make things easier, I glued the cart to a separate piece of card to build up the barricade & make it easier to paint before fitting to the dio. I used the photo at the top of this thread as a reference.
Th sign was made using a homemade transfer. Quite easy, just takes a while, & again adds some interest. The corrugated iron sheets were made from card, with balsa wood for the planks.
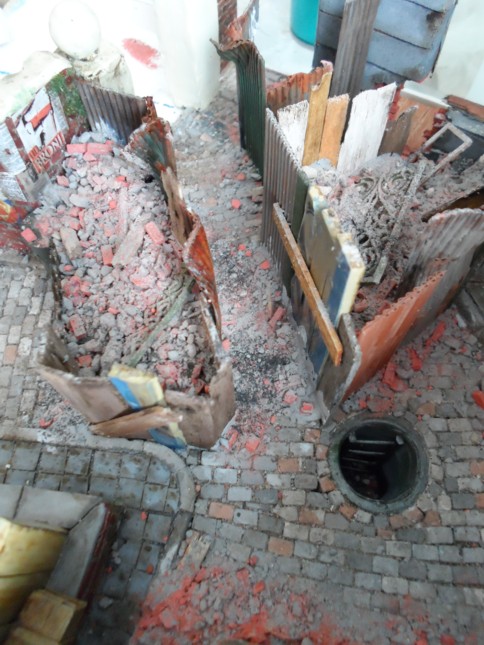
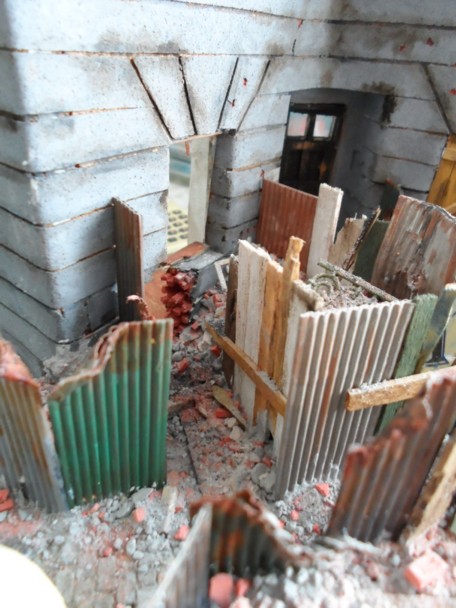
The rubble & debris were made up from crushed plaster, old kit parts, bricks made from moulds, balsa wood & brick dust. There's still more debris to be added on the ground, it all looks too neat at the moment. The last photo shows where the next section will go, the Sd.Kfz. 251-1 will be backed up to here. The cart barricade will have some Home Army guys sitting, reading the Germans ultimatum for them to surrender - hence the title. The steps & doorway will be blocked off with crates, supplies etc...
Added a couple of the figures I'm going to use, the small child from "Sciborminatures" is really nicely detailed. The painters from MK35. Unfortunately I also bought some refugee civilians from "Stalingrad", which although are also well detailed, are tiny small compared to the rest of 'the cast', almost 1/48?? Fortunately they are just small children, & will be sitting away from the other figures, but do look still abit out of scale.
Next job now is to finish the rubble in the street, & start (eventually) on some figure painting. Will add some progress pics in the next few weeks, thanks as always for looking, & for any comments or critiques anyone may have.....
Cheers,
SIMON.
justsendit
Colorado, United States
Joined: February 24, 2014
KitMaker: 3,033 posts
Armorama: 2,492 posts
Joined: February 24, 2014
KitMaker: 3,033 posts
Armorama: 2,492 posts
Posted: Friday, March 27, 2015 - 08:56 PM UTC
Hi Simon, Your dio is taking shape very nicely! Just when I thought the brick wall didn't need to be any better, you've proven me wrong — it looks fantastic! Keep up the great work!
—mike
—mike
210cav
Virginia, United States
Joined: February 05, 2002
KitMaker: 6,149 posts
Armorama: 4,573 posts
Joined: February 05, 2002
KitMaker: 6,149 posts
Armorama: 4,573 posts
Posted: Friday, March 27, 2015 - 09:51 PM UTC
Simon-- great job! The buildings and ground work are eye popping.
Keep up the good work
DJ
Keep up the good work
DJ
Barbarossa
United Kingdom
Joined: August 25, 2005
KitMaker: 216 posts
Armorama: 215 posts
Joined: August 25, 2005
KitMaker: 216 posts
Armorama: 215 posts
Posted: Monday, May 25, 2015 - 01:07 AM UTC
Hey everyone....
Well it's been a while since any updates, not that the work hasn't been in full swing. Firstly thanks Mike & DJ for that feedback guys!
Finished off the final barricade at the top of the hill with futher debris & rubble. There's still some dust & grime to add to the wood & iron sheets, but the main composition is complete.
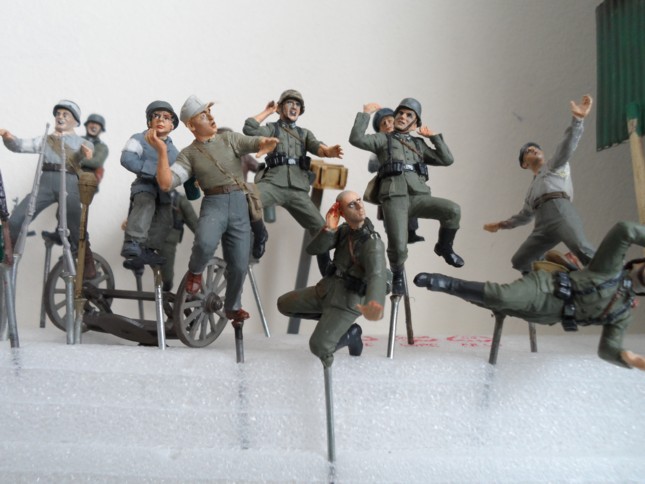
Some of the 'cast', still awaiting some finishing touches. The use of Hornet heads allows them to tell the story alittle easier, especially on the Artillery Riders from Miniart, changing them into Home Army troops. Test fitted them so they'll sit comfortably on the barricade. Need to raise the rubble alitle below their feet.....
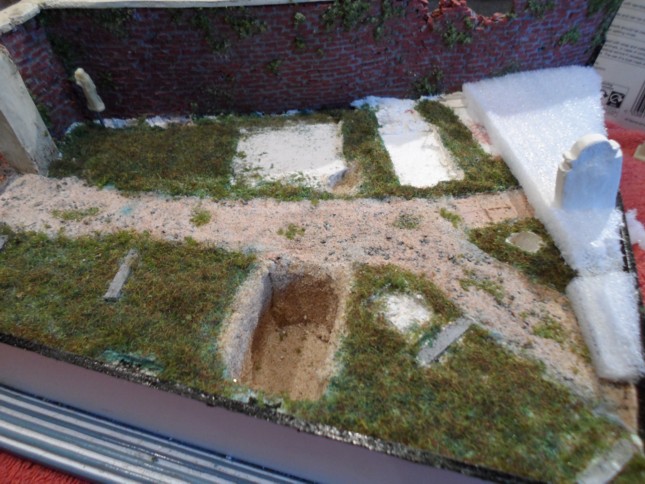
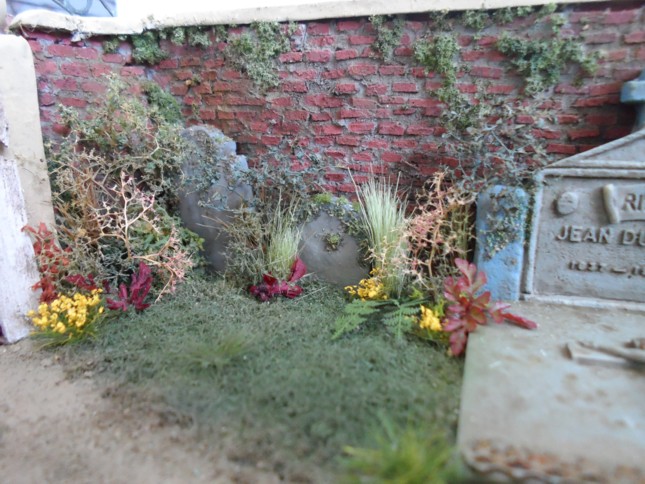
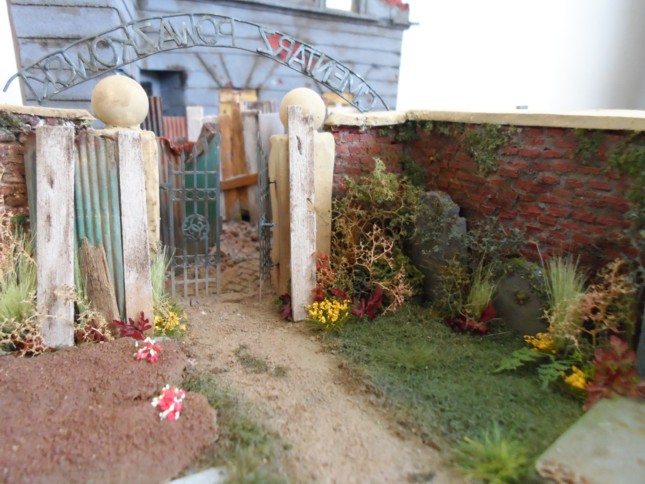
And so to the cemetery. I read that the Polish insurgents hid guns & ammunition in coffins before the Rising started,which was handy,so they had access to them once it all kicked off. So decided to replicate that by having a coffin freshly dug up with empty crates & sheets. After having done the initial groundwork , felt it all was abit 'flat', so raised the end of the cemetery up to give it some height.
The plants were made up from various mediums, such as lichen, sea foam, plants from outside, photo etch & wire wool. Wanted the place to look quite overgrown & unkept. Attached the gates & made a sign to go across the entrance. First time I'd used the seafoam & it's excellent stuff. Highly recommended.
There's still alot to add here, a tree, pigments for the earth, the open grave, a couple of tombstones, & of course the figures, around 8-9 of them.
Thanks all for reading, please feel free to leave any comments or critiques. Cheers
Simon.
Cookiescool2
Georgia, United States
Joined: May 09, 2014
KitMaker: 273 posts
Armorama: 270 posts
Joined: May 09, 2014
KitMaker: 273 posts
Armorama: 270 posts
Posted: Monday, May 25, 2015 - 01:16 AM UTC
Looking pretty good! Can't wait for the next update!
justsendit
Colorado, United States
Joined: February 24, 2014
KitMaker: 3,033 posts
Armorama: 2,492 posts
Joined: February 24, 2014
KitMaker: 3,033 posts
Armorama: 2,492 posts
Posted: Monday, May 25, 2015 - 08:55 AM UTC
Great to see this moving forward. Fantastic work from every angle!
—mike
—mike
dioman13
Indiana, United States
Joined: August 19, 2007
KitMaker: 2,184 posts
Armorama: 1,468 posts
Joined: August 19, 2007
KitMaker: 2,184 posts
Armorama: 1,468 posts
Posted: Monday, May 25, 2015 - 10:39 AM UTC
Simon, Just caught up with your build. Impressive piece you have here. I love dio's and that's what I build, so I always look for those little pieces of eye candy we get to tuck away within the big picture. Like a flower poking through a pile of debrie or a cat laying in some small corner of a blown out wall in the sun. You still have a way to go so the oppertunity is still there. Your attention to the detail of your story is right on target. I look forward to seeing more progress. Keep up the good work, I'm ready for the next chapter. bob d.
If you need any type of small critters or eye catchers, let me know as I have a bunch around.