_GOTOBOTTOM
Dioramas: Vietnam
For Vietnam diorama subjects or techniques.
Hosted by Darren Baker
"Leave that snake alone and let's go!" VN Dio
ReconTL3-1
Visit this Community
Texas, United States
Joined: June 07, 2006
KitMaker: 726 posts
Armorama: 687 posts
Posted: Saturday, March 07, 2015 - 01:26 AM UTC
Hello All,

It's been awhile since I have posted any of my work (September 2014). That is because I had hip surgery and then was working on this diorama.

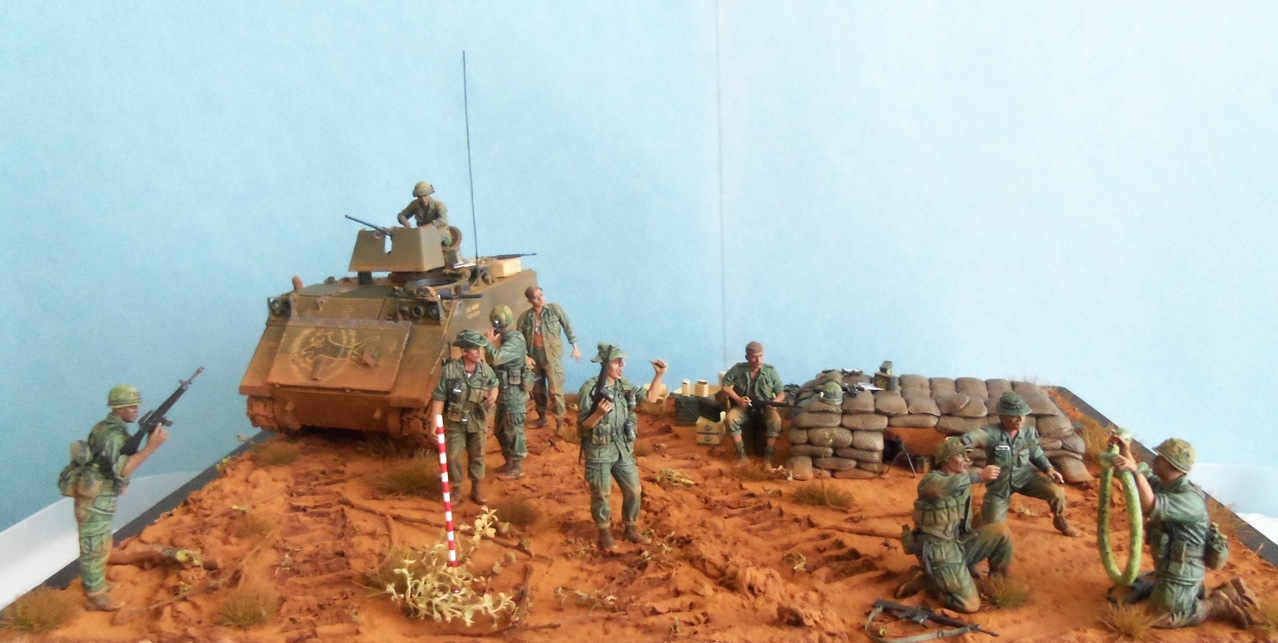
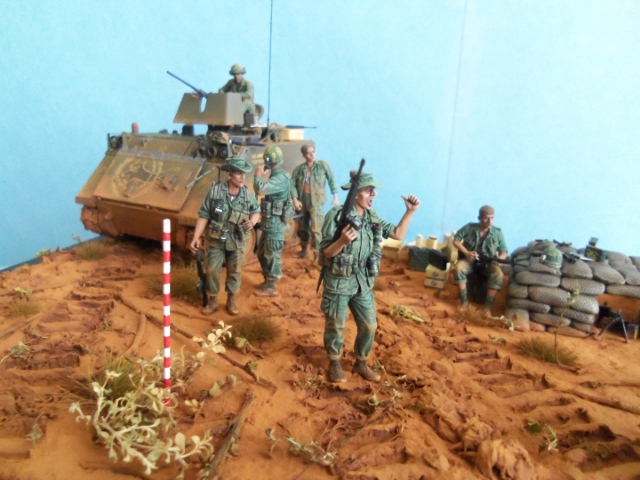
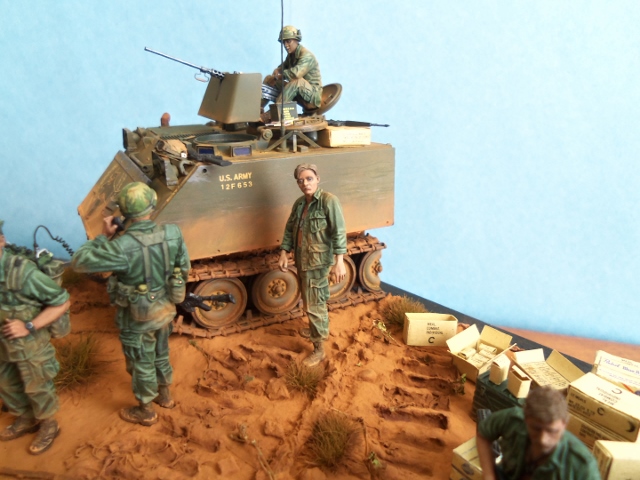
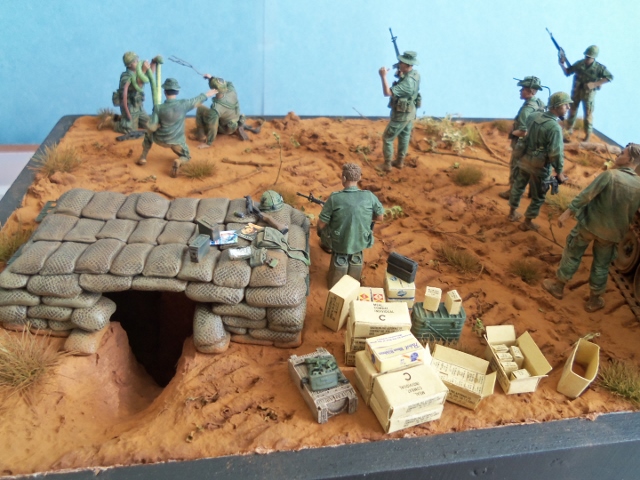
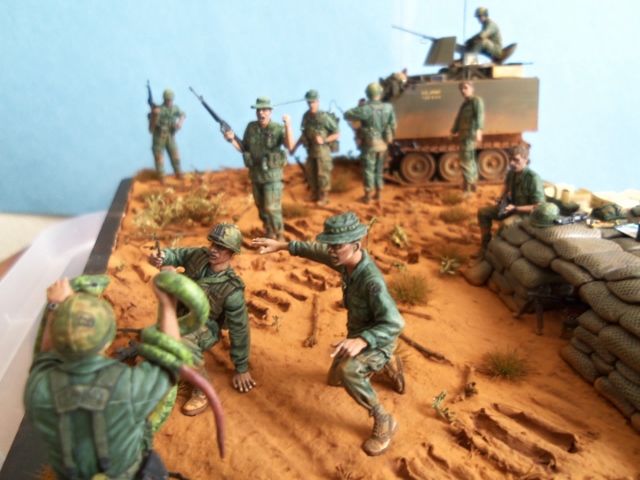
It is titled, "Leave that snake alone and let's go!" and takes place at one of the Fire Support Bases occupied by 2d Battalion, 47th Infantry (Mechanized) of the 9th Infantry Division during Operation Santa Fe where the battalion provided security to engineers who were opening up Route 1 and others by pushing back the jungle so the VC had more difficulty setting in near ambushes and setting up mines as well as the artillerymen who provided support during the operation. Every so often as the route continued to be cleared, the Fire Support Bases would be moved to keep up with the progress of opening the route. This scene takes place along the perimeter of one of these bases. Soldiers from Company C, 2d Battalion, 47th Infantry (Mechanized) are preparing to depart on a dismounted patrol. The platoon leader is speaking with the gunner of the C34 track while waiting a response on the radio granting him permission to leave the wire. While waiting, two Soldiers found a red tailed racer, a tree snake that was displaced by the engineers clearing away the trees. Since they are about to depart, the squad leader is yelling at them to leave the snake alone. Several other Soldiers are looking to see what the squad leader is yelling about.

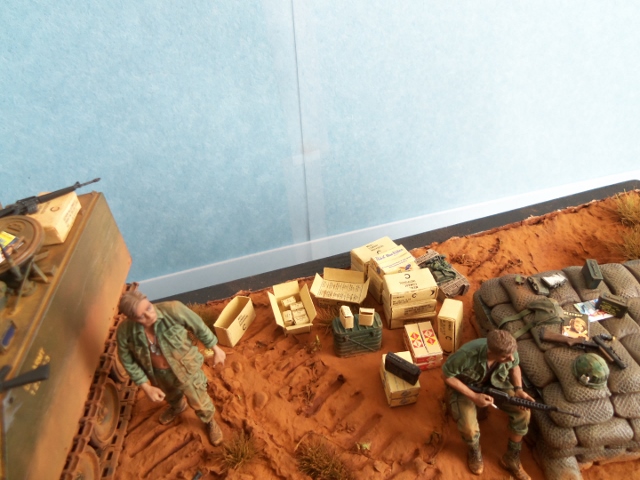
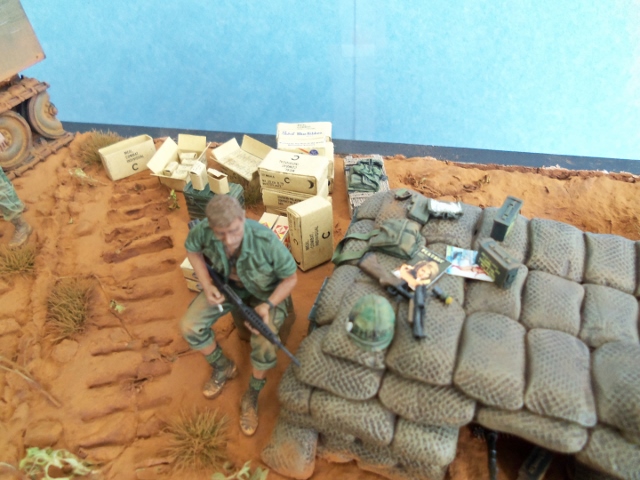
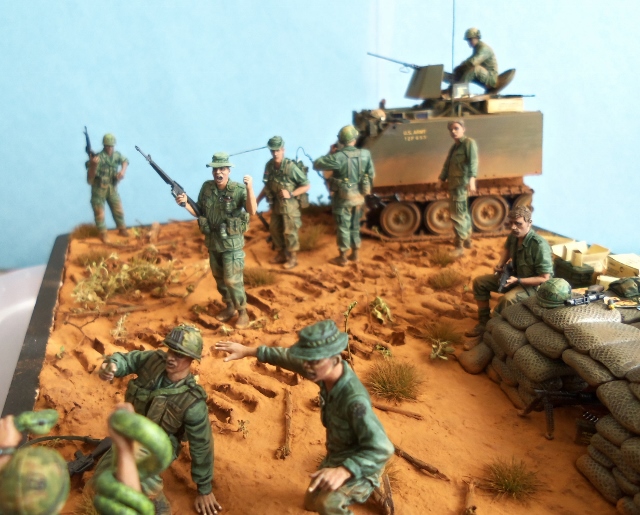
I built this diorama to honor Soldiers of 2d Battalion, 47th Infantry (Mechanized) and for the upcoming Lone Star Figure Show. Since the story I wanted to focus on was the handling of the snake and the squad leader yelling at those Soldiers, I decided to build a wedgie of the M113 instead of the whole vehicle which might take the attention away from the main story. Most of the figures are conversions of Bravo 6 figures with the exception of the black Soldier who is a mixture of Masterbox and Hobby Fan and the Vietnamese interpreter who is a conversion of the kneeling VC from the "Charlie on the Right!" kit from Masterbox. He really is a Cheu Hoi in miniature!:) The guys messing with the snake are conversions of the Hobby Fan recoilless rifle crew. The M113 is from the Academy kit. Since 2/47 Inf (M) vehicles early in the war varied in the installation of the various parts of the ACAV kits, it was common to see some vehicles not having a gun tub, not having a shield, or not having either depending on the weapon systems carried. An example is the C14 track which carried a recoilless rifle on the right side. Since the gun shield for the .50 from the ACAV set hindered the operation of the RR, it was not put on and only the gun tub and one M60 shield on the left side were utilized. Most of the paper products (c-ration cases and boxes, coke cases and beer cases) are from MEC Models. Most of the magazines, which I researched and made sure they were from 1967 or before, are from Archer Fine Transfers. The claymores are from Bravo 6 and are awaiting placement which is why they are out. Take note of the one facing down - it is painted white on the back. This was so the Soldier manning the M60 in the bunker could look through a Starlight scope and ensure that the VC had not turned them around before detonating it. There is also a broken open M79 with a round prepared next to it from TANK Miniatures.

After I had built most of the diorama, I got in contact with Bill Rambow, a veteran of Charlie Company, 2d Battalion, 47th Infantry (Mechanized) from the time period I was depicting. He wrote two excellent historical fiction books about C Co, 2/47th Inf (M) which served as the inspiration for me to start this project (CIB and ROE). I just wish I had been able to speak with him before I started. His photos and advice really helped me alot in terms of getting some of the finer details right and for the ones that I couldn't correct because I had already glued things down, to get right on my next project representing the same unit. He also got me in contact with other unit veterans and with all of the knowledge they are sharing with me, future projects will turn out alot better. So, thank you guys very much!

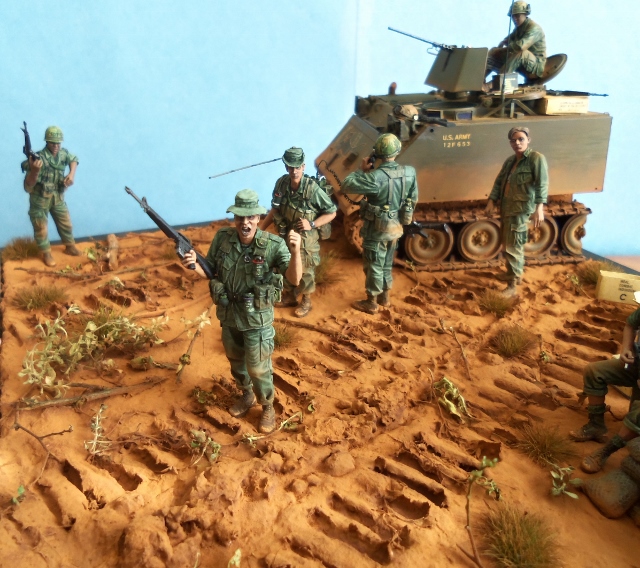
So, now to the pictures. Keep in mind that these were taken before the final bits of advice about the antenna on the track and adding an artillery registration pole were given. I have corrected the length of the antenna and have added the pole and will take a picture just of those a bit later.

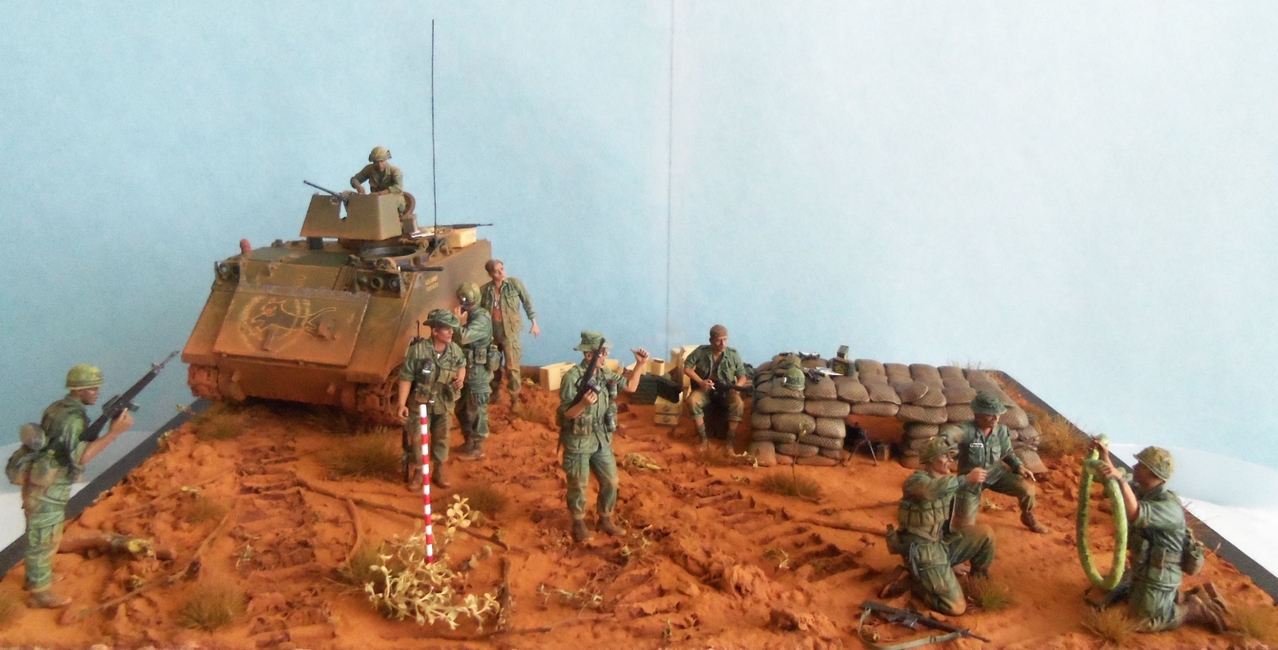
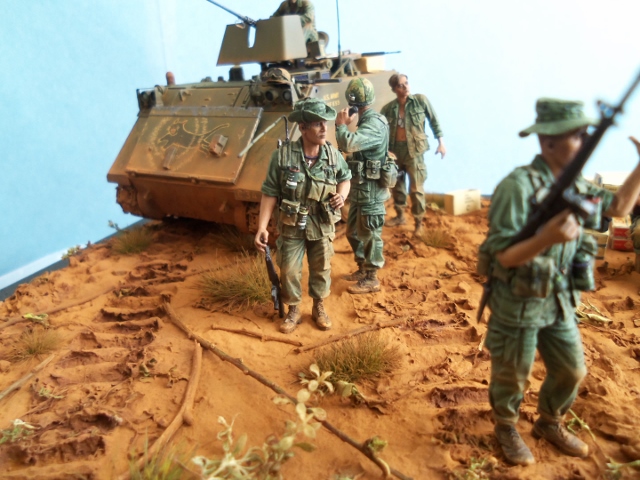
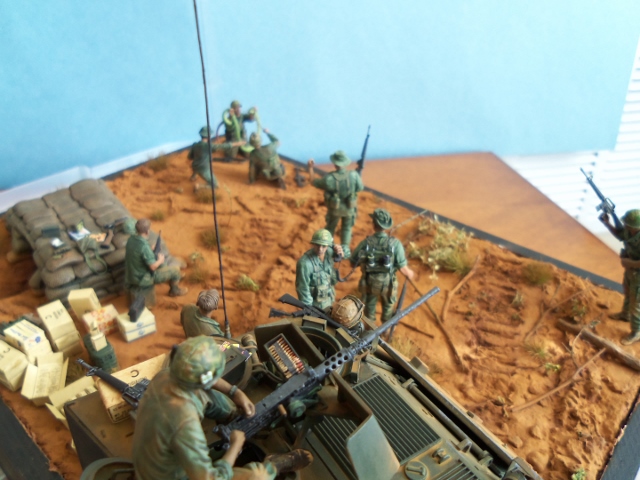
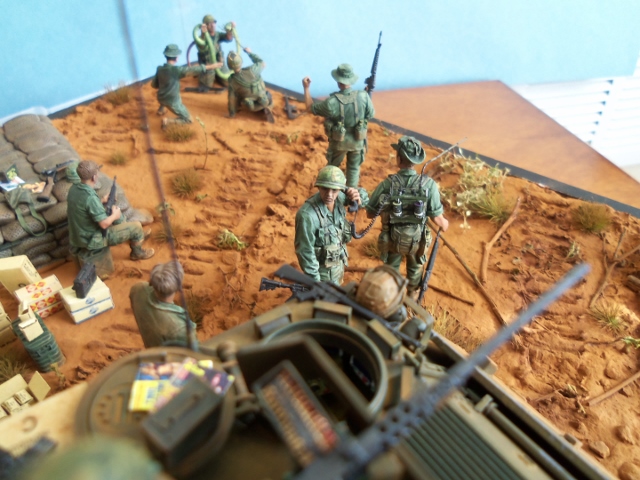
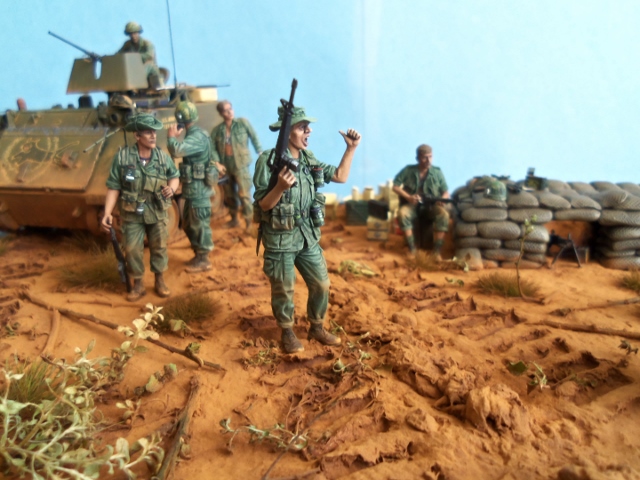
Here is an overall view of the diorama. I still need to do some touch up on the wooden part of the base and add the title plate, but at least you can see the "meat" of the diorama. You can see the tracks left by the Rome Plows when they cleared the area.


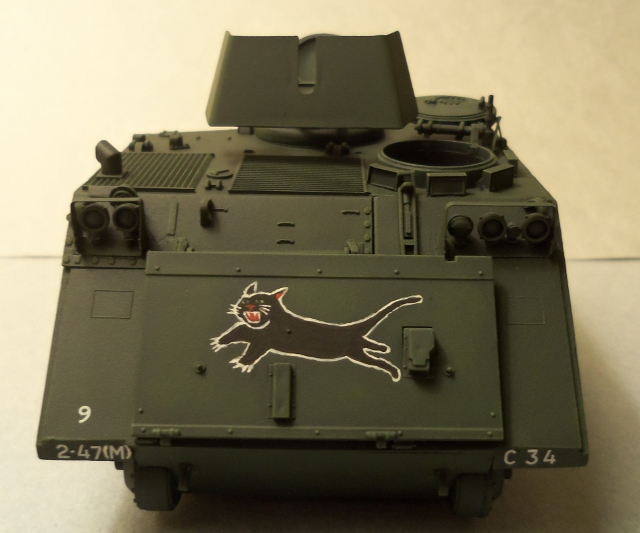
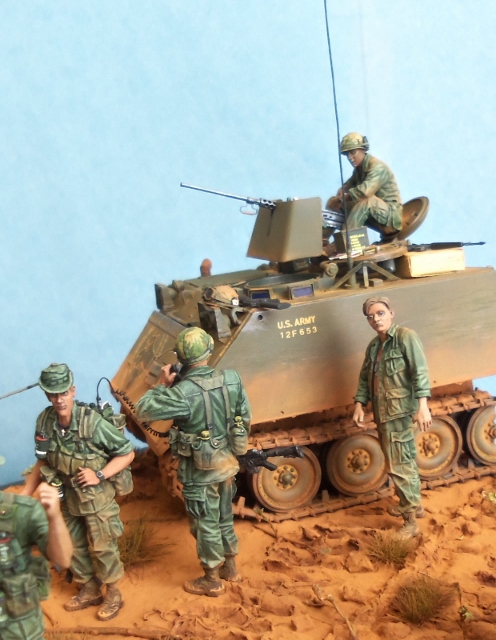
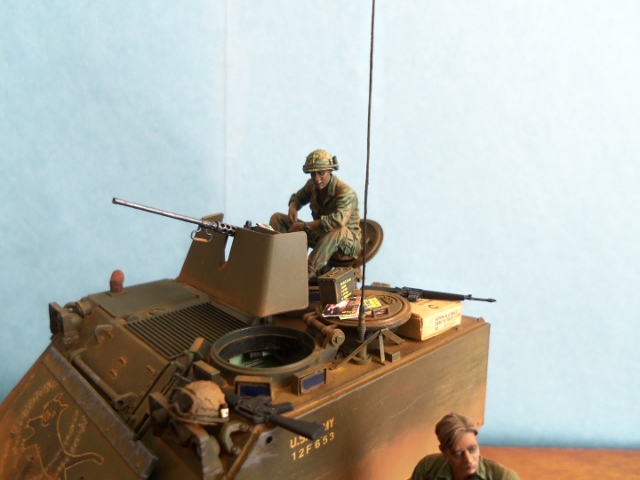
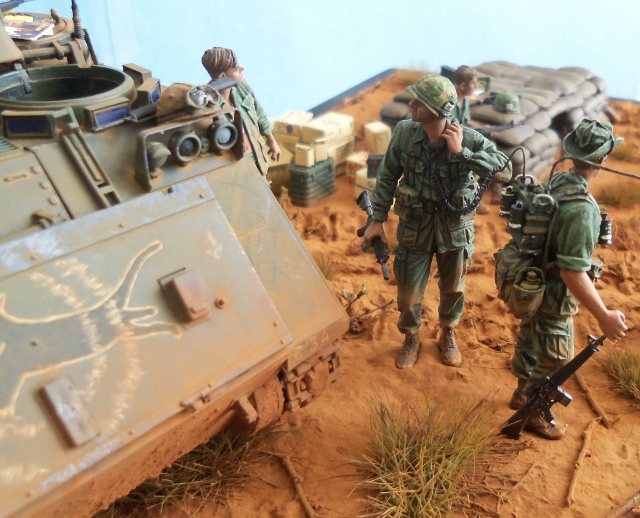
Here is a picture of the front of the M113 before weathering showing the unit markings, bumper code, and leaping panther on the trim vane (before it got all scratched up from carrying rolls of concertina wire on the front) since they are more difficult to see, but are visible enough when looking at the diorama in person, after the weathering process.


Now for the various elements of the diorama. If you have any questions about anything, ask and I will do my best to answer them.

You always have one or two guys in the unit who just have to mess with the wildlife. I know that in my unit we had a couple guys who participated in the "Rattlesnake Roundup" event held in Sweetwater, Texas every year. They were mature enough not to do that stuff in front of the Soldiers which I am thankful for. I can identify with the squad leader's concern about these guys getting bit or something.


This Soldier is carrying a Starlight Scope in that bag on his back. I built him before I had met Bill and found out that they did not have the bags for their scopes and they went out with them mounted on a rifle. Now I Know for next time.


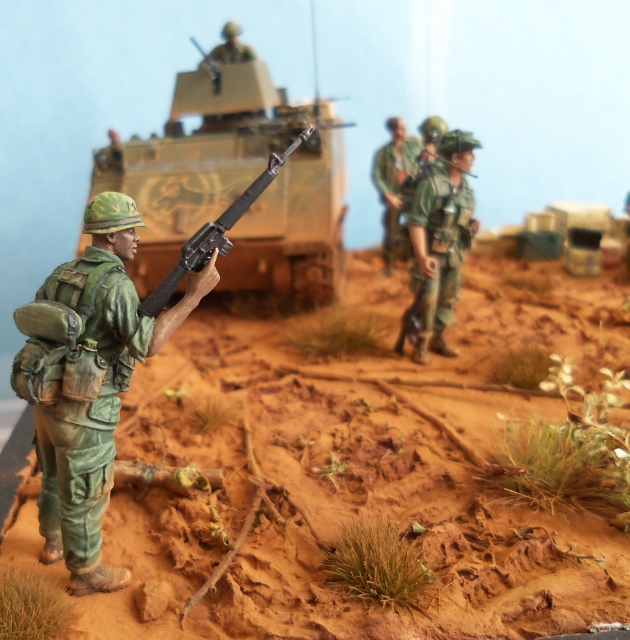
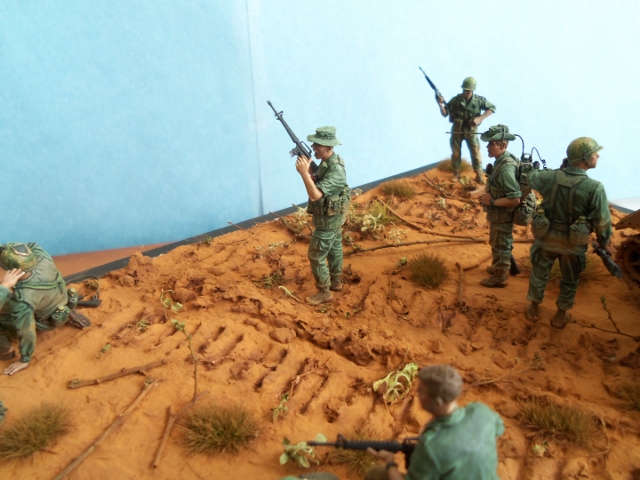
This is the figure that actually started the whole diorama and let to the guys with the snake because I had to figure out what I was going to have him yelling about.


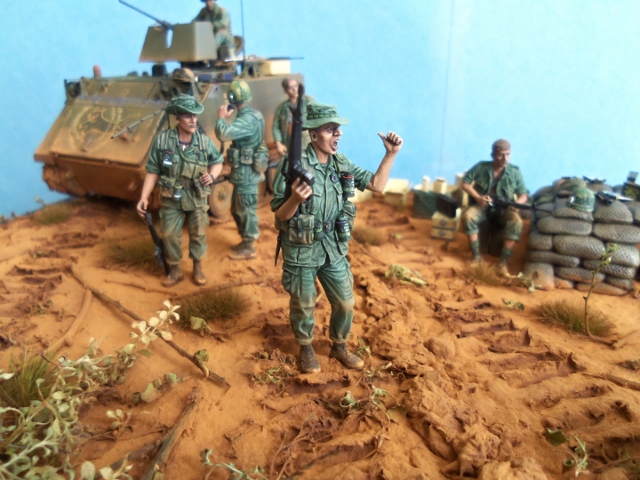
This Soldier was originally going to be in a vignette of guys taking a rest break in the jungle, but his weary look (Infantrymen never get enough sleep between conducting patrols, digging in, work details, standing guard on the .50 all day and night and mannning the bunker at night.) fit right in to this diorama.


Well, those are the pictures for now. Later on I will take a couple shots with the shortened antenna on the M113 and the artillery registration pole in place.

Thanks for looking.

Cheers,
James
jrutman
Visit this Community
Pennsylvania, United States
Joined: April 10, 2011
KitMaker: 7,941 posts
Armorama: 7,934 posts
Posted: Saturday, March 07, 2015 - 01:49 AM UTC
That is some awesome work as per your usual thing. Brilliant painting for sure!! Love the action.
J
justsendit
Visit this Community
Colorado, United States
Joined: February 24, 2014
KitMaker: 3,033 posts
Armorama: 2,492 posts
Posted: Saturday, March 07, 2015 - 02:17 AM UTC
Wow! ... really great work James ... interesting story line as well!

I've gotta' comment on those dirty uniforms and boots ... you really nailed it!

—mike
Graywolf
Staff MemberSenior Editor
HISTORICUS FORMA
Visit this Community
Izmir, Turkey / Türkçe
Joined: December 01, 2001
KitMaker: 6,405 posts
Armorama: 1,850 posts
Posted: Saturday, March 07, 2015 - 02:34 AM UTC
Speechless here. Story, figures, ACAV, sandbags, groundwork, everything is fantastic. Besides the beauty of the scene, you give the story and explain whatever you used in details. Congrats and thanks my friend. Just one question ; yelling squad leader is a conversion ? and which parts?
keep safe
Engin
captfue
Visit this Community
Texas, United States
Joined: September 02, 2006
KitMaker: 785 posts
Armorama: 44 posts
Posted: Saturday, March 07, 2015 - 02:41 AM UTC
Great piece!!
ReconTL3-1
Visit this Community
Texas, United States
Joined: June 07, 2006
KitMaker: 726 posts
Armorama: 687 posts
Posted: Saturday, March 07, 2015 - 03:15 AM UTC
Thanks for the positive comments, guys! It keeps me motivated to try to do better on my next project.

Engin, in answer to you question about the shouting squad leader: Yes, he is a conversion as are most of my figures. His torso is from the Bravo 6 Green Beret Colonel, his legs are from the guy with the canteen from the Bravo 6 "Take 5" set, his right arm is from the Bravo 6 standing MP with a Trumpeter front sight and barrel on it, I don't remember what I did with the left arm, the head is from Hornet's latest "Warface" head set, the boonie hat, grenades, and canteens are from Bravo 6. The ammo pouches are from the parts box. Hope that helps.

Cheers,
James
flasharry
Visit this Community
Wales, United Kingdom
Joined: January 31, 2010
KitMaker: 6 posts
Armorama: 6 posts
Posted: Saturday, March 07, 2015 - 03:42 AM UTC
Fantastic work excellent diorama love the way the figures are seamlessly telling the story..bang up job good sir..all the best darren
ReconTL3-1
Visit this Community
Texas, United States
Joined: June 07, 2006
KitMaker: 726 posts
Armorama: 687 posts
Posted: Saturday, March 07, 2015 - 05:21 AM UTC
Hello All,

Thanks for the positive comments and I am glad that the story seems easy to follow.

As I mentioned, I shortened the antenna on the M113 and added the aiming pole. In the picture it looks kind of crooked, but it actually is straight. Must be my crappy photography skills.


Cheers,
James
jrutman
Visit this Community
Pennsylvania, United States
Joined: April 10, 2011
KitMaker: 7,941 posts
Armorama: 7,934 posts
Posted: Saturday, March 07, 2015 - 05:58 AM UTC
You really have that red clay down!
J
obg153
Visit this Community
Texas, United States
Joined: April 07, 2009
KitMaker: 1,063 posts
Armorama: 1,049 posts
Posted: Saturday, March 07, 2015 - 06:32 AM UTC
From every angle, you've superbly captured the story as described. Outstanding results all around. The only thing I could imagine being different would be a more "colorful" phrase from that squad leader.
Trisaw
Visit this Community
California, United States
Joined: December 24, 2002
KitMaker: 4,105 posts
Armorama: 2,492 posts
Posted: Saturday, March 07, 2015 - 07:02 AM UTC
Outstanding job! I really like how you weathered all the soldiers in the proper places to show that they have been out in the field for days. The eyes get drawn to every corner of your diorama to capture in all the sights and details. You did a marvelous job in making each figure represent something and have a personal story to show. Best of all, your diorama captures how Vietnam could have appeared to those who don't know much about this war (like the youngsters).
ReconTL3-1
Visit this Community
Texas, United States
Joined: June 07, 2006
KitMaker: 726 posts
Armorama: 687 posts
Posted: Saturday, March 07, 2015 - 07:16 AM UTC
Thanks, Jerry. I wasn't sure how this one was going to turn out. For the last several vignettes and my last diorama I had been using the terra cota miliput for my groudwork. But when I did that last diorama, I had a problem with the putty hardening before I had a chance to get everything in place. So this time I decided to use celluclay again. I mixed some brown tempera paint with the dry celluclay to give it color, but as it dried it dried almost white, so I had to paint it all and then give it a dusting with MIG pigments.

Jack, I agree that he should be using more "colorful" language. I know I would be, but kids are going to see this at some of the shows and if I do end up winning anything with it, I figured I'd better have a less colorful title.

Peter, thanks for your comments. I am glad that you think it will be good for youngsters to see as a way of getting a glimpse of Vietnam.

Cheers!
James
Stefan1580
Visit this Community
Berlin, Germany
Joined: November 20, 2006
KitMaker: 360 posts
Armorama: 354 posts
Posted: Saturday, March 07, 2015 - 05:19 PM UTC
Hi James,

now with the better photos it looks amazing. Really great diorama and nice work on the Figures and the groundwork. Also i like your M113 a lot. All in all one of the best Vietnam Diorama i heve ever seen. The little Details like the sculpted case for the night scope is beatufull done. I think the vets will be very pleased and honored with your work.

All the best and keep care

Stefan
210cav
Visit this Community
Virginia, United States
Joined: February 05, 2002
KitMaker: 6,149 posts
Armorama: 4,573 posts
Posted: Saturday, March 07, 2015 - 05:31 PM UTC
James-- I could get ptsd off of seeing that one! Well done indeed. The figures are outstanding
Great job
DJ
Karl187
#284
Visit this Community
Northern Ireland, United Kingdom
Joined: October 04, 2006
KitMaker: 3,094 posts
Armorama: 2,942 posts
Posted: Saturday, March 07, 2015 - 08:19 PM UTC
What a fantastic dio- it creates a really inventive scene with the guys messing about with the snake and getting yelled at. Theres lots of carefully observed details and the figure conversions and painting, as per usual with your work James, are flawless. Stellar work.
ReconTL3-1
Visit this Community
Texas, United States
Joined: June 07, 2006
KitMaker: 726 posts
Armorama: 687 posts
Posted: Saturday, March 07, 2015 - 11:01 PM UTC
Stefan, DJ, and Karl,

Thanks for the positive comments. I guess if looking at the diorama could almost cause PTSD it is a good thing in a way:) I am glad that it is able to get the story across better than some of my previous works. This time I tried to apply those principles of artistic composition that I have read about. Seems as though it works. I don't think I got down the rule of thirds, but it worked out well nonetheless.

This was a good learning experience for getting back into doing larger diorama rather than the smaller figure vignettes that I have been primarily doing the past several years. Next time I will have a whole vehicle since the wedgie came out pretty decent.

I tried to incorporate some comments and suggestions from previous projects into this one to make it better. That is what I like about this site, it helps everyone become better modelers with each project.

Cheers,
James
210cav
Visit this Community
Virginia, United States
Joined: February 05, 2002
KitMaker: 6,149 posts
Armorama: 4,573 posts
Posted: Saturday, March 07, 2015 - 11:46 PM UTC
James-- that is an awarding winning diorama. Let us know how you make out with it. Once again, great work!
DJ
ReconTL3-1
Visit this Community
Texas, United States
Joined: June 07, 2006
KitMaker: 726 posts
Armorama: 687 posts
Posted: Saturday, March 07, 2015 - 11:57 PM UTC
Thanks, DJ.

I appreciate it. I hope it does well. But then again you never know at some shows what the judges are looking for and if they even know anything about your subject. Since this is a figure show, they will be judging the craftsmanship, painting, story line, and stuff like that. I won't really be competing against anyone, it will be more of an assessment of my skills.

I'll let you know how it turns out.

Cheers,
James
justsendit
Visit this Community
Colorado, United States
Joined: February 24, 2014
KitMaker: 3,033 posts
Armorama: 2,492 posts
Posted: Sunday, March 08, 2015 - 12:12 AM UTC

Quoted Text

... But then again you never know at some shows what the judges are looking for and if they even know anything about your subject. Since this is a figure show, they will be judging the craftsmanship, painting, story line, and stuff like that. I won't really be competing against anyone, it will be more of an assessment of my skills.


Contest attendees are about to be treated to this very interesting look into history with your fine piece of visual art-form! You've done your part.

—mike
AlanL
Visit this Community
England - East Anglia, United Kingdom
Joined: August 12, 2005
KitMaker: 14,499 posts
Armorama: 11,675 posts
Posted: Sunday, March 08, 2015 - 12:18 AM UTC
Hi James,

Excellent work on the figures, ground work and vehicle. An interesting and humorous scene.

Nice one.

Al
mariointer
Visit this Community
Italy
Joined: April 01, 2012
KitMaker: 65 posts
Armorama: 57 posts
Posted: Sunday, March 08, 2015 - 03:01 AM UTC
Hi James, many congratulations , as iusually you realize a fantastic diorama tellinf an interesting story...i am really a your fan, (me too love nam period indeed...)an love so much your works. Same questions: of which firm is the tanker on the apc? Do you realized the snake with milliput? great work for sure!!! Many congratulation for the cartridge that you sculpted ( i think) around the hobby fan figure with flak jacket!!Could you show us ,if you have, same pictures of your works on trasformed figures, in particular with the african of masterbox???
I hope to see other pictures of this works figure.
I love your way to use milliput with the figures you isually trasform like you did with thwe yelling man. My only doubt is about the yelling head ,becouse i found that the new Hornet heads of these two last year about, are a bit bigger for Bravo6 figures...isnt it??' And so with Bravo6 boonie hat, perhaps, as dimension is better use ,if you have , same Dragon boonie hat!!!

Many congratulation again and thanks to share with us your masterpiece!!!!

Mario from Italy.
ReconTL3-1
Visit this Community
Texas, United States
Joined: June 07, 2006
KitMaker: 726 posts
Armorama: 687 posts
Posted: Sunday, March 08, 2015 - 08:37 AM UTC
Thanks for your positive comments Mike, Alan, and Mario.

Mario, in answer to your questions: The Soldier manning the .50 on the M113 is one of the guys from the Bravo 6 "Ham and Limas Again!" figure kit. The only thing I did to him was give him a Hornet African American head and put a Bravo 6 helmet on him.

The snake is made of Magic Sculpt. It was a pain in the butt to make because the hands were actually holding other objects, so the snake was built in sections. Last night as I was touching up the wooden parts of the base, I noticed that with the shrinkage of the celluclay when it dried the sling on the M16 belonging to the "snake charmer" was no longer resting on the ground. When I went to move it, the tail of the snake broke off. I was able to get it back on, but is kind of sucked.

The bandoleer carried by the Soldier with the flak jacket on was made from Magic Sculpt.

I did take some in progress pictures of some of the figures. I'll have to see if I have some of the ones you are requesting.

In a way I can see what you mean about the last couple of head sets from Hornet seeming a little bit big for Bravo 6 figures. I just chalk it up to some people having bigger heads than others. The difference isn't all that much and I think the yelling guys seem larger in part of their mouths being open. As far as the boonie hats are concerned, I prefer the Bravo 6 boonie hats way over the Dragon ones. I make sure that I pick the hat that best fits the way I want it to fit on the figure as I usually put on the gear that the figure is going to be wearing to check the fit and positioning while I am converting of sculpting a figure. It kind of helps having all of the real gear to use as references.

Glad you like the diorama. I'll try to find where I saved the in progress pictures tomorrow.

Cheers,
James
JPTRR
Staff MemberManaging Editor
RAILROAD MODELING
#051
Visit this Community
Tennessee, United States
Joined: December 21, 2002
KitMaker: 7,772 posts
Armorama: 2,447 posts
Posted: Sunday, March 08, 2015 - 08:54 AM UTC
James,

Welcome back.

Great work!
Stickframe
#362
Visit this Community
California, United States
Joined: December 01, 2013
KitMaker: 1,661 posts
Armorama: 1,202 posts
Posted: Sunday, March 08, 2015 - 01:47 PM UTC
Hi James,

Nice build all-around! You seem to have nailed all of it! I agree with Mike too, the mud on the soldiers uniforms is a nice touch!

Cheers
Nick
erichvon
Visit this Community
England - East Midlands, United Kingdom
Joined: January 17, 2006
KitMaker: 1,694 posts
Armorama: 1,584 posts
Posted: Sunday, March 08, 2015 - 04:12 PM UTC
James that is excellent work. The painting of the figures is superb and there's a lot to look at. Great interaction between the figures and the snake is definitely something different. Makes the dio. Top work!
 _GOTOTOP