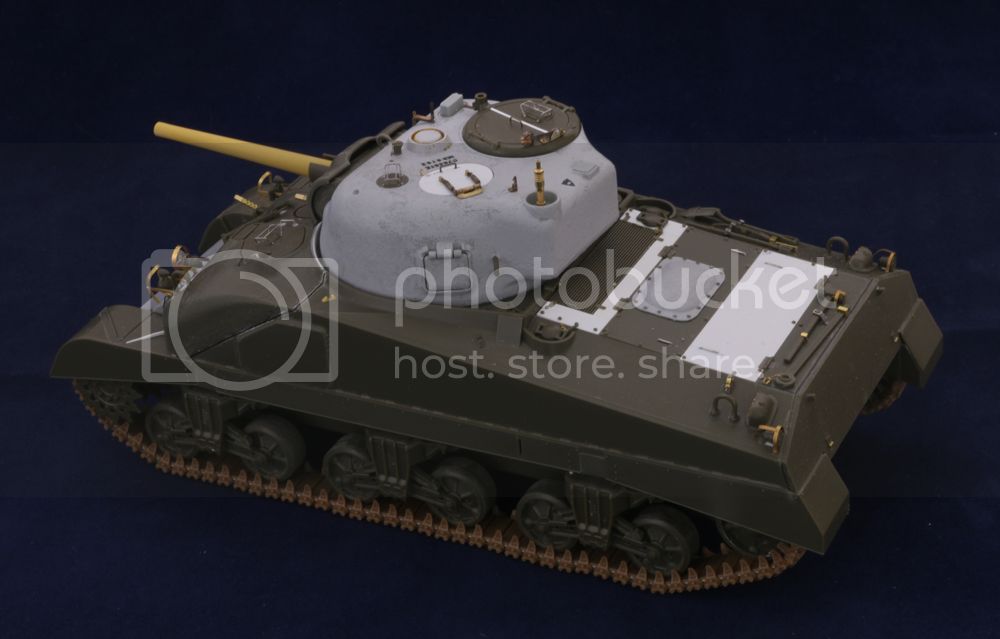
Willem.
Pretty much the same as the standard VVSS sets from Tasca/Asuka. This difference here is upswept arm plus you also get a set of plain dished wheels too
Gary
Hosted by Darren Baker
M4A6 Sherman
gastec
Auckland, New Zealand
Joined: February 03, 2014
KitMaker: 1,042 posts
Armorama: 871 posts
Joined: February 03, 2014
KitMaker: 1,042 posts
Armorama: 871 posts
Posted: Monday, August 03, 2015 - 01:12 PM UTC
gastec
Auckland, New Zealand
Joined: February 03, 2014
KitMaker: 1,042 posts
Armorama: 871 posts
Joined: February 03, 2014
KitMaker: 1,042 posts
Armorama: 871 posts
Posted: Monday, August 03, 2015 - 02:00 PM UTC
Sighting vane and searchlight mount cover both in place completes the turret part of the build...
Gary
Gary
gastec
Auckland, New Zealand
Joined: February 03, 2014
KitMaker: 1,042 posts
Armorama: 871 posts
Joined: February 03, 2014
KitMaker: 1,042 posts
Armorama: 871 posts
Posted: Tuesday, August 04, 2015 - 01:11 PM UTC
As previously mentioned, later type VVSS units on this build with the upswept return roller as can be seen in comparison with an earlier type below...
Tasca/Asuka units are really good, but do require a little TLC. There are some annoying joins between parts to deal with. The one at the end with the return roller assembly is particularly annoying due to its location. Using filler is awkward due to access so I've found the best solution is a piece of stretched sprue works best....
Once the cement has fully cured, a sharp blade is used to carefully shave the sprue away leaving a smooth face.
Standard filler is used for the other parts and styrene strips fill the void usually occupied by the kit track skids which will be replaced with PE items. I've also added the spring adjustment points using Meng styrene nuts...
ET Model provide a very useful PE template for drilling out the 4 holes on the leading face of each unit....
PE track skid added. I've used styrene bolt heads shaved from the kit parts. (Bolt heads are also added to the roller return bracket but not shown here)...
Completed unit....
Gary
barleeni
Napier, New Zealand
Joined: June 12, 2015
KitMaker: 43 posts
Armorama: 43 posts
Joined: June 12, 2015
KitMaker: 43 posts
Armorama: 43 posts
Posted: Tuesday, August 04, 2015 - 01:57 PM UTC
Beautiful work, and a nice pace which makes this thread a joy to follow! top work!
gastec
Auckland, New Zealand
Joined: February 03, 2014
KitMaker: 1,042 posts
Armorama: 871 posts
Joined: February 03, 2014
KitMaker: 1,042 posts
Armorama: 871 posts
Posted: Wednesday, August 05, 2015 - 12:56 PM UTC
Thank you David
Here we are half way through the suspension....
And all complete with the vehicle standing on its own feet...
Gary
Here we are half way through the suspension....
And all complete with the vehicle standing on its own feet...
Gary
gastec
Auckland, New Zealand
Joined: February 03, 2014
KitMaker: 1,042 posts
Armorama: 871 posts
Joined: February 03, 2014
KitMaker: 1,042 posts
Armorama: 871 posts
Posted: Saturday, August 15, 2015 - 10:16 AM UTC
Tracks arrived a while back nut only just made a start on them today. All parts are stripped from the sprue trees and placed into small pots....
Gary
Gary
gastec
Auckland, New Zealand
Joined: February 03, 2014
KitMaker: 1,042 posts
Armorama: 871 posts
Joined: February 03, 2014
KitMaker: 1,042 posts
Armorama: 871 posts
Posted: Saturday, August 15, 2015 - 01:34 PM UTC
Construction starts with the end connectors and pins....
Then the track pads are added using my high tech jig....
Gary
Then the track pads are added using my high tech jig....
Gary
gastec
Auckland, New Zealand
Joined: February 03, 2014
KitMaker: 1,042 posts
Armorama: 871 posts
Joined: February 03, 2014
KitMaker: 1,042 posts
Armorama: 871 posts
Posted: Sunday, August 16, 2015 - 12:42 AM UTC
Side one complete....
Gary
Gary
tanknick22
United States
Joined: February 19, 2009
KitMaker: 1,139 posts
Armorama: 1,100 posts
Joined: February 19, 2009
KitMaker: 1,139 posts
Armorama: 1,100 posts
Posted: Sunday, August 16, 2015 - 01:32 AM UTC
Quoted Text
Ready to join. Will need a little work - especially around the turret ring - but nothing too taxing...
And with a little care, may also end up with an M4 hull too
Gary
Wouldnt it have been easier to cut the hull at the rear between the engine deck and turret ring?
gastec
Auckland, New Zealand
Joined: February 03, 2014
KitMaker: 1,042 posts
Armorama: 871 posts
Joined: February 03, 2014
KitMaker: 1,042 posts
Armorama: 871 posts
Posted: Sunday, August 16, 2015 - 01:30 PM UTC
Not really. My technique copies the real thing so the join between the parts is easily dealt with by adding weld seams. Cutting the hull further back means much more work is needed to hide the join line and ensuring continuity of existing welds.
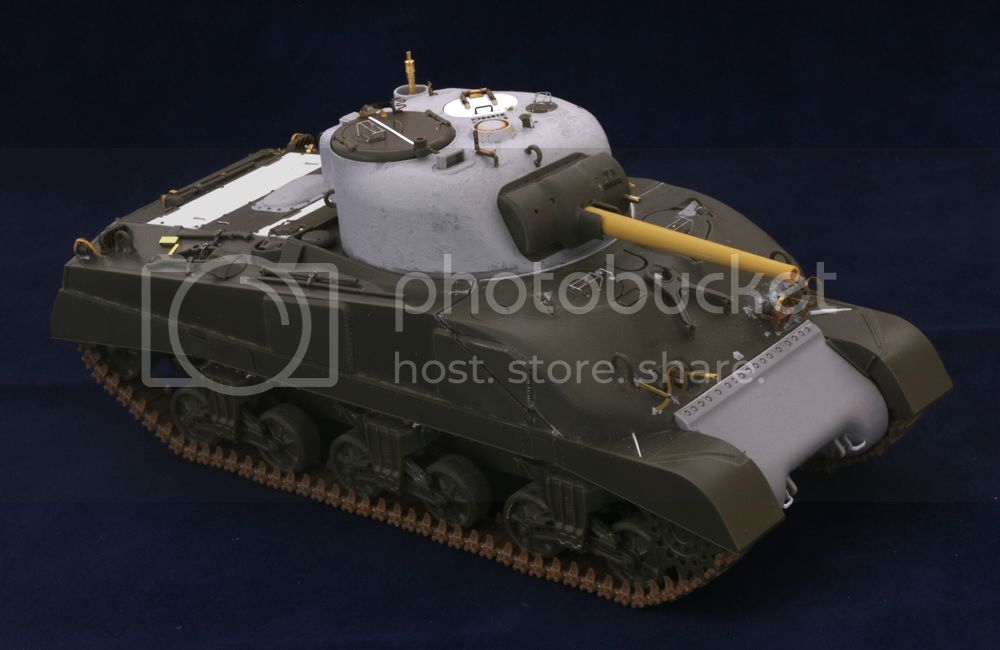
And another ready for the paintshop....
Gary
And another ready for the paintshop....
Gary
hudyjatai
Ceara, Brazil
Joined: February 21, 2011
KitMaker: 89 posts
Armorama: 88 posts
Joined: February 21, 2011
KitMaker: 89 posts
Armorama: 88 posts
Posted: Monday, August 24, 2015 - 01:14 AM UTC
Perfect!
Posted: Monday, August 24, 2015 - 01:39 AM UTC
Nice work Gary, looking good.
Al
Al
canopener5
Ohio, United States
Joined: July 19, 2015
KitMaker: 19 posts
Armorama: 19 posts
Joined: July 19, 2015
KitMaker: 19 posts
Armorama: 19 posts
Posted: Saturday, August 29, 2015 - 02:44 AM UTC
Awesome build.
PanzerGeek
Alberta, Canada
Joined: February 10, 2008
KitMaker: 221 posts
Armorama: 217 posts
Joined: February 10, 2008
KitMaker: 221 posts
Armorama: 217 posts
Posted: Saturday, August 29, 2015 - 03:29 AM UTC
Very nice build Gary.
gastec
Auckland, New Zealand
Joined: February 03, 2014
KitMaker: 1,042 posts
Armorama: 871 posts
Joined: February 03, 2014
KitMaker: 1,042 posts
Armorama: 871 posts
Posted: Saturday, August 29, 2015 - 07:29 AM UTC
Thank you gentlemen
Gary
Gary