_GOTOBOTTOM
Armor/AFV: Allied - WWII
Armor and ground forces of the Allied forces during World War II.
Hosted by Darren Baker
M3A1 Halftrack w Verlinden Command Conversion
phantom_phanatic309
#372
Visit this Community
United Kingdom
Joined: March 10, 2010
KitMaker: 2,568 posts
Armorama: 423 posts
Posted: Friday, February 19, 2016 - 11:52 PM UTC

Quoted Text

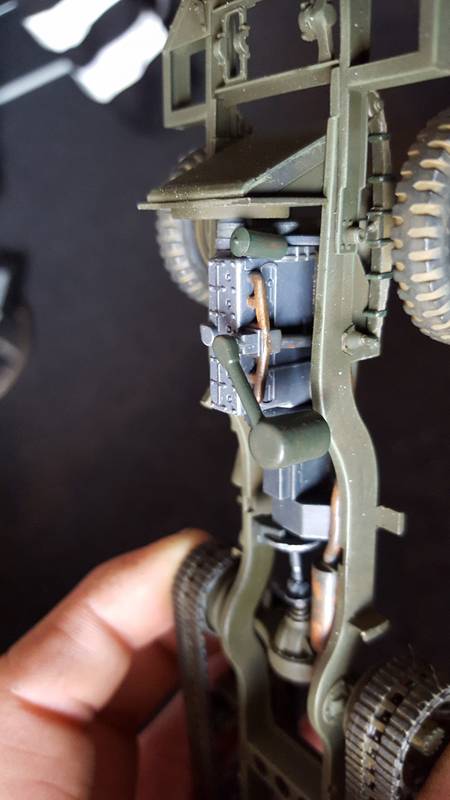
Stephan: trust Si and me. I've built four DML US Halftracks -- all appearing in published articles. I have two more on the workbench. The tracks are one of the least areas of concern. Like I said, the track suspension is extremely well designed and engineered. This shouldn't give you the slightest worry. Roy


I've got a few kits to get through before before I get to my halftrack, but I'll see how it goes. What I was struggling to work out was how the raised lip inside the track was supposed to slide in between the road wheels and return rollers. Do the tracks have some flex to allow them to slip over?
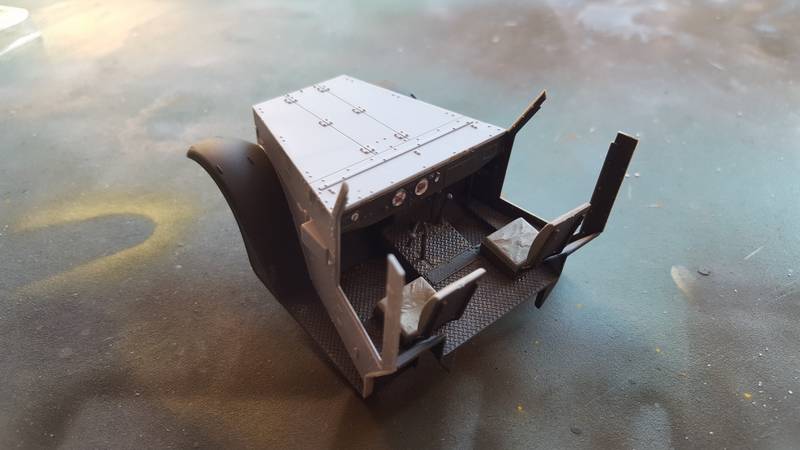
I have to confess to be being a band-track man for pure ease of use. Whenever I come against something different I do tend to panic! I won't even touch indy-link tracks! But given the nature of the M3/M5 tracks I don't think Dragon could have done them any other way and they do look nice.

Si, it's looking great and I do apologise if it seemed like I had hijacked your thread.
ericadeane
Visit this Community
Michigan, United States
Joined: October 28, 2002
KitMaker: 4,021 posts
Armorama: 3,947 posts
Posted: Saturday, February 20, 2016 - 01:57 AM UTC
You assemble the track halves and then slip the drive sprocket and idler wheel in. Then you slip all three onto the sprocket axle and idler axle.

You DON'T glue in the sprocket and idler and then try to slip the tracks onto them.
phantom_phanatic309
#372
Visit this Community
United Kingdom
Joined: March 10, 2010
KitMaker: 2,568 posts
Armorama: 423 posts
Posted: Saturday, February 20, 2016 - 02:37 AM UTC

Quoted Text

You assemble the track halves and then slip the drive sprocket and idler wheel in. Then you slip all three onto the sprocket axle and idler axle.

You DON'T glue in the sprocket and idler and then try to slip the tracks onto them.


Cool. I'll keep it in mind when I get round to building it. Thanks for the advice.
SiStorey
Visit this Community
England - North East, United Kingdom
Joined: March 14, 2014
KitMaker: 242 posts
Armorama: 161 posts
Posted: Tuesday, March 01, 2016 - 03:13 PM UTC
Hi all, sorry for the delay. Little bit of progress over the last week or so. Been at work most of this week so haven't had much chance to get on the work bench.

So first off I went about finishing the construction of the front drivers compartment.


Test fit on to the chassis went well, nice snug fit. There is a small piece that sits on the underneath of the cab that needs some playing with but bar that a good solid fit.

Also there is a little glue over spill which I need to fix but that's for sometime this week.

Whilst that was left to dry I moved onto the figure. For this I used images from a Facebook page called WW2 Colourised Images to get some ideas on the colours of the uniform. Using Vallejo paints I ended up with this. Yes I need to work on his face, still not got that down to a fine art but its all practice practice.


I also went about adjusting the parts of the engine that needed a repaint and went with a similar green to the vehicle itself.


Kept the same grey but changed parts of it to green.

That's all for now, I do have more work but I haven't got any photos yet, stay tuned later on in the week.
ericadeane
Visit this Community
Michigan, United States
Joined: October 28, 2002
KitMaker: 4,021 posts
Armorama: 3,947 posts
Posted: Tuesday, March 01, 2016 - 07:38 PM UTC
Si: Hopefully you've not glued in the seats. There are some major seams (on the slanted fairing aft of the seats -- they form the forward part of the track well) to fill with putty as you mate the driver's compartment with the fighting compartment.

Also it's curious that you added Archer treadplate on the right running board. That area is hidden because the battery box will sit atop it.

YOu should do some dry fitting of the fighting compartment, drivers compartment and chassis -- to ensure alignment and fit. I suspect you'll have to scrape off paint from your chassis b/c it's a tight fit, even w/o paint. Good luck!
 _GOTOTOP