_GOTOBOTTOM
Constructive Feedback
For in-progress or completed build photos. Give and get contructive feedback!
Tamiya Matilda
BornToDig
Visit this Community
Maryland, United States
Joined: December 25, 2002
KitMaker: 345 posts
Armorama: 311 posts
Posted: Friday, January 22, 2016 - 03:51 AM UTC
After several years of failed experiments, dead ends, and general disappointment, I finally patched together a finish on my Tamiya Matilda that I'm generally happy with. I don't like how the bed rolls look, but I'm sick of messing with this model, and its been months since I've finished anything. So I'm calling it done.

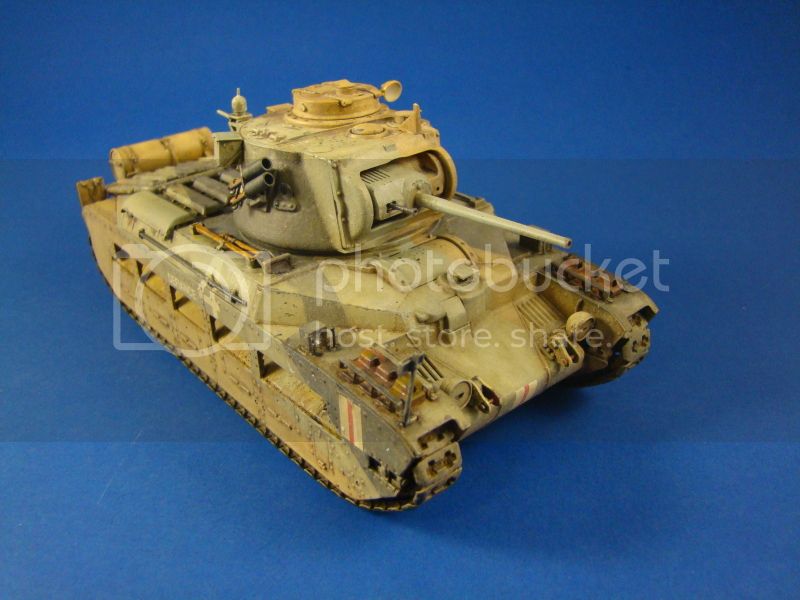
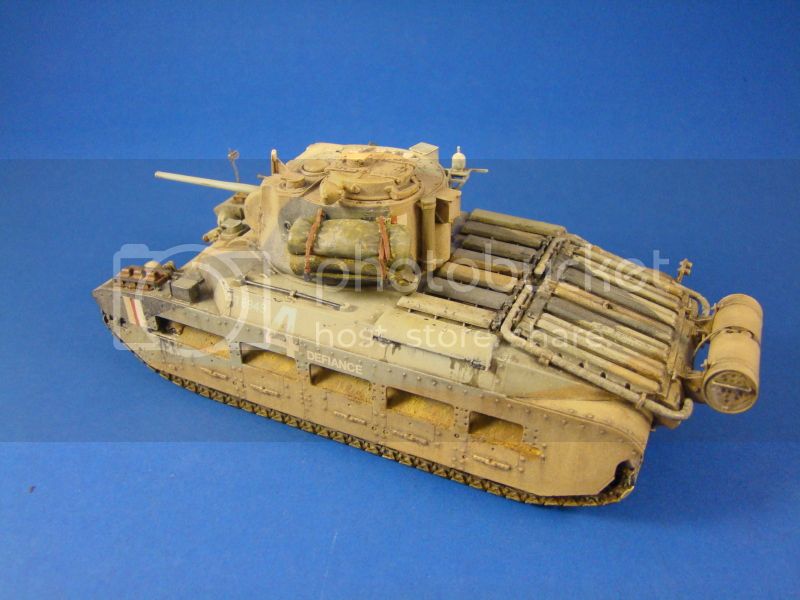
The tank is not 100% historically accurate, but I think it evokes the feeling of a desert Matilda pretty well.


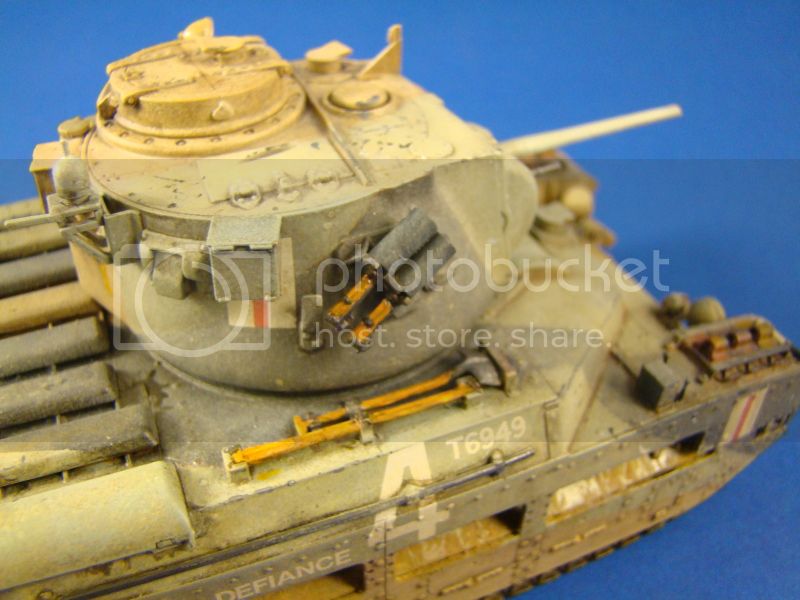
ugh! That bedroll looks like plastic, not cloth!

The kit had a few extra details made from wire, tape, and thin styrene rod. All painting was done with Vallejo points. Weathering was done with artists oils, various ground pastels, ground pencil graphite, Mig pigments, white glue, Tamiya smoke, a bunch of Vallejo earth tones, and Liquitex matte medium. Much thanks to those on Armorama who provided weathering suggestions a few weeks ago.

The model is ~90% brush painted. I only used the airbrush for a few matte coats, and a semi-translucent coat of sand color.
Magpie
Visit this Community
Queensland, Australia
Joined: July 10, 2011
KitMaker: 653 posts
Armorama: 273 posts
Posted: Friday, January 22, 2016 - 04:35 AM UTC
Bedrolls look fine to me. Maybe they are rubberised?

Great work on the weathering, not too much not to light
tatbaqui
Staff MemberNews Writer
ARMORAMA
#040
Visit this Community
Metro Manila, Philippines
Joined: May 06, 2007
KitMaker: 2,713 posts
Armorama: 2,451 posts
Posted: Friday, January 22, 2016 - 05:03 AM UTC
Congrats on the finish Ralph. I can relate to that feeling -- on and off builds that get to be an eye sore on the shelf, moreso that feeling on non-accomplishment. Now you remind me of my Tamiya Matilda that also needs to get done!
obg153
Visit this Community
Texas, United States
Joined: April 07, 2009
KitMaker: 1,063 posts
Armorama: 1,049 posts
Posted: Friday, January 22, 2016 - 06:32 AM UTC
Agree with the others, you really brought that kit to life with the overall finish! And the bedrolls look fine.
AFVFan
Visit this Community
North Carolina, United States
Joined: May 17, 2012
KitMaker: 1,980 posts
Armorama: 1,571 posts
Posted: Friday, January 22, 2016 - 11:05 PM UTC
I'm currently working on one of these. I hope mine turns out half as good as yours. Nice job!
BornToDig
Visit this Community
Maryland, United States
Joined: December 25, 2002
KitMaker: 345 posts
Armorama: 311 posts
Posted: Saturday, January 23, 2016 - 05:02 AM UTC
Cheers, guys!

I appreciate the positive feedback
ColinEdm
Staff MemberAssociate Editor
ARMORAMA
Visit this Community
Alberta, Canada
Joined: October 15, 2013
KitMaker: 1,355 posts
Armorama: 1,229 posts
Posted: Saturday, January 23, 2016 - 05:19 AM UTC
I think it's very well done! Only comment is the wooden tool handles are a tad too bright a yellow.
Lakota
#123
Visit this Community
New Mexico, United States
Joined: November 17, 2008
KitMaker: 1,202 posts
Armorama: 635 posts
Posted: Saturday, January 23, 2016 - 08:20 AM UTC
Incredible brush paint job! The woodwork could use a coat of dust to blend them in. Great work!
Thanks for sharing,
Don "Lakota"
BornToDig
Visit this Community
Maryland, United States
Joined: December 25, 2002
KitMaker: 345 posts
Armorama: 311 posts
Posted: Monday, January 25, 2016 - 07:45 PM UTC
Thanks, Don and Colin. I drybrushed a bit of sand onto the tools to tone them down and blend them in.

kenely
Visit this Community
Ipoh, Malaysia
Joined: July 29, 2005
KitMaker: 36 posts
Armorama: 31 posts
Posted: Monday, January 25, 2016 - 08:25 PM UTC
Looks real nice...good job...I did builed the same model three years ago https://gallery.kitmaker.net/showgallery.php?cat=30263&catp=bodsulak
IPLawyer
Visit this Community
Virginia, United States
Joined: March 18, 2015
KitMaker: 71 posts
Armorama: 63 posts
Posted: Tuesday, May 10, 2016 - 09:12 AM UTC
Your build looks fine. I would be proud to have your finished model on my shelf.

As I'm currently building this Matilda, I also have a question for you or anyone else who has built this model:

What tracks did you use and at what stage did you paint the tracks?

Also:

If you used the length and link tracks and painted the tracks before the rest of the tank, how did you mask the tracks when you painted the rest of the tank?

I'm assuming that if you use the rubberband tracks, you could theoretically delay adding the tracks until after the rest of the tank is painted by "threading" them through the space between the fender and the track skids (where the return rollers were on earlier versions of the Matilda)?

Namabiiru
Staff MemberAssociate Editor
MODEL SHIPWRIGHTS
#399
Visit this Community
Rhode Island, United States
Joined: March 05, 2014
KitMaker: 2,888 posts
Armorama: 1,920 posts
Posted: Tuesday, May 10, 2016 - 05:45 PM UTC
Great-looking Matilda--much better than the one I finished for the Tamiya campaign a month or so ago. And I think your rolls (are they bed rolls or tarps?) look just fine.

In answer to Mark's question, for my Matilda I used the Bronco Matilda II workable links rather than the Tamiya rubber bands. My method (I'm sure there are others) was to assemble the hull, prime and base coat the hull and side skirts separately. The tracks I painted with Vallejo German Grey, dry brushed with Vallejo Oily Steel, and then washed with burnt umber oil paint. Once the tracks were painted and mounted, I attached the skirts to the hull, masked the tracks and was ready start laying down the camo. I was VERY sparing with anything looking like rust as the dry, sandy desert environment would have kept bare metal scoured pretty clean.

Oh, and AK has a set of paints out now specifically for doing Caunter schemes, which is what I used. Really good article about it here.

IPLawyer
Visit this Community
Virginia, United States
Joined: March 18, 2015
KitMaker: 71 posts
Armorama: 63 posts
Posted: Wednesday, May 11, 2016 - 04:41 AM UTC
Mark C.,

Thanks so much for the info and link. I actually have that AK Interactive Caunter Scheme set, because appears "close enough" to the "right colors" (whatever they may be) for me and I would not need to mix paint to create the colors.
retiredyank
Visit this Community
Arkansas, United States
Joined: June 29, 2009
KitMaker: 11,610 posts
Armorama: 7,843 posts
Posted: Wednesday, May 11, 2016 - 05:32 PM UTC
Great build.
Namabiiru
Staff MemberAssociate Editor
MODEL SHIPWRIGHTS
#399
Visit this Community
Rhode Island, United States
Joined: March 05, 2014
KitMaker: 2,888 posts
Armorama: 1,920 posts
Posted: Wednesday, May 11, 2016 - 07:00 PM UTC
Mark,
Since you asked about tracks, one thing I had forgotten was that the kit sprockets need some modification. From what I can see they don't really kit the kit tracks very well (perhaps Ralph has a better feel for that), but they definitely are an issue with the Bronco tracks. They need to be narrowed down a bit before putting the two halves together or else they are too wide for the tracks. The sprocket teeth also need some filing work in order to get them to mesh properly with the tracks.

Dragline
Visit this Community
Massachusetts, United States
Joined: November 25, 2016
KitMaker: 24 posts
Armorama: 16 posts
Posted: Saturday, November 26, 2016 - 12:51 AM UTC
Beautiful example. I love this site.
darthpanzer
Visit this Community
Puerto Rico
Joined: May 27, 2011
KitMaker: 38 posts
Armorama: 17 posts
Posted: Saturday, November 26, 2016 - 12:59 AM UTC
Congratulations on that lady. It looks awesome. I love the weathering. Spot on.
 _GOTOTOP