_GOTOBOTTOM
Constructive Feedback
For in-progress or completed build photos. Give and get contructive feedback!
DML StuG III ausf F late
russamotto
Visit this Community
Utah, United States
Joined: December 14, 2007
KitMaker: 3,389 posts
Armorama: 2,054 posts
Posted: Tuesday, March 22, 2016 - 10:07 PM UTC
It has been a while since I did the inbox review of this kit. I have some build progress to report, although the full process will be fairly drawn out. The initial steps are fairly basic-assembly of the suspension and lower hull components. The instructions state to remove some placement pins on the sides. I did but don't know if this was needed, as I failed to dry fit the parts first. The torsion bars are handed, so even though the instructions show them facing backwards, you can only place them one way, and only on the correct side. The mount for the third idler wheel is added to the hull, and it is possible to see where the hull side hatch doors were filled in for this kit, which will require some minor sanding. The multi-part etch rim for the idler wheel was done most likely to save space on the fret. It goes together fairly easily. The forward hull plate has placement nubs and cutouts so you get the part on the right way as well. For those not familiar with the Dragon Pz. III/StuG III kits, with care and proper planning, you can make the suspension moveable by removing small locating pins on the suspension arms and carefully applying glue only to the keyed ends of the torsion bars. This will allow you to pose the vehicle on uneven ground for diorama purposes. I haven't added the idler wheel arms yet. I usually wait until towards the end of the build when I am going to place them. This is how it looks right now.


Let me know if I missed anything, or any parts are backwards.
Unreality
Visit this Community
Georgia, United States
Joined: November 04, 2010
KitMaker: 172 posts
Armorama: 145 posts
Posted: Tuesday, March 22, 2016 - 11:54 PM UTC
Looks great (and I do love a good stug). Nice crisp photos too.

Just FYI: some modelers shave part of the "U" off on the ContinentaU logo to make it a capital "L" and read ContinentaL. I would only worry about that if you don't plan on adding mud to the suspension.
Hudson29
#460
Visit this Community
California, United States
Joined: September 16, 2014
KitMaker: 1,156 posts
Armorama: 1,024 posts
Posted: Friday, March 25, 2016 - 02:12 AM UTC
My next build after a few of the current builds are finished is the Drago Stug A. The parts look like those on your F. How did you remove the return roller mount at the front or did you need to?

Hou about quickly shaving the U down to a L on so many of the tires?
russamotto
Visit this Community
Utah, United States
Joined: December 14, 2007
KitMaker: 3,389 posts
Armorama: 2,054 posts
Posted: Tuesday, April 26, 2016 - 11:04 PM UTC
Paul, sorry I missed your post. I didn't need to remove the return roller mount at the front. It would take 5-10 minutes to change the U to an L, with a sharp knife and good magnification. I just never really bothered with it.

I actually have made some progress with this kit. I ran into a few bumps with the instructions that needed sorting out. First off, I mounted the rear plate and the idler mounts, which join together. Fit of the rear parts wasn't perfect, so some putty was used to fill in the small gaps. I just need to finish cleaning it off.


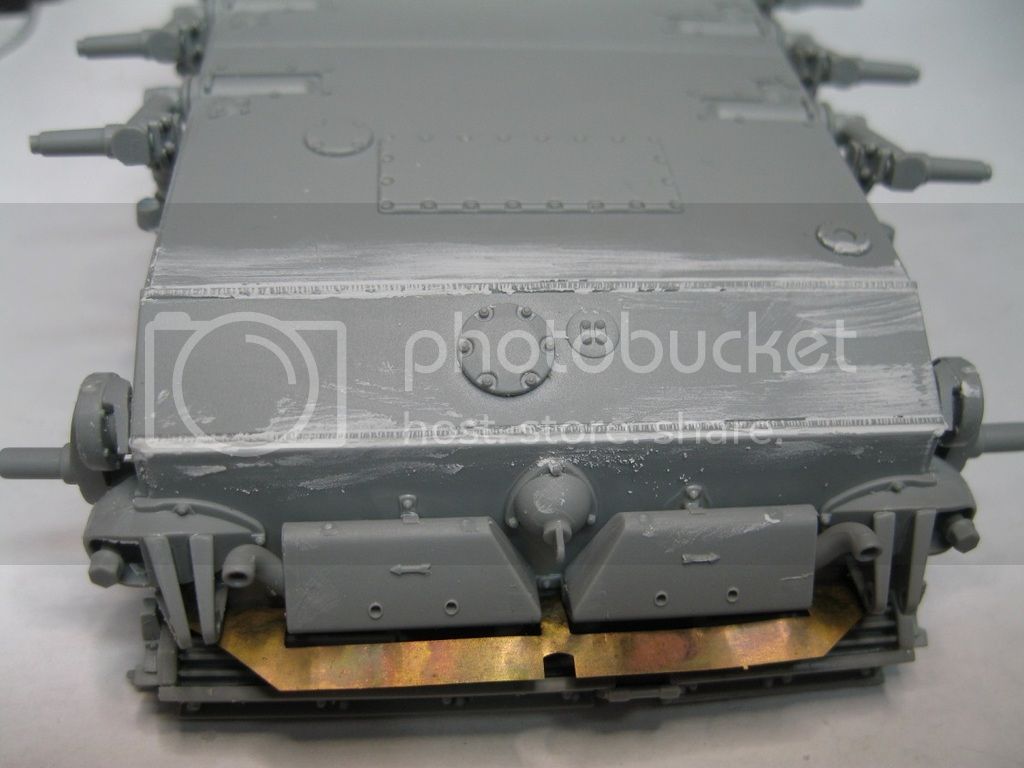
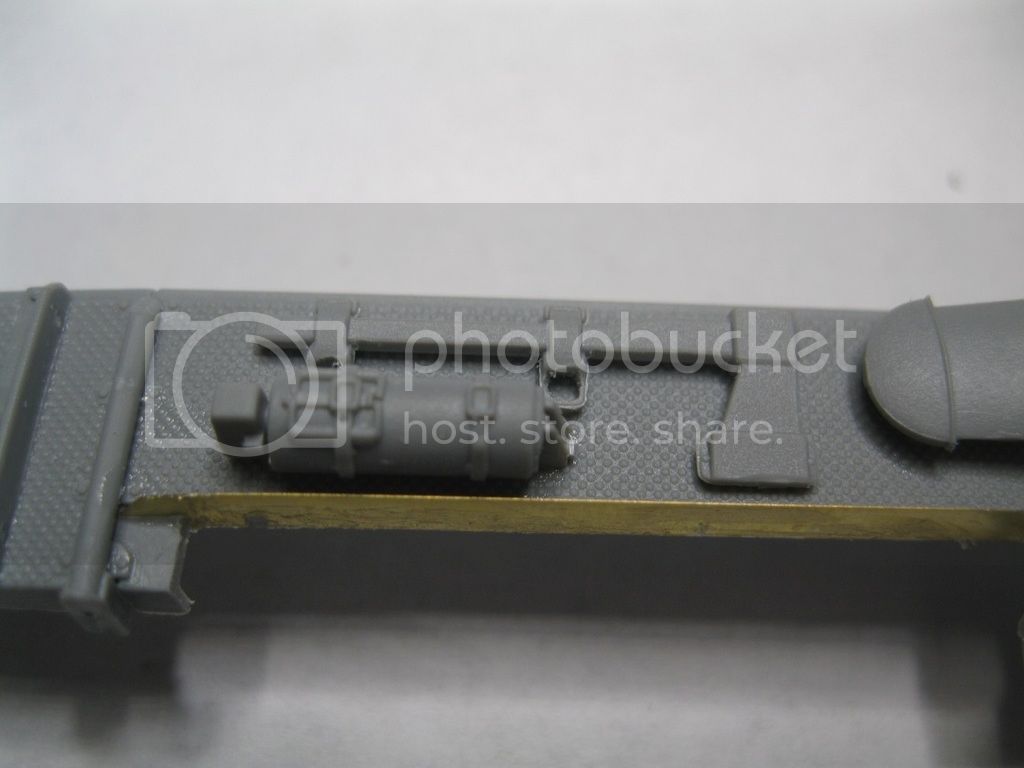
I have since bored out the exhaust openings a little more to give better depth and thin the pipe sides. Next up is assembly of the fenders. There are holes to open and some to fill. I chose to fill but there is no clear indicator as to where to drill the holes, so I didn't. I placed the tools and gear, but should have filled most of the other holes as they weren't used. Placements are not clear, and when the superstructure is added the side extensions will hit the tools, so it would have been better for me to hold off placing most of these items until final construction. Also, the rear fenders are mis-labeled in the instructions. The parts indicated are not the parts to use. I went to the "A" sprue to find what I needed that matched the images and photos. You have the option of using two parts to represent the inner flap and outer piece, in the event you want to pose the outer part folded up, with the tail light showing through the opening. I was going to leave them down and so chose the one piece part, as it is thinner overall.


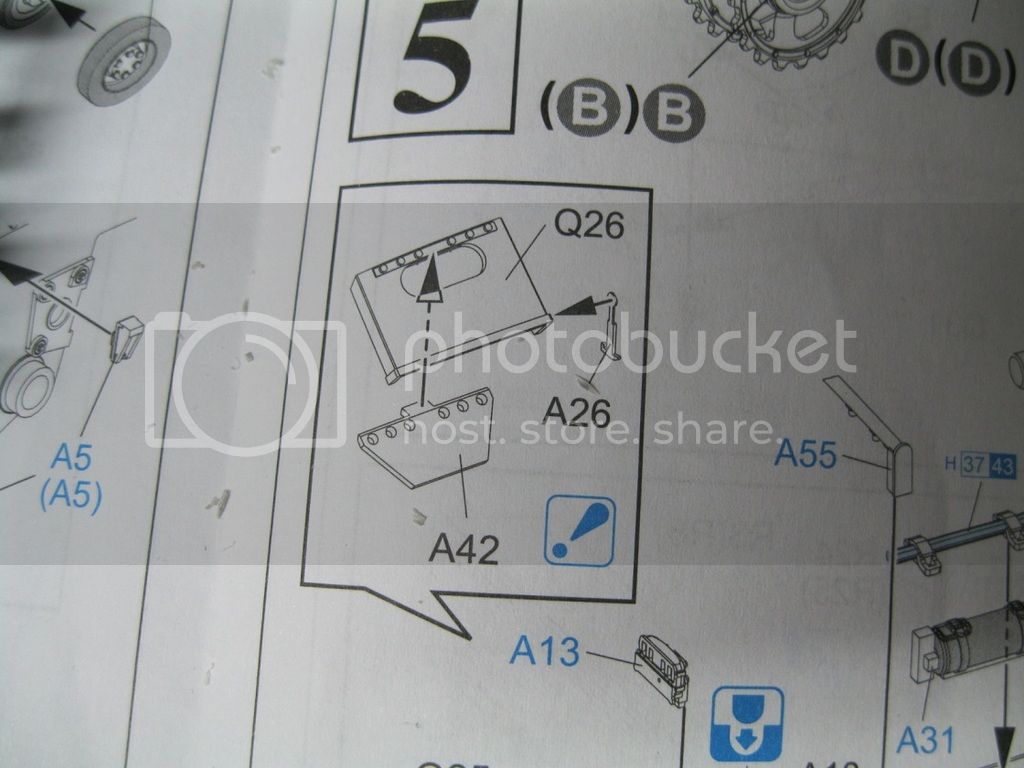
The instructions show to remove one part from each mud guard, the extension shaded in blue. The other should also be removed as it won't allow parts to fit later in the construction.

Next in the assembly is the fighting compartment. Mine will be closed up so I won't add the interior details such as radios and MP 40 SMG with etch sling and straps, but they are in the kit if you want them. The main issue pointed out with this kit is the sections on the sides of the gun opening. On the F model, the roof sections should be recessed, closer to horizontal. Dragon's solution was to provide a small insert that replicates concrete, giving the appearance that this section was filled in. The two concrete pieces don't fit all that well. Again, from what I can see in photos, the concrete fills the area completely, with no side gaps. I still haven't decided if I will try to cut the parts down to the proper placement, or do my own concrete fill. The roof sections/hatches go together fairly easily-just dry fit first, but there is no specific indication as to how the etch piece fits in the opening for the sight. It just sort of goes on to your best guess and fit. The front applique armor was welded on for the F series. The radio boxes get specific antenna bases, with the placement holes for the antenna base already on the parts needing to be filled in.


That is all for now. I should be able to update more tomorrow. Once the mud guards are done the kit fairly flies together. I keep feeling like Dragon just threw this kit together as an afterthought, and really didn't have a plan for how it would all turn out. I hope their other F kit is planned more carefully. Any comments, questions, or helpful pointers as to what I have missed will help.
easyco69
Visit this Community
Ontario, Canada
Joined: November 03, 2012
KitMaker: 2,275 posts
Armorama: 2,233 posts
Posted: Wednesday, April 27, 2016 - 01:50 AM UTC
kit #? Imperial?
russamotto
Visit this Community
Utah, United States
Joined: December 14, 2007
KitMaker: 3,389 posts
Armorama: 2,054 posts
Posted: Wednesday, April 27, 2016 - 06:47 AM UTC
Kit # is 6756. It is a recent release.
russamotto
Visit this Community
Utah, United States
Joined: December 14, 2007
KitMaker: 3,389 posts
Armorama: 2,054 posts
Posted: Wednesday, May 04, 2016 - 12:13 AM UTC
A few more additions to the build. The upper hull sub assemblies are broken down into three sections-front hull, fighting compartment and engine deck. For the front hull there is an applique armor plate that the instructions show with cut outs. The part itself does not have this cutout but does have lines showing where to remove material. I botched the job cutting the corners off. The rear deck went better. Some parts were not called out clearly or the CAD drawing had a glitch, but with care each part can be identified.


The fighting compartment is semi-complete, with a full gun and mount, plus the radios and MP40s I had previously omitted. The instructions show the floor fitted to the rear firewall but there is no clear positive connection. I placed both parts in the hull and carefully cemented them together, and then removed them to complete the gun mount. The gun assembly went quickly-so fast that I forgot to pause and take photos of the sub assemblies.


With all of the major sub assemblies completed I began to test fit to make sure everything would line up on the hull. The first thing I discovered is, as I mentioned earlier, the large tabs on the track guards need to be removed.


Once they were out of the way the track guards fit just fine and everything else was placed. It is always tricky to get the gun through the opening on the armored fighting compartment. Maybe one day it could be built with a separate roof to make it more accessable, but with some patience and care everything will fit. All the parts lined up and I didn't knock any parts off. I did have to re-position the wire cutters.


Just a few more parts to add and construction will be complete.
joepanzer
Visit this Community
North Carolina, United States
Joined: January 21, 2004
KitMaker: 803 posts
Armorama: 740 posts
Posted: Wednesday, May 04, 2016 - 01:36 AM UTC
That kit looks really sweet! Did Continental really make rubber for German Roadwheels??
tatbaqui
Staff MemberNews Writer
ARMORAMA
#040
Visit this Community
Metro Manila, Philippines
Joined: May 06, 2007
KitMaker: 2,713 posts
Armorama: 2,451 posts
Posted: Wednesday, May 04, 2016 - 05:05 AM UTC

Quoted Text

That kit looks really sweet! Did Continental really make rubber for German Roadwheels??


Yes, and Dunlop as well. I read somewhere that there were some that even had Firestone on some softskins IIRC.
russamotto
Visit this Community
Utah, United States
Joined: December 14, 2007
KitMaker: 3,389 posts
Armorama: 2,054 posts
Posted: Wednesday, May 04, 2016 - 10:58 PM UTC
Small update today. The antenna stowage bins were added. The etch braces get folded but the instructions are poor here. They mount to the top of the etch intake grill. I did the basic bends to get them into shape and then placed them on the stowage bin/tray. Once the glue had set I adjusted the braces to set them in place. After they were set I added the last brace that goes from the rear hull to the side of the rearmost side piece. That last brace must be twisted to place it properly. I also added the applique armor to the lower hull front, which needs to have the corners cut out just like the upper piece. I did better here. Then I placed the towing brackets and etch piece and the spare track holder. I placed it based on the instructions but it appears the hull was a little too wide and the part bows in at the middle. It will need a little tweaking.


On a whim I decided to do my own cement fill for the driver's and radio operator's roof sections. I used squadron green putty. Then, to see how it looked I did a primer coat over the surface. I will be using the Vallejo color system for German DAK vehicles as these vehicles were sent to the eastern front in the tropical scheme. The primer coat is schwarzgrau.


I can adjust the texture of the concrete to give it a more finished appearance, and look over the kit to check for any other issues, and then start with painting.
LeeSpender
Visit this Community
Western Australia, Australia
Joined: April 26, 2016
KitMaker: 51 posts
Armorama: 51 posts
Posted: Thursday, May 05, 2016 - 06:55 PM UTC
Very nice build Russ
I will be getting one of these Stug III kits so I am watching with interest. Nice pics by the way

Lee
HEINE-07
Visit this Community
Ohio, United States
Joined: February 28, 2007
KitMaker: 392 posts
Armorama: 198 posts
Posted: Tuesday, May 10, 2016 - 03:12 AM UTC
Dang! Fine subtleties.
russamotto
Visit this Community
Utah, United States
Joined: December 14, 2007
KitMaker: 3,389 posts
Armorama: 2,054 posts
Posted: Tuesday, May 10, 2016 - 10:08 PM UTC
Thank you for the comments. Dragon does well with their StuG kits.

Just a small update. I started the painting process with the Afrika braun 8020, followed by a lighter coat directed at the center of the panels and fixtures of yellow sand.


The detail is hard to pick out in the photos because of the lighting. The first two photos are of the initial coat of RAL 8020, but the appearance is much different between them. The LED bulbs I am using are supposedly a daylight bulb that brings out color but everything ended up kind of washed out. If all goes well, I will add the camouflage pattern of grau 7027 that is recommended from the Vallejo paint set. I picked up the Tamiya rubber black and will give it a try on the tires.
tatbaqui
Staff MemberNews Writer
ARMORAMA
#040
Visit this Community
Metro Manila, Philippines
Joined: May 06, 2007
KitMaker: 2,713 posts
Armorama: 2,451 posts
Posted: Wednesday, May 11, 2016 - 05:04 AM UTC
Been following this log, thanks for sharing Russ. Am curious as to how you will paint the concrete part. Given that this is a different surface / material, my thinking is that it would be a shade different from that of the steel / metal surfaces Cheers, Tat
russamotto
Visit this Community
Utah, United States
Joined: December 14, 2007
KitMaker: 3,389 posts
Armorama: 2,054 posts
Posted: Sunday, May 15, 2016 - 10:55 PM UTC
Tat, thanks for watching. I have been thinking about the concrete as well. It would have been added after the base paint coat unless the StuG was repainted in the field. I've tried to look up information but haven't had any luck as of yet.

I have finished the primary paint coat and was able to get the rubber on the wheels. In the past I also went over the idler and drive sprocket with a pencil to simulate the exposed steel, but the Vallejo paint rubbed off fairly easily, so I went with Citadel leadbelcher, which has a nice steel sheen.


The only decals in the kit are the two Balkencruz, so markings are very basic. I will apply them and paint the DS tracks and tools, and then start with the washes. I'll keep looking for info on the concrete armor.
tatbaqui
Staff MemberNews Writer
ARMORAMA
#040
Visit this Community
Metro Manila, Philippines
Joined: May 06, 2007
KitMaker: 2,713 posts
Armorama: 2,451 posts
Posted: Monday, May 16, 2016 - 04:18 AM UTC
Thanks Russ, been googling on this as well. I've seen builds that either had paint / camo on the concrete part or none at all. I guess the latter's the easier option to depict. If concrete's painted on my thinking is that it may have a bit of sheen compared to the metallic area around it. Or maybe it should be the other way around - it being more flat, bone-dry if I may say. Hmmm.

I like your base and camo combo. Look forward to your progress

Cheers,

Tat
GazzaS
#424
Visit this Community
Queensland, Australia
Joined: April 23, 2015
KitMaker: 4,648 posts
Armorama: 2,248 posts
Posted: Monday, May 16, 2016 - 10:51 AM UTC
Russ,
I've been following along silently. Just wanted to say that I really like what you've done, especially the color scheme.

Keet it up,

Gaz
Venko555
Visit this Community
Bulgaria
Joined: December 07, 2013
KitMaker: 908 posts
Armorama: 698 posts
Posted: Monday, May 16, 2016 - 11:08 AM UTC
Love DAK colors and RAL 8020 looks spot on

Cheers!
Thirian24
Visit this Community
Oklahoma, United States
Joined: September 30, 2015
KitMaker: 2,493 posts
Armorama: 2,344 posts
Posted: Monday, May 16, 2016 - 06:46 PM UTC
I've been following as well, I really like the camo color. What color green is that? I'm always looking for new greens and browns to give my models a bit of variation.
 _GOTOTOP